
Popular categories
Looking for a yarn?


|
|||||||
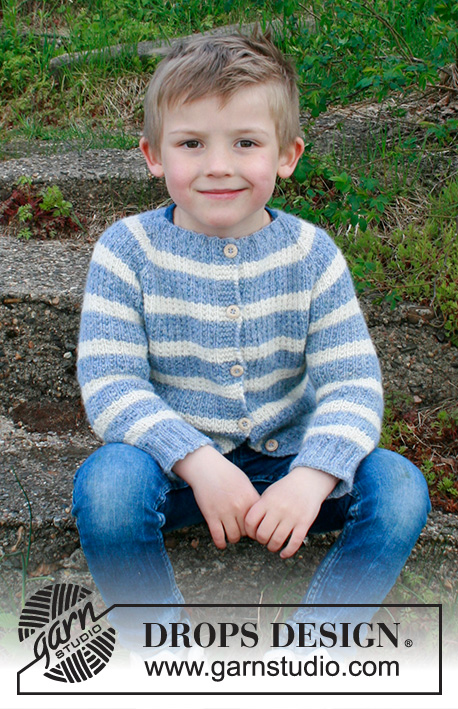
Sky Stripes Jacket |
|||||||
 |
 |
||||||
Knitted jacket with stripes for kids in DROPS Sky. Piece is knitted top down with raglan and textured pattern. Size 2-12 years
DROPS Children 34-20 |
|||||||
|
---------------------------------------------------------- EXPLANATION FOR THE PATTERN: ---------------------------------------------------------- GARTER STITCH (back and forth): 1 ridge = knit 2 rows. STRIPES AND PATTERN: Work piece in pattern A.1, A.2 and A.3 – AT THE SAME TIME work stripes as follows: * Work 3 cm = 1⅛" light jeans blue (including neck edge), and then 2 cm = ¾" white * – repeat these color stripes until 5-5-6-7-8-9 stripes with white have been worked on yoke/body and 6-7-8-9-10-10 stripes white on yoke/sleeve. Then work with light jeans blue until finished measurements. INCREASE TIP (evenly spaced): To calculate how to increase evenly, use the total number of stitches on row (e.g. 141 stitches), minus bands (= 131 stitches) and divide the stitches by number of increases to be done (e.g. 27) = 4.8. In this example increase after approx. every 5th stitch by making 1 yarn over and do not increase over bands. On next row work yarn overs twisted to avoid holes. RAGLAN: Increase on each side of the 4 stitches with markers on every row from right side as follows: Make 1 yarn over, work 1 stitch in stockinette stitch (= stitch with marker), make 1 yarn over. On next row purl yarn over twisted to avoid holes. Work the increased stitches in pattern when increasing. DECREASE TIP (applies to sleeves): Decrease 1 stitch on each side of stitch with marker as follows: Work until 2 stitches remain before stitch with marker, slip 1 stitch knitwise, knit 1, pass slipped stitch over stitch worked, knit 1 (marker is in the stitch), knit the next 2 stitches together. BUTTONHOLES: Decrease for buttonholes on right band (when garment is worn). Decrease from right side when 3 stitches remain on row as follows: Make 1 yarn over, knit the next 2 stitches together, knit last stitch. On next row knit yarn over to make holes. Decrease first buttonhole when piece measures approx. 1 cm = ⅜". Then decrease the next 4-4-5-5-6-6 buttonholes approx. every 6-7-6½-7-7-7½ cm = 2⅜"-2¾"-2½"-2¾"-2¾"-3". ---------------------------------------------------------- START THE PIECE HERE: ---------------------------------------------------------- JACKET - SHORT OVERVIEW OF THE PIECE: Yoke and body are worked back and forth, top down. Work sleeves in the round on double pointed needles. YOKE: Cast on 88-92-96-100-104-108 stitches (including 5 band stitches in each side of piece) on circular needle size 3 mm = US 2,5 with light jeans blue. Work 5 band stitches in GARTER STITCH – read explanation above, work rib (= knit 2 / purl 2) until 7 stitches remain, knit 2 and 5 band stitches in garter stitch. When piece measures approx. 1 cm = ⅜", switch to circular needle size 4 mm = US 6 and decrease for BUTTONHOLES – read explanation above. Knit 1 row from right side while increasing evenly 7-5-7-5-7-5 stitches = 95-97-103-105-111-113 stitches. Knit 1 row from wrong side. Now insert 4 markers for RAGLAN in the piece without working as follows: Insert 1st marker in the 18th-18th-20th-20th-22nd-22nd stitch, insert 2nd marker in the 32nd-32nd-34th-34th-36th-36th stitch, insert 3rd marker in the 64th-66th-70th-72nd-76th-78th stitch, insert 4th marker in the 78th-80th-84th-86th-90th-92nd stitch. then work STRIPES AND PATTERN with 5 band stitches in garter stitch in each side - read explanation above, and read the entire section before continuing. Work as follows from right side: Work 5 band stitches in garter stitch, work A.1 over 1 stitch, work A.2 over the next 10-10-12-12-14-14 stitches, work A.3 over 1 stitch, make 1 yarn over, 1 stitch in stockinette stitch, make 1 yarn over (= increase for raglan). Work A.2 over the next 12 stitches, work A.3 over 1 stitch, make 1 yarn over, 1 stitch in stockinette stitch, make 1 yarn over (= increase for raglan). Work A.2 over the next 30-32-34-36-38-40 stitches, work A.3 over 1 stitch, make 1 yarn over, 1 stitch in stockinette stitch, make 1 yarn over (= increase for raglan). Work A.2 over the next 12 stitches, work A.3 over 1 stitch, make 1 yarn over, 1 stitch in stockinette stitch, make 1 yarn over (= increase for raglan). Work A.2 over the next 12-12-14-14-16-16 stitches and 5 band stitches in garter stitch. First increase for raglan is now done (= 8 stitches increased). Work from wrong side as follows: Work 5 band stitches in garter stitch, work pattern according to A.1/A.2/A.3 (purl all rows from wrong side in diagram) until 5 stitches remain, and work 5 band stitches in garter stitch. REMEMBER THE KNITTING GAUGE! Continue with stripes and pattern and increases for raglan until you have increased a total of 15-16-17-18-19-20 times = 215-225-239-249-263-273 stitches. Continue with pattern and stripes until piece measures 13-14-15-16-17-18 cm = 5⅛"-5½"-6"-6¼"-6¾"-7" from cast-on edge. On next row divide piece for body and sleeves as follows: Work 5 band stitches in garter stitch, 28-29-32-33-36-37 stitches in pattern as before (= front piece), slip the next 43-45-47-49-51-53 stitches on a stitch holder for sleeve and cast on 6 stitches in the side under sleeve, work 63-67-71-75-79-83 stitches in pattern as before (= back piece), slip the next 43-45-47-49-51-53 stitches on a stitch holder for sleeve and cast on 6 stitches under sleeve, work 28-29-32-33-36-37 stitches in pattern as before and finish with 5 band stitches in garter stitch (= front piece) = 141-147-157-163-173-179 stitches. BODY: Continue with pattern, stripes and band stitches as before. NOTE: When 5-5-6-7-8-9 stripes with white have been worked in total, work the rest of the piece in light jeans blue. When piece measures 17-19-22-25-28-31 cm = 6¾"-7½"-8¾"-9¾"-11"-12¼" from division, knit 1 row from right side while increasing 27-33-31-37-39-41 stitches evenly - read INCREASE TIP = 168-180-188-200-212-220 stitches. Switch to circular needle size 3 mm = US 2,5. Work next row from wrong side as follows: Work 5 band stitches in garter stitch, work rib (= knit 2 / purl 2) until 7 stitches remain, purl 2 and 5 band stitches in garter stitch. Bind off by knitting from right side when piece measures 19-21-24-27-30-33 cm = 7½"-8¼"-9½"-10⅝"-11¾"-13" from division – use if needed a thicker needle to bind off to avoid a tight edge. Jacket measures approx. 33-36-40-44-48-52 cm = 13"-14¼"-15¾"-17¼"-19"-20½", measured from shoulder and down. SLEEVE: Slip the 43-45-47-49-51-53 stitches from stitch holder in one side of piece on double pointed needles size 4 mm = US 6 and pick up 1 new stitch in each of the 6 stitches cast on under sleeve = 49-51-53-55-57-59 stitches. Work in the round and continue pattern and stripes as before (the stitch with marker is knitted on every round). When sleeve measures 2 cm = ¾" from where sleeve was divided from body, decrease 1 stitch on each side of marker thread (= 2 stitches decreased) - read DECREASE TIP. Decrease like this every 4-4-5-5-7-6 cm = 1½"-1½"-2"-2"-2¾"-2⅜" 5-6-5-6-5-6 times in total = 39-39-43-43-47-47 stitches. NOTE: When 6-7-8-9-10-10 stripes with white have been worked in total, work the rest of the piece in light jeans blue. Work until piece measures 19-23-27-31-35-38 cm = 7½"-9"-10⅝"-12¼"-13¾"-15" from division. Knit 1 round and decrease 3-3-3-3-3-3 stitches evenly = 36-36-40-40-44-44 stitches. Switch to double pointed needles size 3 mm = US 2,5 and work rib with knit 2/purl 2. Bind off by knitting when sleeve measures 23-27-31-35-39-42 cm = 9"-10⅝"-12¼"-13¾"-15¼"-16½" from division – use if needed a thicker needle to bind off to avoid a tight edge. Work the other sleeve the same way. ASSEMBLY: Sew the buttons on to the left band. |
|||||||
Diagram explanations |
|||||||
|
|||||||

|
|||||||
|
Have you made this or any other of our designs? Tag your pictures in social media with #dropsdesign so we can see them! Do you need help with this pattern?You'll find tutorial videos, a Comments/Questions area and more by visiting the pattern on garnstudio.com. © 1982-2024 DROPS Design A/S. We reserve all rights. This document, including all its sub-sections, has copyrights. Read more about what you can do with our patterns at the bottom of each pattern on our site. |
|||||||


With over 40 years in knitting and crochet design, DROPS Design offers one of the most extensive collections of free patterns on the internet - translated to 17 languages. As of today we count 304 catalogs and 11422 patterns - 11417 of which are translated into English (US/in).
We work hard to bring you the best knitting and crochet have to offer, inspiration and advice as well as great quality yarns at incredible prices! Would you like to use our patterns for other than personal use? You can read what you are allowed to do in the Copyright text at the bottom of all our patterns. Happy crafting!
Comments / Questions (44)
I cannot make the raglan increases fit the number of stitches I cast on for the rib. It means the raglan is placed too far to one side. Surely there should be the same number of stitches for the front right and front left when the markers have been attached?
21.09.2020 - 17:04DROPS Design answered:
Dear Mrs Wallbank, there should be same number of sts on each front piece and on each sleeve - raglan increases are worked on each side of the stitch in stocking stitch(= raglan stitch), new stitches should be worked in pattern, ie 1 stitch in stocking st (= A.1 / 2,nd st in A.2)/1 stitch in garter stitch (1st st in A.2/A.3). You are welcome to tell more about size worked, row etc.. Happy knitting!
22.09.2020 - 11:13The increases for the yoke in the smallest size don't work. Please could you clarify. Is there a mistake?
19.09.2020 - 21:26DROPS Design answered:
Dear Mrs Wallbank, what do you mean with "don't work"? Can you please tell us more? So that we can explain another way how to do. Thanks for your comprehension.
21.09.2020 - 09:37De 6 maskorna som läggs upp under ärmen ska de stickas i mönstret? Blir i sådana fall inte jämt.
15.08.2020 - 11:36DROPS Design answered:
Hej Kerstin. Ja det stämmer, det ska stickas runt och fortsättas med mönster och ränder som förut på alla maskor. Mvh DROPS Design
20.08.2020 - 13:58Bonjour, Que veut dire tricoter au dessus de la maille suivante s'il vous plaît ? Merci d'avance de votre aide. Cordialement
10.08.2020 - 20:04DROPS Design answered:
Bonjour Jack, quand il est indiqué de tricoter A.3 au-dessus de la maille suivante, vous devez tricoter la maille suivante en suivant le diagramme A.3 (= alternativement 1 maille envers sur l'endroit et 1 maille envers sur l'envers). Bon tricot!
11.08.2020 - 08:44Bonjour, désolé je ne comprends bien vos explications. Est-ce que toutes les augmentations se tricotent tous à l'endroit sur l'endroit. Pourriez-vous me donner un exemple où une augmentation se tricote à l'envers sur le côté endroit ? J'ai essayé de tricoter les augmentations au fur et à mesure en point fantaisie ( A1/A2/A3) mais ça ne fonctionne pas. Merci pour votre aide et patience.
14.07.2020 - 21:02DROPS Design answered:
Bonjour Mme Rivard, tout à fait, lorsque l'augmentation est une maille que l'on doit tricoter en jersey (= comme la 1ère, la 3ème, la 5ème etc...) on la tricotera à l'envers sur l'envers. Les 2èmes, 4èmes, 6èmes ... augmentations se tricoteront au point mousse. Ainsi, le point fantaisie continuera toujours sans discontinuer. Les augmentations se font de part et d'autre de la maille jersey et vont se tricoter alternativement en jersey et au point mousse. Bon tricot!
15.07.2020 - 07:35Barn - Sky Stripes Jacket: Efter raglanudtagning er der 263 masker. der skal strikkes til arb måler 17 cm uden indtagning eller andet. næste afsnit deles arbejdet... når maskeantallet lægges sammen bliver det til 275 masker - men I skriver, at der nu er 173 masker tilbage. Det er også dette tal i går videre med i opskriften. Hvordan kommer man fra 275 masker til 173 masker?
14.07.2020 - 13:25DROPS Design answered:
Hej Laila, de 263 masker deler du arbejdet op til forstykker og bagstykke ifølge opskrifter, du sætter ærmerne på en tråd, slår 6 nye masker op under hvert ærme. Når du har gjort det har du 173 masker på pinden. God fornøjelse!
30.07.2020 - 14:09Après avoir fait les augmentations du raglan, vous dites de tricoter en faisant le point fantaisie ( A1 , A2 , A3 ) . Comme le A2 a parfois 10 mailles, 12 mailles ou 30 . Pouvez-vous préciser quelle genre de mailles ( endroit ou envers ) doit-ont faire avec les augmentations car ils se situent toujours de chaque côté de la maille avec le marqueur. J'espère que je suis assez claire dans ma demande. Merci pour le beau patron et les explications.
14.07.2020 - 02:12DROPS Design answered:
Bonjour Mme Rivard, les augmentations du raglan se tricotent en suivant le point fantaisie, autrement dit, quand on augmente au début de la manche/du dos/devant, on va tricoter la nouvelle maille comme la précédente du diagramme et quand on augmente à la fin du devant/dos/des manches, on tricote la nouvelle maille comme la maille suivante du diagramme. Par ex, à la première augmentation, vous aurez: 1 augm à tricoter en jersey, *1 m point mousse, 1 m jersey end*, 1 m point mousse, 1 augm à tricoter en jersey. L'augm. suivante sera à tricoter au point mousse. Bon tricot!
14.07.2020 - 09:15Skal det ikke være mønster A. 2 og ikke mønster A. 1 på ærmerne?
01.07.2020 - 00:13DROPS Design answered:
Hej Anne. Jo det stämmer, du ska sticka mønster og striber som før (A.1 har nu tagits bort från texten där). Mvh DROPS Design
01.07.2020 - 12:27In Größe 134/140 stricke ich die 19 M Raglanzunahmen folgendermaßen am Beispiel eines Vorderteils... nach den BlendenM 1x A1, 14x A2, 1x A3, dann die 19 M Zunahmen mustergemäß i. j. 2. R... Die 1. ZunahmeM wird im Muster re gestrickt, die 19. ZunahmeM dann ebenfalls re... die RaglanM auch re... bei den ÄrmelM gilt das selbe... wie soll das im weiteren Verlauf also gehen... 3 M re um die RaglanM? Es passt einfach nicht... ich hab ohne Fehler gestrickt...
14.05.2020 - 18:56DROPS Design answered:
Liebe Sandra, die 4 Raglanmaschen = die 4 Maschen mit einem Markierer, werden glatt rechts gestrickt, und die anderen Maschen werden immer im Muster gestrickt: 5 BlendeM, A.1 (= 1 M), A.2 (über 14 M wiederholen), A.3 (=1 M) => jetzt haben Sie 16 Maschen im Muster gestrickt - 1 Masche zunehmen, die Raglanmasche glatt rechts stricken, 1 Masche zunehmen, und jetzt wieder Muster: A.2 wiederholen und mit A.3 enden usw. Die Zunahmen stricken Sie dann immer weiter im Muster, dh abwechslungsweise 1 Masche kraus recht (= die 1. Masche in A.2 und die Masche in A.3, 1 Masche glatt rechts. Viel Spaß beim stricken!
15.05.2020 - 08:37Die Ärmel werden lt. Ihren Angaben in der Anleitung nur mit Diagramm A1 gestrickt... vllt sollten Sie gemäß Ihrer unten genannten Antwort die Anleitung anpassen...
14.05.2020 - 17:06