
Popular categories
Looking for a yarn?


|
|||||||||||||||||||||||||||||||
Empress |
|||||||||||||||||||||||||||||||
 |
 |
||||||||||||||||||||||||||||||
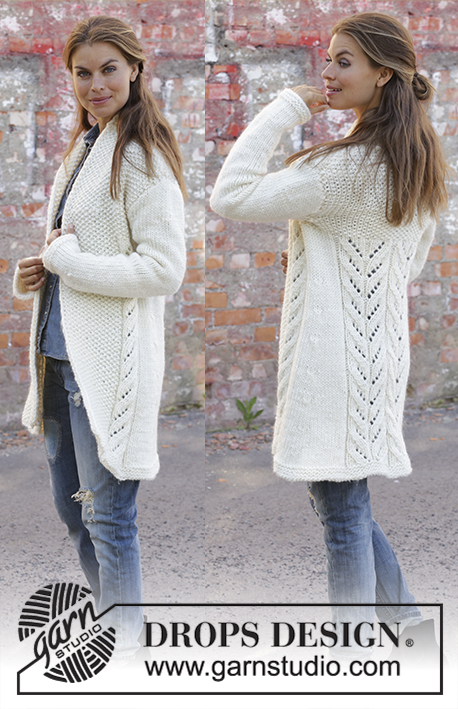
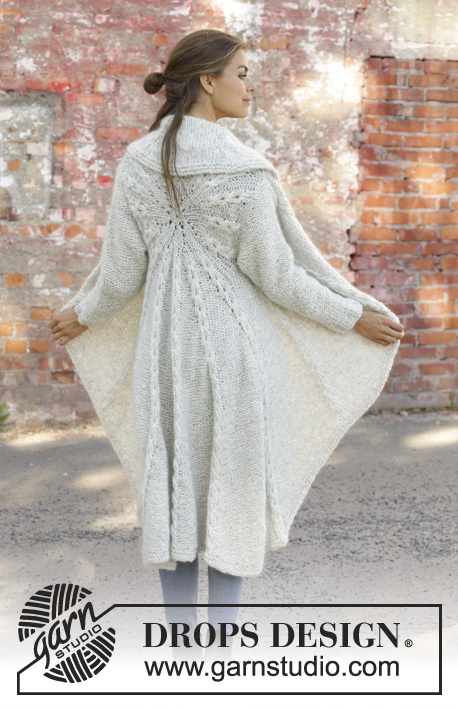
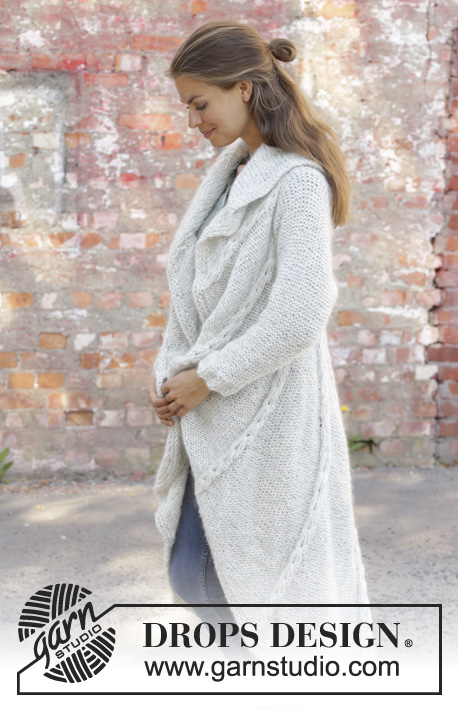
Knitted long circle jacket in 1 strand DROPS Air and 1 strand DROPS Brushed Alpaca Silk. The piece is worked in the round in a circle with texture. Sizes S - XXXL.
DROPS 194-17 |
|||||||||||||||||||||||||||||||
|
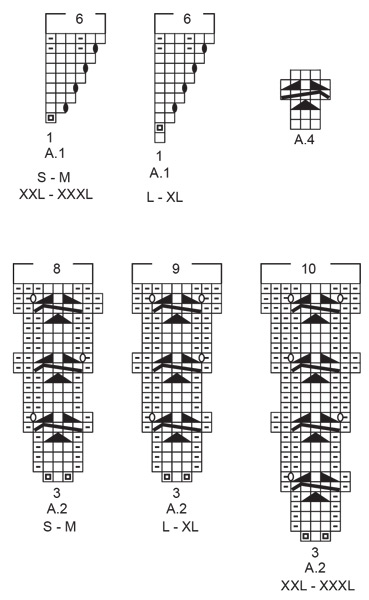
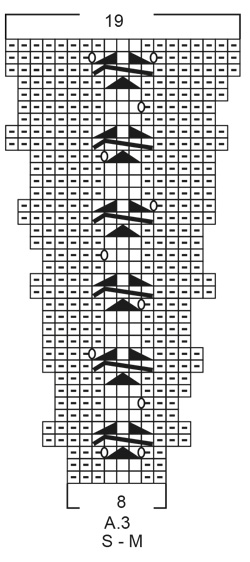
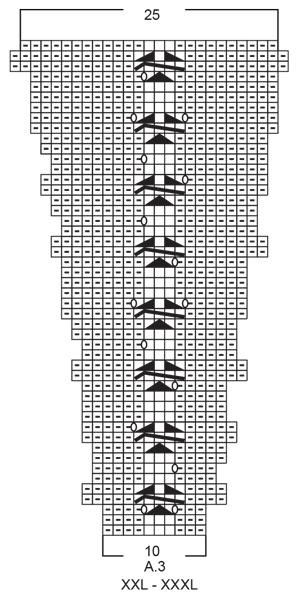
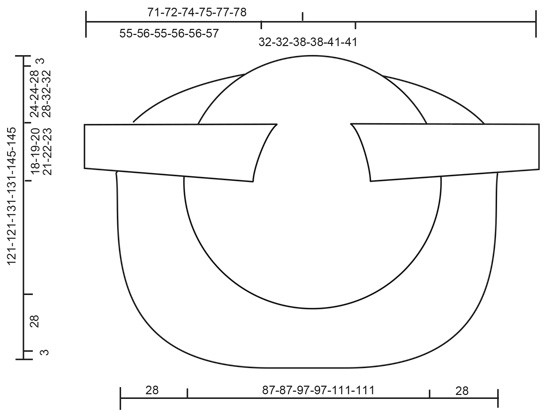
------------------------------------------------------- EXPLANATIONS FOR THE PATTERN: ------------------------------------------------------- RIDGE/GARTER STITCH (worked in the round): 1 ridge = 2 rounds. Knit 1 round and purl 1 round. RIDGE/GARTER STITCH (worked back and forth): 1 ridge = knit 2 rows. PATTERN: See diagrams A.1 to A.4. Choose diagram for your size. The diagrams show all the rows in the pattern seen from the right side! DECREASE TIP (for sleeves): All decreases are made from the side in purl! Decrease 1 stitch by purling 2 stitches together ------------------------------------------------------- START THE PIECE HERE: ------------------------------------------------------- CIRCLE JACKET - SHORT OVERVIEW OF THE PIECE: The piece is worked in the round in a circle from the middle of the back outwards. Change to circular needle(s) when necessary. Then work back and forth with short rows for the front pieces and down the back. The sleeves are worked top down in stockinette stitch with the wrong side out. Because of the weight of the yarn, the garment will stretch somewhat after use. CIRCLE JACKET: CIRCLE: Cast on 8 stitches with double pointed needles size 8 mm = US 11 and 1 strand Air and 1 strand Brushed Alpaca Silk (= 2 strands). Divide the stitches between 4 needles so that there are 2 stitches on each. Insert a marker thread at the beginning of the round. Allow the marker thread to follow your work onwards. Work pattern in the round according to A.1 – choose diagram for your size, a total of 8 times on the round. REMEMBER THE KNITTING GAUGE! When A.1 is finished, there are 48 stitches on the round. Now work pattern as follows: Work A.2 – choose diagram for your size, a total of 16 times on the round. After the next-to-last round in A.2 there are 128-128-144-144-160-160 stitches on the round. The last round in A.2 is worked as follows: Work the first 39-39-45-45-49-49 stitches (there is now 1-1-0-0-1-1 stitch left in the last repeat of A.2 worked), insert a new marker thread here (follows your work onwards and is later used when you work short rows from the front pieces and down the body on the back piece), bind off the next 20-21-22-23-24-25 stitches (= armhole), work the next 49-47-55-53-63-61 stitches, bind off the last 20-21-22-23-24-25 stitches (= armhole). The piece measures approx. 39-39-41-41-47-47 cm = 15¼"-15¼"-16⅛"-16⅛"-18½"-18½" in diameter. The next round is worked as follows: Work A.3 – choose diagram for your size (= 8-8-9-9-10-10 stitches on the first round in the diagram) a total of 16 times on the round and at the same time cast on 20-21-22-23-24-25 new stitches on the needle where the stitches were bind off for the armholes = 128-128-144-144-160-160 stitches. Continue in the round with A.3 until the whole diagram has been completed in height. There are now 304-304-352-352-400-400 stitches on the round. The piece measures approx. 87-87-97-97-111-111 cm = 34¼"-34¼"-38¼"-38¼"-43¾"-43¾" in diameter. Cut the strand. Place the first 94-94-110-110-124-124 stitches on the round (= stitches between the 2 marker threads) on a thread. FRONT PIECES AND DOWN THE BODY: There are now 210-210-242-242-276-276 stitches for the front pieces and down the body on the back piece. Start from the right side after the second marker thread and work short rows back and forth for the front pieces and down the body on the back piece as follows: ROW 1 (right side): Purl over purl and work A.4 (= 3 stitches) over each cable until there are 3 stitches left before the next marker thread (i.e. start of round), turn. ROW 2 (wrong side): Work back until there are 3 stitches left before the marker thread, turn. ROW 3: Purl over purl and work A.4 over each of the cables until there are 6 stitches left before the marker thread, AT THE SAME TIME increase 1 purled stitch after each cable/A.4, turn. ROW 4: Work back until there are 6 stitches left before the marker thread, turn. Continue back and forth like this by working 3 fewer stitches than the previous row and increase 1 stitch after each cable/A.4 every 4th row until you have worked 7 repeats of A.4 in height (= 42 rows). The piece measures approx. 72-72-77-77-84-84 cm = 28⅜"-28⅜"-30⅜"-30⅜"-33"-33" from the middle of the circle and down mid back. The last row is worked from the wrong side. Do not cut the strand. Insert a marker thread in the middle cable/A.4 mid back of jacket. Continue back and forth with pattern as before over the bottom of the left front piece as follows: ROW 1 (right side): Work until there are 4 stitches left before the cable/A.4 with the marker thread mid back, turn. ROW 2 (wrong side): Work until there are 3 more stitches left before the marker thread than the previous row (start of round), AT THE SAME TIME increase 1 purled stitch after each cable/A.4, turn. ROW 3 (right side): Work until there are 4 more stitches than last time left before the cable/A.4 with the marker thread mid back, turn. ROW 4 (wrong side): Work until there are 3 more stitches before the marker thread than the previous row, turn. Continue back and forth with pattern and increase after each cable/A.4 every 4th row until you have worked 3 repeats of A.4 in height (= 18 rows). Cut the strand. Start from the right side and after A.4/mid back and work short rows back and forth over the bottom of the right front piece in the same way, but reversed, i.e. each row from the wrong side is turned when there are 4 more stitches before the cable/A.4 with the marker thread mid back than the previous time and on each row from the right side is turned when there are 3 more stitches left than the previous time. EDGE: Place all stitches on the circle back on circular needle and work 2 RIDGES – read description above, around the whole circle. Bind off, but to avoid the bind-off edge being tight you can make 1 yarn over after approx. each 5th stitch - the yarn overs are bind off as normal stitches. SLEEVE: The sleeve is worked in stockinette stitch with the wrong side out (reversed stockinette stitch). Cast on 11-11-12-12-14-14 stitches with circular needle size 8 mm = US 11 and 1 strand Air and 1 strand Brushed Alpaca Silk (= 2 strands). Work stockinette stitch back and forth, AT THE SAME TIME cast on new stitches at the end of each row in each side as follows: Cast on 2 stitches 2 times, 1 stitch 3-4-5-6-6-7 times, 2 stitches 1 time and 4 stitches 1 time = 37-39-42-44-46-48 stitches. THE PIECE IS NOW MEASURED FROM HERE. Continue back and forth with stockinette stitch and 1 edge stitch in GARTER STITCH – read description above, in each side. When the piece measures 4 cm decrease 1 stitch inside the 1 edge stitch in garter stitch in each side – read DECREASE TIP. Decrease like this every 7-6-6-5-5-4 cm = 2¾"-2⅜"-2⅜"-2"-2"-1½" a total of 6-7-7-8-8-9 times = 25-25-28-28-30-30 stitches. When the piece measures 42-42-40-40-39-39 cm = 16½"-16½"-15¾"-15¾"-15¼"-15¼" increase 7-7-4-9-7-7 stitches evenly on row = 32-32-32-37-37-37 stitches. Change to circular needle size 7 mm = US 10,75. Work rib, starting from the side with purl (reversed stockinette stitch/the wrong side out) as follows: 1 edge stitch in garter stitch (knit 2, purl 3) until there is 1 stitch left, 1 edge stitch in garter stitch. When the rib measures 5 cm = 2" bind off with knit over knit and purl over purl. The sleeve measures approx. 55-56-55-56-56-57 cm = 21⅝"-22"-21⅝"-22"-22"-22½" from the sleeve cap down. Work the other sleeve in the same way. ASSEMBLY: Sew sleeves to body inside the bind-off/cast-on edge. Sew sleeve seams. Make sure that the seam is not tight. |
|||||||||||||||||||||||||||||||
Diagram explanations |
|||||||||||||||||||||||||||||||
|
|||||||||||||||||||||||||||||||
|
|||||||||||||||||||||||||||||||
|
|||||||||||||||||||||||||||||||

|
|||||||||||||||||||||||||||||||
|
|||||||||||||||||||||||||||||||
|
|||||||||||||||||||||||||||||||
|
Have you made this or any other of our designs? Tag your pictures in social media with #dropsdesign so we can see them! Do you need help with this pattern?You'll find tutorial videos, a Comments/Questions area and more by visiting the pattern on garnstudio.com. © 1982-2024 DROPS Design A/S. We reserve all rights. This document, including all its sub-sections, has copyrights. Read more about what you can do with our patterns at the bottom of each pattern on our site. |
|||||||||||||||||||||||||||||||


With over 40 years in knitting and crochet design, DROPS Design offers one of the most extensive collections of free patterns on the internet - translated to 17 languages. As of today we count 304 catalogs and 11422 patterns - 11417 of which are translated into English (US/in).
We work hard to bring you the best knitting and crochet have to offer, inspiration and advice as well as great quality yarns at incredible prices! Would you like to use our patterns for other than personal use? You can read what you are allowed to do in the Copyright text at the bottom of all our patterns. Happy crafting!
Comments / Questions (174)
Should row 4 of chart A.4 be the same as row 4 of chart A.3? Chart A.3 has the three middle stitches knitted but chart A.4 has the three middle stitches purled.
25.05.2019 - 18:36DROPS Design answered:
Dear Deborah, the chart A.3 has a double decrease at the middle (then the cable and the two symmetric decreases) on the 5th row, the sanme starts in teh A.4 pattern on row 3. Row 4th is not the same for the two pattern. I hope this helps. Happy knitting!
26.05.2019 - 20:54Hej Drops jeg har et problem med mønster A2 i 1 omgang skal man strikke hver anden maske 2 gange men når 2 række skal strikkes går det ikke op med antal mansker, i række 2 strikkes der mønster over 70 masker i str L men man har jo 72 masker efter at have strikket 1 omgang, hvad gør jeg forkert
15.05.2019 - 16:06DROPS Design answered:
Hei Jette. Det stemmer, du øker 2 masker i hver rapport av A.2 på første omgang. Du har 48 masker på pinnen etter at du har strikket A.1, og før du begynner med A.2. Du gjentar A.2 totalt 16 ganger i breddem. Siden du øker 2 masker i hver rapport vil det si du øker: 16 x 2 = 32 masker økt på første pinne av A.2. 32 masker økt + 48 masker fra før = 80 masker på pinnen etter første omgang. På 2 omgang er det 4 masker i hver rapport, og det er fortsatt 16 rappoert i bredden. God fornøyelse
16.05.2019 - 07:56Har fundet den
09.05.2019 - 10:33Er der ingen forklaring til hvad de forskellige tegn i mønstrer betyder ?
09.05.2019 - 10:28DROPS Design answered:
Hei Toni. Jo, det er en symbolforklaring rett over diagrammene. Om du har problemer med å se den kan du forsøke å bruke en annen enhet (PC, mobil, nettbrett), eller printe ut oppskriften. God fornøyelse
10.05.2019 - 08:56Jeg har brugt 9 ng silk og 10 ng air, og mine mål passer jeg jeres. Jeg har strikket den nøjagtig efter opskriften.
04.05.2019 - 12:16DROPS Design answered:
Hei Ninna. Designavdelingen skal ta en titt på garnforbruket i oppskriften, eventuelle rettelser vi bli informert om nederst på oppskriften, over diagrammene. hilsen DROPS
06.05.2019 - 07:31Jeg har købt 15 nøgler af alpaka og 14 nøgler drops air, som der stod i opskriften. Min trøje vejer 618 g den holder målene efter skitsen. Så jeg forstår det ikke.
02.05.2019 - 15:56DROPS Design answered:
Hej Ninna, det er garnforbruget til den største størrelse og der strikkes med dobbelt garn. Har du strikket strukturmønstret (det bruger en del garn). Måler din jakke 145 cm i højden og 111 cm i bredden? Hvor mange nøgler har du brugt af DROPS Brushed Alpaca Silk? og hvor mange nøgler i DROPS Air?
03.05.2019 - 10:17Jeg har strikket denne trøje , og bestilte garn til str. XXxl. Men jeg har alt for meget garn tilbage .5 nøgler drops air, og 6 nøgler drops brusede alpaka silk tilbage. Der må være sket et fejl med jeres beregning af garn. Strikkefasthed passer.
02.05.2019 - 08:23DROPS Design answered:
Hei Ninna. Dette høres merkelig ut, garnmengden skal stemme. Om du strikker XXXL har du kjøpt 14 nøster Air (=14x50 = 700 gram), og 15 nøster Brushed Alpaca Silk (15x25 = 375 g). Du har strikket med 1 tråd av hver kvalitet (altså 2 tråder) alle omganger. Om du har 5 nøster Air igjen, har du altså brukt 450 gram, som er garnmengde som trengs for en XXXL genser/jakke i hoftelengde. Det samme for Brushed Alpaca Silk: om du har 6 nøster igjen har du bare brukt 225 g, som tilsvarer genser/jakke i hoftelengde. Og denne jakken er jo veldig mye lenger enn ned dette (ca 145 cm). Veier genseren din kun 675 gram? Kanskje du har fått tilsendt feil antall nøster fra butikk? hilsen Drops
02.05.2019 - 13:44Hallo, ich habe nun im mittleren Zopf der Rückenmitte die Markierung angebracht. Muss ich jetzt die Hälfte der stillgelegten Maschen wieder aufnehmen? Denn in der 2. Reihe (Rückreihe), soll ich ja bis zur Markierung des Rundenbeginns stricken. Vielen Dank und Grüße, Cookie
19.04.2019 - 20:01DROPS Design answered:
Liebe Cookie, wenn Sie nur den linken Vorderteil stricken, stricken Sie von der oberen Seite (wie zuvor) bis zur Markierer aber mit verkürzten Reihen, dh immer weniger Maschen auf beiden Seiten oben (wie zuvor) und jetzt unten (untere Kante). Dann wird der rechten Vorderteil gegengleich gestrickt. Viel Spaß beim stricken!
23.04.2019 - 12:28On chart A-2 for S-M size, It seems there is an extra purl stitch on the left side of the chart on line 14 (counting up from the bottom). If this stitch is suppose to be there where did I miss the increase? Just want to make sure I am reading the chart correctly. Thanks
08.04.2019 - 23:27DROPS Design answered:
Dear Mrs Deborah Byer! In row 13: there is 1 stitch added and 2 decreased: 8+1-2=7. As a result in row 14 there are only 7 stitches. You should also see the video How to knit an exciting texture pattern. Happy knitting!
09.04.2019 - 07:34Hallo, ich starte gerade mit Diagramm A.3. Hier verstehe ich nicht, wie ich in der dritten Runde, 4 Maschen tiefer über den Ärmelausschnitten einstechen soll? Ich habe dort doch erst den Maschenanschlag + zwei Runden? Danke für die Hilfe
05.04.2019 - 15:49DROPS Design answered:
Liebe Cookie, stechen Sie hier in die Maschen von Anschlag für die Ärmel ein. Viel Spaß beim stricken!
05.04.2019 - 16:16