
Popular categories
Looking for a yarn?


|
|||||||||||||||||||||||||||||||
Empress |
|||||||||||||||||||||||||||||||
 |
 |
||||||||||||||||||||||||||||||
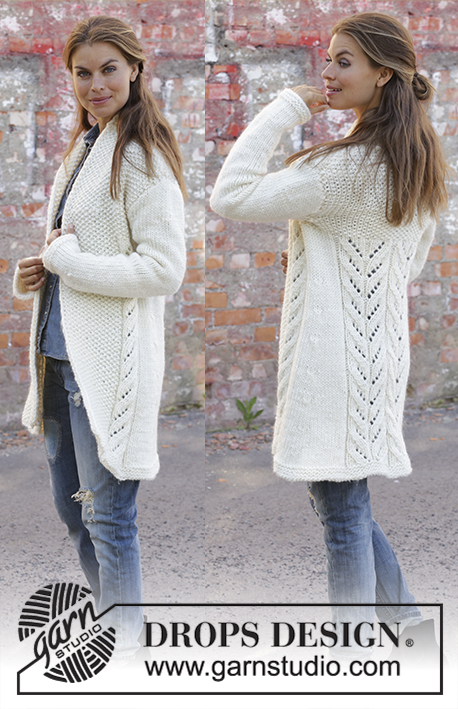
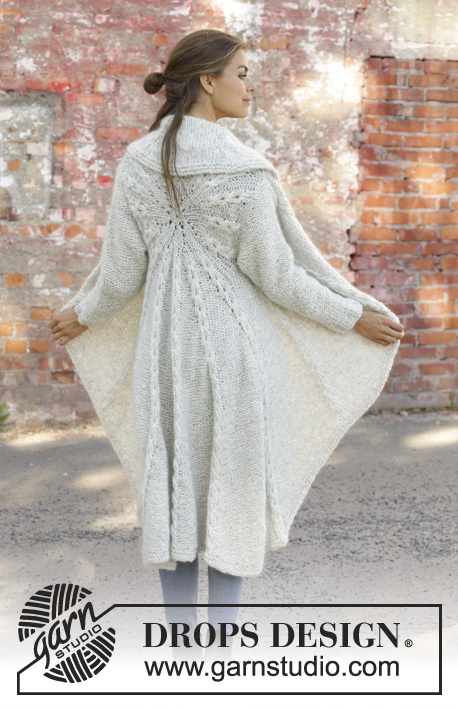
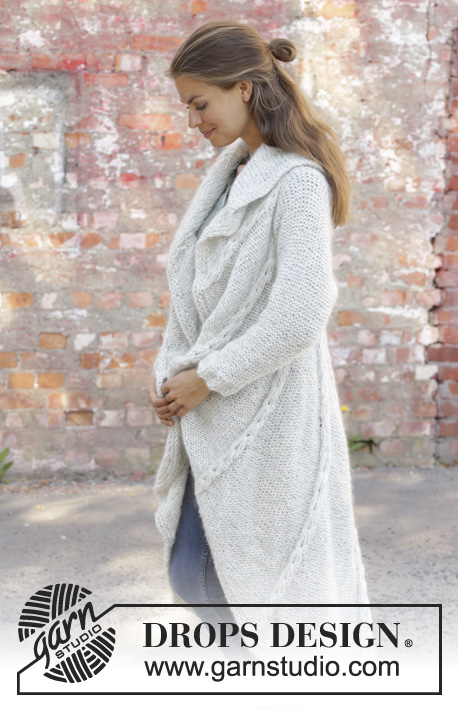
Knitted long circle jacket in 1 strand DROPS Air and 1 strand DROPS Brushed Alpaca Silk. The piece is worked in the round in a circle with texture. Sizes S - XXXL.
DROPS 194-17 |
|||||||||||||||||||||||||||||||
|
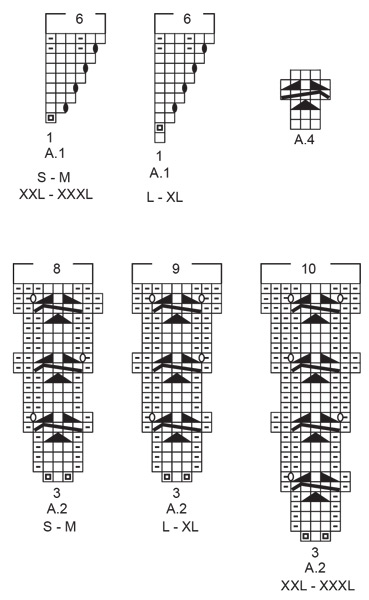
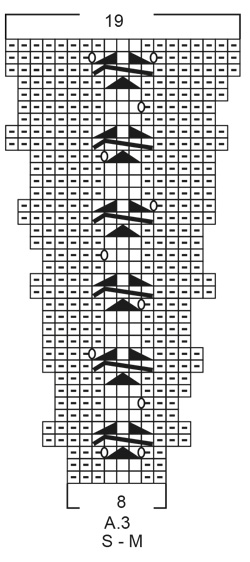
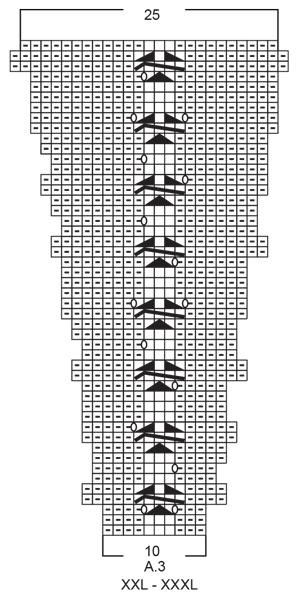
------------------------------------------------------- EXPLANATIONS FOR THE PATTERN: ------------------------------------------------------- RIDGE/GARTER STITCH (worked in the round): 1 ridge = 2 rounds. Knit 1 round and purl 1 round. RIDGE/GARTER STITCH (worked back and forth): 1 ridge = knit 2 rows. PATTERN: See diagrams A.1 to A.4. Choose diagram for your size. The diagrams show all the rows in the pattern seen from the right side! DECREASE TIP (for sleeves): All decreases are made from the side in purl! Decrease 1 stitch by purling 2 stitches together ------------------------------------------------------- START THE PIECE HERE: ------------------------------------------------------- CIRCLE JACKET - SHORT OVERVIEW OF THE PIECE: The piece is worked in the round in a circle from the middle of the back outwards. Change to circular needle(s) when necessary. Then work back and forth with short rows for the front pieces and down the back. The sleeves are worked top down in stockinette stitch with the wrong side out. Because of the weight of the yarn, the garment will stretch somewhat after use. CIRCLE JACKET: CIRCLE: Cast on 8 stitches with double pointed needles size 8 mm = US 11 and 1 strand Air and 1 strand Brushed Alpaca Silk (= 2 strands). Divide the stitches between 4 needles so that there are 2 stitches on each. Insert a marker thread at the beginning of the round. Allow the marker thread to follow your work onwards. Work pattern in the round according to A.1 – choose diagram for your size, a total of 8 times on the round. REMEMBER THE KNITTING GAUGE! When A.1 is finished, there are 48 stitches on the round. Now work pattern as follows: Work A.2 – choose diagram for your size, a total of 16 times on the round. After the next-to-last round in A.2 there are 128-128-144-144-160-160 stitches on the round. The last round in A.2 is worked as follows: Work the first 39-39-45-45-49-49 stitches (there is now 1-1-0-0-1-1 stitch left in the last repeat of A.2 worked), insert a new marker thread here (follows your work onwards and is later used when you work short rows from the front pieces and down the body on the back piece), bind off the next 20-21-22-23-24-25 stitches (= armhole), work the next 49-47-55-53-63-61 stitches, bind off the last 20-21-22-23-24-25 stitches (= armhole). The piece measures approx. 39-39-41-41-47-47 cm = 15¼"-15¼"-16⅛"-16⅛"-18½"-18½" in diameter. The next round is worked as follows: Work A.3 – choose diagram for your size (= 8-8-9-9-10-10 stitches on the first round in the diagram) a total of 16 times on the round and at the same time cast on 20-21-22-23-24-25 new stitches on the needle where the stitches were bind off for the armholes = 128-128-144-144-160-160 stitches. Continue in the round with A.3 until the whole diagram has been completed in height. There are now 304-304-352-352-400-400 stitches on the round. The piece measures approx. 87-87-97-97-111-111 cm = 34¼"-34¼"-38¼"-38¼"-43¾"-43¾" in diameter. Cut the strand. Place the first 94-94-110-110-124-124 stitches on the round (= stitches between the 2 marker threads) on a thread. FRONT PIECES AND DOWN THE BODY: There are now 210-210-242-242-276-276 stitches for the front pieces and down the body on the back piece. Start from the right side after the second marker thread and work short rows back and forth for the front pieces and down the body on the back piece as follows: ROW 1 (right side): Purl over purl and work A.4 (= 3 stitches) over each cable until there are 3 stitches left before the next marker thread (i.e. start of round), turn. ROW 2 (wrong side): Work back until there are 3 stitches left before the marker thread, turn. ROW 3: Purl over purl and work A.4 over each of the cables until there are 6 stitches left before the marker thread, AT THE SAME TIME increase 1 purled stitch after each cable/A.4, turn. ROW 4: Work back until there are 6 stitches left before the marker thread, turn. Continue back and forth like this by working 3 fewer stitches than the previous row and increase 1 stitch after each cable/A.4 every 4th row until you have worked 7 repeats of A.4 in height (= 42 rows). The piece measures approx. 72-72-77-77-84-84 cm = 28⅜"-28⅜"-30⅜"-30⅜"-33"-33" from the middle of the circle and down mid back. The last row is worked from the wrong side. Do not cut the strand. Insert a marker thread in the middle cable/A.4 mid back of jacket. Continue back and forth with pattern as before over the bottom of the left front piece as follows: ROW 1 (right side): Work until there are 4 stitches left before the cable/A.4 with the marker thread mid back, turn. ROW 2 (wrong side): Work until there are 3 more stitches left before the marker thread than the previous row (start of round), AT THE SAME TIME increase 1 purled stitch after each cable/A.4, turn. ROW 3 (right side): Work until there are 4 more stitches than last time left before the cable/A.4 with the marker thread mid back, turn. ROW 4 (wrong side): Work until there are 3 more stitches before the marker thread than the previous row, turn. Continue back and forth with pattern and increase after each cable/A.4 every 4th row until you have worked 3 repeats of A.4 in height (= 18 rows). Cut the strand. Start from the right side and after A.4/mid back and work short rows back and forth over the bottom of the right front piece in the same way, but reversed, i.e. each row from the wrong side is turned when there are 4 more stitches before the cable/A.4 with the marker thread mid back than the previous time and on each row from the right side is turned when there are 3 more stitches left than the previous time. EDGE: Place all stitches on the circle back on circular needle and work 2 RIDGES – read description above, around the whole circle. Bind off, but to avoid the bind-off edge being tight you can make 1 yarn over after approx. each 5th stitch - the yarn overs are bind off as normal stitches. SLEEVE: The sleeve is worked in stockinette stitch with the wrong side out (reversed stockinette stitch). Cast on 11-11-12-12-14-14 stitches with circular needle size 8 mm = US 11 and 1 strand Air and 1 strand Brushed Alpaca Silk (= 2 strands). Work stockinette stitch back and forth, AT THE SAME TIME cast on new stitches at the end of each row in each side as follows: Cast on 2 stitches 2 times, 1 stitch 3-4-5-6-6-7 times, 2 stitches 1 time and 4 stitches 1 time = 37-39-42-44-46-48 stitches. THE PIECE IS NOW MEASURED FROM HERE. Continue back and forth with stockinette stitch and 1 edge stitch in GARTER STITCH – read description above, in each side. When the piece measures 4 cm decrease 1 stitch inside the 1 edge stitch in garter stitch in each side – read DECREASE TIP. Decrease like this every 7-6-6-5-5-4 cm = 2¾"-2⅜"-2⅜"-2"-2"-1½" a total of 6-7-7-8-8-9 times = 25-25-28-28-30-30 stitches. When the piece measures 42-42-40-40-39-39 cm = 16½"-16½"-15¾"-15¾"-15¼"-15¼" increase 7-7-4-9-7-7 stitches evenly on row = 32-32-32-37-37-37 stitches. Change to circular needle size 7 mm = US 10,75. Work rib, starting from the side with purl (reversed stockinette stitch/the wrong side out) as follows: 1 edge stitch in garter stitch (knit 2, purl 3) until there is 1 stitch left, 1 edge stitch in garter stitch. When the rib measures 5 cm = 2" bind off with knit over knit and purl over purl. The sleeve measures approx. 55-56-55-56-56-57 cm = 21⅝"-22"-21⅝"-22"-22"-22½" from the sleeve cap down. Work the other sleeve in the same way. ASSEMBLY: Sew sleeves to body inside the bind-off/cast-on edge. Sew sleeve seams. Make sure that the seam is not tight. |
|||||||||||||||||||||||||||||||
Diagram explanations |
|||||||||||||||||||||||||||||||
|
|||||||||||||||||||||||||||||||
|
|||||||||||||||||||||||||||||||
|
|||||||||||||||||||||||||||||||

|
|||||||||||||||||||||||||||||||
|
|||||||||||||||||||||||||||||||
|
|||||||||||||||||||||||||||||||
|
Have you made this or any other of our designs? Tag your pictures in social media with #dropsdesign so we can see them! Do you need help with this pattern?You'll find tutorial videos, a Comments/Questions area and more by visiting the pattern on garnstudio.com. © 1982-2024 DROPS Design A/S. We reserve all rights. This document, including all its sub-sections, has copyrights. Read more about what you can do with our patterns at the bottom of each pattern on our site. |
|||||||||||||||||||||||||||||||


With over 40 years in knitting and crochet design, DROPS Design offers one of the most extensive collections of free patterns on the internet - translated to 17 languages. As of today we count 304 catalogs and 11422 patterns - 11417 of which are translated into English (US/in).
We work hard to bring you the best knitting and crochet have to offer, inspiration and advice as well as great quality yarns at incredible prices! Would you like to use our patterns for other than personal use? You can read what you are allowed to do in the Copyright text at the bottom of all our patterns. Happy crafting!
Comments / Questions (174)
Bjr, je viens de terminer les 42 rangs des DEVANTS ET BAS de la veste et de placer le marqueur au milieu du dos, deux questions 1)doit-on avoir le meme nombre de mailles par rapport a ce fil ..et 2) les 18 rangs suivants sont-ils RACCOURCIS DES 2 COTES : les rangs impairs sur l'endroit de 4m au milieu du dos, et les rangs pairs sur l'envers de 3m par rapport au fils marqueur du debut des tours...Merci....
26.07.2019 - 19:04DROPS Design answered:
Bonjour Mme Quéré, vous devez effectivement avoir le même nombre de mailles pour que l'arrondi des devants soit identique des deux côtés (ce qui doit être le cas si votre nombre de mailles est juste). Vous tricotez ensuite les rangs raccourcis en laissant d'abord les 3 dernières mailles à la fin de chaque rang (sur l'endroit et sur l'envers), puis en laissant 4 m sur l'endroit et 3 m sur l'envers. Bon tricot!
06.08.2019 - 10:29Har lyst å strikke denne til en dame med brystmål 138 cm og klarer ikke å gjennomskue om største størrelse blir stor nok, eller hvor i mønster jeg evt evt kan øke. Håper dere kan hjelpe meg :-)
25.07.2019 - 08:21DROPS Design answered:
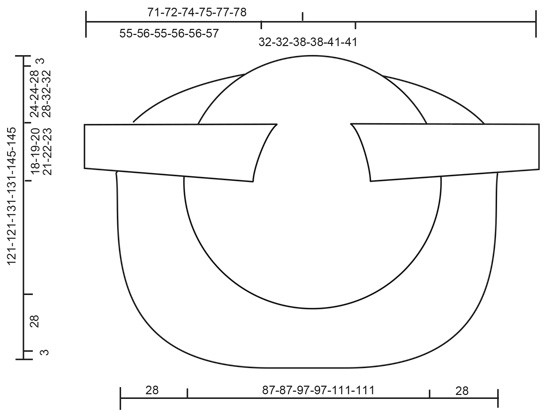
Hej Annette, jo XXXL er stor nok, du finder alle jakkens mål i måleskitsen nederst i opskriften. God fornøjelse!
02.08.2019 - 09:39Bør dette plagget vaskes før det tas i bruk? Er strikket i originalgarn etter mønsteret.
21.07.2019 - 17:51DROPS Design answered:
Hei JF. Det er et ganske personlig spørsmål. Noen vil absolutt vaske et strikkeplagg før bruk, mens andre aldri vasker sine ullplagg (de bare lufter plagget). Personlig ville jeg ikke ha vasket denne jakken som er strikkert i DROPS Air før bruk. God Fornøyelse!
09.09.2019 - 14:48Hello! I'm a bit confused about the sizing and measurements. Are the chest measurements of circumference or edge to edge? They just seem rather small. Thank you!
21.07.2019 - 16:57DROPS Design answered:
Dear Heather, see the bottom line with measurements: in the middle you see measure for the circle piece (= back from side to side, 87-87-97-97-111-111 cm) and 28 cm for each front piece. Hope this will help. Happy knitting!
21.07.2019 - 20:54J'ai voulu écrire : OU ALORS L'AUTRE RANG 3 plus bas ?...
13.07.2019 - 20:04Bonjour et pardon d'insister : la correction donnée sert-elle a corriger cela : RANG 3: Tricoter les mailles envers à l’envers et tricoter A.4 au-dessus de chaque torsade jusqu'à ce qu'il reste 6 mailles avant le fil marqueur, EN MÊME TEMPS, augmenter 1 maille envers après chaque torsade/A.4, tourner. OU ALORS L'AUTRE RANG plus bas ?
13.07.2019 - 08:34DROPS Design answered:
Bonjour Mme Quéré, la correction a été faite sur le rang 3 de la 2ème partie des devants; si vous avez imprimé les explications après la date de la correction, le texte est juste, tricotez simplement comme indiqué dans les explications. Bon tricot!
15.07.2019 - 09:07Love the pattern lool
13.07.2019 - 06:27Bonjour.....Pouvez vous certifier la correction et son emplacement...elle "détruit" la symétrie du modèle et elle parle d'un fil marqueur au milieu du dos dont il na pas t question jusqu'ici.... J'ai tricot sans difficulté le modèle jusqu'à la fin du cercle....Merci
12.07.2019 - 13:53DROPS Design answered:
Bonjour Mme Quere, la correction est bien juste, après le cercle, vous tricotez les devants et le bas en allers et retours et rangs raccourcis pour former la partie que l'on voit dans le schéma, les rangs raccourcis se tricotent de chaque côté pour justement conserver la symétrie. Bon tricot!
12.07.2019 - 15:06Erg leuk vest om te breien. Af en toe even puzzelen, uitzoeken en weer door.
29.05.2019 - 22:05Sorry for my last question. I realize now that the 4th row is worked on the wrong side of the garment. Sorry to have bothered you.
25.05.2019 - 23:50