
Popular categories
Looking for a yarn?


|
|||||||||||||||||||||||||||||||
Empress |
|||||||||||||||||||||||||||||||
 |
 |
||||||||||||||||||||||||||||||
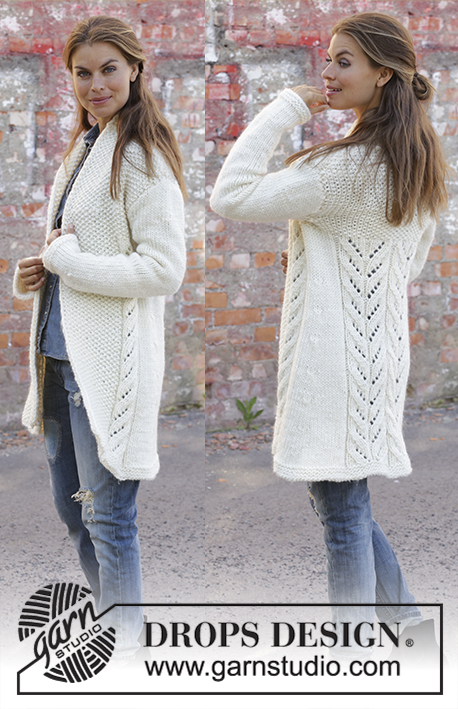
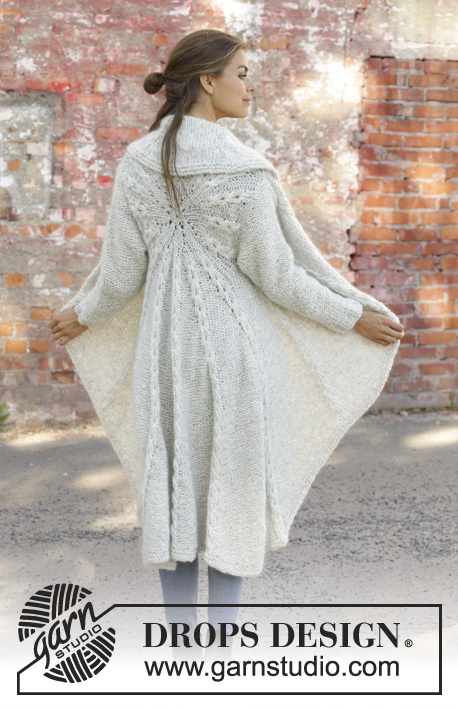
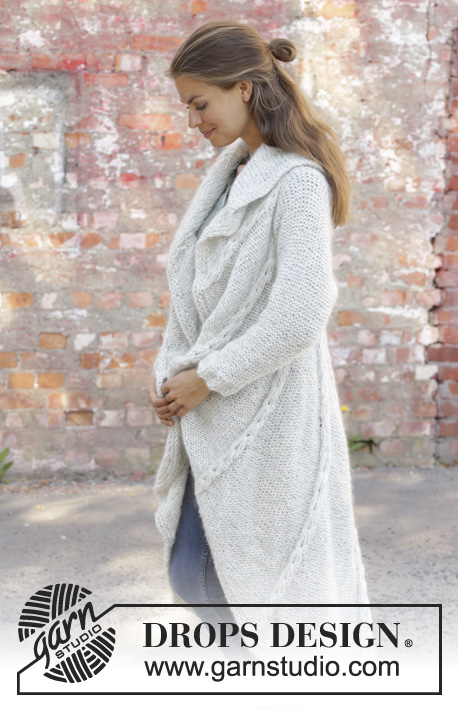
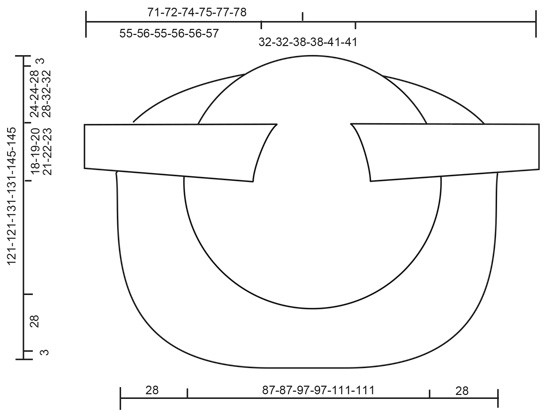
Knitted long circle jacket in 1 strand DROPS Air and 1 strand DROPS Brushed Alpaca Silk. The piece is worked in the round in a circle with texture. Sizes S - XXXL.
DROPS 194-17 |
|||||||||||||||||||||||||||||||
|
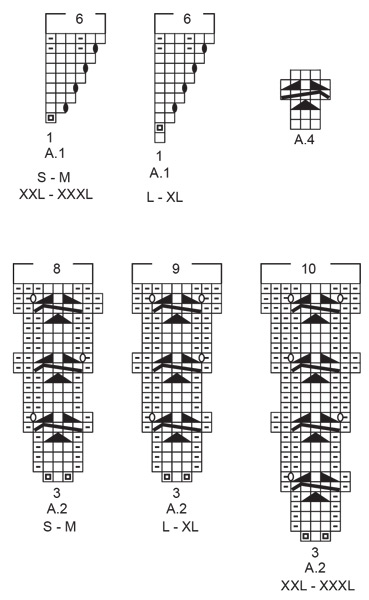
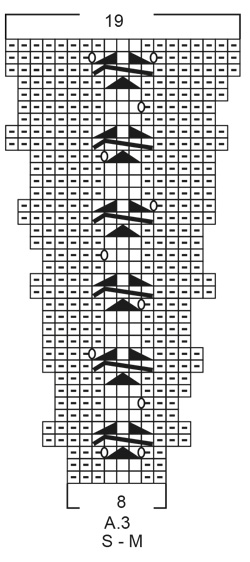
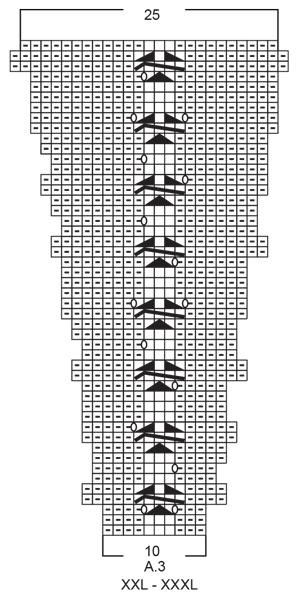
------------------------------------------------------- EXPLANATIONS FOR THE PATTERN: ------------------------------------------------------- RIDGE/GARTER STITCH (worked in the round): 1 ridge = 2 rounds. Knit 1 round and purl 1 round. RIDGE/GARTER STITCH (worked back and forth): 1 ridge = knit 2 rows. PATTERN: See diagrams A.1 to A.4. Choose diagram for your size. The diagrams show all the rows in the pattern seen from the right side! DECREASE TIP (for sleeves): All decreases are made from the side in purl! Decrease 1 stitch by purling 2 stitches together ------------------------------------------------------- START THE PIECE HERE: ------------------------------------------------------- CIRCLE JACKET - SHORT OVERVIEW OF THE PIECE: The piece is worked in the round in a circle from the middle of the back outwards. Change to circular needle(s) when necessary. Then work back and forth with short rows for the front pieces and down the back. The sleeves are worked top down in stockinette stitch with the wrong side out. Because of the weight of the yarn, the garment will stretch somewhat after use. CIRCLE JACKET: CIRCLE: Cast on 8 stitches with double pointed needles size 8 mm = US 11 and 1 strand Air and 1 strand Brushed Alpaca Silk (= 2 strands). Divide the stitches between 4 needles so that there are 2 stitches on each. Insert a marker thread at the beginning of the round. Allow the marker thread to follow your work onwards. Work pattern in the round according to A.1 – choose diagram for your size, a total of 8 times on the round. REMEMBER THE KNITTING GAUGE! When A.1 is finished, there are 48 stitches on the round. Now work pattern as follows: Work A.2 – choose diagram for your size, a total of 16 times on the round. After the next-to-last round in A.2 there are 128-128-144-144-160-160 stitches on the round. The last round in A.2 is worked as follows: Work the first 39-39-45-45-49-49 stitches (there is now 1-1-0-0-1-1 stitch left in the last repeat of A.2 worked), insert a new marker thread here (follows your work onwards and is later used when you work short rows from the front pieces and down the body on the back piece), bind off the next 20-21-22-23-24-25 stitches (= armhole), work the next 49-47-55-53-63-61 stitches, bind off the last 20-21-22-23-24-25 stitches (= armhole). The piece measures approx. 39-39-41-41-47-47 cm = 15¼"-15¼"-16⅛"-16⅛"-18½"-18½" in diameter. The next round is worked as follows: Work A.3 – choose diagram for your size (= 8-8-9-9-10-10 stitches on the first round in the diagram) a total of 16 times on the round and at the same time cast on 20-21-22-23-24-25 new stitches on the needle where the stitches were bind off for the armholes = 128-128-144-144-160-160 stitches. Continue in the round with A.3 until the whole diagram has been completed in height. There are now 304-304-352-352-400-400 stitches on the round. The piece measures approx. 87-87-97-97-111-111 cm = 34¼"-34¼"-38¼"-38¼"-43¾"-43¾" in diameter. Cut the strand. Place the first 94-94-110-110-124-124 stitches on the round (= stitches between the 2 marker threads) on a thread. FRONT PIECES AND DOWN THE BODY: There are now 210-210-242-242-276-276 stitches for the front pieces and down the body on the back piece. Start from the right side after the second marker thread and work short rows back and forth for the front pieces and down the body on the back piece as follows: ROW 1 (right side): Purl over purl and work A.4 (= 3 stitches) over each cable until there are 3 stitches left before the next marker thread (i.e. start of round), turn. ROW 2 (wrong side): Work back until there are 3 stitches left before the marker thread, turn. ROW 3: Purl over purl and work A.4 over each of the cables until there are 6 stitches left before the marker thread, AT THE SAME TIME increase 1 purled stitch after each cable/A.4, turn. ROW 4: Work back until there are 6 stitches left before the marker thread, turn. Continue back and forth like this by working 3 fewer stitches than the previous row and increase 1 stitch after each cable/A.4 every 4th row until you have worked 7 repeats of A.4 in height (= 42 rows). The piece measures approx. 72-72-77-77-84-84 cm = 28⅜"-28⅜"-30⅜"-30⅜"-33"-33" from the middle of the circle and down mid back. The last row is worked from the wrong side. Do not cut the strand. Insert a marker thread in the middle cable/A.4 mid back of jacket. Continue back and forth with pattern as before over the bottom of the left front piece as follows: ROW 1 (right side): Work until there are 4 stitches left before the cable/A.4 with the marker thread mid back, turn. ROW 2 (wrong side): Work until there are 3 more stitches left before the marker thread than the previous row (start of round), AT THE SAME TIME increase 1 purled stitch after each cable/A.4, turn. ROW 3 (right side): Work until there are 4 more stitches than last time left before the cable/A.4 with the marker thread mid back, turn. ROW 4 (wrong side): Work until there are 3 more stitches before the marker thread than the previous row, turn. Continue back and forth with pattern and increase after each cable/A.4 every 4th row until you have worked 3 repeats of A.4 in height (= 18 rows). Cut the strand. Start from the right side and after A.4/mid back and work short rows back and forth over the bottom of the right front piece in the same way, but reversed, i.e. each row from the wrong side is turned when there are 4 more stitches before the cable/A.4 with the marker thread mid back than the previous time and on each row from the right side is turned when there are 3 more stitches left than the previous time. EDGE: Place all stitches on the circle back on circular needle and work 2 RIDGES – read description above, around the whole circle. Bind off, but to avoid the bind-off edge being tight you can make 1 yarn over after approx. each 5th stitch - the yarn overs are bind off as normal stitches. SLEEVE: The sleeve is worked in stockinette stitch with the wrong side out (reversed stockinette stitch). Cast on 11-11-12-12-14-14 stitches with circular needle size 8 mm = US 11 and 1 strand Air and 1 strand Brushed Alpaca Silk (= 2 strands). Work stockinette stitch back and forth, AT THE SAME TIME cast on new stitches at the end of each row in each side as follows: Cast on 2 stitches 2 times, 1 stitch 3-4-5-6-6-7 times, 2 stitches 1 time and 4 stitches 1 time = 37-39-42-44-46-48 stitches. THE PIECE IS NOW MEASURED FROM HERE. Continue back and forth with stockinette stitch and 1 edge stitch in GARTER STITCH – read description above, in each side. When the piece measures 4 cm decrease 1 stitch inside the 1 edge stitch in garter stitch in each side – read DECREASE TIP. Decrease like this every 7-6-6-5-5-4 cm = 2¾"-2⅜"-2⅜"-2"-2"-1½" a total of 6-7-7-8-8-9 times = 25-25-28-28-30-30 stitches. When the piece measures 42-42-40-40-39-39 cm = 16½"-16½"-15¾"-15¾"-15¼"-15¼" increase 7-7-4-9-7-7 stitches evenly on row = 32-32-32-37-37-37 stitches. Change to circular needle size 7 mm = US 10,75. Work rib, starting from the side with purl (reversed stockinette stitch/the wrong side out) as follows: 1 edge stitch in garter stitch (knit 2, purl 3) until there is 1 stitch left, 1 edge stitch in garter stitch. When the rib measures 5 cm = 2" bind off with knit over knit and purl over purl. The sleeve measures approx. 55-56-55-56-56-57 cm = 21⅝"-22"-21⅝"-22"-22"-22½" from the sleeve cap down. Work the other sleeve in the same way. ASSEMBLY: Sew sleeves to body inside the bind-off/cast-on edge. Sew sleeve seams. Make sure that the seam is not tight. |
|||||||||||||||||||||||||||||||
Diagram explanations |
|||||||||||||||||||||||||||||||
|
|||||||||||||||||||||||||||||||
|
|||||||||||||||||||||||||||||||
|
|||||||||||||||||||||||||||||||

|
|||||||||||||||||||||||||||||||
|
|||||||||||||||||||||||||||||||
|
|||||||||||||||||||||||||||||||
|
Have you made this or any other of our designs? Tag your pictures in social media with #dropsdesign so we can see them! Do you need help with this pattern?You'll find tutorial videos, a Comments/Questions area and more by visiting the pattern on garnstudio.com. © 1982-2024 DROPS Design A/S. We reserve all rights. This document, including all its sub-sections, has copyrights. Read more about what you can do with our patterns at the bottom of each pattern on our site. |
|||||||||||||||||||||||||||||||


With over 40 years in knitting and crochet design, DROPS Design offers one of the most extensive collections of free patterns on the internet - translated to 17 languages. As of today we count 304 catalogs and 11422 patterns - 11417 of which are translated into English (US/in).
We work hard to bring you the best knitting and crochet have to offer, inspiration and advice as well as great quality yarns at incredible prices! Would you like to use our patterns for other than personal use? You can read what you are allowed to do in the Copyright text at the bottom of all our patterns. Happy crafting!
Comments / Questions (174)
PS de mon premier message : le second repère se trouve bien entendu 49 mailles APRES les 94 mises en attente.
12.09.2019 - 19:42Bonjour, je fais ce modèle en taille M et je suis bloquée, j'ai réussi à tricoter jusqu'au moment de mettre les 94 mailles sur le fil; j'ai bien 210 mailles pour faire les rangs raccourcis, le premier repère était le début du rang et le second 51 mailles plus loin et au milieu d'un motif (torsade). Pouvez-vous me guidé pour faire les rangs raccourcis et le devant et bas de la veste. Merci de votre aide
12.09.2019 - 18:58DROPS Design answered:
Bonjour Catherine, vous tricotez maintenant des rangs raccourcis en laissant non tricotées 3 mailles en fin de rang sur l'endroit et 3 mailles en fin de rang sur l'envers (vous répétez les 4 rangs décrits = vous augmentez 1 m après chaque torsade à chaque rang 3) jusqu'à ce que vous ayez tricoté 42 rangs (= 7 fois A.4 en hauteur depuis le début des rangs raccourcis). Vous continuerez ensuite en rangs raccourcis entre le milieu du bas du dos et le haut du devant. Bon tricot!
13.09.2019 - 08:00J ai fini le rond et commencer a diminuer pour l emmanchure vous dites continuer avec positif A3 mais y a pas ? Il y a A1 A4
09.09.2019 - 18:17DROPS Design answered:
Bonjour Mme Corbel, je suis désolée je ne comprends pas votre question, les mailles des emmanchures sont rabattues dans un tour du cercle (pas diminuées) et on monte les mailles des emmanchures (côté devants) au tour suivant, avant la fin du cercle. À quel niveau en êtes-vous?
10.09.2019 - 09:42Jeg er igang med at strikke denne smukke cardigan. Men jeg kan ikke finde ud af at læse diagram A2 (str S-M) den allerførste omgang skal der strikkes 2 masker i én i en rapport. Men det fremgår ikke om det er retmasker eller vrangmasker og da der på oinden allerede er ret og vrangmasker er jeg i tvivl hvordan denne omgang skal strikkes. ?
03.09.2019 - 12:12DROPS Design answered:
Hej Liselotte, når du strikker 2 masker i én er det lettest at strikke 1 ret i forreste maskeled og så 1 ret i bagerste maskeled, først på næste omgang, strikkes de i ret og vrangmasker ifølge diagrammet. God fornøjelse!
06.09.2019 - 11:36Merci pour votre réponse. Effectivement il faudra l ajuster, c est un très joli modèle.
31.08.2019 - 08:37Bonsoir, est -il possible de réaliser ce modèle au crochet ?
29.08.2019 - 22:45DROPS Design answered:
Bonjour Mme Bakoly, probablement, mais il vous faudra ajuster le modèle en conséquence - vous trouverez ici tous nos modèles de gilets/vestes crochetés en rond. Bon crochet!
30.08.2019 - 09:17Hello I am on A3 and once I get to the cast on stitches there aren’t enough rows to go down an pick up stitches please help confused!!!🧶🧶
21.08.2019 - 19:21DROPS Design answered:
Dear Debbie, simply work the stitches from cast on edge on sleeves, and continue as before. Happy knitting!
22.08.2019 - 09:32J'ai une photo de mon travail jusque là.....Puis-je vous la faire parvenir ?... Ce modèle est magnifique...mais, pour ces nouveaux rangs raccourcis pour finir le devant gauche...et ensuite le devant droit....en fait, exprimé encore d'une autre manière, je dois savoir quelles sont les mailles que je reprends...peut-être pourriez vous donner le nombre de ces mailles, taille L........Merci beaucoup pour votre future réponse :-)
02.08.2019 - 10:22DROPS Design answered:
Bonjour Mme Quere, vous pouvez volontiers publier votre photo sur notre Facebook ou dans notre groupe. Quand vous tricotez les rangs raccourcis des devants uniquement, vous continuez comme avant côté encolure et vous tricotez maintenant des rangs raccourcis côté bas du dos (pour que l'arrondi de l'encolure continue et éviter d'ajouter de la longueur en bas du dos). Bon tricot!
07.08.2019 - 09:45Bonjour....Je ne sais si vous comprenez ou pas mes questions précédentes..Comment dire : Pour LES DEVANTS et BAS de la veste APRES LES 42 rangs FAUT-IL pour les 18 rangs suivants , quand vous dites :" Continuer en allers et retours comme avant au-dessus du devant gauche ainsi..." donc FAUT-IL PRENDRE TOUTES LES MAILLES situées entre le fil marqueur du milieu dos et le fil marqueur du début de rang en INCLUANT les groupes de 3 fils abandonnés lors des 42 rangs précédents... MERCI
02.08.2019 - 10:15DROPS Design answered:
Bonjour Mme Quere, après les 42 rangs de rangs raccourcis sur le bas de la veste (= dos & devants), vous continuez sur le devant uniquement, c'est-à-dire que les mailles non tricotées des 42 rangs ne sont pas tricotées sur ces 18 rangs, on continue les rangs raccourcis en laissant des mailles supplémentaires en attente côté haut du devant, et on tricote des rangs raccourcis en bas du dos. Toutes les mailles non tricotées seront ensuite reprises pour la bordure. Bon tricot!
07.08.2019 - 09:43Bjr.. une autre question a la suite des 2 autres, avant de commencer ces 18 rangs, donc faut-il prendre TOUTES LES MAILLES entre les fils marqueurs DU MILIEU DU DOS ET DU DEBUT DES TOURS (y compris donc les groupes de 3 mailles "abandonnées lors des 42 rangs précedents) sans oublier,en meme temps d' augmenter 1 maille envers après chaque torsade/A.4, tourner. MERCI
27.07.2019 - 07:04DROPS Design answered:
Bonjour Mme Quere, après les 42 rangs de rangs raccourcis sur le bas de la veste (= d'un devant à l'autre en passant donc par le bas), on va continuer en rangs raccourcis mais cette fois à partir du milieu du bas de la veste et uniquement sur le devant, les mailles non tricotées pendant les 42 rangs ne le sont toujours pas, on laisse toujours plus de mailles non tricotées (cf schéma). Quand les 2 devants sont faits, on tricotera la bordure sur toutes les mailles tout autour du cercle (qui n'en forme plus un vrai de part les rangs raccourcis). Bon tricot!
06.08.2019 - 10:44