
Popular categories
Looking for a yarn?


|
|
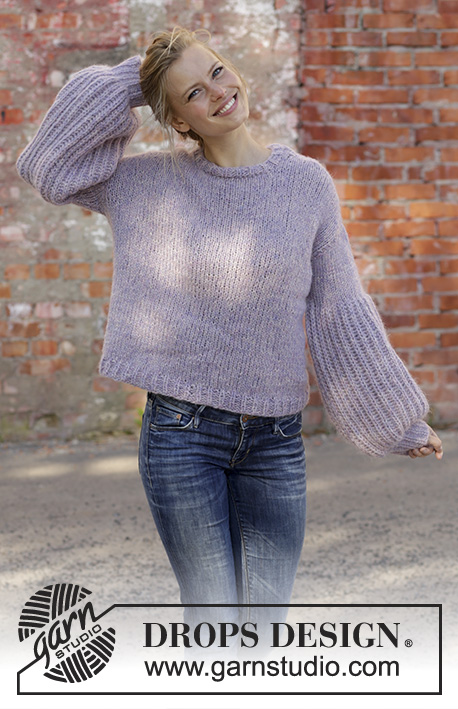
Bewitched |
|
 |
 |
Knitted sweater in DROPS Air with English rib. Sizes S - XXXL.
DROPS 194-21 |
|
|
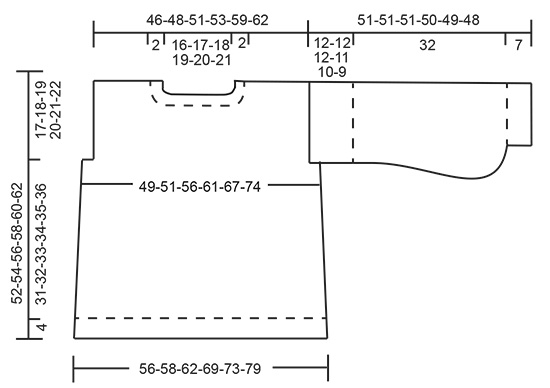
------------------------------------------------------- EXPLANATIONS FOR THE PATTERN: ------------------------------------------------------- RIDGE/GARTER STITCH (worked back and forth): 1 ridge = Knit 2 rows. DECREASE TIP-1 (for sides of front/back piece): All decreases are made from the right side! Work 1 edge stitch in garter stitch, knit 1, slip 1 stitch as if to knit, knit 1, pass the slipped stitch over the knitted stitch (= 1 stitch decreased), knit until there are 4 stitches left, knit 2 together (= 1 stitch decreased), knit 1 and finish with 1 edge stitch in garter stitch. DECREASE TIP-2 (for neck on front piece): Decrease 1 stitch after the 1 stitch as follows: slip 1 stitch as if to knit, knit 1, pass the slipped stitch over the knitted stitch (= 1 stitch decreased). Decrease 1 stitch before the 1 stitch as follows: Work until there are 3 stitches left on the row, knit 2 together (= 1 stitch decreased) and finish with knit 1. INCREASE TIP (evenly spaced): To work out how to increase evenly, count the total number of stitches on the needle (e.g. 44 stitches) and divide by the number of increases to be made (e.g. 11) = 4. In this example, increase by making 1 yarn over after approx. each 4th stitch. On the next round work the yarn overs twisted to avoid holes. ENGLISH RIB: ROW 1: 1 stitch in garter stitch, * knit 1, 1 yarn over, slip 1 stitch as if to purl *, work from *-* until there are 2 stitches left, finish with knit 1 and 1 stitch in garter stitch. ROW 2: 1 stitch in garter stitch, * 1 yarn over, slip 1 stitch as if to purl, knit together the yarn over and the slipped stitch *, work from *-* until there are 2 stitches left, finish with 1 yarn over, slip 1 stitch as if to purl and 1 stitch in garter stitch. ROW 3: 1 stitch in garter stitch, * knit the yarn over and slipped stitch together, 1 yarn over, slip 1 stitch as if to purl *, work from *-* until there are 3 stitches left (including the yarn over), knit the yarn over and slipped stitch together, 1 stitch in garter stitch. Repeat rows 2 and 3 upwards. ------------------------------------------------------- START THE PIECE HERE: ------------------------------------------------------- SWEATER - SHORT OVERVIEW OF THE PIECE: The piece is worked back and forth with circular needle. The front and back pieces are worked separately. The sleeves are worked back and forth with circular needle. The neck is worked in the round with circular needle. BACK PIECE: Cast on 80-83-89-98-104-113 stitches (including 1 edge stitch in each side of the piece) with circular needle size 7 mm / US 10.75 and Air. Work rib (= knit 1 / purl 2) with 1 edge stitch in garter stitch in each side of the piece. When the rib measures 4 cm / 1½", continue with stockinette stitch and 1 edge stitch in garter stitch in each side. REMEMBER THE GAUGE! When the piece measures 8 cm / 3⅛" decrease 1 stitch inside the 2 stitches in each side of the piece – read DECREASE TIP-1. Decrease like this every 6-6-9-6-9-9 cm / 2⅜"-2⅜"-3 ½"-2⅜"-3 ½"-3 ½" a total of 5-5-4-5-4-4 times = 70-73-81-88-96-105 stitches. When the piece measures 35-36-37-38-39-40 cm / 13¾"-14¼"-14½"-15"-15¼"-15¾", bind off 2-2-4-6-6-8 stitches for the armholes at the beginning of the next 2 rows = 66-69-73-76-84-89 stitches. Work stockinette stitch with 1 edge stitch in garter stitch in each side of the piece. When the piece measures 48-50-52-54-56-58 cm / 19"-19¾"-20½"-21¼"-22"-22¾" bind off the middle 26-27-29-30-32-33 stitches for neck = 20-21-22-23-26-28 stitches left on each shoulder. Each shoulder is finished separately. Continue with stockinette stitch and 1 edge stitch in garter stitch as before until the piece measures 52-54-56-58-60-62 cm / 20½"-21¼"-22"-22¾"-23⅝"-24⅜" from the cast-on edge. Bind off with knit. Work the other shoulder in the same way. FRONT PIECE: Cast on and work as for back piece until the piece measures 42-44-44-46-46-48 cm / 16 ½"-17 ¼"-17 ¼"-18"-18"-18⅞" = 66-69-73-76-84-89 stitches. Now bind off the middle 20-21-23-24-26-27 stitches for neck and each shoulder is finished separately = 23-24-25-26-29-31 stitches left on each shoulder. On the next row from the right side decrease 1 stitch inside 1 stitch for neck – read DECREASE TIP-2! Decrease like this every 2nd row a total of 3 times = 20-21-22-23-26-28 stitches. Work stockinette stitch with 1 edge stitch in garter stitch as before until the piece measures 52-54-56-58-60-62 cm / 20½"-21¼"-22"-22¾"-23⅝"-24⅜" from the cast-on edge. Bind off with knit. Work the other shoulder in the same way. SLEEVE: The sleeve is worked back and forth with circular needle. Cast on 44-47-47-50-50-53 stitches (including 1 edge stitch in each side of the piece) with circular needle size 4 mm / US 6 and Air. Work rib (= knit 1, purl 2) with 1 edge stitch in garter stitch in each side of the piece. When the rib measures 7 cm / 2¾", adjust so that the next row is from the right side, work 1 more row of rib but, AT THE SAME TIME increase 11-12-12-13-13-14 stitches evenly on row – read INCREASE TIP = 55-59-59-63-63-67 stitches. Purl 1 row from the wrong side with 1 edge stitch in garter stitch in each side. Change to circular needle size 7 mm / US 10.75 and work ENGLISH RIB – read description above. Continue until the piece measures 39 cm. Now continue with stockinette stitch and 1 edge stitch in garter stitch in each side AT THE SAME TIME as on the first row you decrease 5-7-4-5-2-3 stitches evenly on row = 50-52-55-58-61-64 stitches. Bind off when the sleeve measures 51-51-51-50-49-48 cm / 20"-20"-20"-19⅝"-19 ¼"-18⅞". Work the other sleeve in the same way. ASSEMBLY: Sew shoulder seams in outermost loop of outermost stitch. Sew in the sleeves, inside the 1 edge stitch. Sew sleeve and side seams inside the 1 edge stitch. NECK: Knit up approx. 63 to 84 stitches with circular needle size 7 mm / US 10.75 (make sure the number of stitches is divisible by 3). Work rib (= knit 1, purl 2) in the round over all stitches for 2 cm / ¾". Then bind off with knit over knit and purl over purl. |
|
|
|
|
Have you made this or any other of our designs? Tag your pictures in social media with #dropsdesign so we can see them! Do you need help with this pattern?You'll find tutorial videos, a Comments/Questions area and more by visiting the pattern on garnstudio.com. © 1982-2024 DROPS Design A/S. We reserve all rights. This document, including all its sub-sections, has copyrights. Read more about what you can do with our patterns at the bottom of each pattern on our site. |
|


With over 40 years in knitting and crochet design, DROPS Design offers one of the most extensive collections of free patterns on the internet - translated to 17 languages. As of today we count 304 catalogs and 11422 patterns - 11417 of which are translated into English (US/in).
We work hard to bring you the best knitting and crochet have to offer, inspiration and advice as well as great quality yarns at incredible prices! Would you like to use our patterns for other than personal use? You can read what you are allowed to do in the Copyright text at the bottom of all our patterns. Happy crafting!
Comments / Questions (38)
Bonjour, je vais réaliser ce modèle pour ma fille en taille M. Elle souhaite que je fasse les manches en jersey plutôt qu'en côtes anglaises et sans les diminutions de la fin pour les garder bien larges. Je dois prévoir la même quantité de laine, ou bien plus , ou moins ? merci d'avance pour votre réponse. Je tricote régulièrement vos modèles, qui sont magnifiques. Bonne année !
05.01.2019 - 14:05DROPS Design answered:
Bonjour Catherine, nous ne sommes malheureusement pas en mesure de pouvoir adapter chaque modèle à chaque demande individuelle. Votre magasin saura en revanche vous conseiller même par mail ou téléphone. Bon tricot!
07.01.2019 - 09:55Buongiorno, sto facendo il campione con una lana diversa ( usando il convertitore) e ho fatto il campione usando i ferri 7 anche se l'indicazione del gomitolo dice di usare il n. 5. È corretto? il campione mi viene 16 maglie X 17 ferri , devo aumentare il n. di ferri? Grazie mille Alessia
27.10.2018 - 17:37DROPS Design answered:
Buongiorno Alessia. Provi a fare un campione con ferri di misura più grande. Buon lavoro!
27.10.2018 - 18:29Beryl Wilks wrote:
Sorry I am still not understanding .. finishing fishermans rib I have approx 81 sts, change to st st, dec 5sts evenly = 50 sts. what do I do with the other 31 sts which I gained from row one of fishermans rib yarn overs ? Do I carry on st st with 81 sts in total ?
23.10.2018 - 11:20DROPS Design answered:
Dear Mrs Wilks, in size S you have a total of 55 sts worked in Fisherman's rib (including YOs of the pattern), on the first row stocking stitch work the YO and the slipped stitch together (= 1 stitch) and at the same time decrease 5 sts evenly (= work tog: YO, slipped st + stitch before/after this YO and slipped st) = 55-5= 50 sts. Happy knitting!
23.10.2018 - 14:41Beryl Wilks wrote:
Thank you for this lovely pattern, I am in the process of knitting the first sleeve and have just completed the Fisherman's Rib section ... am I mistaken or has the yarn over increases on Row one of the Fisherman's Rib NOT been taken into account when reducing for the stocking stitch continuation?
22.10.2018 - 23:11DROPS Design answered:
Dear Mrs Wilks, the yarn overs from the pattern are not included in the number of sts. Happy knitting!
23.10.2018 - 09:52Bonjour, si on commence les diminutions 1 pour le dos et le devant à partir de 8cm et que l'on en fait 5 tous les 6cm (taille M), cela fait monter le tricot jusqu'à 38cm. Or, il faut commencer les emmanchures à 35cm. Je ne comprends pas. N'y aurait-il pas une erreur (diminuer tous les 6 rangs au lieu de 6cm par exemple ?). Je vous remercie de m'éclairer.
14.10.2018 - 16:04DROPS Design answered:
Bonjour Nathalie, vous commencez la 1ère diminution à 8 cm, puis tous les 6 cm: la 2ème sera à 14 cm, la 3ème à 20 cm, la 4ème à 26 cm et la 5ème à 32 cm. Vous rabattrez ensuite les emmanchures à 35 cm, soit 3 cm après la dernière diminution. Bon tricot!
15.10.2018 - 10:29Salve. Vivo a EMPOLI (Firenze). Sapreste indicarmi se c’e Un punto vendita dei vostri prodotti vicino a me? Grazie
10.10.2018 - 12:02DROPS Design answered:
Buongiorno Valentina. A questa pagina trova l’elenco dei rivenditori Drops in Italia, con tutti i loro riferimenti per contattarli. Buon lavoro!
10.10.2018 - 12:52Il campione deve essere fatto con i ferri n.5 o n.7? Grazie
09.10.2018 - 09:13DROPS Design answered:
Buongiorno Valentina, il campione è lavorato con i ferri n° 7 mm. Buon lavoro!
09.10.2018 - 09:45Bonjour, La majorité des tricots drops sont sur aiguille circulaire et j'y ai pris goût ! Pourquoi celui-ci est-il en aller retour ? peut-on convertir les explications en circulaire pour les manches et associer dos et devant (en enlevant 4 mailles lisières ) ou cela va-t-il coincer pour les emmanchures ? Merci !
06.10.2018 - 10:22DROPS Design answered:
Bonjour Nathalie, on choisit de tricoter sur aiguille circulaire pour avoir suffisamment de place pour y loger toutes les mailles. Pour ce modèle, seul le col sera tricoté en rond. Vous trouverez ici des informations utiles sur l'adaptation d'un tricot sur aiguilles droites. Bon tricot!
08.10.2018 - 08:08Bonjour,\r\nLa majorité des tricots drops sont sur aiguille circulaire et j\'y ai pris goût ! Pourquoi celui-ci est-il en aller retour ? peut-on convertir les explications en circulaire pour les manches et associer dos et devant (en enlevant 4 mailles lisières ) ou cela va-t-il coincer pour les emmanchures ? Merci !
05.10.2018 - 17:12Hej, Super fin opskrift. Jeg forstår ikke sætningen: "strik rib (=1 ret/2 vrang)". For det første er ribstrik vel 1 ret, 1 vrang eller 2 ret, 2 vrang. Er det en fejl i opskriften, eller forstår jeg det bare ikke? For det andet skal jeg lave den i en størrelse medium, hvor man begynder med 83 masker. 83 masker minus de to kantmasker der er i hver side giver 81 masker. Men det vil 2 ret, 2 vrang jo ikke gå op i?
29.08.2018 - 18:39DROPS Design answered:
Hej Juliane, jo når man strikker skiftevis ret og vrang så er det rib (81/3 = 27 gange) God fornøjelse! :)
30.08.2018 - 13:24