
Popular categories
Looking for a yarn?


|
||||||||||||||||
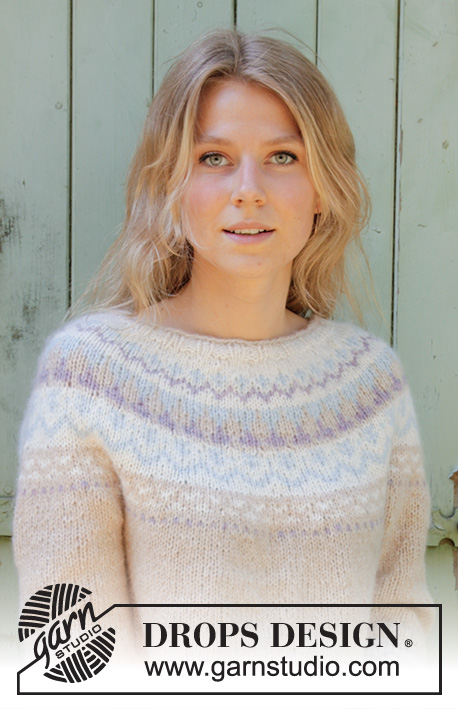
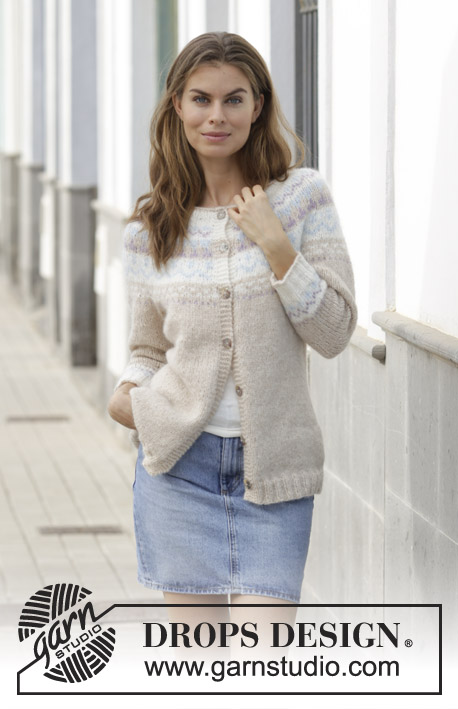
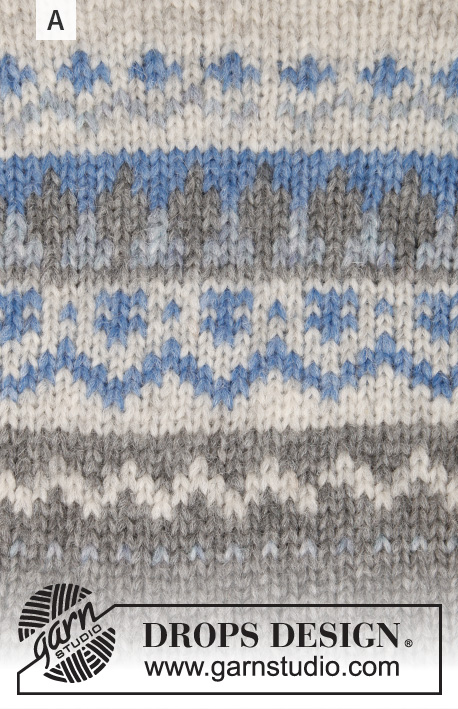
Nougat Cardigan |
||||||||||||||||
 |
 |
|||||||||||||||
Knitted jacket with round yoke and multi-colored Nordic pattern, worked top down. Sizes S - XXXL. The piece is worked in DROPS Air.
DROPS 191-3 |
||||||||||||||||
|
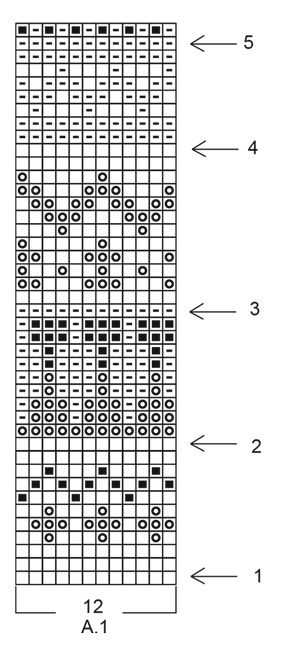
INFORMATION FOR THE PATTERN: RIDGE/GARTER STITCH (worked back and forth): 1 ridge = Knit 2 rows. PATTERN: See diagrams A.1 and A.2. The diagram shows all the rows in the pattern seen from the right side. INCREASE TIP-1 (evenly spaced): To work out how to increase evenly, count the total number of stitches on the needle (e.g. 92 stitches), minus the bands (e.g. 10 stitches) and divide the remaining stitches by the number of increases to be made (e.g. 27) = 3.037. In this example, increase by making 1 yarn over after approx. every 3rd stitch; on the next round knit the yarn overs twisted to avoid holes. INCREASE TIP-2: Start 1 stitch before the marker thread, 1 yarn over, knit 2 stitches, 1 yarn over. On the next row purl the yarn overs twisted to avoid holes. DECREASE TIP: Decrease as follows before the marker thread (start 3 stitches before the marker thread): Knit 2 together, knit 1. Decrease as follows after the marker thread: Knit 1 stitch, slip 1 stitch as if to knit, knit 1, pass the slipped stitch over. KNITTING TIP: To avoid that the jacket loses its elasticity when working color pattern it is important that the strands on the wrong side of piece are not too tight. If the pattern is to tight try going up a needle size. BUTTONHOLES: Work buttonholes on the right band (when the garment is worn): Work from the right side until there are 3 stitches left at the end of the row, make 1 yarn over, knit the next 2 stitches together and knit the last stitch. On the next row knit the yarn over to leave a hole. The first buttonhole is worked when the rib in the neck measures approx. 1½-2 cm / ½-¾". Then work the other 6 buttonholes with approx.9-9-9-10-10-10 cm / 3½"-3½"-3½"-4"-4"-4" between each one. ---------------------------------------------------------- JACKET: The piece is worked back and forth with circular needle from mid front, top down. You can work an elevation in the back of the neck for a better fit; the yoke will be a little higher in the back of the neck. You can also leave out the elevation if you wish; the neck will then be the same front and back – see description of elevation a bit further down in the text. Work buttonholes on the right band. After the yoke, the body is worked back and forth on circular needle. The sleeves are worked in the round with double pointed needles, top down NECK: Cast on 92-96-100-104-108-112 stitches with circular needle size 4.5 mm / US 7 and wheat. Purl 1 row from the wrong side. Change to off white and work rib as follows – from the right side: 5 band stitches in GARTER STITCH – see description above, (knit 2 / purl 2) until there are 7 stitches left on the row, knit 2 and 5 band stitches in garter stitch. Continue back and forth like this until the rib measures 3-3-4-4-5-5 cm / 1⅛"-1⅛"-1½"-1½"-2"-2" – remember BUTTONHOLES on right band – see description above. Change to circular needle SIZE 5.5 mm/US 9. REMEMBER THE GAUGE! Now you can work an elevation in the back of the neck or go straight to working the yoke if you do not want an elevation. ELEVATION IN BACK OF NECK: Skip this section if you do not want an elevation. Insert 1 marker mid back (= 46-48-50-52-54-56 stitches in from each side) Start from the right side with off white and knit until you have worked 11-11-12-13-13-14 stitches past the marker, turn, tighten strand and purl 22-22-24-26-26-28 stitches. Turn, tighten strand and knit 33-33-36-39-39-42 stitches, turn, tighten strand and purl 44-44-48-52-52-56 stitches. Turn, tighten strand and knit to end of row. Purl 1 row from the wrong side, with 5 band stitches in garter stitch in each end. YOKE: Now work pattern - read KNITTING TIP, as follows: 5 band stitches in garter stitch, work the last stitch in A.1, A.1 (= 12 stitches) until there are 5 stitches left, 5 band stitches in garter stitch, AT THE SAME TIME increase stitches evenly on the rows marked with arrows in the diagram – read INCREASE TIP-1 (evenly spaced): Note: When working pattern with 2 colors on the yoke, use the background color in the pattern over the 5 band stitches in garter stitch in each side. On the row marked with arrow-1 increase 27-35-31-39-35-43 stitches evenly on row = 119-131-131-143-143-155 stitches. On the row marked with arrow-2 increase 36-36-48-48-48-60 stitches evenly on row = 155-167-179-191-191-215 stitches. On the row marked with arrow-3 increase 36-36-48-48-48-60 stitches evenly on row = 191-203-227-239-239-275 stitches. On the row marked with arrow-4 increase 34-34-34-34-46-46 stitches evenly on row = 225-237-261-273-285-321 stitches. Continue the pattern like this: 5 band stitches in garter stitch, work the last stitch in A.1, A.1 (= 12 stitches) until there are 5 stitches left (the last time you work A.1 on the row, you just work the first 10 stitches in the diagram), 5 band stitches in garter stitch. On the row marked with arrow-5 increase 2-14-14-18-30-18 stitches evenly on row = 227-251-275-291-315-339 stitches. Change to wheat. Continue with wheat, stockinette stitch and 5 band stitches in garter stitch in each side until the piece measures 24-25-26-27-28-29 cm / 9½"-9¾"-10¼"-10⅝"-11"-11⅜" from the cast-on edge and down mid front – adjust so that the next row is worked from the right side (if the knitting gauge is correct in height, this measurement is attained in Size S when A.1 has been completed). The next row is worked as follows: Work the first 36-39-43-47-51-56 stitches (= left front piece), place the next 47-52-56-57-60-63 stitches on a thread for sleeve, cast on 8-8-8-10-10-10 new stitches on the needle (= in side under the sleeve), work the next 61-69-77-83-93-101 stitches (= back piece), place the next 47-52-56-57-60-63 stitches on a thread for sleeve, cast on 8-8-8-10-10-10- new stitches on the needle (= in side under the sleeve) and work the next 36-39-43-47-51-56 stitches (= right front piece). Body and sleeves are finished separately. THE PIECE IS NOW MEASURED FROM HERE! BODY: = 149-163-179-197-215-233 stitches. Insert a marker thread in each side, in the middle of the 8-8-8-10-10-10 new stitches cast on under the sleeves (= 4-4-4-5-5-5 new stitches on each side of the marker thread). Continue back and forth with wheat, stockinette stitch and 5 band stitches in garter stitch in each side towards mid front. When the piece measures 4 cm / 1½", decrease 2 stitches in each side – read DECREASE TIP. Decrease like this every 4-4-5-5-6-6 cm / 1½"-1½"-2"-2"-2⅜"-2⅜" a total of 3 times = 137-151-167-185-203-221 stitches. When the piece measures 15-15-17-17-19-19 cm / 6"-6"-6¾"-6¾"-7½"-7½", increase 2 stitches in each side – read INCREASE TIP-2. Increase in this way every 3 cm / 1" a total of 5 times = 157-171-187-205-223-241 stitches. When the piece measures 30-31-32-33-34-35 cm / 11¾"-12¼"-12½"-13"-13⅜"-13¾", increase 11-13-13-15-17-19 stitches evenly on row = 168-184-200-220-240-260 stitches. Change to circular needle size 4.5 mm / US 7 and work rib as follows: 5 band stitches in garter stitch, (knit 2 /purl 2) until there are 7 stitches left on the row, knit 2, 5 band stitches in garter stitch. When the rib measures 4 cm / 1½" bind off with knit over knit and purl over purl, but to avoid the bind-off edge being tight, you can make 1 yarn over after every 4th stitch at the same time as you bind off (the yarn overs are bind off as normal stitches). The jacket measures approx. 58-60-62-64-66-68 cm / 22¾"-23⅝"-24⅜"-25¼"-26"-26¾" from the cast on edge down mid front. SLEEVE: = 47-52-56-57-60-63 stitches. Place the 47-52-56-57-60-63 stitches from the thread in the one side of the piece on double pointed needles SIZE 5.5 mm/US 9 / US 9 and, in addition, knit up 1 stitch in each of the 8-8-8-10-10-10 new stitches cast on under the sleeve with wheat = 55-60-64-67-70-73 stitches. Insert 1 marker thread in the middle of the 8-8-8-10-10-10 new stitches (= 4-4-4-5-5-5 new stitches on each side of the marker thread). Start the round here and work stockinette stitch in the round with wheat. When the piece measures 4-4-4-4-3-3 cm / 1½"-1½"-1½"-1½"-1"-1" from the separation, decrease 2 stitches under the sleeve – read DECREASE TIP. Decrease like this every 4th-3rd-3rd-3rd-3rd-3rd round 10-12-13-13-14-14 times = 35-36-38-41-42-45 stitches. When the piece measures 24-24-23-23-23-23 cm / 9½"-9½"-9"-9"-9"-9", increase 1-4-2-3-2-3 stitches evenly on round = 36-40-40-44-44-48 stitches. Work A.2 (= 4 stitches) in the round. When the whole of A.2 has been completed in height, change to double pointed needles size 4.5 mm / US 7 and off white. Work rib (knit 2 /purl 2) for 5 cm / 2". Change to wheat, work 1 round rib as before and loosely bind off with wheat, knit over knit and purl over purl, but to avoid the bind-off edge being tight, you can make 1 yarn over after every 4th stitch at the same time as you bind off (the yarn overs are bind off as normal stitches). The sleeve measures 35-35-34-34-34-34-34 cm / 13¾"-13¾"-13½"-13½"-13½"-13½"-13½" from the separation. Work the other sleeve in the same way. ASSEMBLY: Sew buttons onto left band. |
||||||||||||||||
Diagram explanations |
||||||||||||||||
|
||||||||||||||||

|
||||||||||||||||
|
||||||||||||||||
|
Have you made this or any other of our designs? Tag your pictures in social media with #dropsdesign so we can see them! Do you need help with this pattern?You'll find tutorial videos, a Comments/Questions area and more by visiting the pattern on garnstudio.com. © 1982-2024 DROPS Design A/S. We reserve all rights. This document, including all its sub-sections, has copyrights. Read more about what you can do with our patterns at the bottom of each pattern on our site. |
||||||||||||||||


With over 40 years in knitting and crochet design, DROPS Design offers one of the most extensive collections of free patterns on the internet - translated to 17 languages. As of today we count 304 catalogs and 11422 patterns - 11417 of which are translated into English (US/in).
We work hard to bring you the best knitting and crochet have to offer, inspiration and advice as well as great quality yarns at incredible prices! Would you like to use our patterns for other than personal use? You can read what you are allowed to do in the Copyright text at the bottom of all our patterns. Happy crafting!
Comments / Questions (26)
50g farve 01 natur er ikke nok til størrelse XXL (og følgelig heller ikke til XXXL). Der er nok til bærestykket, men ikke til ærmerne. Jeg har strikket forhøjning i nakken, men selv uden den, ville der ikke have været nok.
26.12.2019 - 19:25HALLO bij pijl 4 staat een uitleg die ik niet zo goed begrijp,
03.11.2019 - 10:13DROPS Design answered:
Dag Hilde,
Op de 5e pijl meerder je het aantal aangegeven steken verdeeld op de toer, net als bij de andere 4 pijlen. Daarna staat aangegeven hoe je A.1 breit. (wat door de meerderingen een beetje anders is). Dus je breit 5 voorbiessteken, de laatste steek in A.1 en dan herhaal je steeds A.1, waarbij je op de laatste herhaling van A.1 alleen de eerste 10 steken in patroon breit. Tot slot nog de 5 voorbiessteken.
05.11.2019 - 10:17Hvor mange gram garn skal jeg bruge hvis jeg vil strikke denne cardigan i kun én farve, i str L og XL?
20.10.2019 - 22:09DROPS Design answered:
Hei Sofie. Det har vi desverre ikke oversikten over, men jeg tipper et sted mellom 400-500 garn. mvh DROPS design
21.10.2019 - 13:22Hei. Jeg har startet på mønsteret, men får det ikke til å stemme. Strikker i str. S og skal da ha 119 masker (minus 5 stolpemasker på hver side) etter 1. økning når mønsteret starter. Hva gjør jeg feil?
28.09.2019 - 23:36DROPS Design answered:
Hej Vibeke, du starter med 92 masker, ved pil 1 tager 27 masker ud jævnt fordelt (over maskerne imellem stolpemaskerne) og har da 119 masker. God fornøjelse!
01.10.2019 - 15:31Vorrei fare questo cardigan in tinta unita con filato A+A per una taglia M quanto filato dovrò ordinare per ogni capo di filo A? Grazie fin d’ora per la cortese risposta.
30.04.2019 - 14:00DROPS Design answered:
Buongiorno Annarosa. A questo link trova le indicazioni utili per sostituire i filati. Per ogni ulteriore aiuto, può rivolgersi al suo rivenditore Drops di fiducia. Buon lavoro!
30.04.2019 - 14:11Når jeg skal øke i str.S, første gang til 119 masker, er da stolpene iberegnet her. Eller blir det 119 masker pluss 10 masker til stolpene? Mvh. Marit
03.02.2019 - 12:26DROPS Design answered:
Hei igjen Marit. Stolpemaskene teller alltid med i det totale maskeantallet, hvis ikke vil dette stå sepesifisert. Husk at du ikke skal øke i stolpemaskene. God fornøyelse.
07.02.2019 - 08:30Hei. Når jeg legger opp til str. S, skal jeg da legge opp 92 masker pluss 10 masker til stolpene? Får ikke mønsteret til å stemme, når jeg begynner på det. Mvh. Marit
03.02.2019 - 12:17DROPS Design answered:
Hei Marit. De 92 maskene du legger opp er inklusive stolpemaskene. dvs at du har 5 stolpemasker i hver side, og 82 masker mellom. God fornøyelse.
07.02.2019 - 08:25Jeg kan simpelt hen ikke få ærmerne til at blive rigtige. De bliver alt for korte og alt for stramme, når jeg følger opskriften. Selve trøjedelen passer fint, men ærmerne er mindst 15 cm. for korte, og med 40 masker i den sidste del, bliver det meget stramt. Jeg strikker den i Air-garn og i str. L. Håber at I kan hjælpe mig venlig hilsen Mette Marboe
31.01.2019 - 10:39DROPS Design answered:
Hei Mette. Ermene på denne genseren er nok litt korte, som du også kan se på målskissen nederst på siden. Når du begynner på ermet har du 64 masker på pinnen, som tilsvarer ca 40 cm rundt. I løpet av ermet skal du felle til du har 40 masker = ca 25 cm rundt. Dette målet skal være rundt håndleddet, men om ditt erme er 15 cm for kort kan det kanskje være derfor det også er for stramt? Strikk gjerne erme lenger før du strikker A.2, og fell med flere omgangers mellomrom. Om du likevel tror det blir for stramt kan du selvfølgelig felle ferre ganger (påse at maskeantallet er delelig med 4, så det går opp i A.2). God fornøyelse.
31.01.2019 - 13:27Hello, I have just completed the elevation at the back of the neck with a knit row, ready to start the diagram A.1. Since my next row is the wrong side, should I treat Row 1 of the diagram A.1 as the wrong side and use purl stitches, or purl one row first before I start A.1? This is my first fair Isle knitting but the cardigan is fo beautiful that I just have to try it! Thank you.
18.01.2019 - 15:57DROPS Design answered:
Dear Eliz, work one more row from WS over all stitches so that diagram will be start with 1st row from RS. Happy knitting!
18.01.2019 - 17:22Bonjour Après les premières augmentations on a 155 mailles pour la tailles XXL ce chiffre n'est pas divisible par les 12 mailles de A1 . Ça ne tombe pas juste est-ce normal ou y-a-t-il une erreur?
16.01.2019 - 11:16DROPS Design answered:
Bonjour Mme Broux, tout à fait, A.1 se tricote ainsi: 5 m de bordure devant, on commence ensuite par la dernière m de A.1, on répète ensuite les 12 m de A.1 (= par ex 12 x 12 = 144 m) et on termine par 5 m de bordure devant soit: 5 + 1 + 144 + 5 = 155 m. Bon tricot!
16.01.2019 - 13:06