
Popular categories
Looking for a yarn?


Comments / Questions (9)
![]() Petra wrote:
Petra wrote:
I can´t find Drops Fabel with this colours......
22.08.2023 - 17:26DROPS Design answered:
Hi Petra, our colourshades are changing time to time, some colours, used in older patterns, are aalready discontinued. Colour 901 and 911 is still available, feel free replace the other 2 colours with a combination of your choice. Happy knitting!
22.08.2023 - 18:27
![]() BARBARA LOWELL wrote:
BARBARA LOWELL wrote:
HI, above you reference in the pattern first 4 strands, then below 6 strands. Can you tell me which it is? Confused.
20.03.2021 - 17:23DROPS Design answered:
Dear Mrs Lowell, you will cast on (and cast off) stitches with 6 strands but work only with 4 strands. Cast on with: 1 strand bourgogne + 1 strand candy + 2 strands yellow/pink + 2 strands fun lilac (= 6 strands) and continue with 1 strand each colour = 1 strand bourgogne + 1 strand candy + 1 strand yellow/pink + 1 strand fun lilac (= 6 strands). And then cast off with 6 strands: 2 strands bourgogne + 2 strands candy + 1 strand yellow/pink + 1 strand fun lilac). Happy knitting!
22.03.2021 - 10:14
![]() Sandra Auger wrote:
Sandra Auger wrote:
Bonjour, je n'ai jamais tricoté avec plusieurs couleurs, là on parle de monter les mailles avec 6 fils / 4 couleurs: est ce que je prends les 6 fils tous ensemble comme un gros fil et tricote avec ? Et lorsqu'il parle de passer à 4 fils ensuite que faire des deux en trop ? ou est ce que cela se fait autrement ? Comment ? De même on parle de rebattre avec 6 fils au lieu de quatre, comment les ajouter alors ? Merci !
10.11.2020 - 16:12DROPS Design answered:
Bonjour Mme Auger, on monte ici effectivement les mailles avec 6 fils comme s'il n'y en avait qu'un, mais on ne va tricoter ensuite qu'avec 4 fils (1 de chaque couleur) - monter les mailles avec 6 fils permet au montage de rester bien souple - on va ensuite rabattre avec 6 fils aussi pour la même raison. Cette vidéo montre par exemple comment monter et rabattre avec 2 fils en tricotant avec 1 seul fil entre temps - on fera de même mais avec 6 fils pour monter et rabattre et 4 fils entre. Bon tricot!
10.11.2020 - 16:53
![]() SANDRA wrote:
SANDRA wrote:
Bonjour, j'aimerais une couverture tout à fait ce style là mais en kid silk ou équivalent niveau chaleur et douceur , qu en pensez vous ? cela vous parait il possible de la faire en kid silk ou avez vous une autre proposition ? merci !
10.10.2020 - 16:19DROPS Design answered:
Bonjour Sandra, vous pouvez remplacer 1 des 4 fils Fabel par 1 fil Kid-silk (-utilisez le convertisseur à cet effet pour connaître la quantité nécessaire) -ou bien vous pouvez vous amuser avec les différentes alternatives: 4 fils A ou bien 2 fils C ou bien 1 fil E. Retrouvez plus d'infos sur les alternatives ici, votre magasin saura - même par mail ou téléphone - vous aider à choisir la laine idéale en fonction de ce que vous souhaitez et recherchez. Bon tricot!
12.10.2020 - 07:52
![]() Silvia wrote:
Silvia wrote:
Verstehe ich es richtig, dass 6 Fäden angeschlagen werden, man dann aber nur mit 4 Fäden strickt ? Und man erst für das Abketten wieder 6 Fäden nutzt? Kann man denn nicht einfach nur mit 4 Fäden anschlagen und mit 4 Fäden abketten? Das wäre doch viel praktischer und billiger. Dann kann ich mir doch zwei Farben a 200g sparen, oder nicht?
29.01.2020 - 15:23DROPS Design answered:
Liebe Silvia, anschlagen und abketten mit 6 Fäden wird die Arbeit locker machen, die ganze Decke wird dann mit nur 4 Fäden gestrickt. Viel Spaß beim stricekn!
29.01.2020 - 15:55
![]() Charlotte wrote:
Charlotte wrote:
Ik zou deze plaid graag breien op formaat +- 150cmx200cm. Hoeveel steken moeten ik opzetten en hoeveel wol moet ik hiervoor aankopen? Alvast bedankt.
30.10.2019 - 16:51DROPS Design answered:
Dag Charlotte,
De hoeveelheid wol kan je uitrekenen door het verschil in oppervlakte. Ik kom op een factor 2,7, dus afgerond op 550 gram per kleur.
Het aantal op te zetten steken kun je uitrekenen aan de hand van de steken verhouding: 9 steken = 10 cm, dus kom je op 135 steken. Deze rond je af op een even getal (i.v.m. het gerstekorrelpatroon.)
05.11.2019 - 13:42
![]() Nancy wrote:
Nancy wrote:
Hello, I could use help with a yarn substitution. I would like to use Alpaca instead, and I can calculate how much I would need if I continue to use four strands per the pattern. But if I wanted to make a lighter-weight blanket and use three strands or even just two, I cannot figure out the quantity. Can you please help? Thank you!
12.07.2019 - 19:34DROPS Design answered:
Dear Nancy, if you use three strands instead of four, your yarm will me smaller, and consequently, your gauge will be different, so you will be knitting more stitches to get the same sized blanket. As always, things also depend on your personal knitting style as well (how thight or loose you are knitting. I would advise to knit a sample swatch and calculate the yarn amount accordingly. For basic sunstitutions you can also use ou yarn converter here. Happy Knitting!
13.07.2019 - 03:08
![]() Antje wrote:
Antje wrote:
151 Guacamole 522 Turquoise/Blue 677 Green-turquoise 914 Shoreline bietet eine wunderschöne Alternative in grün/blau. is a real nice alternative for green/blue hues.
10.05.2019 - 16:56
![]() Grete Larsen wrote:
Grete Larsen wrote:
Mangler i opstrikker så vil jeg gerne strikke modeller for jer. Er en erfaren strikket
08.03.2017 - 09:35
|
|
Sweet Confit#sweetconfitblanket |
|
 |
 |
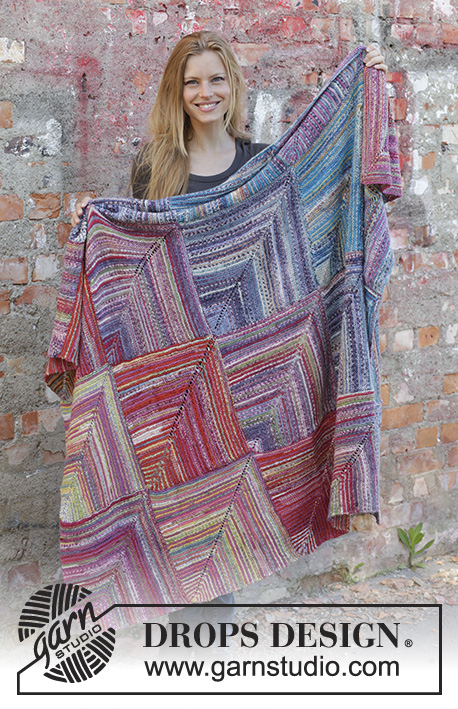
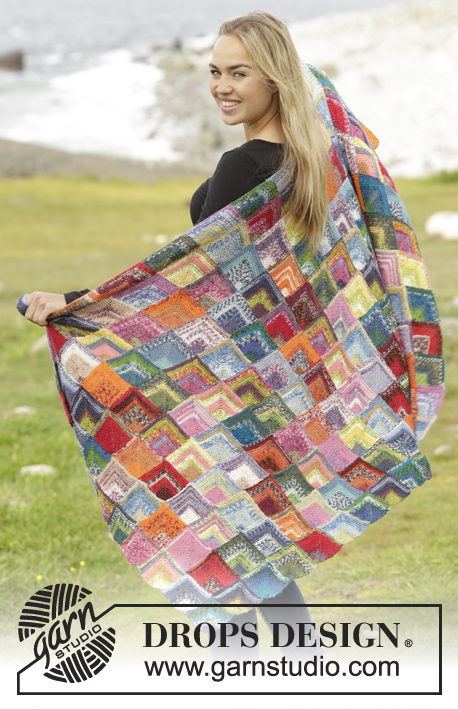
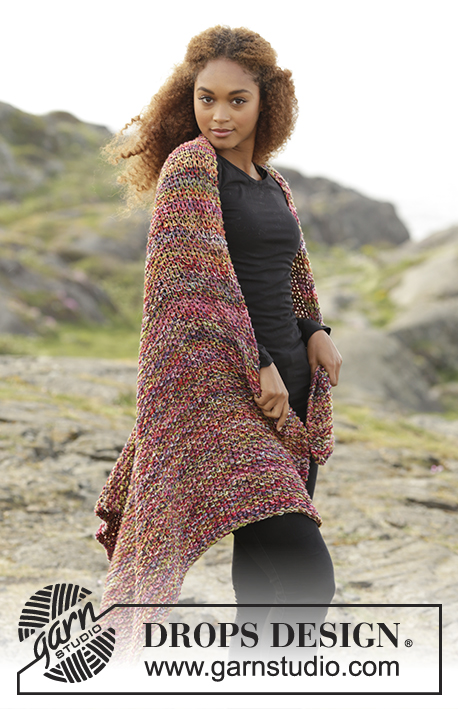
Blanket in moss stitch, knitted in 4 strands DROPS Fabel.
DROPS Extra 0-1364 |
|
|
MOSS STITCH: Row 1: * Knit 1, purl 1 *, repeat from *-*. Row 2: Knit over purl and purl over knit. Repeat 2nd row upwards. ---------------------------------------------------------- BLANKET: Work piece back and forth on circular needle. Cast on 74 stitches on circular needle size 10 mm with 1 strand bourgogne and candy and 2 strands yellow/pink and fun lilac (= 6 strands). Continue with 1 strand of each colour (= 4 strands) in MOSS STITCH - see explanation above. REMEMBER THE KNITTING TENSION Work until almost all of the yarn is used. Cast off with knit over knit and purl over purl with 6 strand (e.g. 2 strands bourgogne and candy + 1 strand yellow/pink and fun lilac). Blanket measures approx. 132 cm. |
|
Have you finished this pattern?Tag your pictures with #dropspattern #sweetconfitblanket or submit them to the #dropsfan gallery. Do you need help with this pattern?You'll find 11 tutorial videos, a Comments/Questions area and more by visiting the pattern on garnstudio.com. © 1982-2025 DROPS Design A/S. We reserve all rights. This document, including all its sub-sections, has copyrights. Read more about what you can do with our patterns at the bottom of each pattern on our site. |
|


With over 40 years in knitting and crochet design, DROPS Design offers one of the most extensive collections of free patterns on the internet - translated to 17 languages. As of today we count 314 catalogues and 11822 patterns translated into English (UK/cm).
We work hard to bring you the best knitting and crochet have to offer, inspiration and advice as well as great quality yarns at incredible prices! Would you like to use our patterns for other than personal use? You can read what you are allowed to do in the Copyright text at the bottom of all our patterns. Happy crafting!
Post a comment to pattern DROPS Extra 0-1364
We would love to hear what you have to say about this pattern!
If you want to leave a question, please make sure you select the correct category in the form below, to speed up the answering process. Required fields are marked *.