


Komentáře / Otázky (16)
![]() Birthe Kjærsgaard napsala:
Birthe Kjærsgaard napsala:
Jeg forstår ikke, hvordan den model skal ende som poncho. Jeg vil gerne se modellen i en helt enkelt tegning. Jeg håber at I kan hjælpe..
30.03.2025 - 19:49
![]() Isabelle napsala:
Isabelle napsala:
Bonjour, je ne comprends pas du tout comment positionner les pièces pour la deuxième couture. Les explications ne sont pas claires pour moi. Pouvez vous m'aider ?
04.08.2024 - 12:06Odpověď DROPS Design :
Bonjour Isabelle, dans cette vidéo, nous montrons comment assembler un poncho tricoté sur la base de 2 rectangles, vous procéderez de la même façon avec vos 2 bandes/rectangles au crochet. Bon assemblage!
05.08.2024 - 07:48
![]() Liesbeth napsala:
Liesbeth napsala:
Beste, ik heb een vraag over het begin en het einde van het haakpatroon nl. over patronen A 1B en A 1A. Bijv. -op het einde van de eerste haakrij na de vaste steken, haken we 3 losse steken en dan patroon A 1A (1 losse steek). Op de volgende haakrij (terug A 1A) komt er dan een stokje in steek. In welke steek moet dit stokje komen? -idem einde 2de haakrij, 4 losse steken. Eerste steek derde rij A 1B (1 stokje in steek). In welke steek moet dit stokje komen? Alvast bedankt
16.05.2024 - 21:40Odpověď DROPS Design :
Dag Liesbeth,
De eerste toer begint aan de rechterkant in de tekening en lees je van rechts naar links en is de eerste toer na de toer met de pijl. Dus je begint met met 1 losse plus 3 lossen en eindigt met 1 vaste. De volgende toer begin je met 4 lossen plus 1 losse dan 1 stokje om de lossenlus enzovoort. Dus deze toer lees je weer van links naar rechts.
20.05.2024 - 19:11
![]() Hottois Maryline napsala:
Hottois Maryline napsala:
Bonjour, pourriez-vous m'expliquer la première ligne de mailles serrées je n'arrive pas à avoir le nombre exacte. Je commence par une maille serrée à la deuxième maille en l'air, une maille serrée dans la maille en l'air suivante puis je ne sais pas. Merci de votre réponse.
26.09.2022 - 17:48Odpověď DROPS Design :
Bonjour Mme Hottois, comme la chaînette de base est souvent trop serrée, vous montez ici plus de mailles en l'air que vous n'avez besoin de mailles serrées, autrement dit, au 1er rang, vous allez sauter des mailles en l'air pour avoir le bon nombre de mailles serrées, soit: 1 ms dans la 2ème ml à partir du crochet, puis 1 ms dans la ml suivante, *sautez 1 ml, 1 ms dans chacune des 3 ml suivantes* (vous crochetez 3 mailles serrées au-dessus de 4 mailles en l'air), répétez de *-* jusqu'à la fin du rang = vous aurez ainsi 48-57-66-75 mailles serrées. Bon crochet!
27.09.2022 - 08:38
![]() Mylène DEPINOY napsala:
Mylène DEPINOY napsala:
Merci à vous bien que je n'ai toujours pas compris ! Une vidéo serait plus compréhensible pour moi. :)
16.04.2021 - 15:53
![]() DEPINOY MYLENE napsala:
DEPINOY MYLENE napsala:
Bonjour, Je ne comprends pas du tout les diagrammes, pourriez-vous me montrer une vidéo pour commencer cet ouvrage et je vous en remercie d'avance! Mylène
16.04.2021 - 15:12Odpověď DROPS Design :
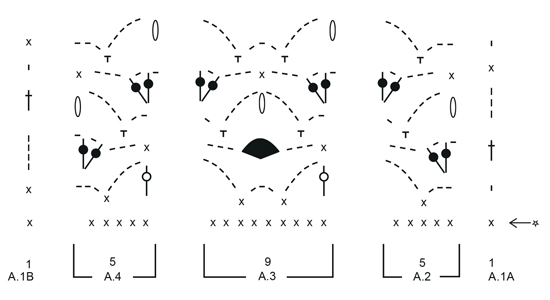
Bonjour Mme Depinoy, vous retrouverez la signification de la chaque symbole sous la légende, crochetez sur l'endroit A.1A (= 1 maille = début du rang), A.2 (= 5 mailles), répétez 4-5-6-7 fois A.3 (=9 mailles ) et terminez par A.4 (= 5 mailles) et A.1B (= 1 maille = fin du rang). Tournez et crochetez: A.1B (=début du rang sur l'envers), et lisez les diagrammes de gauche à droite: A.4; répétez 4-5-6-7 fois A.3, 1 fois A.2 et terminez par A.1A (fin de rang sur l'envers). Retrouvez plus d'infos sur les diagrammes ici. Bon crochet!
16.04.2021 - 15:43
![]() Helle napsala:
Helle napsala:
Hvorfor er den ikke i en skreven opskrift? Jeg er virkelig dårlig til diagrammer.😊
09.01.2021 - 16:14
![]() Kornelia Willing napsala:
Kornelia Willing napsala:
Hallo! Wie geht bitte Luftmaschen mit Paris anschlagen?
26.07.2019 - 22:13Odpověď DROPS Design :
Liebe Frau Willing, "Paris" ist der Name des Garns. Sie schlagen ganz normal Luftmaschen an, und zwar mit dem DROPS Garn Paris. Sie finden alle DROPS Garne unter "Garne". Viel Spaß beim Häkeln!
27.07.2019 - 09:02
![]() Yvette Treglia napsala:
Yvette Treglia napsala:
Je ne sais pas lire un diagramme par quoi faut il commencer j ai une taille m
04.03.2019 - 08:55Odpověď DROPS Design :
Bonjour Mme Treglia, cette leçon explique comment lire des diagrammes: commencez (sur l'endroit) au rang après la flèche et crochetez 1 fois A.1A, puis 1 x A.2, répétez 5 fois A.3 en largeur, puis terminez par A.4 au-dessus des 5 mailles suivantes et A.1B dans la dernière maille. Bon crochet!
04.03.2019 - 11:36
![]() Lohsmann napsala:
Lohsmann napsala:
Vielen Dank für die schnelle Antwort
04.06.2018 - 12:07
|
||||||||||||||||||||||||||||
Arabella#arabellaponcho |
||||||||||||||||||||||||||||
|
|
||||||||||||||||||||||||||||
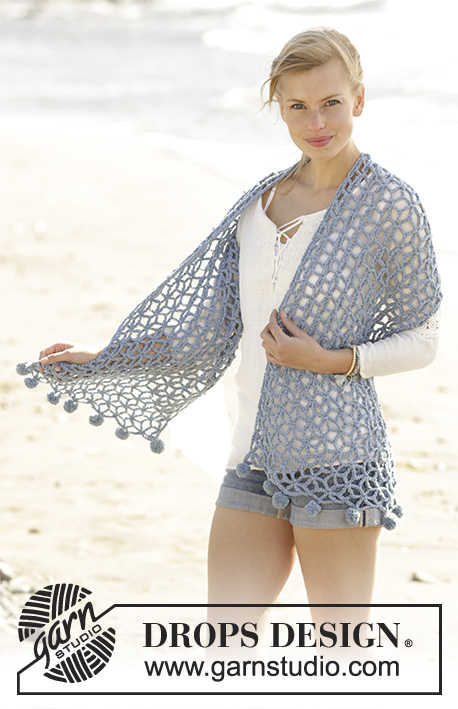
Pončo s krajkovým vzorem háčkované z příze DROPS Paris. Velikost: S – XXXL.
DROPS 177-29 |
||||||||||||||||||||||||||||
|
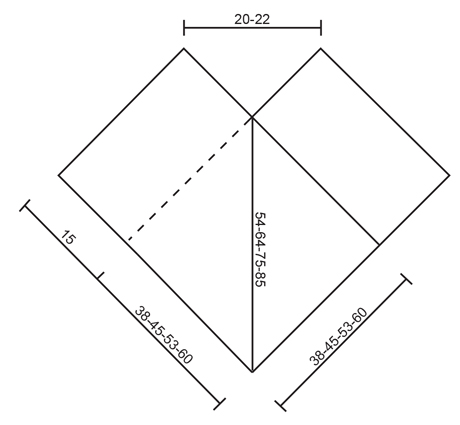
VZOR: Viz schémata A.1 až A.4. ---------------------------------------------------------- PONČO: Uháčkujeme 2 šály (obdélníky), které nakonec sešijeme a vytvoříme z nich pončo. Háčkem č. 5 uháčkujeme přízí Paris 63-75-87-99 řetízkových ok. Do 2. oka od háčku uháčkujeme 1 krátký sloupek (= 2 krátké sloupky), pak háčkujeme 1 krátký sloupek do následujícího řetízkového oka, *1 řetízkové oko vynecháme, po 1 krátkém sloupku do každého z dalších 3 řetízkových ok*, *-* opakujeme v průběhu celé řady = 48-57-66-75 krátkých sloupků. Pokračujeme takto – začínáme 2. řadou ze schématu (= lícová): vzor A.1A (= 1 oko), vzor A.2 nad následujícími 5 krátkými sloupky, nad následujícími A.3 nad dalšími 36-45-54-63 krátkými sloupky (= 4-5-6-7 sekvencí vzoru po 9 okách), vzor A.4 nad dalšími 5 krátkými sloupky a nakonec vzor A.1B (= 1 oko). Pokračujeme v řadách dle schématu. Po dokončení 1 celé sekvence vzoru A.1 až A.4 (na výšku) opskujeme poslední 4 řady ze schématu, a to až do výše asi 68-75-83-90 cm. Práci pak ukončíme a konec příze zapošijeme. Stejným způsobem uháčkujeme druhý díl. DOKONČENÍ: Poslední (uzavřenou) řadu 2. dílu přiložíme k pravé dlouhé straně 1. dílu (nahlíženo z lícové strany) – sesadíme je od dolního rohu a po do výše asi 38-45-53-60 cm sešijeme drobnými stehy – dbáme na to, abychom díly příliš nenatahovali. Máme hotovou přední stranu ponča. Obdobně pak sesadíme a sešijeme první řadu 1. dílu s pravou dlouhou stranou 2. dílu. POZN.: díly můžeme místo sešívání také sháčkovat, takto: 1 krátký sloupek do 1. oka na 2. dílu, 1 krátký sloupek do 1. oka na 1. dílu, *2 řetízková oka, asi 1 cm vynecháme, 1 krátký sloupek do dalšího oka na 2. dílu, 1 řetízkové oko, 1 krátký sloupek do dalšího oka na 1. dílu*, *-* opakujeme podél celého okraje. Pak práci ukončíme. |
||||||||||||||||||||||||||||
Vysvětlivky ke schématu |
||||||||||||||||||||||||||||
|
||||||||||||||||||||||||||||
|
||||||||||||||||||||||||||||
|
||||||||||||||||||||||||||||
Dokončili jste tento model?Pak označte své fotky tagem #dropspattern #arabellaponcho nebo je pošlete do galerie #dropsfan. Potřebujete s tímto návodem poradit?Otevřete-li si návod na stránce garnstudio.com, najdete tam 5 výukových video-ukázek, Komentáře/Dotazy a další užitečné informace. © 1982-2025 DROPS Design A/S. Vyhrazujeme si veškerá práva. Tento dokument, včetně všech jeho dílčích částí, podléhá autorským právům. Podrobnější komentář k možnostem užití našich návodů najdete dole pod každým návodem na našich stránkách. |
||||||||||||||||||||||||||||


V oblasti pletené a háčkované módy působí DROPS Design více než 40 let. Díky tomu vám můžeme nabídnout jednu z nejrozsáhlejších kolekcí modelů s bezplatnými návody dostupnými na internetu - navíc v 17 jazycích. K dnešnímu dni máme na 314 katalogů a 11822 návodů celkem - z nich je už 7048 dostupných v [češtině].
Přidejte komentář k návodu DROPS 177-29
Rádi bychom věděli, co si o tomto modelu myslíte!
Pokud se chcete na něco zeptat, dbejte prosím na to, abyste ve formuláři níže vybrali správnou kategorii - díky tomu se dříve dozvíte, co potřebujete vědět. Povinná pole jsou označena *.