
Popular categories
Looking for a yarn?


Comments / Questions (21)
![]() Leanne wrote:
Leanne wrote:
I love this design but I am having problems with the following part . Work the 3rd row in the diagrams from the wrong side as follows: Work A.4c, work A.4b in total 5-5-6-6-7-7 times in width, work 3 chain stitches and 1 double crochet around the next chain space. Cut the strand. NOTE: This row is worked so that the side flares out a little at the bottom. What does it mean to work from the wrong side and in width? Do I crochet 5 more rows of 3rd row
05.02.2024 - 10:48
![]() Simonnet Emmanuelle wrote:
Simonnet Emmanuelle wrote:
Je bloque sur l'explication du côté. La phrase "crocheter le 3eme et le 4 eme rang de A4a A4b et A4c. " Ces diagrammes ont 5 rangs. Prend t'on en compte le 1er rang?
03.05.2022 - 17:22DROPS Design answered:
Bonjour Mme Simonet, pour le côté gauche (coins B-C), vous crochetez d'abord les rangs 2, 3 et 4 puis vous crochetez encore 1 à 4 fois les rangs 3 et 4 (= encore 2 rangs d'arceaux x 1, 2, 3 ou 4 selon la taille), vous aurez ainsi davantage d'arceaux en hauteur. Bon crochet!
04.05.2022 - 07:53
![]() Helene wrote:
Helene wrote:
Jeg sidder med venstre side og bøvler med hvad 3. og 4. række, er. Hvornår skal man hækle 5. række? Hvis de der gentages er de to sidste rækker, passer det ikke med 5 lm-rækker men det passer med 11 buer. Var det ikke en ide at tegne et diagram for hele siden?
24.04.2022 - 14:02
![]() Pia wrote:
Pia wrote:
Hej. Var det ikke muligt, at få en opskrift, på en ikke , så kompliceret hæklet bluse? Så alle kan være med😊
30.06.2021 - 13:42DROPS Design answered:
Hej Pia, her har du flere hæklede bluser at vælge imellem: Bluser - Hæklet
30.06.2021 - 15:05
![]() EJF wrote:
EJF wrote:
I'm working on the initial square -- when I got to the end of the A.1 charts everything was fine. Size was a perfect 8 1/4". Now I've just finished the A.2 charts (an additional 5 rounds) and the square is only 12", not 13.5" as expected -- a huge difference. I am baffled as to how this happened. Instructions say 'start in 3rd row' of the A.2 charts, which I did, and what I have matches the picture. Any idea where this went wrong?
30.03.2021 - 02:40
![]() Lorena wrote:
Lorena wrote:
Si en los lados quedan 11 arcos, es imposible hacer lo siguiente porque se necesitan 13 arcos (talla M): 4 puntos altos dentro del mismo arco, 5 puntos altos dentro de cada uno de los siguientes 4 arcos, 3 puntos altos dentro del siguiente arco, continuar con 5 puntos altos en cada uno de los siguientes 6 arcos y 2 puntos altos en el último arco. Ayuda por favor, donde estan los 2 arcos que faltan? O hay un error en el patron?
26.10.2020 - 02:25DROPS Design answered:
Hola Lorena, se cuentan los 3 puntos de cadeneta a cada lado como arcos, por lo que los 11 arcos + los 3 puntos de cadeneta a cada lado = 13 arcos.
20.11.2020 - 23:51
![]() Ann Kathrine wrote:
Ann Kathrine wrote:
Hej. Jeg er i fuld gang, men jeg kan ikke få rapporterne til at passe videre ned over rygstykket. I 2. Afsnit står der at A2.b skal hækles 8 rapporter i bredden over de 122 stangmasker. Her får jeg plads til 9 rapporter. Kan I være behjælpelige?
09.05.2019 - 14:34
![]() Eva wrote:
Eva wrote:
Beställt det rekommenderade garnet och det är så många trådar som inte håller ihop så arbetet ser ut som en trasmatta bestående av rivna lakan.☹️
04.04.2019 - 20:23DROPS Design answered:
Hei Eva. Det var leit å høre. Dersom det er noe feil med garnet har du sikkert reklamasjonsrett der du kjøpte det. Men være klar over at de enkelte trådene i bommulsgarn ikke henger like tett sammen som i feks ullgarn, på grunn av teksturen i fibrene. Men dette skal ikke være noe problem, og det skal gå helt fint ann å hekle med garnet på vanlig måte. God fornøyelse
11.04.2019 - 15:16
![]() D. Severijns wrote:
D. Severijns wrote:
Rechterschouder. Bij de 3e toer (dus als je voor de 1e keer keert) staan bij A4c 3 kleine verticale streepjes boven elkaar. Wat is dat voor steek? Een verticaal streepje is een halve vaste. Maar ik begrijp niet hoe ik hier 3 hv moet verwerken.
06.08.2018 - 16:16DROPS Design answered:
Dag D. Severijns, Die streepjes zijn lossen. (Zowel verticale als horizontale streepjes zijn dus lossen.)
07.08.2018 - 09:13
![]() Jette wrote:
Jette wrote:
Jeg mener, der er en trykfejl, jeg kunne i hvert fald ikke luftmaskbuerne til at stemme. Ventre side 3. sidste linje : 6-6-7-7-8-8 Der mener jeg der skal stå 5-5-6-6-7-7.
29.05.2018 - 23:30DROPS Design answered:
Hej Jette, Vi har ikke hørt at der skal være fejl, men vi skal prøve at få design til at se på det :)
30.05.2018 - 15:06
|
||||||||||||||||||||||||||||||||||||||||||||||||||||
Rose Window#rosewindowtunic |
||||||||||||||||||||||||||||||||||||||||||||||||||||
|
|
||||||||||||||||||||||||||||||||||||||||||||||||||||
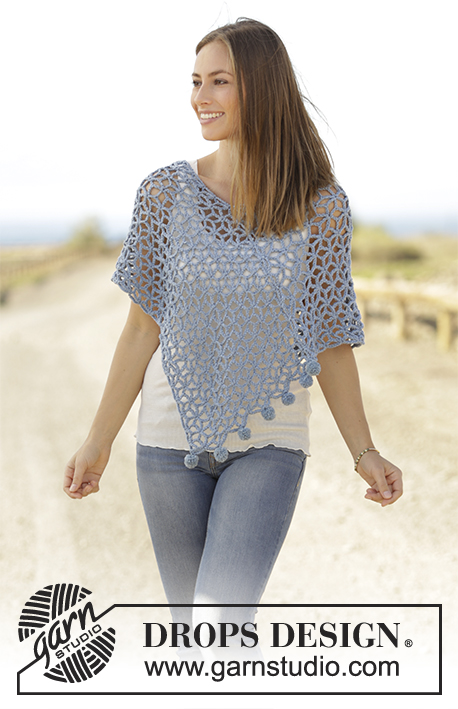
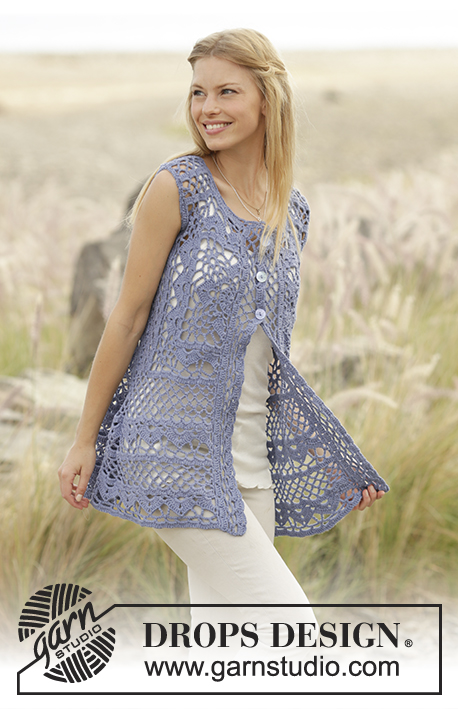
Tunic with crochet squares and lace pattern, worked from top down in DROPS Cotton Light. Sizes S - XXXL.
DROPS 177-31 |
||||||||||||||||||||||||||||||||||||||||||||||||||||
|
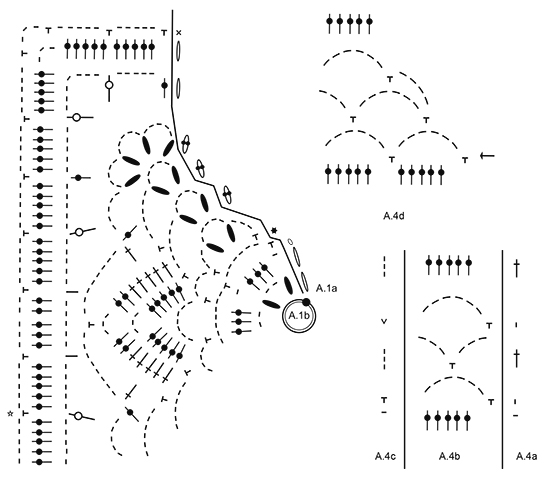
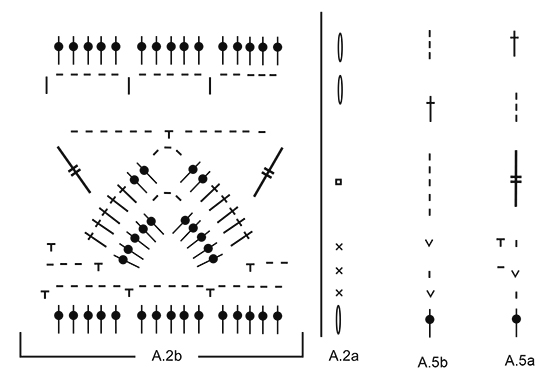
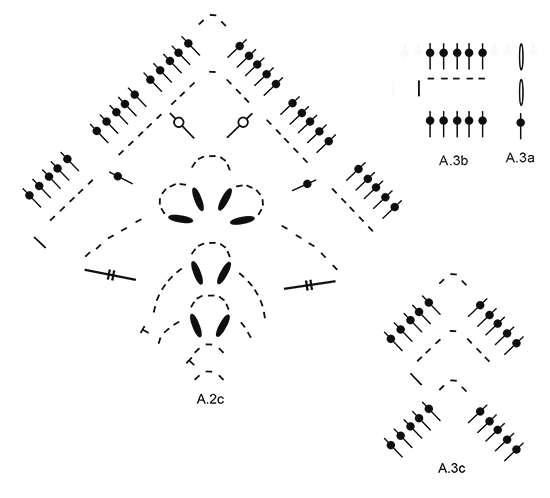
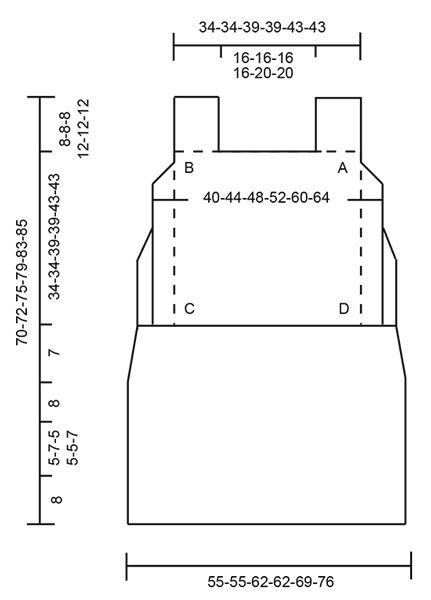
CROCHET INFO: At the beginning of each row with treble crochet, replace the first treble crochet with 3 chain stitches. INCREASE TIP: Increase in each side by working an extra chain space (= 6 chain stitches and 1 double crochet) around the first and last chain spaces on the row (= chain space with 3 chain stitches). PATTERN: See diagrams A.1 to A.5 ---------------------------------------------------------- TUNIC: First work a crochet square, then work the shoulders and sides on this and finally work the body downwards. The back and front pieces are the same. BACK PIECE: CROCHET SQUARE: Start with hook size 3 mm and Cotton Light and work the pattern from diagram A.1b in total 4 times on the round. Diagram A.1a shows how the round begins and finishes. REMEMBER THE CROCHET TENSION! When the whole of diagrams A.1a and A.1b are completed in height, the crochet square measures approx. 21 x 21 cm. Cut the strand. Start in the double crochet marked with a star on the last round of A.1b and work from the 3rd round in the diagrams as follows: Work A.2a in the double crochet (A.2a shows how the round starts and finishes), work A.2b over the first 3 chain spaces, * work A.2c (= corner), work A.2b over the next 9 chain spaces (= 3 repeats) *, repeat from *-* 2 more times, work A.2c in the corner and finish with A.2b over the remaining 6 chain spaces (= 2 repeats) on the round. When the last round in A.2a to A.2c are completed, the crochet square measures approx. 34 x 34 cm. Now the crochet square in sizes S and M is finished. For sizes L, XL, XXL and XXXL continue as follows: Work 2 chain stitches, start the 2nd row in the diagrams and work A.3a (shows how the round starts and finishes), work A.3b the whole round but in each corner work A.3c. When the diagrams have been completed in height, the crochet square measures approx. 39 x 39 cm and the crochet square for sizes L and XL is finished. For sizes XXL and XXXL repeat the last 2 rounds of A.3 1 more time in height. The crochet square measures approx. 43 x 43 cm and sizes XXL and XXXL are finished. Cut the strand. RIGHT SHOULDER: Start on the 2nd row in the diagrams and work the shoulder back and forth as follows: Work A.4a around the chain space in corner A – see the sketch, work A.4b over the next 20-20-25-25-25-25 treble crochet (4-4-5-5-5-5 repeats), work A.4c around the space between the next 2 treble crochet. Turn and continue in this way back and forth until A.4a to A.4c are complete in height. Then repeat rows 2-5, 1-1-1-2-2-2 times in height. The shoulder measures approx. 8-8-8-12-12-12 cm from the crochet square. Cut and fasten the strand. LEFT SHOULDER: Skip 35-35-35-35-45-45 treble crochet for the neck after the right shoulder = 20-20-25-25-25-25 treble crochet for the left shoulder. Around the space between the next 2 treble crochet fasten the strand with 1 double crochet. Start on the 2nd row in the diagrams and work A.4a, work A.4b over the next 20-20-25-25-25-25 treble crochet (= 4-4-5-5-5-5 repeats), work A.4c around the chain space in corner B (see sketch). Then repeat rows 2-5 in the diagram 1-1-1-2-2-2 times more in height. Cut and fasten the strand. LEFT HAND SIDE (between corners B and C – see sketch): Skip 15 treble crochet in all sizes from the chain space in corner B. Start on the 2nd row in the diagrams and work A.4d over the next 10 treble crochet, work A.4b over the next 50-50-60-60-70-70 treble crochet, finish with A.4c around the chain space in corner C on the crochet square (= 12-12-14-14-16-16 chain spaces). Turn and work back and forth until the 4th row in the diagrams is completed in height. You have now decreased 1 chain space in A.4d = 11-11-13-13-15-15 chain spaces. Work the 3rd and 4th row in A.4a, A.4b and A.4c 0-1-1-2-3-4 more times in height (= 3-5-5-7-9-11 rows of chain spaces). There are now 11-11-13-13-15-15 chain spaces on the left side. Work the 3rd row in the diagrams from the wrong side as follows: Work A.4c, work A.4b in total 5-5-6-6-7-7 times in width, work 3 chain stitches and 1 double crochet around the next chain space. Cut the strand. NOTE: This row is worked so that the side flares out a little at the bottom. Fasten the strand with 1 double crochet around the top chain space in the side seen from the right side (i.e.the chain space outermost by the armhole), work 3 chain stitches (= 1 treble crochet) – READ CROCHET INFO, work 4 treble crochet around the same chain space, work 5 treble crochet around each of the next 4-4-5-5-6-6 chain spaces (= all the way to the last chain space worked on the previous row), work 3 treble crochet around the next chain space, continue with 5 treble crochet around each of the next 6-6-7-7-8-8 chain spaces and work 2 treble crochet around the last chain space (= chain space with 3 chain stitches) = 55-55-65-65-75-75 treble crochet. Now the side is finished. Cut and fasten the strand. RIGHT HAND SIDE (between corners A and D – see sketch) The right hand side is worked in the same way as the left hand side but in reverse. Work from the wrong side and skip 15 treble crochet from the chain space in corner A. Do not cut the strand when the last row of treble crochet is complete. CONTINUING DOWN THE BOTTOM OF BACK PIECE: THE PIECE IS NOW MEASURED FROM HERE! Now continue to work down the bottom of back piece, back and forth over the bottom edge of the sides and the crochet square. Start from the wrong side and work the 2nd row as follows: Work A.4a (= 1 chain stitch on the 2nd row), work 3-4-4-5-6-7 repeats of A.4b along the bottom edge on the right hand side, continue with A.4b over the 75-75-85-85-95-95 treble crochet on the crochet square (between corners D and C), work 3-4-4-5-6-7 repeats of A.4b along the bottom edge on the left hand side and finish with A.4c around the last treble crochet = 21-23-25-27-31-33 chain spaces. Work the 3rd and 4th rows in the diagrams 3 times (= in total 7 rows of chain spaces) AT THE SAME TIME as you increase 1 chain space each time the 4th row is worked – READ INCREASE TIP = 27-29-31-33-37-39 chain spaces. The piece measures approx. 7 cm. Work the next row from the right side as follows: Work 4 treble crochet around each chain space while at the same time increasing 14-6-13-5-4-11 treble crochet evenly along the row = 122-122-137-137-152-167 treble crochet. Start on the 2nd row in the diagrams and work as follows: Work A.5a, work A.2b (= 8-8-9-9-10-11 repeats in width), work A.5b. On the last row of the diagrams increase 15-25-20-30-35-30 treble crochet evenly along the row = 137-147-157-167-187-197 treble crochet. When the diagrams are completed in height the piece measures approx. 15 cm. Start on the 2nd row in the diagrams and work as follows: Work A.4a over A.5a, work A.4b until there is 1 treble crochet left on the row, work A.4c over A.5b (= 27-29-31-33-37-39 chain spaces). Repeat the 3rd and 4th row until you have worked 5-7-5-5-5-7 rows with chain spaces in height. The piece measures approx. 20-22-20-20-20-22 cm. Work the next row as follows: Work 4 treble crochet around each chain space while at the same time increasing 14-6-13-5-4-11 treble crochet evenly along the row = 122-122-137-137-152-167 treble crochet. Now work the pattern starting from row 2 in the diagrams as follows: Work A.5a, work A.2b (= 8-8-9-9-10-11 times in width), work A.5b. When the diagrams have been completed in height, the piece measures approx. 70-70-75-79-83-85 cm from the shoulder. Cut and fasten the strand. FRONT PIECE: Work the front piece in the same way as the back piece. NOTE: The sketch shows the back piece. This means that when the front piece is worked, the right side is between B and C and the left side is between A and C. ASSEMBLY: Sew the shoulder seams together in the outermost loop of the outermost stitch so that the seam is not thick. Lay the side of the front piece towards the side of the back piece and crochet the sides together from the right side as follows: Start with 1 double crochet in the first treble crochet towards the armhole, work 3 chain stitches, work 1 double crochet in the treble crochet on the opposite side, * work 3 chain stitches, skip approx. 1 cm, work 1 double crochet in the treble crochet/around the chain space on the other side *, repeat from *-* down along the whole side. Cut and fasten the strand. Work the other side in the same way. NECKLINE: ROUND 1: Start mid-top of the shoulder and work 1 double crochet, * work 3 chain stitches, skip approx. 1 cm, 1 double crochet *, repeat from *-* around the whole neck. The number of chain spaces should be even. Finish with 1 slip stitch in the first double crochet and work slip stitch across to the middle of the first chain space. ROUND 2: Work 1 double crochet around the same chain space, * Work 5 chain stitches, skip 1 chain space, 1 double crochet around the next chain space* , repeat from *-* around the whole neck but finish with 1 slip stitch in the first double crochet of the round. Cut and fasten the strand. SLEEVE EDGE: Start with 1 double crochet mid under the armhole, * work 3 chain stitches, skip approx. 1 cm, 1 double crochet *, repeat from *-* around the whole armhole, but finish with 1 slip stitch in the first double crochet. Cut and fasten the strand. Repeat around the other armhole. |
||||||||||||||||||||||||||||||||||||||||||||||||||||
Diagram explanations |
||||||||||||||||||||||||||||||||||||||||||||||||||||
|
||||||||||||||||||||||||||||||||||||||||||||||||||||
|
||||||||||||||||||||||||||||||||||||||||||||||||||||
|
||||||||||||||||||||||||||||||||||||||||||||||||||||
|
||||||||||||||||||||||||||||||||||||||||||||||||||||
|
||||||||||||||||||||||||||||||||||||||||||||||||||||
Have you finished this pattern?Tag your pictures with #dropspattern #rosewindowtunic or submit them to the #dropsfan gallery. Do you need help with this pattern?You'll find 11 tutorial videos, a Comments/Questions area and more by visiting the pattern on garnstudio.com. © 1982-2025 DROPS Design A/S. We reserve all rights. This document, including all its sub-sections, has copyrights. Read more about what you can do with our patterns at the bottom of each pattern on our site. |
||||||||||||||||||||||||||||||||||||||||||||||||||||


With over 40 years in knitting and crochet design, DROPS Design offers one of the most extensive collections of free patterns on the internet - translated to 17 languages. As of today we count 314 catalogues and 11822 patterns translated into English (UK/cm).
We work hard to bring you the best knitting and crochet have to offer, inspiration and advice as well as great quality yarns at incredible prices! Would you like to use our patterns for other than personal use? You can read what you are allowed to do in the Copyright text at the bottom of all our patterns. Happy crafting!
Post a comment to pattern DROPS 177-31
We would love to hear what you have to say about this pattern!
If you want to leave a question, please make sure you select the correct category in the form below, to speed up the answering process. Required fields are marked *.