
Oblíbené kategorie
Hledáte přízi?


|
|||||||||||||||||||
All Smiles |
|||||||||||||||||||
 |
 |
||||||||||||||||||
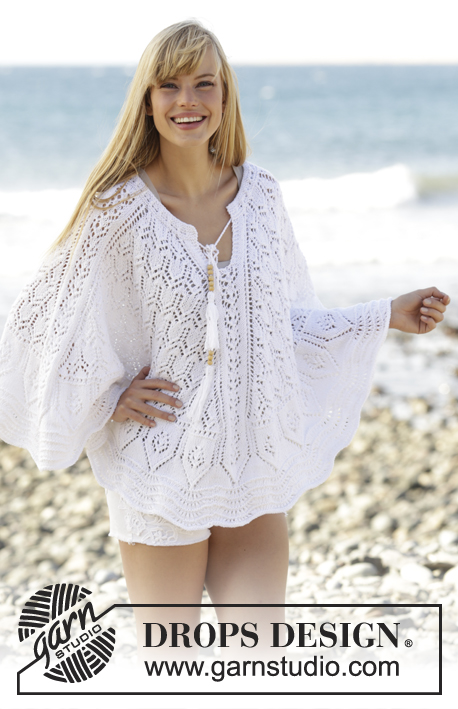
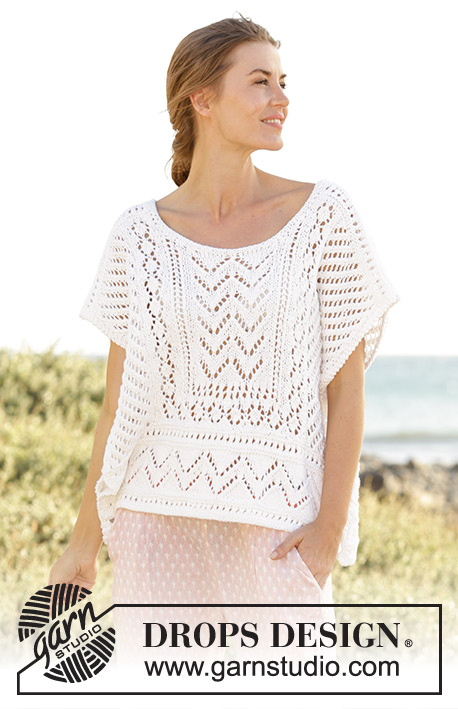
DROPS volná krajková halena - top pletená z příze "Paris". Velikost: S-XXXL.
DROPS 170-18 |
|||||||||||||||||||
|
VROUBKOVÝ VZOR: Pleteme stále hladce, lícové i rubové řady. 1 vroubek = 2 řady hladce. KRAJKOVÝ VZOR: Viz schémata A.1 až A.4; zobrazeny jsou všechny řady vzoru nahlížené z lícové strany. ---------------------------------------------------------- TOP: Pleteme ve dvou dílech. ZADNÍ DÍL: Pleteme v řadách na kruhové jehlici. Na kruhovou jehlici č.3,5 nahodíme přízí Paris 91-103-115-127-139 ok a první řadu – lícovou – pleteme takto: 3 krajní oka vroubkovým vzorem – viz výše, vzor A.1 – sekvenci vzoru opakujeme až po poslední 4 oka, pak upleteme 1. oko vzoru A.1 a končíme 3 krajními oky vroubkovým vzorem. V tomto rozvržení vzorů pokračujeme – POZN.: v 7. řadě vzoru pleteme na konci řady 1. oko vzoru A.1 lícovým žerzejem. Po dokončení 1 celé sekvence vzoru A.1 (na výšku) převedeme pleteninu na kruhovou jehlici č.4,5 a následující lícovou řadu pleteme takto: 3 krajní oka vroubkovým vzorem, následujících 72-84-96-108-120 ok pleteme vzorem A.2A (= 6-7-8-9-10 sekvencí vzoru po 12 okách), vzor A.2B (= 13 ok) a končíme 3 krajními oky vroubkovým vzorem. V tomto rozvržení vzorů pokračujeme. Po dokončení 1 celé sekvence vzoru A.2 (na výšku) pleteme opět vzor A.1 stejně jako dříve se 3 krajními oky vroubkovým vzorem na každé straně. V předposlední řadě vzoru A.1 (tj. z lícové strany) končí postranní rozparky a proto nahodíme na konci této řady 1 nové oko (krajové oko pro postranní šev). Upleteme poslední řadu vzoru A.1 a SOUČASNĚ ujmeme rovnoměrně 6 ok (platí pro všechny velikosti) a na konci řady opět nahodíme 1 nové oko (krajové oko pro postranní šev) = na jehlici máme 87-99-111-123-135 ok. Pokračujeme takto (1. řada = lícová): 1 krajové oko vroubkovým vzorem, následujících 15-21-27-33-39 ok pleteme vzorem A.4A, vzor A.3A (= 55 ok), dalších 15-21-27-33-39 upleteme vzorem A.4B a končíme 1 krajovým okem vroubkovým vzorem. V tomto rozvržení vzorů pokračujeme. Po dokončení 1 celé sekvence vzoru A.3A (na výšku) pleteme nad prostředními 55 oky vzor A.3B (ostatní oka pleteme jako dříve). SOUČASNĚ ve výši 32-33-34-35-36 cm nahodíme na konci každé z následujících 2 řad 5 nových ok (= rukávky) = na jehlici máme 97-109-121-133-145 ok. Pokračujeme takto: 3 krajní oka vroubkovým vzorem (= lem rukávku), dalších 18-24-30-36-42 ok pleteme vzorem A.4A (dbáme na to, aby vzor plynule navazoval), nad následujícími 55 oky pokračujeme vzorem A.3B jako dosud, dalších 18-24-30-36-42 ok pleteme vzorem A.4B a končíme 3 krajními oky vroubkovým vzorem (= lem rukávku). Pleteme do výše 54-56-58-60-62 cm, končíme rubovou řadou. Pleteninu převedeme na kruhovou jehlici č.3,5 a pleteme v řadách vzor A.1 se 3 krajními oky vroubkovým vzorem na každé straně. SOUČASNĚ ve výši 55-57-59-61-63 cm uzavřeme prostředních 27-27-31-31-31 ok (= průkrčník) a obě náramenice dokončíme odděleně. Pokračujeme vzorem jako dosud a v následující řadě uzavřeme na každé straně průkrčníku 1 oko = zbývá 33-39-43-49-55 ok každé náramenice. Po dokončení celé sekvence vzoru A.1 všechna oka VOLNĚ hladce z lícové strany uzavřeme. PŘEDNÍ DÍL: Nahodíme a pleteme stejně jako zadní díl až do výše 44-46-48-50-52 cm. Pak odložíme prostředních 15-15-19-19-19 ok na pomocnou jehlici (= průkrčník) a každou náramenici dokončíme odděleně. Pokračujeme vzorem jako dosud a SOUČASNĚ tvarujeme průkrčník: uzavíráme na jeho okrajích v každé řadě 2x 2 oka a 4x 1 oko = zbývá 33-39-43-49-55 ok každé náramenice. Pleteme do výše 54-56-58-60-62 cm, končíme rubovou řadou. Pleteninu převedeme na kruhovou jehlici č.3,5 a pleteme v řadách vzor A.1 s 1 krajním okem vroubkovým vzorem na okrajích průkrčníku a 3 krajními oky vroubkovým vzorem na okrajích rukávků. Po dokončení celé sekvence vzoru A.1 všechna oka VOLNĚ hladce z lícové strany uzavřeme. DOKONČENÍ: Sešijeme náramenice. Sešijeme rukávové a postranní švy až k rozparkům. LEM PRŮKRČNÍKU: Z lícové strany nabereme krátkou kruhovou jehlicí č.3,5 přízí Paris z okraje průkrčníku asi 94 až 114 ok (včetně odložených ok z pomocné jehlice) a upleteme 1 kruhovou řadu obrace, 1 hladce a 1 obrace. Pak všechna oka volně hladce uzavřeme. |
|||||||||||||||||||
Vysvětlivky ke schématu |
|||||||||||||||||||
|
|||||||||||||||||||

|
|||||||||||||||||||

|
|||||||||||||||||||

|
|||||||||||||||||||
|
Vyrobili jste si tento nebo nějaký jiný z našich modelů? Přidejte ke svým fotkám na sociálních sítích tag #dropsdesign - díky tomu je uvidíme i my! Potřebujete s tímto návodem poradit?Otevřete-li si návod na stránce garnstudio.com, najdete tam výukových video-ukázek, Komentáře/Dotazy a další užitečné informace. © 1982-2024 DROPS Design A/S. Vyhrazujeme si veškerá práva. Tento dokument, včetně všech jeho dílčích částí, podléhá autorským právům. Podrobnější komentář k možnostem užití našich návodů najdete dole pod každým návodem na našich stránkách. |
|||||||||||||||||||


V oblasti pletené a háčkované módy působí DROPS Design více než 40 let. Díky tomu vám můžeme nabídnout jednu z nejrozsáhlejších kolekcí modelů s bezplatnými návody dostupnými na internetu - navíc v 17 jazycích. K dnešnímu dni máme na 304 katalogů a 11422 návodů celkem - z nich je už 6292 dostupných v češtině.
Komentáře / Otázky (16)
Bonjour, quelqu'un aurait des photos du mod_le en gros plan sur les differentes parties de la dentelle ? je traville mieux au visuel et le modele est photographié trop loin, c'est difficile avec seulement le diagramme ! Merci
16.06.2023 - 12:40DROPS Design answered:
Bonjour Aliceopays, nous avons ajouté quelques photos supplémentaires, elles pourront peut-être vous aider. Retrouvez également ici comment lire un diagramme. Bon tricot!
27.07.2023 - 09:14If i start with 127 stiches on the needles and row 7 in chart A1 says to knit 2 together accross the row how can i still have over 100 sriches for the next direction?
11.07.2021 - 05:07DROPS Design answered:
Dear Jb, work the 127 sts as follows: 3 sts in garter stitch, repeat (K2 tog, yarn over) a total of 60 times (= over the next 120 sts) until 4 sts remain, knit 1stitch and end with 3 sts in garter stitch = there are still 127 sts on needle Happy knitting!
12.07.2021 - 07:35Merci pour ce très joli modèle ! Après avoir monté les mailles, je tricote le 1er rang qui se trouve à l’envers de l’ouvrage Par conséquent, comment l’avant dernier rang est-il à l’endroit de l’ouvrage (d’après vos explications) Merci de m’éclairer ! Par ailleurs, que signifie « NOTE: Au 7ème rang du diagramme, tricoter la 1ère m de A.1 en jersey à la fin du rang. » Merci pour votre aide !
11.05.2021 - 19:54DROPS Design answered:
Bonjour Yasmine, dans ce modèle, le premier rang se tricote sur l'endroit comme indiqué, avec le 1er rang du diagramme = sur l'endroit (rangs pairs = envers). Au 7ème rang de A.1, vous répétez A.1 jusqu'à ce qu'il reste 4 mailles, tricotez 1 maille jersey (= à l'endroit sur l'endroit) et 3 mailles point mousse. Bon tricot!
12.05.2021 - 07:01Wie fasse ich die Maschen am Halsausschnitt auf? Ist die strickarbeit dabei auf der rechten Seite? Und fasse ich die zuvor abgeketteten Maschen vorn oder hinten auf?
10.04.2021 - 22:20DROPS Design answered:
Liebe Frau Ehwald, die Maschen vom Feden stricken Sie so, dann fassen Sie die Maschen so quer und so seitlich. Viel Spaß beim stricken!
12.04.2021 - 08:30Werden bei drops 170-18 keine Randmaschen gestrickt?
11.03.2021 - 14:10DROPS Design answered:
Liebe Frau Ehwald, bei diesem Modell werden die 3 ersten und die 3 letzten Maschen jeder Reihe (= Hin- sowie Rückreihe) kraus rechts gestrickt, dh keine extra Randmaschen sind anzuschlagen. Viel Spaß beim stricken!
11.03.2021 - 14:37Bei drops 170-18 werden im Muster A1 in der 7. REIHE immer 2 Maschen zusammen gestrickt. Dadurch halbiert sich die Maschenanzahl auf der Nadel. Aber das kann doch nicht sein.
10.03.2021 - 23:31DROPS Design answered:
Liebe Frau Ehwald, bei der 7. Reihe in A.1 stricken Sie die ganze Reihe (2 Maschen rechts zusammen, 1 Umschlag), so bleibt die Maschenanzahl gleich, denn der Umschlag die Abnahme ausgleichen. Viel Spaß beim stricken!
11.03.2021 - 08:21Grazie mille, siete gentilissimi
19.05.2020 - 16:56Buongiorno, anche questo modello è bellissimo, vorrei sapere se si può lavorare in tondo senza spacchi laterali e fino a dove? Grazie
19.05.2020 - 10:33DROPS Design answered:
Buongiorno Dea. Può lavorare in tondo, senza spacchi laterali, fino a quando non vengono avviate le 5 maglie ai lati per le maniche. Buon lavoro!
19.05.2020 - 13:19Hej! Har beställt garn till denna objekt, undrar hur jag räknar maskorna, vill sticka del hel till armhålan? Alltså runt på en rundsticka. Mvh Ros-Marie
22.07.2019 - 07:39Einfach fantastisch, diese Kollektion, wo soll ich nur anfangen, eins schöner als das andere, herrlich, danke, tausendmal danke!!!
10.02.2016 - 09:23