
Popular categories
Looking for a yarn?


|
|||||||||||||||||||||||||||||||
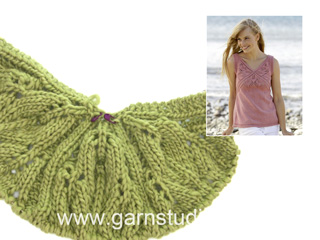
Butterfly Heart |
|||||||||||||||||||||||||||||||
 |
 |
||||||||||||||||||||||||||||||
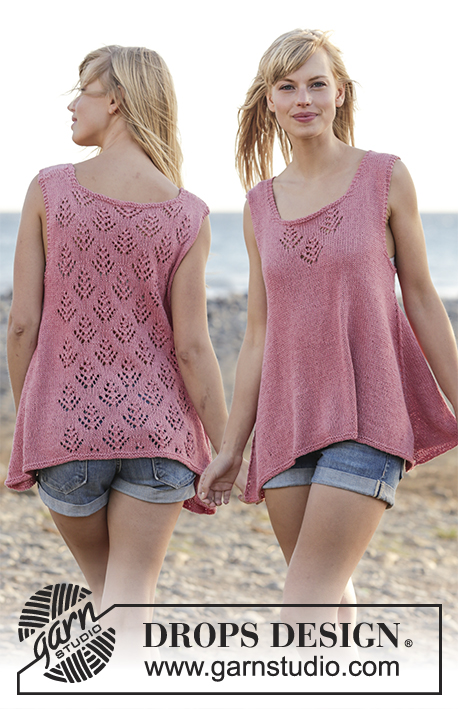
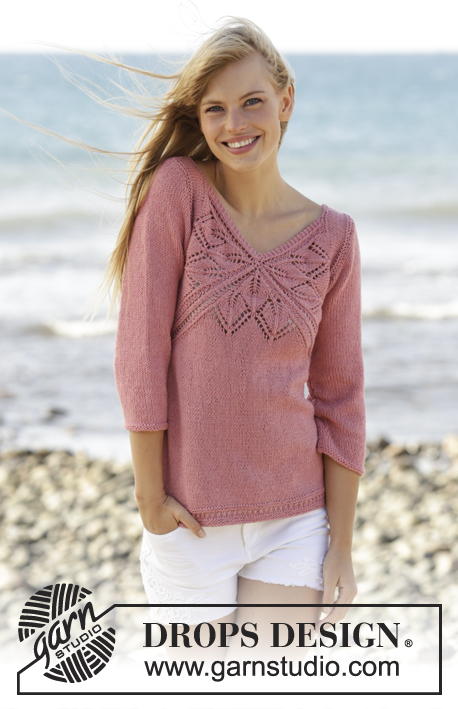
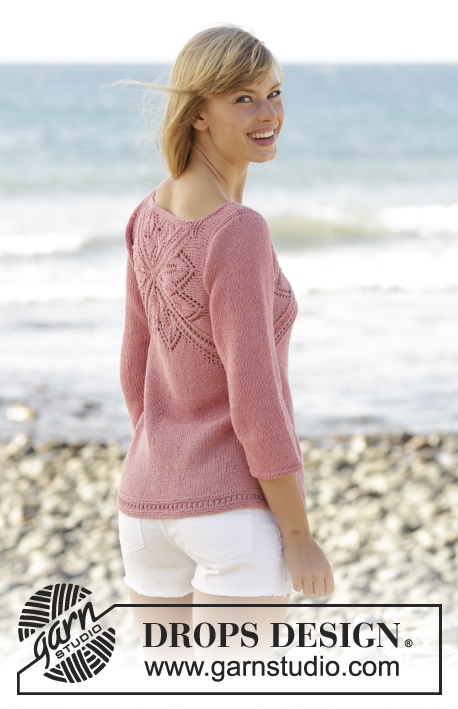
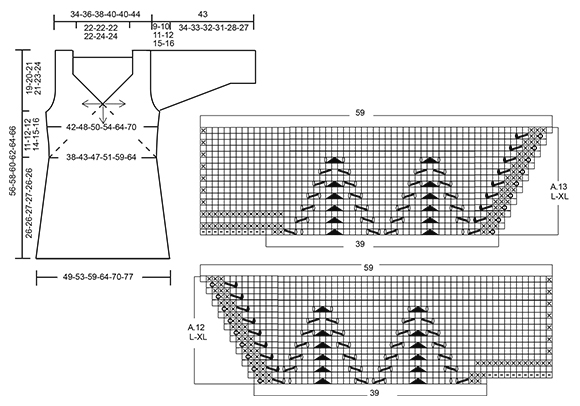
Knitted DROPS jumper with lace pattern and V-neck in ”Belle”. Worked top down. Size: S - XXXL.
DROPS 170-3 |
|||||||||||||||||||||||||||||||
|
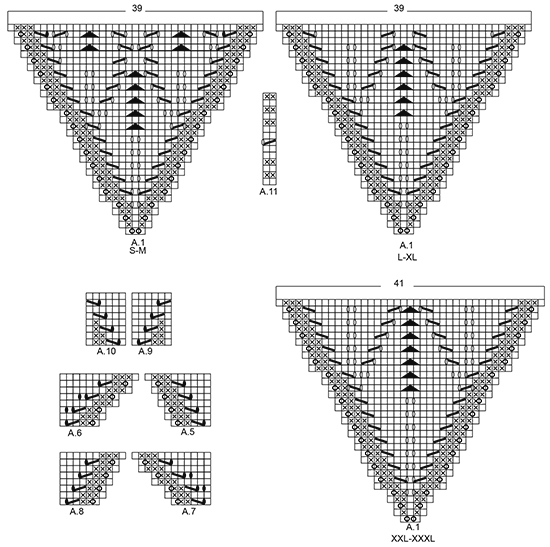
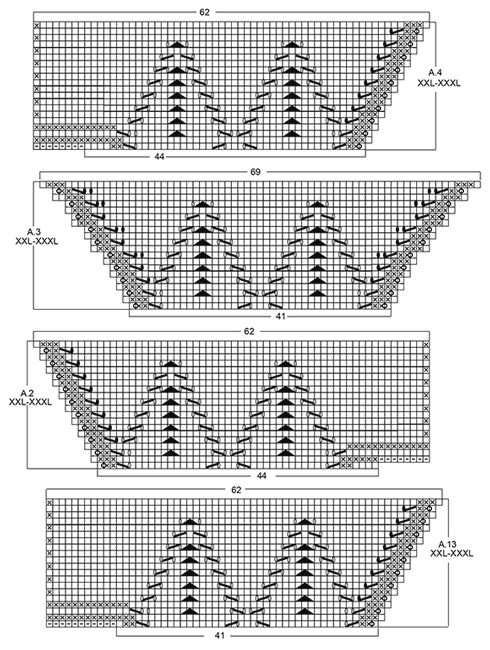
GARTER ST (back and forth): K all rows. 1 ridge = K2 rows. PATTERN: See diagrams A.1 to A.13. The diagrams show all rows in pattern seen from RS. See diagram for correct size. SHORT ROWS: When turning in short rows, slip first st as if to K. Tighten thread and make sure to avoid big holes. INCREASE TIP: All inc are done from RS. Inc 1 st by making 1 YO, on next row P YO twisted to avoid holes. DECREASE TIP: All dec are done from RS! Dec 1 st at beg of row as follows: K 1, slip 1 st as if to K, K 1, psso Dec 1 st at end of row as follows: Work until 3 sts remain (includes the 2 new sts worked for the first time), K 2 tog. ---------------------------------------------------------- JUMPER: Work from the middle of V-neck and out in 3 triangles on front piece and 4 triangles on back piece, then work downwards. FRONT PIECE: Work back and forth from neck and down. Cast on 8 sts on circular needle size 4 mm / US 6 with Belle. K 1 row. On next row inc as follows: * K 1, 1 YO *, repeat from *-* until 1 st remains and finish with K 1 = 15 sts on needle. Work next row as follows (from RS): Work YOs from previous row twisted, they should not make holes. Work 3 sts in GARTER ST - see explanation above, A.1, insert 1st marker, A.1, insert 2nd marker, A.1 (= repeat A.1 3 times in total on row), finish with 3 sts in garter st. REMEMBER THE KNITTING GAUGE When A.1 has been worked 1 time vertically, there are 123-123-123-123-129-129 sts on needle. Piece measures approx. 11-11-11-11-12-12 cm / 4½"-4½"-4½"-4½"-4 3/4"-4 3/4" from cast-on edge. Work next row as follows from RS: Work A.2 over the first 42-42-42-42-44-44 sts, A.3 over the next 39-39-39-39-41-41 sts and A.4 over the last 42-42-42-42-44-44 sts, after A.4 cast on 8 sts at the end of row for shoulder (see diagram). Work A.4 to A.2 on next row, after A.2 cast on 8 sts at the end of row for shoulder (see diagram). When A.2 to A.4 have been worked 1 time vertically, there are 165-165-183-183-193-193 sts on needle. Piece measures approx. 15-15-17-17-19-19 cm / 6"-6"-6 3/4"-6 3/4"-7½"-7½" from cast-on edge. READ ALL OF THE FOLLOWING SECTION BEFORE CONTINUING! WORK PATTERN AS BEFORE WHILE AT THE SAME TIME WORKING SHORT ROWS IN EACH SIDE OF PIECE. PATTERN: Work next row as follows from RS: Work 1 st in garter st, 48-48-52-52-55-55 sts in stockinette st, work A.5 over the next 6 sts, (marker), A.6 over the next 6 sts, 43-43-53-53-57-57 sts in stockinette st, A.7 over the next 6 sts, (marker), A.8 over the next 6 sts, 48-48-52-52-55-55 sts in stockinette st, finish with 1 st in garter st. Repeat A.5 to A.8 over the 6 sts on each side of each marker 2-3-2-3-4-5 times in total, then repeat the first 0-0-6-4-4-4 rows of A.5 to A.8 1 more times. SHORT ROWS: AT THE SAME TIME when 2-6-0-2-0-6 rows of A.5 to A.8 have been worked, work SHORT ROWS - see explanation above - in each side of piece as follows: Work until 26-26-24-23-18-18 sts remain on row (work A.5 to A.8 as before), turn and work until 26-26-24-23-18-18 sts remain, turn piece. Then work short rows in the different sizes as follows: SIZE M: Work 6 sts less for every turn 2 times in each side of piece. SIZE L-XL: Work 6 sts less for every turn 1-2 times in each side of piece, then work 4 sts less on every turn 3-2 times in each side of piece. SIZE XXL-XXXL: Work 6 sts less for every turn 1-1 time in each side of piece, then work 4 sts less for every turn 4-4 times in each side of piece, then work 2 sts less on every turn 4-5 times in each side of piece. ALL SIZES: When the short rows have been worked, work last row from WS, so that next row beg from shoulder. Then work over all sts from RS as follows: Work in garter st over the first 42-44-46-48-50-52 sts AT THE SAME TIME inc 0-2-4-4-6-6 sts evenly, work as before (i.e. A.5 to A.8 and stockinette st) until 42-44-46-48-50-52 sts remain, work in garter st over the last sts AT THE SAME TIME inc 0-2-4-4-6-6 sts evenly (= 42-46-50-52-56-58 sts in garter st in each side of piece). Work 3 rows in garter st over the outermost 42-46-50-52-56-58 sts in garter st in each side of piece, pattern and stockinette st over the remaining sts. On next row from WS work as follows: K the first 40-44-48-50-54-56 sts and slip them on a stitch holder for sleeve, work 2 sts in garter st, work in stockinette st and pattern as before until 42-46-50-52-56-58 sts remain, 2 sts in garter st, K the next 40-44-48-50-54-56 sts and then slip them on a stitch holder for sleeve. Cut the yarn. 8-8-8-12-12-12 rows of A.5 to A.8 remain. Beg next row from RS. Continue to work in garter st over the first and last 2 sts in each side of piece. When A.5 to A.8 have been worked, there are 23-25-26-27-32-34 sts before 1st marker, 79-91-99-107-123-135 sts between 1st and 2nd marker and 23-25-26-27-32-34 sts after 2nd marker = 125-141-151-161-187-203 sts in total on row. Piece measures approx. 21-24-25-27-32-35 cm / 8 1/4"-9½"-9 3/4"-10½"-12½"-13 3/4" on the widest measured from cast-on edge. Insert 1 marker in piece, NOW MEASURE PIECE FROM HERE. On next row from RS loosely bind off the first 22-24-25-26-31-33 sts knitwise, work 1 edge st in garter st, (marker), work A.9 over the first 6 sts after marker, stockinette st over the next 67-79-87-95-111-123 sts, A.10 over the last 6 sts before second marker, (marker ), 1 edge st in garter st, loosely cast of the last 22-24-25-26-31-33 sts knitwise = 81-93-101-109-125-137 sts remain on row. Cut the yarn. Work next row from WS over the remaining sts as follows: 1 edge st in garter st, A.10 as before, stockinette st over the next 67-79-87-95-111-123 sts, A.9 as before, 1 edge st in garter st. When A.9 and A.10 have been worked 1 time vertically, continue in stockinette st with 1 edge st in garter st in each side of piece. When piece measures 3 cm / 1'' from marker, inc 1 st in each side of piece inside 1 edge st (= 2 sts inc) - READ INCREASE TIP. Repeat inc every 1½-1½-1½-1-1-1 cm / ½"-½"-½"-3/8"-3/8"-3/8" 12-10-12-14-12-13 times in total = 105-113-125-137-149-163 sts on needle. When piece measures 23-23-24-24-23-23 cm / 9"-9"-9½"-9½"-9"-9" from marker (piece measures 53-55-57-59-61-63 cm / 21''-21 5/8''-22½''-23¼''-24''-24¾'' in total from shoulder), adjust so that next row is from RS, switch to circular needle size 3.5 mm / US 4. Work next row from RS as follows: Work 1 edge st in garter st, work A.11 (= 2 sts) until 2 sts remain, work first st in A.11, finish with 1 edge st in garter st. On row with holes (i.e. 7th row) work next to last st K. Bind off when A.11 has been worked 1 time vertically. Piece measures 56-58-60-62-64-66 cm / 22''-22¾''-23 5/8''-24 3/8''-25¼''-26'' in total from shoulder. BACK PIECE: Piece is first worked in the round, then worked as front piece. Cast on 6 sts on double pointed needles size 4 mm / US 6 with Belle, switch to circular needle when needed. K 1 row. On next row inc as follows: * K 1, 1 YO *, repeat from *-* = 12 sts on row, K YOs twisted on next row, they should not make holes. Work A.1 4 times in total, insert 1 marker between each A.1 (= 4 markers). When A.1 has been worked 1 time vertically, there are 156-156-156-156-164-164 sts on needle. Continue as follows: A.12 over the first 39-39-39-39-41-41 sts, work A.3 over the next 39-39-39-39-41-41 sts and A.13 over the last 39-39-39-39-41-41 sts, slip the remaining sts on a stitch holder for neck edge (= 39-39-39-39-41-41 sts), after A.13 cast on 11 sts at the end of row for shoulder (see diagram). Then work back and forth on needle. Work A.13/A.3/A.12 on next row, after A.12 cast on 11 sts at the end of row for shoulder (see diagram). When A.12/A.3/A.13 have been worked 1 time vertically, there are 165-165-183-183-193-193 sts on needle. Piece measures approx. 15-15-17-17-19-19 cm / 6"-6"-6 3/4"-6 3/4"-7½"-7½" from cast-on edge. Now continue back piece as front piece. NECK EDGE: Worked back and forth on needle. Slip sts from stitch holder for neck edge on back piece back on circular needle size 3.5 mm / US 4. Work 2 ridges. Fasten ridges where sts were cast on for shoulder. Fasten off. ASSEMBLY: Sew the side seams inside 1 edge st in garter st. Sew shoulder seams inside 1 edge st in garter st. Tighten tog the middle (i.e. cast-on edge) on both front and back piece. SLEEVE: Worked back and forth on circular needle in stockinette st. Slip sts from the 2 stitch holders (on front and back piece) in one side of piece back on circular needle size 4 mm / US 6 = 80-88-96-100-108-112 sts. Work short rows for sleeve cap as follows: Beg to work in the 25th-29th-31st-35th-43rd-45th st (i.e. 24-28-30-34-42-44 sts in one side are not worked). Work from RS 34-34-38-34-26-26 sts in stockinette st, turn piece (= 22-26-28-32-40-42 sts remain on needle). Work in stockinette st over the 36-36-40-36-28-28 sts, turn piece. Work 2 sts more on every turn in each side of piece until all sts have been worked. AT THE SAME TIME dec 1 st in each side of piece (= 2 sts dec), inside 1 st on every 4th-4th-2nd-4th-4th-4th row 4-6-8-8-10-10 times in total – READ DECREASE TIP = 72-76-80-84-88-92 sts on needle. Work 8-8-8-12-12-12 rows in stockinette st over all sts, insert 1 marker in piece (sew side seam on sleeve up to here later). NOW MEASURE THE PIECE FROM HERE. Cast on 1 edge st at the end of the next 2 rows = 74-78-82-86-90-94 sts. Work edge sts in garter st until finished measurements. On next row from RS dec 1 st inside 2 sts in each side of piece (= 2 sts dec). Repeat dec every 2½-2-2-1½-1-1 cm / 7/8"-3/4"-3/4"-½"-3/8"-3/8" 9-10-11-12-13-13 more times = 54-56-58-60-62-66 sts on needle. When sleeve measures 31-30-29-27-24-23 cm / 12 1/4"-11 3/4"-11½"-10½"-9½"-9", switch to circular needle size 3.5 mm / US 4. Work 2 ridges. Bind off. Slip sts from stitch holders in the other side of piece on circular needle size 4 mm / US 6 and work the same way. ASSEMBLY: Sew sleeve seams up to where 1 edge st in garter st was cast on in each side of piece. Sew the under arm seam. |
|||||||||||||||||||||||||||||||
Diagram explanations |
|||||||||||||||||||||||||||||||
|
|||||||||||||||||||||||||||||||
|
|||||||||||||||||||||||||||||||

|
|||||||||||||||||||||||||||||||
|
|||||||||||||||||||||||||||||||

|
|||||||||||||||||||||||||||||||
|
|||||||||||||||||||||||||||||||
|
Have you made this or any other of our designs? Tag your pictures in social media with #dropsdesign so we can see them! Do you need help with this pattern?You'll find tutorial videos, a Comments/Questions area and more by visiting the pattern on garnstudio.com. © 1982-2024 DROPS Design A/S. We reserve all rights. This document, including all its sub-sections, has copyrights. Read more about what you can do with our patterns at the bottom of each pattern on our site. |
|||||||||||||||||||||||||||||||


With over 40 years in knitting and crochet design, DROPS Design offers one of the most extensive collections of free patterns on the internet - translated to 17 languages. As of today we count 304 catalogs and 11422 patterns - 11417 of which are translated into English (US/in).
We work hard to bring you the best knitting and crochet have to offer, inspiration and advice as well as great quality yarns at incredible prices! Would you like to use our patterns for other than personal use? You can read what you are allowed to do in the Copyright text at the bottom of all our patterns. Happy crafting!
Comments / Questions (154)
Ich bin gerade beim Zusammennähen der Seitenteile angelangt und verzweifle so langsam. Die Seitennähte innerhalb von 1 Rand-M. schließen steht da..als Videos habe ich mir die Seitennaht und den Matratzenstich angeschaut..durch die Zunahmen erscheint mir das aber deutlich komplizierter als im Video. Können Sie mir weiterhelfen? ich möchte diesen schönen Pulli endlich fertig bekommen!
05.07.2016 - 18:50DROPS Design answered:
Liebe Inge, das sind die beiden Techniken, die Sie zum Schliessen der Seitennähte brauchen und damit sollten Sie ein gutes Ergebnis erhalten.
06.07.2016 - 08:03Könnten Sie bitte noch meine 2. Frage beantworten ?
03.07.2016 - 19:48DROPS Design answered:
Hallo Eileen, wir dachten, dass mit dem Verweis auf den Text unter «alle Grössen» Ihre Frage beantwortet ist. Ja, dort steht für Ihre Grösse, dass nach dem Stilllegen noch 8 R des Musters übrig sind.
06.07.2016 - 11:13Je ne comprends pas comment faire les diminutions des manches . Doit-on débuter les diminutions en même temps que les rangs raccourcis? Si oui, on les fait donc au départ juste avant de tourner l'ouvrage pour recommencer un autre rang raccourci? Merci de votre réponse
28.06.2016 - 09:41DROPS Design answered:
Bonjour Mme Perrier, quand on fait les rangs raccourcis du début de la manche, on diminue 4-10 fois (cf taille) 1 m de chaque côté tous les 4-2 rangs (= après 1 m en début de rang raccourci, et avant la dernière m à la fin du rang raccourci). Quand toutes les mailles ont été tricotées (= après les rangs raccourcis) et les diminutions faites, vous devez avoir 72-92 m. Bon tricot!
28.06.2016 - 12:12In the instructions for A5 to A8 are the repetitions worked before the short rows? Also there are no instructions specific to the small size do I work to the Medium size?
18.06.2016 - 15:17DROPS Design answered:
Dear Mrs Hamilton, you've to work short rows while you're working diagrams A.5-A.8, but for Size S you've to work just the first two rows of short rows as indicated and then you've to follow "all sizes" instructions. Happy knitting!
18.06.2016 - 18:42Hallo, ich stricke das Modell in Gr. M. Wie oft werden insgesamt die verkürzten Reihen gestrickt ? Laut Anleitung bei der 6. Reihe von A5-8 beginnen und dann noch 2x mit je 6 Maschen weniger ? Außerdem soll A5-8 3x in der Höhe gestrickt werden und dann sollten noch 8 Reihen übrig bleiben nachdem die Maschen für den Ärmel stillgelegt wurden ? Danke im Voraus für die Hilfe !
13.06.2016 - 22:56DROPS Design answered:
Hallo Eileen, Sie stricken 6 R A.5 bis A.8 und beginnen dann mit den verkürzten Reihen. Dann stricken Sie, wie unter Gröse M beschrieben (Bei jedem Wenden beidseitig über 6 M weniger str, dies beidseitig 2 x arb.) und anschliessend weiter unter "alle Grössen".
23.06.2016 - 08:24J'ai commencer ce modèle en taille S , j'ai parfaitement réussi le devant. Avant de commencer le dos je voudrais savoir si il faut tricoter A12 et A13 même en taille S.
31.05.2016 - 15:22DROPS Design answered:
Bonjour Muriel, tout à fait, en taille S, vous tricotez d'abord A.1 en rond, puis vous continuez en allers et retours en tricotant A.12, A.3 sur les 39 m suivantes et vous terminez par A.13. Bon tricot!
31.05.2016 - 16:57Ich suche verzweifelt die vorlage A 11,A1-10 ist vorhanden und A12-13.laut text soll ich im moment bei A11 weiterstricken,wie geht das ohne vorlage?vielen dank für ihre mühe und einen schönen gruss h.eble
21.05.2016 - 21:20DROPS Design answered:
Liebe Hella, A.11 ist etwas versteckt zwischen den beiden Diagrammen von A.1
23.05.2016 - 10:21...brei in tricotst en patroon als hiervoor tot er 42-46-50-52-56-58 st over zijn, 2 st in ribbelst, brei de volgende 40-44-48-50-54-56 st recht en zet ze dan op een hulpdraad voor de mouw. Knip de draad af. Er zijn 8-8-8-12-12-12 nld van A.5 tot en met A.8 over. Begin de volgende nld aan de goede kant. Hier brei je de teruggaande nld volgens mij niet
20.05.2016 - 09:14DROPS Design answered:
Hoi Loltje. Jawel, er staat in het patroon: Brei in de volgende nld aan de verkeerde kant als volgt: brei de eerste 40-44-48-50-54-56 st recht en zet ze op een hulpdraad voor de mouw, brei 2 st in ribbelst, brei in tricotst en patroon als hiervoor tot er 42-46-50-52-56-58 st over zijn, 2 st in ribbelst, brei de volgende 40-44-48-50-54-56 st recht en zet ze dan op een hulpdraad voor de mouw. Knip de draad af. Er zijn 8-8-8-12-12-12 nld van A.5 tot en met A.8 over. Begin de volgende nld aan de goede kant.
20.05.2016 - 10:53Reju Venu wrote:
I am from India ...loved your site and subscribed just now..I have joined for the meadow CAL.can I use my own ideas for the floral granny square or have to follow your tutorial? PleAse I firm so that I can start the cal as I am already late. ....thanking you...
20.05.2016 - 08:19DROPS Design answered:
Dear Mrs Venu, feel free to make your own square if you like to, but remember materials and instructions have been made for the flowers we have made. Happy crocheting!
20.05.2016 - 10:44Voor het voorpand zou je na de verkorte toeren steken op een hulpvraag moeten zetten en dan de draad afknippen. Als je dan zoals het patroon voorschrijft aan de goede kant weer begint mis je de teruggaande toer. Klopt dit?
18.05.2016 - 16:53DROPS Design answered:
Hoi Loltje. Er staat na het breien van de verkorte toeren onder ALLE MATEN: Als de verkorte toeren klaar zijn, brei dan de laatste nld aan de verkeerde kant zodat de volgende nld begint bij de schouder. Dan zou je daarna weer moeten beginnen op de goede kant en mis je geen teruggaande nld. Als dit niet je vraag beantwoord, geef dan graag aan welke maat je breit en waar in het patroon je bent. Dan kan ik vanaf daar meekijken :-)
19.05.2016 - 13:31