
Popular categories
Looking for a yarn?


|
|
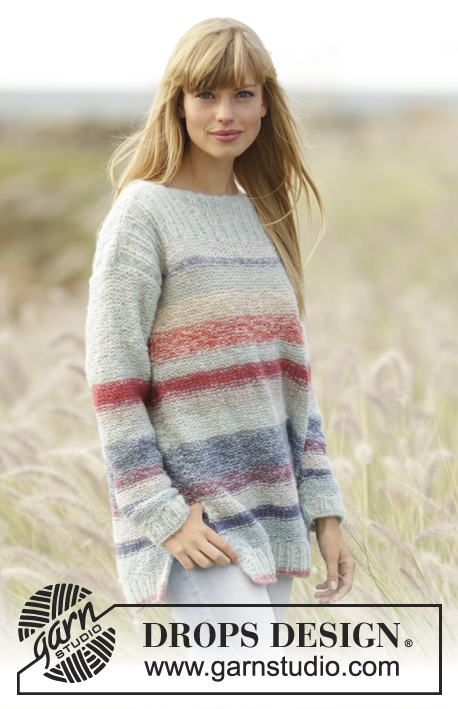
Weekend Getaway |
|
|
|
|
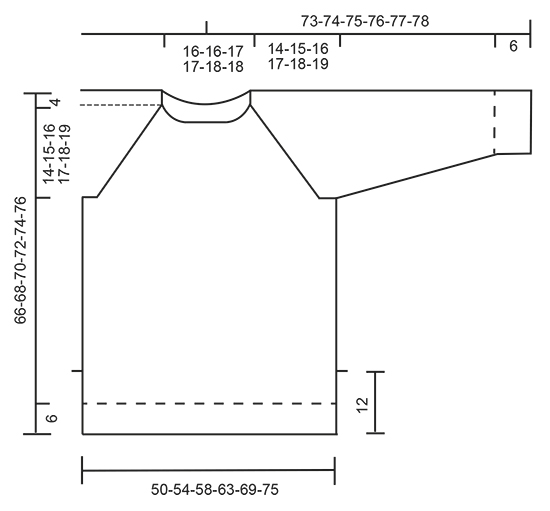
Knitted DROPS jumper with raglan, vent in the sides and stripes, worked top down in ”Brushed Alpaca Silk”. Size S-XXXL.
DROPS 169-7 |
|
|
GARTER ST (worked in the round): 1 ridge = 2 rounds. * K 1 round and P 1 round *, repeat from *-*. GARTER ST (back and forth): K all rows. 1 ridge = K2 rows. STRIPES: Work stripes as follows on body and sleeves: Work 9-9-10-10-11-11 cm / 3½"-3½"-4"-4"-4½"-4½" with off white. Work 9-9-10-10-11-11 cm / 3½"-3½"-4"-4"-4½"-4½" with light sea green. Then work with off white until finished measurements. RAGLAN BODY: NOTE: K all YOs on next round to make holes. Inc 2 sts as follows: Before 1st and 3rd marker: Work until 3 sts remain before marker, K 2 in next st, 1 YO, K 2. After 2nd and 4th marker: K 2, 1 YO, K 2 in next st. Then inc 1 st as follows: Before 1st and 3rd marker: Work until 2 sts remain before marker, 1 YO, K 2. After 2nd and 4th marker: K 2, 1 YO. RAGLAN SLEEVE: Inc 1 st after 1st and 3rd marker as follows: K 2, 1 YO. Inc 1 st before 2nd and 4th marker as follows: Work until 2 sts remain before marker, 1 YO, K 2. On next round K the YO to make hole. DECREASE TIP: Dec as follows before marker: Work until 3 sts remain before marker, K 2 tog, K 1. Dec as follows after marker: K 1, slip 1 st as if to K, K 1, psso ---------------------------------------------------------- JUMPER: Worked in stockinette st in the round, from the top and down to vent on body. Then divide the piece in front and back piece and continue back and forth until finished measurements. NOTE: Beg round = mid back. YOKE: Cast on 80-80-85-85-90-90 sts on circular needle size 4.5 mm / US 7 with light sea green. K 1 round. Then work 4 rounds rib (= K 2/P 3). Switch to circular needle size 5 mm / US 8 and work 1 round in stockinette st while inc 18-20-21-25-24-30 sts evenly = 98-100-106-110-114-120 sts. Now insert 4 markers in the piece as follows: Work the first 15-16-16-16-17-18 sts (= half back piece), insert 1st marker, work the next 18-18-20-22-22-24 sts (= sleeve), insert 2nd marker, work the next 31-32-33-33-35-36 sts (= front piece), insert 3rd marker, work the next 18-18-20-22-22-24 sts (= sleeve), insert 4th marker, work the remaining 16-16-17-17-18-18 sts (= half back piece). On next round beg inc for raglan. NOTE: Inc differently on sleeves and body - READ RAGLAN BODY and RAGLAN SLEEVE. Inc as follows: Work until 3 sts remain before 1st marker, K 2 in next st, 1 YO, K 4 (marker is in the middle of these sts), 1 YO, work until 2 sts remain before 2nd marker, 1 YO, K 4 (marker is in the middle of these sts), 1 YO, K 2 in next st, work until 3 sts remain before 3rd marker, K 2 in next st, 1 YO, K 4 (marker is in the middle of these sts), 1 YO, work until 2 sts before 4th marker, 1 YO, K 4 (marker is in the middle of these sts), 1 YO, K 2 in next st, work the remaining sts on round. REMEMBER THE KNITTING GAUGE Repeat inc on every other round as follows: On sleeves 14-15-16-17-19-20 more times (= 15-16-17-18-20-21 times in total), on body with 2 sts 7-9-11-14-16-20 more times (= 8-10-12-15-17-21 times in total) and then on body with 1 st 7-6-5-3-3-0 times. When all inc are done, there are 250-268-290-314-342-372 sts on round and piece measures 14-15-16-17-18-19 cm / 5½''-6''-6¼''-6¾''-7''-7½'' from the neck mid front and down. Now work as follows: Work the first 38-42-45-49-54-60 sts (= half back piece) slip the next 48-50-54-58-62-66 sts on a stitch holder (= sleeve), cast on 8 sts under sleeve, work the next 77-84-91-99-109-120 sts (= front piece), slip the next 48-50-54-58-62-66 sts on a stitch holder (= sleeve), cast on 8 sts under sleeve, work the remaining 39-42-46-50-55-60 sts on needle (= half back piece). NOW MEASURE THE PIECE FROM HERE. BODY: There are now 170-184-198-214-234-256 sts on round. Continue in the round in stockinette st and STRIPES - see explanation above. When piece measures 35-36-37-38-39-40 cm / 13¾''-14¼''-14½''-15''-15¼''-15¾'', work as follows: Work 39-43-46-50-55-61 sts in stockinette st, work 6 sts in GARTER ST - see explanation above, work 79-86-93-101-111-122 sts in stockinette st, work 6 sts in garter st, work stockinette st over the remaining 40-43-47-51-56-61 sts. Continue like this until 2 ridges have been work over the 6 sts in each side (= over vents). Now divide the piece into front and back piece as follows: Work the first 42-46-49-53-58-64 sts as before (i.e. stockinette st with 3 sts in garter st in the side), turn and work back over 85-92-99-107-117-128 sts (work the first and last 3 sts in garter st) = back piece. Slip the remaining 85-92-99-107-117-128 sts on a stitch holder for front piece. Continue back and forth over sts on needle until piece measures 42-43-44-48-46-47 cm / 16½"-17"-17 1/4"-19"-18"-18½". On next row from RS switch to circular needle size 4.5 mm / US 7 and inc 13-16-19-21-21-25 sts evenly (but not over the 3 outermost sts) = 98-108-118-128-138-153 sts. Work 1 row from WS as before, then work rib (K 2/P 3) with 3 sts in garter st in each side. NOTE: Beg and end with K 2 inside the 3 sts in garter st in each side. When rib measures 6 cm / 2 3/8'', bind off with K over K and P over P. Piece measures 66-68-70-72-74-76 cm / 26''-26¾''-27½''-28 3/8''-29 1/8''-30'' in total from shoulder. Slip sts from stitch holder back on needle and work as back piece. SLEEVE: Work sleeve in stockinette st in the round on double pointed needles. There are 48-50-54-58-62-66 sts for each sleeve. Slip sts from stitch holder back on double pointed needles size 5 mm / US 8 and cast on 8 new sts under sleeve = 56-58-62-66-70-74 sts. Work in stockinette st and stripes as on body in the round, AT THE SAME TIME insert a marker in the middle of the new sts under sleeve (i.e. 4 new sts on each side of marker). NOW MEASURE THE PIECE FROM HERE. When piece measures 4 cm / 1½'', dec 1 st on each side of marker - READ DECREASE TIP. Repeat dec approx. every 4-4-3-3-2½-2½ cm / 1½"-1½"-1"-1"-7/8"-7/8" 10-10-12-13-14-15 more times = 34-36-36-38-40-42 sts. When sleeve measures 45-45-45-45-44-44 cm / 17 3/4"-17 3/4"-17 3/4"-17 3/4"-17 1/4"-17 1/4" (NOTE: Shorter measurements in the larger sizes because of longer yoke), switch to double pointed needles size 4.5 mm / US 7 and inc 6-4-9-7-5-8 sts evenly on next round = 40-40-45-45-45-50 sts. Work rib = K 2/P 3 for 6 cm / 2 3/8''. When sleeve measures 51-51-51-51-50-50 cm / 20"-20"-20"-20"-19 3/4"-19 3/4", bind off with K over K and P over P. Work the other sleeve the same way. ASSEMBLY: Sew the openings under the sleeves. |
|
|
|
|
Have you made this or any other of our designs? Tag your pictures in social media with #dropsdesign so we can see them! Do you need help with this pattern?You'll find tutorial videos, a Comments/Questions area and more by visiting the pattern on garnstudio.com. © 1982-2024 DROPS Design A/S. We reserve all rights. This document, including all its sub-sections, has copyrights. Read more about what you can do with our patterns at the bottom of each pattern on our site. |


With over 40 years in knitting and crochet design, DROPS Design offers one of the most extensive collections of free patterns on the internet - translated to 17 languages. As of today we count 304 catalogs and 11422 patterns - 11417 of which are translated into English (US/in).
We work hard to bring you the best knitting and crochet have to offer, inspiration and advice as well as great quality yarns at incredible prices! Would you like to use our patterns for other than personal use? You can read what you are allowed to do in the Copyright text at the bottom of all our patterns. Happy crafting!
Comments / Questions (46)
Forstår jeg rett at for å se økningen før merket/eller på bolen, leser jeg på oppskrift Raglan bol, og for å lese hva som skjer etter merket, må jeg lese raglan arm? Skal jeg strikke en pinne rett mellom hver gang det økes? Når skal jeg øke 2 masker og når skal jeg øke 1 maske?
02.05.2020 - 19:56DROPS Design answered:
Hei Elise. Det økes forskjellig på ermer og bol – LES RAGLAN BOL og RAGLAN ERME. Det økes 2 masker før/etter merkene bare 1 gang /omgang og det strikkes 1 omgang mellom hver øke omgang. På de omgangene det ikke økes, strikkes kastene fra forrige omgang rett, slik at det blir et hullmønster. mvh DROPS design
04.05.2020 - 14:33Hejsa Jeg kan simpelthen ikke lige læse hvornår jeg samler mit bærestykke foran, skulle jeg have gjort det allerede inden rib kanten, som jo er det allerførste man laver. ? kh Sanne
16.03.2020 - 14:03DROPS Design answered:
Hej Sanne, du strikker hele bærestykket rundt ovenfra og ned, så det har været samlet hele tiden... eller misforstår jeg dit spørgsmål?
18.03.2020 - 15:47Hej, jag undrar om jag ska börja med rundsticka 4.5 & 60 cm för resår och sen byta till 5 ? Vilken längd på rundstickan ska jag ha då? Det blir väldigt lite maskor på en så lång rundsticka. Finns det kortare rundstickor för jag tycker inte om att sticka med strumpstickor? Tacksam för svar
07.01.2020 - 12:01DROPS Design answered:
Hej Här kan man byta rundsticka när man själv tycker att det blir för många maskor med den kortare rundstickan. Det finns även rundsticka i längd 40 cm om man skulle vilja använda det i början. Lycka till!
29.01.2020 - 11:36Kan man strikke denne uten splittene i siden? Og gjør jeg det i så fall ved å fortsette rundt og rundt, og uten å strikke det med riller?
10.11.2019 - 21:46DROPS Design answered:
Hei Mimsen. Ja, det kan du. Bare fortsett å strikke glattstrikk og husk å øke før du starter med vrangbord, se oppskriften for hvor mange masker (i den størrelsen du strikker). Pass også på at du har et maskeantall der vrangborden (2 rett-3 vrang) går opp. God Fornøyelse!
11.11.2019 - 12:32Mooi patroon. Wel als alle raglanpatronen/rondbreipatronen met een vervelend lage nek. Is het mogelijk om eens een raglanpatroon te maken met extra toeren in de nek, zodat het een echt warme trui wordt?
19.08.2019 - 10:04Hej igen och tack för svar. Tyvärr förstår jag inte vad en hopfällningssöm (rundfelling) är. Har sökt det hos er och på nätet och hittar ingen förklaring. Snälla hjälp mig. Mvh Solveig
31.07.2019 - 22:38DROPS Design answered:
Hej Solveig, rundfelling = runt ok. Om du inte vill sticka raglan, så kan du sticka med runt ok istället. Du kan söka på runt ok under "Hitta mönster". Lycka till!
01.08.2019 - 15:00Hej igen. Vill gärna börja sticka denna tröja så fort som möjligt så jag vore tacksam på ett svar på min föregående fråga.
30.07.2019 - 22:54DROPS Design answered:
Hei Solveig. Du kan strikke denne med rundfelling om du vil. Da er økingen spredt jevnt fordelt å omgangem, og relativt jevnmt frodelt i høyden. Jeg anbefaler at du ser på en genser med rundfelling i samme garn/garngruppe, og bruk denne fremgangsmåten som utgangspunkt. God fornøyelse
31.07.2019 - 14:26Hej. Jag vill sticka denna tröja utan raglan. Hur gör jag då? Tack för en fantastisk sida :)
28.07.2019 - 14:26DROPS Design answered:
Hei Solveig, se svar over :)
31.07.2019 - 14:26Hei jeg sliter litt med øking. Følger oppskrift, så står det strikk til 3 masker før 1 merke så står det strikk 2 i neste maske et kast, så 4 masker så et kast også 2 i neste maske. Så forran merke 2 et kast 4 masker 1kast og 2 rett i samme maske, dette gjøres forran merke 3 og 4, videre står det øke med to, og der etter med 1. Men til slutt får jeg 100 masker mer en det jeg skal ha. Jeg følger oppskrift m. Hva gjør jeg galt? Mvh anne gro
10.07.2019 - 15:27DROPS Design answered:
Hei Anne Gro. Det som står er: strikk til 3 m før 1. merke, 2 m rett i neste m, 1 kast (du har økt 2 masker), strikk 4 m rett (merket sitter midt mellom disse m, og du har nå økt til RAGLAN BOL), 1 kast, strikk til det gjenstår 2 m før 2.merke.. Du strikker altså IKKE 2 masker i neste maske etter kastet (du har økt til RAGLAN ERME: 2 rett (halvparten av de 4 rettm), 1 kast). Når du så kommer til 2 m før 2. merke økes til RAGLAN ERME: 1 kast, 2 rett.. videre strikkes 2 rett (=altså totalt 4 rett) og så økes til RAGLAN BOL: 1 kast, 2 rett i neste maske, osv. Du øker altså 1 m i hver side av hvert erme, og 2 m i hver side av for-bakstykket. God fornøyelse
11.07.2019 - 11:31Hei, det står strikk to masker rett i en maske.. Jeg forstod det slik at jeg tar to masker på pinnen og stikker begge rett .. men da får jeg 1 maske av 2.. så jeg skal ikke øke.. men det blir mindre masker på annen hver omgang.. Eller mener du lag 2 masker av 1 ?
05.07.2019 - 11:43DROPS Design answered:
Hej Paulina, hvor i opskriften er du? Når vi skriver: Strikk 2 m rett i neste m, så betyder det at du strikker 2 m rett i neste (samme) maske. Du øker 1 m på denne måde. God fornøjelse!
05.07.2019 - 14:36