
Popular categories
Looking for a yarn?


Comments / Questions (18)
![]() ISABELLE DALY wrote:
ISABELLE DALY wrote:
Bonjour, si je voulais tricoter ce modèle mais en jacquart, quelle laine me conseillez vous pour avoir ce même fini?
12.01.2025 - 17:44DROPS Design answered:
Bonjour Mme Daly, DROPS Nepal se prête très bien aux jacquards, retrouvez par exemple quelques modèles ici. Bon tricot!
13.01.2025 - 10:00
![]() Jane wrote:
Jane wrote:
OK, thank you, I just wondered why they were both labelled as garter stitch at the beginning.
05.11.2024 - 08:36DROPS Design answered:
Happy knitting, enjoy!
05.11.2024 - 08:43
![]() Jane wrote:
Jane wrote:
Hello, for bonfire snuggle is it garter stitch or stocking stitch in the round please? Not sure if I have understood correctly. Thank you for your help.
05.11.2024 - 07:43DROPS Design answered:
Hi Jane, when you are knitting in the round, you have to work in stocking st with 10 sts in garter st in each side of piece. Please take a look at the picture. Happy knitting!
05.11.2024 - 08:33
![]() Susan wrote:
Susan wrote:
Hi, I don’t see any knitting tension guide for how many stitches to 10cm?
13.05.2024 - 12:55DROPS Design answered:
Hi Susan, knitting tension info is by the needles, under the material info. For this pattern we work with the gauge 16 sts x 20 rounds in stocking st on needles 5,5 = 10 x 10 cm. Happy knitting!
13.05.2024 - 14:32
![]() Mal wrote:
Mal wrote:
Hi! I have to use bigger needles (size 6mm instead of 5.5) to get the correct gauge for stockinette stitch, but it made me wonder: if I have to switch the 5.5 needles for half-size bigger, should I also change the 5.0 needles accordingly to get correct measurements for the piece?
08.09.2022 - 11:27DROPS Design answered:
Hi Mal, you should take needles no 6 for stocking stitch and no 5,5 for garter stitch. Happy knitting!
08.09.2022 - 11:30
![]() Patrizia L wrote:
Patrizia L wrote:
It's wonderful!!!!
27.06.2022 - 11:09
![]() Anne Holst wrote:
Anne Holst wrote:
Hej Garnstudio Jeg er igang med at strikke drops 164-25 og har et spørgsmål vedr. opskriften. Der skal laves en del indtagninger - jeg laver str small så når jeg regner sammen alle indtagninger bliver det til flere masker end angivet. Jeg får regnet frem til at jeg lukker 12 m + 48 m + 76 m ialt 136 m men i opskriften står der 108. Er der en fejl med antal indtagninger? Mange hilsner Anne
14.05.2021 - 07:05DROPS Design answered:
Hej Anne, du har 248 masker, tager ind først 4 m 4 gange = 16, så 48, og så 76 = 108 masker tilbage. God fornøjelse!
14.05.2021 - 09:56
![]() DUPIRE Sophie wrote:
DUPIRE Sophie wrote:
Bonjour, peut-on tricoter ce modèle en 2 parties, avec des aiguilles droites ? Si oui, où puis-je trouver les explications ? Merci d’avance. Cordialement Sophie
13.01.2020 - 19:12DROPS Design answered:
Bonjour Mme Dupire, vous trouverez ici quelques informations sur les aiguilles circulaires et l'adaptation d'un modèle sur aiguilles droites. Bon tricot!
14.01.2020 - 07:32
![]() Laura wrote:
Laura wrote:
Gentili deposito design, ho un dubbio: una volta lavorate le due parti,avanti e dietro, e passate sul ferro circolare, devo avere entrambi i lati pronti per essere lavorati al dritto del lavoro. Quindi se non ho capito male iniziò a lavorare in tondo dalle 5 maglie a maglia rasata che mi trovo su un lato giusto? Grazie
12.05.2018 - 14:48DROPS Design answered:
Buongiorno Laura. Sì, il giro inizia sul lato con 5 maglie a legaccio. Buon lavoro!
12.05.2018 - 16:02
![]() Jane wrote:
Jane wrote:
How do i size this please? I am 104cm/42" bust. Many thanks
11.04.2017 - 14:28
|
|
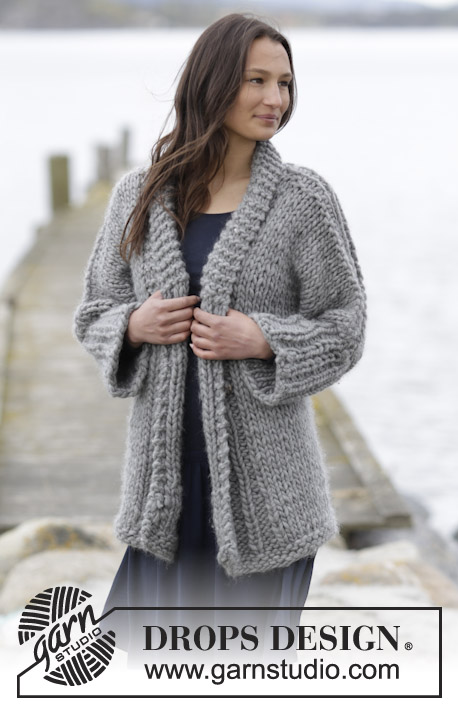
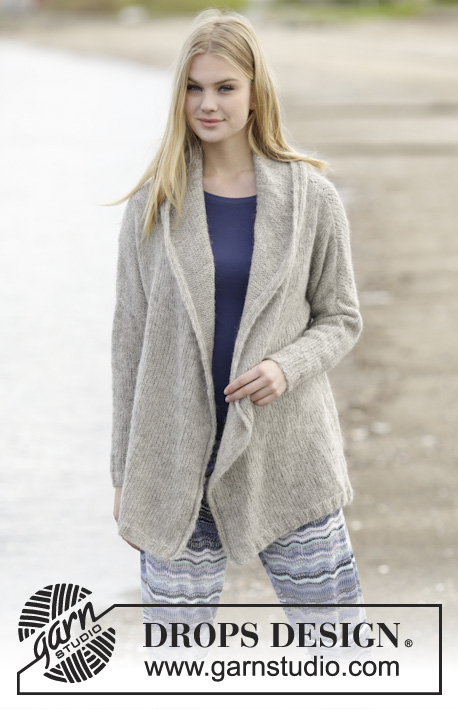
Bonfire Snuggle#bonfiresnuggleponcho |
|
|
|
|
Knitted DROPS poncho in ”Nepal”. Size: S - XXXL.
DROPS 164-25 |
|
|
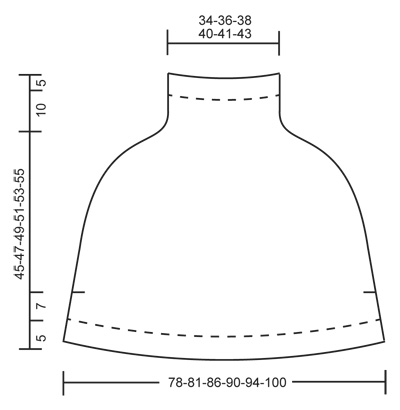
GARTER ST (back and forth): K all rows. 1 ridge = 2 rows K. GARTER ST (worked in the round): * K 1 round and P 1 round *, repeat from *-*. 1 ridge = 2 rounds. DECREASE TIP: Dec 1 st before sts in garter st as follows: Work until 2 sts remain before st in garter st, slip 1 st as if to K, K 1, psso. Dec 1 st after sts in garter st as follows: K the next 2 sts tog. ---------------------------------------------------------- PONCHO: Work back and forth on circular needle until vent, then put the two part tog and work in the round on circular needle. BACK PIECE: Cast on 124-130-138-144-150-160 sts on circular needle size 5 mm with Nepal. Work in GARTER ST - see explanation above - for 5 cm. Switch to circular needle size 5.5 mm. Work in stocking st with 5 sts in garter st in each side. REMEMBER THE KNITTING TENSION When piece measures 12 cm, adjust so that next row is from RS, put piece aside and work front piece. FRONT PIECE: Cast on and work as back piece. BODY: Now work in the round on circular needle. Slip front and back piece on to same circular needle size 5.5 mm = 248-260-276-288-300-320 sts. Continue with 10 sts in GARTER ST - see explanation above - in each side of piece and stocking st as before. When piece measures 17-18-18-19-19-19 cm, dec 1 st on each side of sts in garter st in each side of piece (= 4 sts dec) – see DECREASE TIP. Repeat dec every 4th round 3 more times, on every other round 12-13-14-15-17-17 times and then every round 19-19-21-21-21-25 times = 108-116-120-128-132-136 sts. Piece measures approx. 45-47-49-51-53-55 cm. Continue in stocking st with 10 sts in garter st in each side of piece. When piece measures 55-57-59-61-63-65 cm, switch to circular needle size 5 mm. Work in garter st. Cast off when piece measures 60-62-64-66-68-70 cm. |
|
 |
|
Have you finished this pattern?Tag your pictures with #dropspattern #bonfiresnuggleponcho or submit them to the #dropsfan gallery. Do you need help with this pattern?You'll find 13 tutorial videos, a Comments/Questions area and more by visiting the pattern on garnstudio.com. © 1982-2026 DROPS Design A/S. We reserve all rights. This document, including all its sub-sections, has copyrights. Read more about what you can do with our patterns at the bottom of each pattern on our site. |


With over 40 years in knitting and crochet design, DROPS Design offers one of the most extensive collections of free patterns on the internet - translated to 17 languages. As of today we count 324 catalogues and 12252 patterns translated into English (UK/cm).
We work hard to bring you the best knitting and crochet have to offer, inspiration and advice as well as great quality yarns at incredible prices! Would you like to use our patterns for other than personal use? You can read what you are allowed to do in the Copyright text at the bottom of all our patterns. Happy crafting!
Post a comment to pattern DROPS 164-25
We would love to hear what you have to say about this pattern!
If you want to leave a question, please make sure you select the correct category in the form below, to speed up the answering process. Required fields are marked *.