
Popular categories
Looking for a yarn?


Comments / Questions (197)
![]() Delphine wrote:
Delphine wrote:
Si je souhaite faire ce modèle en taille L/XL mais d'une seule couleur, combien de grammes me faut-il? Merci
23.02.2025 - 15:51DROPS Design answered:
Bonjour Delphine, comme ce modèle a été réalisé avec les rayures, nous n'avons que la quantité correspondante pour les 3 couleurs; vous pouvez les additionner, il vous en faudra probablement un peu moins. Votre magasin pourra vous aider et vous conseiller, même par mail ou téléphone. Bon crochet!
24.02.2025 - 09:15
![]() Sonngard Lammerding wrote:
Sonngard Lammerding wrote:
Was bedeutet "nicht über den Stb. der Blende abnehmen? Wo soll man dann gleichmäßig 10 Stb. In der Runde abnehmen?"
20.01.2025 - 18:53DROPS Design answered:
Liebe Frau Lammerding, man muss die restlichen Maschen abnehmen, dh so häkeln: Blenden-Maschen, dann die nächsten Stäbchen häkeln bis die Blenden-Maschen übrig sind und gleichzeitig abnehmen (siehe Größe für Maschenanzahl und diese Lektion ) und mit den Blenden-Maschen enden. Viel Spaß beim Häkeln!
21.01.2025 - 09:39
![]() Stephanie wrote:
Stephanie wrote:
I have almost finished this beautiful cardigan but am having the same problem as others - I am left with a bump in the centre back where the centre upward point goes into the yoke. It seems to need to be squared off before the yoke starts but I don't know how to do that. Also the back neck of the garment is extremely low and looks a bit silly. Can you please help
01.07.2023 - 09:39DROPS Design answered:
Dear Stephanie, make sure you kept the correct tension in width and in height, it might help. Blocking the jacket afterwards might help. About neck, there is no neck shaping on back piece, but you can add some short rows (playing with the number of stitches or with the kind of stitches) to make the neck higher on back piece, it might hep. Happy crocheting!
03.07.2023 - 09:50
![]() Linda Bradbury wrote:
Linda Bradbury wrote:
This pattern has proved IMPOSSIBLE to complete, I have counted EVERY STITCH on EVERY ROW and there is NO WAY the sleeves are correct, Also y0u end up with a triangle sticking up in the back and a Triangle shaped pouch at the back of the sleeve! I asked a clear question which was do you have to make two jacket pieces and was told you didn't understand the question, I would love to know how, if you don't understand a simple question, you managed to translate the pattern? I am so disappointed!
14.12.2021 - 22:18
![]() Linda Bradbury wrote:
Linda Bradbury wrote:
Thank you for your reply, but I'm more confused now. Do you have to make 2 pieces of the jacket or one?
10.12.2021 - 10:18DROPS Design answered:
Dear Mrs Bradbury, I don't understand your question sorry, you work first body bottom up to armholes, then the both sleeves, then insert the sleeves between front & back pieces skipping some repeats/stitches for amrholes. Can this help?
10.12.2021 - 11:27
![]() Linda Bradbury wrote:
Linda Bradbury wrote:
I have tried and tried but cannot attach the sleeves, plus how many triangles should be on jacket and how many on sleeve please. I have done this 3 times now and cannot get it right. I have 6 triangles on jacket and 2 on the sleeve, pleeeeeease help ...thank you
09.12.2021 - 22:10DROPS Design answered:
Dear Mrs Bradbury, follow the explanation on first row on yoke, you should get: 32-40-48 tr (UK-English) for each front piece + 52-68-84 tr for each sleeve + 52-68-84 sts for back piece = 220-284-348 tr. Can this help?
10.12.2021 - 08:44
![]() Annabel wrote:
Annabel wrote:
Bonjour Je voudrai faire ce pull en simple fil avec du fil Drops Safran . Du coup, je veux utiliser 5 couleurs différentes, pour faire les 5 vagues. Combien de pelotes de chaque couleur faut il que j'achète ? pour la va Merci Annabel
02.03.2021 - 17:35DROPS Design answered:
Bonjour Annabel, ce modèle a été conçu pour 2 fils Alpaca (ou Safran) sur la base de 15 brides x 9 rangs = 10 x 10 cm, si vous choisissez 1 seul fil Safran, votre échantillon ne sera pas le même et toutes les explications devront être recalculées; vous pouvez en revanche utiliser 1 fil du groupe C (Paris par exemple si vous voulez du coton). Retrouvez ici plus d'infos sur les alternatives. Bon crochet!
03.03.2021 - 06:54
![]() Karin Nilsson wrote:
Karin Nilsson wrote:
Hej! Det står hur man mäter under Mättips, men det kan inte gälla ärmarna? Om jag kikar på diagrammet ser det ut som jag ska mäta ärmen från spetsen (vändningarna i vågmönstret), stämmer det?
11.07.2020 - 06:30DROPS Design answered:
Hei Karin. Uansett hvor du måler på ermene, enten fra tuppen eller ikke, så er cm målene det samme, som skal være: 3 cm med 1 tråd grågrønn + 1 tråd lys grågrønn, 11 cm med 2 tråder lys grågrønn og 11-12-13 cm med 1 tråd lys grågrønn + 1 tråd natur. mvh DROPS design
13.07.2020 - 10:48
![]() Veronica Martin wrote:
Veronica Martin wrote:
I want to make this for my granddaughter her chest measurement is 26” please help
18.06.2019 - 19:36DROPS Design answered:
Dear Mrs Martin, we are unfortunately not able to adjust every single pattern to every individual request, for any further individual assistance, please contact your DROPS store, even per mail or telephone, they will be able to assist you. Happy crocheting!
19.06.2019 - 07:02
![]() Inger wrote:
Inger wrote:
Nav uw reactie over de hoeveelheid garen hoeft het niet zo te zijn dat het niet eerder gebeurd is dat mensen garen tekort zijn gekomen. Wellicht hebben mensen het gewoon niet gemeld. Van het licht groen wordt aanzienlijk meer gebruikt in het vest en in de mouwen dan van de overige kleuren. Ik zal garen moeten bij bestellen en dat zal een ander verfbad hebben gehad en zal u in dus kleurverschil krijgen.
23.08.2018 - 22:59
|
|
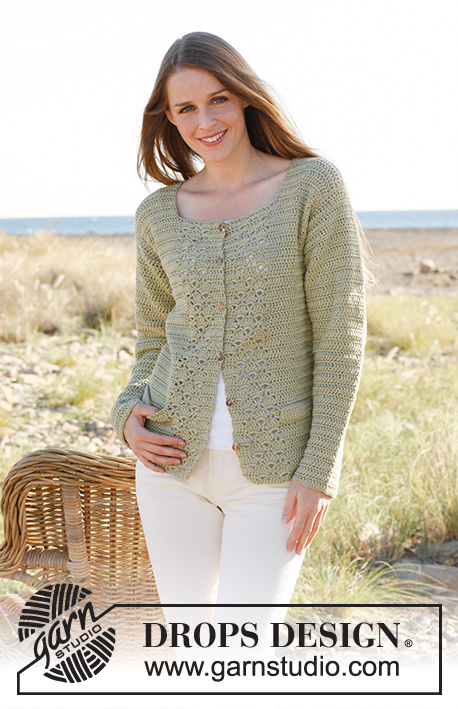
Sea Waves#seawavescardigan |
|
 |
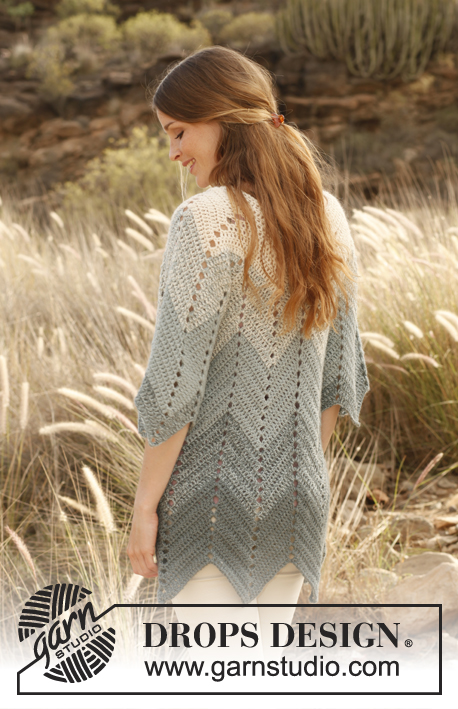 |
Crochet DROPS jacket with zig-zag pattern in 2 strands "Alpaca". Size: S - XXXL.
DROPS 147-10 |
|
|
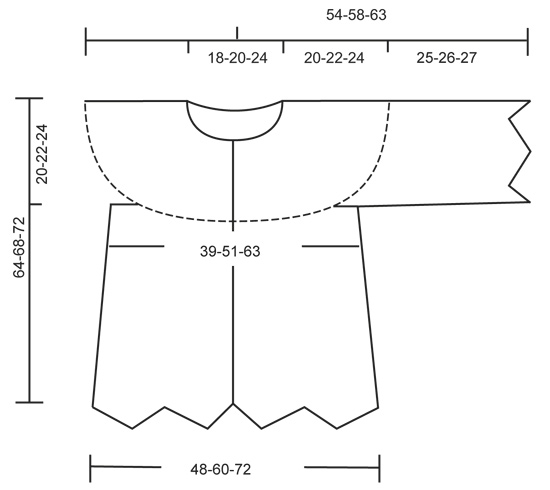
MEASURING TIP: All measurements should be done up along band mid front. STRIPES: Work stripes as follows: BODY - SEE MEASURING TIP: From beg edge to 11 cm: 2 strands dark grey green 11 to 22 cm: 1 strand dark grey green and 1 strand light greyish green 22 cm to 33-34-35 cm: 2 strands light greyish green 33-34-35 cm to 44-46-48 cm: 1 strand light greyish green and 1 strand off white 44-46-48 cm until finished measurements: 2 strands off white SLEEVE: From beg edge to 3 cm: 1 strand dark grey green and 1 strand light greyish green 3 to 14 cm: 2 strands light greyish green 14 cm to 25-26-27 cm: 1 strand light greyish green and 1 strand off white DECREASE TIP: Work 1 tr, but wait with last pull through (= 2 sts on hook), work next tr, but on last pull through, pull thread through all sts on hook - 1 tr has been dec. ---------------------------------------------------------- JACKET: Jacket is worked back and forth from mid front, bottom up. Work 236-284-332 loose ch on hook size 4.5 mm with 2 strands dark grey green. Work STRIPES - see explanation above. ROW 1: Work 1 tr in 4th ch from hook (= 2 tr), 1 tr in each of the next 20-24-28 ch, * skip 5 ch, 1 tr in each of the next 16-20-24 ch, 3 ch, 1 tr in each of the next 16-20-24 ch *, repeat from *-* 5 times in total, skip 5 ch and finish with 1 tr in each of the last 22-26-30 ch = 204-252-300 tr. ROW 2: 3 ch (= 1 tr), 1 tr in each of the next 5 tr (= 6 tr in band), 2 tr in each of the next 2 tr, 1 tr in each of the next 12-16-20 tr, * skip 4 tr, 1 tr in each of the next 14-18-22 tr, 2 tr in ch-space, 3 ch, 2 tr in ch-space, 1 tr in each of the next 14-18-22 tr *, repeat from *-* a total of 5 times, skip 4 tr, finish with 1 tr in each of the next 12-16-20 tr and 2 tr in each of the next 2 tr, 1 tr in each of the last 6 tr (= band) = 16-20-24 tr between every hole, 204-252-300 tr in total. Repeat 2nd row until piece measures 12 cm – READ MEASURING TIP. Now work as follows: ROW 1: 3 ch (= 1 tr), 1 tr in each of the next 5 tr (= 6 tr in band), 2 tr in next tr, 1 tr in each of the next 13-17-21 tr, * skip 4 tr, 1 tr in each of the next 14-18-22 tr, 1 tr in ch-space, 3 ch, 1 tr in ch-space, 1 tr in each of the next 14-18-22 tr *, repeat from *-* a total of 5 times, skip 4 tr, finish with 1 tr in each of the next 13-17-21 tr, 2 tr in next tr and 1 tr in each of the last 6 tr (= band) = 192-240-288 tr (15-19-23 tr between every hole). ROW 2: 3 ch (= 1 tr), 1 tr in each of the next 5 tr (= 6 tr in band), 2 tr in each of the next 2 tr, 1 tr in each of the next 11-15-19 tr, * skip 4 tr, 1 tr in each of the next 13-17-21 tr, 2 tr in ch-space, 3 ch, 2 tr in ch-space, 1 tr in each of the next 13-17-21 tr *, repeat from *-* a total of 5 times, skip 4 tr, finish with 1 tr in each of the next 11-15-19 tr, 2 tr in each of the next 2 tr and 1 tr in each of the last 6 tr (= band) = 192-240-288 tr (15-19-23 tr between every hole). Repeat 2nd row until piece measures approx. 22 cm. Now work as follows: ROW 1: 3 ch (= 1 tr), 1 tr in each of the next 5 tr (= 6 tr in band), 2 tr in next tr, 1 tr in each of the next 12-16-20 tr, * skip 4 tr, 1 tr in each of the next 13-17-21 tr, 1 tr in ch-space, 3 ch, 1 tr in ch-space, 1 tr in each of the next 13-17-21 tr *, repeat from *-* a total of 5 times, skip 4 tr, finish with 1 tr in each of the next 12-16-20 tr, 2 tr in next tr and 1 tr in each of the last 6 tr (= band) = 180-228-276 tr (14-18-22 tr between every hole). ROW 2: 3 ch (= 1 tr), 1 tr in each of the next 5 tr (= 6 tr in band), 2 tr in each of the next 2 tr, 1 tr in each of the next 10-14-18 tr, * skip 4 tr, 1 tr in each of the next 12-16-20 tr, 2 tr in ch-space, 3 ch, 2 tr in ch-space, 1 tr in each of the next 12-16-20 tr *, repeat from *-* a total of 5 times, skip 4 tr, finish with 1 tr in each of the next 10-14-18 tr, 2 tr in each of the next 2 tr and 1 tr in each of the last 6 tr (= band) = 180-228-276 tr (14-18-22 tr between every hole). Repeat 2nd row until piece measures approx. 32-33-34 cm. Now work as follows: ROW 1: 3 ch (= 1 tr), 1 tr in each of the next 5 tr (= 6 tr in band), 2 tr in next tr, 1 tr in each of the next 11-15-19 tr, * skip 4 tr, 1 tr in each of the next 12-16-20 tr, 1 tr in ch-space, 3 ch, 1 tr in ch-space, 1 tr in each of the next 12-16-20 tr *, repeat from *-* a total of 5 times, skip 4 tr, finish with 1 tr in each of the next 11-15-19 tr, 2 tr in next tr and 1 tr in each of the last 6 tr (= band) = 168-216-264 tr (13-17-21 tr between every hole). ROW 2: 3 ch (= 1 tr), 1 tr in each of the next 5 tr (= 6 tr in band), 2 tr in each of the next 2 tr, 1 tr in each of the next 9-13-17 tr, * skip 4 tr, 1 tr in each of the next 11-15-19 tr, 2 tr in ch-space, 3 ch, 2 tr in ch-space, 1 tr in each of the next 11-15-19 tr *, repeat from *-* a total of 5 times, skip 4 tr, finish with 1 tr in each of the next 9-13-17 tr, 2 tr in each of the next 2 tr and 1 tr in each of the last 6 tr (= band) = 168-216-264 tr (13-17-21 tr between every hole). Repeat 2nd row until piece measures approx. 44-46-48 cm. Put piece aside. SLEEVE: Work 93-117-141 loose ch on hook size 4.5 mm with 1 strand dark grey green and 1 strand light greyish green and form a ring with 1 sl st in first ch. Work in the round and with STRIPES - see explanation above. ROUND 1: Work 3 ch in first ch (= 1 tr), * 3 ch, 1 tr in each of the next 13-17-21 ch, skip 5 ch, 1 tr in each of the next 13-17-21 ch *, repeat from *-* 2 times, 3 ch, 1 tr in each of the next 13-17-21 ch, skip 5 ch, 1 tr in each of the last 12-16-20 ch and finish with 1 sl st in 3rd ch from beg of round. ROUND 2: 3 ch (= 1 tr), 1 tr in ch-sp, ch 3, 2 tr in ch-sp, * 1 tr in each of the next 11-15-19 tr, skip 4 tr, 1 tr in each of the next 11-15-19 tr, 2 tr in ch-space, 3 ch, 2 tr in ch-space *, repeat from *-* 2 times, 1 tr in each of the next 11-15-19 tr, skip 4 tr, 1 tr in each of the next 10-14-18 tr and finish with 1 sl st in 3rd ch from beg of round, 1 sl st in each of next 2 sts = 78-102-126 tr. Repeat 2nd round until sleeve measures 25-26-27 cm, fasten off. YOKE: Work piece tog as follows – beg on right front piece with 2 strands off white on hook size 4.5 mm: 3 ch (= 1 tr), 1 tr in each of the next 5 tr (= 6 tr in band), 2 tr in each of the next 2 tr, 1 tr in each of the next 9-13-17 tr, skip 4 tr, 1 tr in each of the next 11-15-19 tr, 2 tr in ch-space, 3 ch. Continue work from sleeve: 2 tr in a ch-space, 1 tr in each of the next 11-15-19 tr, skip 4 tr, 1 tr in each of the next 11-15-19 tr, 2 tr in ch-space, 3 ch, 2 tr in ch-space, 1 tr in each of the next 11-15-19 tr, skip 4 tr, 1 tr in each of the next 11-15-19 tr, 2 tr in ch-space, 3 ch. Skip the remaining tr on sleeve, skip 1 repetition from body (13-17-21 + 13-17-21 tr), then work from body as follows: 2 tr in ch-space, 1 tr in each of the next 11-15-19 tr, skip 4 tr, 1 tr in each of the next 11-15-19 tr, 2 tr in ch-space, 3 ch, 2 tr in ch-space, 1 tr in each of the next 11-15-19 tr, skip 4 tr, 1 tr in each of the next 11-15-19 tr, 2 tr in ch-space, 3 ch. Continue work from sleeve: 2 tr in a ch-space, 1 tr in each of the next 11-15-19 tr, skip 4 tr, 1 tr in each of the next 11-15-19 tr, 2 tr in ch-space, 3 ch, 2 tr in ch-space, 1 tr in each of the next 11-15-19 tr, skip 4 tr, 1 tr in each of the next 11-15-19 tr, 2 tr in ch-space, 3 ch. Skip the remaining tr on sleeve, skip 1 repetition from body (13-17-21 + 13-17-21 tr), then work from body as follows: 2 tr in ch-space, 1 tr in each of the next 11-15-19 tr, skip 4 tr, finish with 1 tr in each of the next 9-13-17 tr and 2 tr in each of the next 2 tr, 1 tr in each of the next 6 tr (= band) = 220-284-348 tr (13-17-21/26-34-42 tr between every hole). ROW 1: 3 ch (= 1 tr), 1 tr in each of the next 5 tr (= 6 tr in band), 2 tr in each of the next 2 tr, 1 tr in each of the next 9-13-17 tr, * skip 4 tr, 1 tr in each of the next 22-30-38 tr, skip 4 tr, 1 tr in each of the next 11-15-19 tr, 2 tr in ch-space, 3 ch, 2 tr in ch-space, 1 tr in each of the next 11-15-19 tr *, repeat from *-* 3 times in total, skip 4 tr, 1 tr in each of the next 22-30-38 tr, skip 4 tr, finish with 1 tr in each of the next 9-13-17 tr and 2 tr in each of the next 2 tr, 1 tr in each of the last 6 tr (= band) = 204-268-332 tr. ROW 2: 3 ch (= 1 tr), 1 tr in each of the next 5 tr (= 6 tr in band), 2 tr in next tr, 1 tr in each of the next 10-14-18 tr, * skip 4 tr, 1 tr in each of the next 18-26-34 tr, skip 4 tr, 1 tr in each of the next 7-11-15 tr, work the next 2 tr tog - READ DEC.TIPS, work the next 2 tr tog, 2 tr in ch-space, 3 ch, 2 tr in ch-space, work the next 2 tr tog, work the next 2 tr tog, 1 tr in each of the next 7-11-15 tr *, repeat from *-* 3 times in total, skip 4 tr, 1 tr in each of the next 18-26-34 tr, skip 4 tr, finish with 1 tr in each of the next 10-14-18 tr and 2 tr in next tr, 1 tr in each of the last 6 tr (= band) = 174-238-302 tr. ROW 3: 3 ch (= 1 tr), 1 tr in each of the next 5 tr (= 6 tr in band), 2 tr in each of the next 2 tr, 1 tr in each of the next 8-12-16 tr, * skip 4 tr, 1 tr in each of the next 14-22-30 tr, skip 4 tr, 1 tr in each of the next 5-9-13 tr, work the next 2 tr tog, work the next 2 tr tog, 2 tr in ch-space, 3 ch, 2 tr in ch-space, work the next 2 tr tog, work the next 2 tr tog, 1 tr in each of the next 5-9-13 tr *, repeat from *-* 3 times in total, skip 4 tr, 1 tr in each of the next 14-22-30 tr, skip 4 tr, finish with 1 tr in each of the next 8-12-16 tr and 2 tr in each of the next 2 tr, 1 tr in each of the last 6 tr (= band) = 146-210-274 tr. ROW 4: 3 ch (= 1 tr), 1 tr in each of the next 5 tr (= 6 tr in band), 2 tr in next tr, 1 tr in each of the next 9-13-17 tr, * skip 4 tr, 1 tr in each of the next 10-18-26 tr, skip 4 tr, 1 tr in each of the next 5-9-13 tr, work the next 2 tr tog, 4 tr in ch-space, work the next 2 tr tog,1 tr in each of the next 5-9-13 tr*, repeat *-* 3 times in total, skip 4 tr, 1 tr in each of the next 10-18-26 tr, skip 4 tr, finish with 1 tr in each of the next 9-13-17 tr and 2 tr in next tr, 1 tr in each of the last 6 tr (= band) = 122-186-250 tr. ROW 5: 3 ch (= 1 tr), 1 tr in each of the next 5 tr (= 6 tr in band), 2 tr in each of the next 2 tr, 1 tr in each of the next 7-11-15 tr, * skip 4 tr, 1 tr in each of the next 6-14-22 tr, skip 4 tr, 1 tr in each of the next 4-8-12 tr, 1 tr in next tr, 2 tr in each of next 2 tr, 1 tr in next tr, 1 tr in each of the next 4-8-12 tr *, repeat from *-* 3 times in total, skip 4 tr, 1 tr in each of the next 6-14-22 tr, skip 4 tr, finish with 1 tr in each of the next 7-11-15 tr and 2 tr in each of the next 2 tr, 1 tr in each of the last 6 tr (= band) = 100-164-228 tr. Now finish the jacket with 1 tr in every tr - the zig-zag pattern is no longer worked. Replace first tr on every row with 3 ch. ROW 6: Work 1 tr in every tr while AT THE SAME TIME dec 5-9-10 tr evenly (do not dec over tr in bands) = 95-155-218 tr. Work 3-7-11 more rows with 1 tr in every tr while AT THE SAME TIME dec 5-9-10 tr evenly on every row = 80-92-108 tr. Fasten off. ASSEMBLY: Sew tog the openings under the sleeves and sew on buttons on left band. Sew the upper button 2 cm from upper edge, then distribute the rest of the buttons downwards approx. 8 cm apart. Button the buttons between tr on right front piece. |
|
 |
|
Have you finished this pattern?Tag your pictures with #dropspattern #seawavescardigan or submit them to the #dropsfan gallery. Do you need help with this pattern?You'll find 10 tutorial videos, a Comments/Questions area and more by visiting the pattern on garnstudio.com. © 1982-2026 DROPS Design A/S. We reserve all rights. This document, including all its sub-sections, has copyrights. Read more about what you can do with our patterns at the bottom of each pattern on our site. |
|


With over 40 years in knitting and crochet design, DROPS Design offers one of the most extensive collections of free patterns on the internet - translated to 17 languages. As of today we count 325 catalogues and 12298 patterns translated into English (UK/cm).
We work hard to bring you the best knitting and crochet have to offer, inspiration and advice as well as great quality yarns at incredible prices! Would you like to use our patterns for other than personal use? You can read what you are allowed to do in the Copyright text at the bottom of all our patterns. Happy crafting!
Post a comment to pattern DROPS 147-10
We would love to hear what you have to say about this pattern!
If you want to leave a question, please make sure you select the correct category in the form below, to speed up the answering process. Required fields are marked *.