
Popular categories
Looking for a yarn?


Comments / Questions (26)
![]() Evelina wrote:
Evelina wrote:
Hallo Drops Team, als ik dit vest in tricotsteek zou breien veranderen daardoor de afmetingen? Ik zou dit vest graag willen breien voor de constructie, eerst het rugpand met mouwen, dan vanaf de schouder naar beneden de voorpanden. Helaas vind ik dat kantpatroon niet mooi. Ik zou willen breien met Melody. Alvast hartelijk dank voor jullie antwoord!
27.03.2023 - 17:56DROPS Design answered:
Dag Evelina,
Je kunt inderdaad dit vest prima in tricotsteek breien en dezelfde maten en op te zetten steken aanhouden. Het kantpatroon heeft ongeveer dezelfde stekenverhouding als tricotsteek.
27.03.2023 - 20:52
![]() Mamyfred wrote:
Mamyfred wrote:
Je cherche un fil pour réaliser cette très jolie veste . Que me conseillez vous ?
21.01.2023 - 20:47DROPS Design answered:
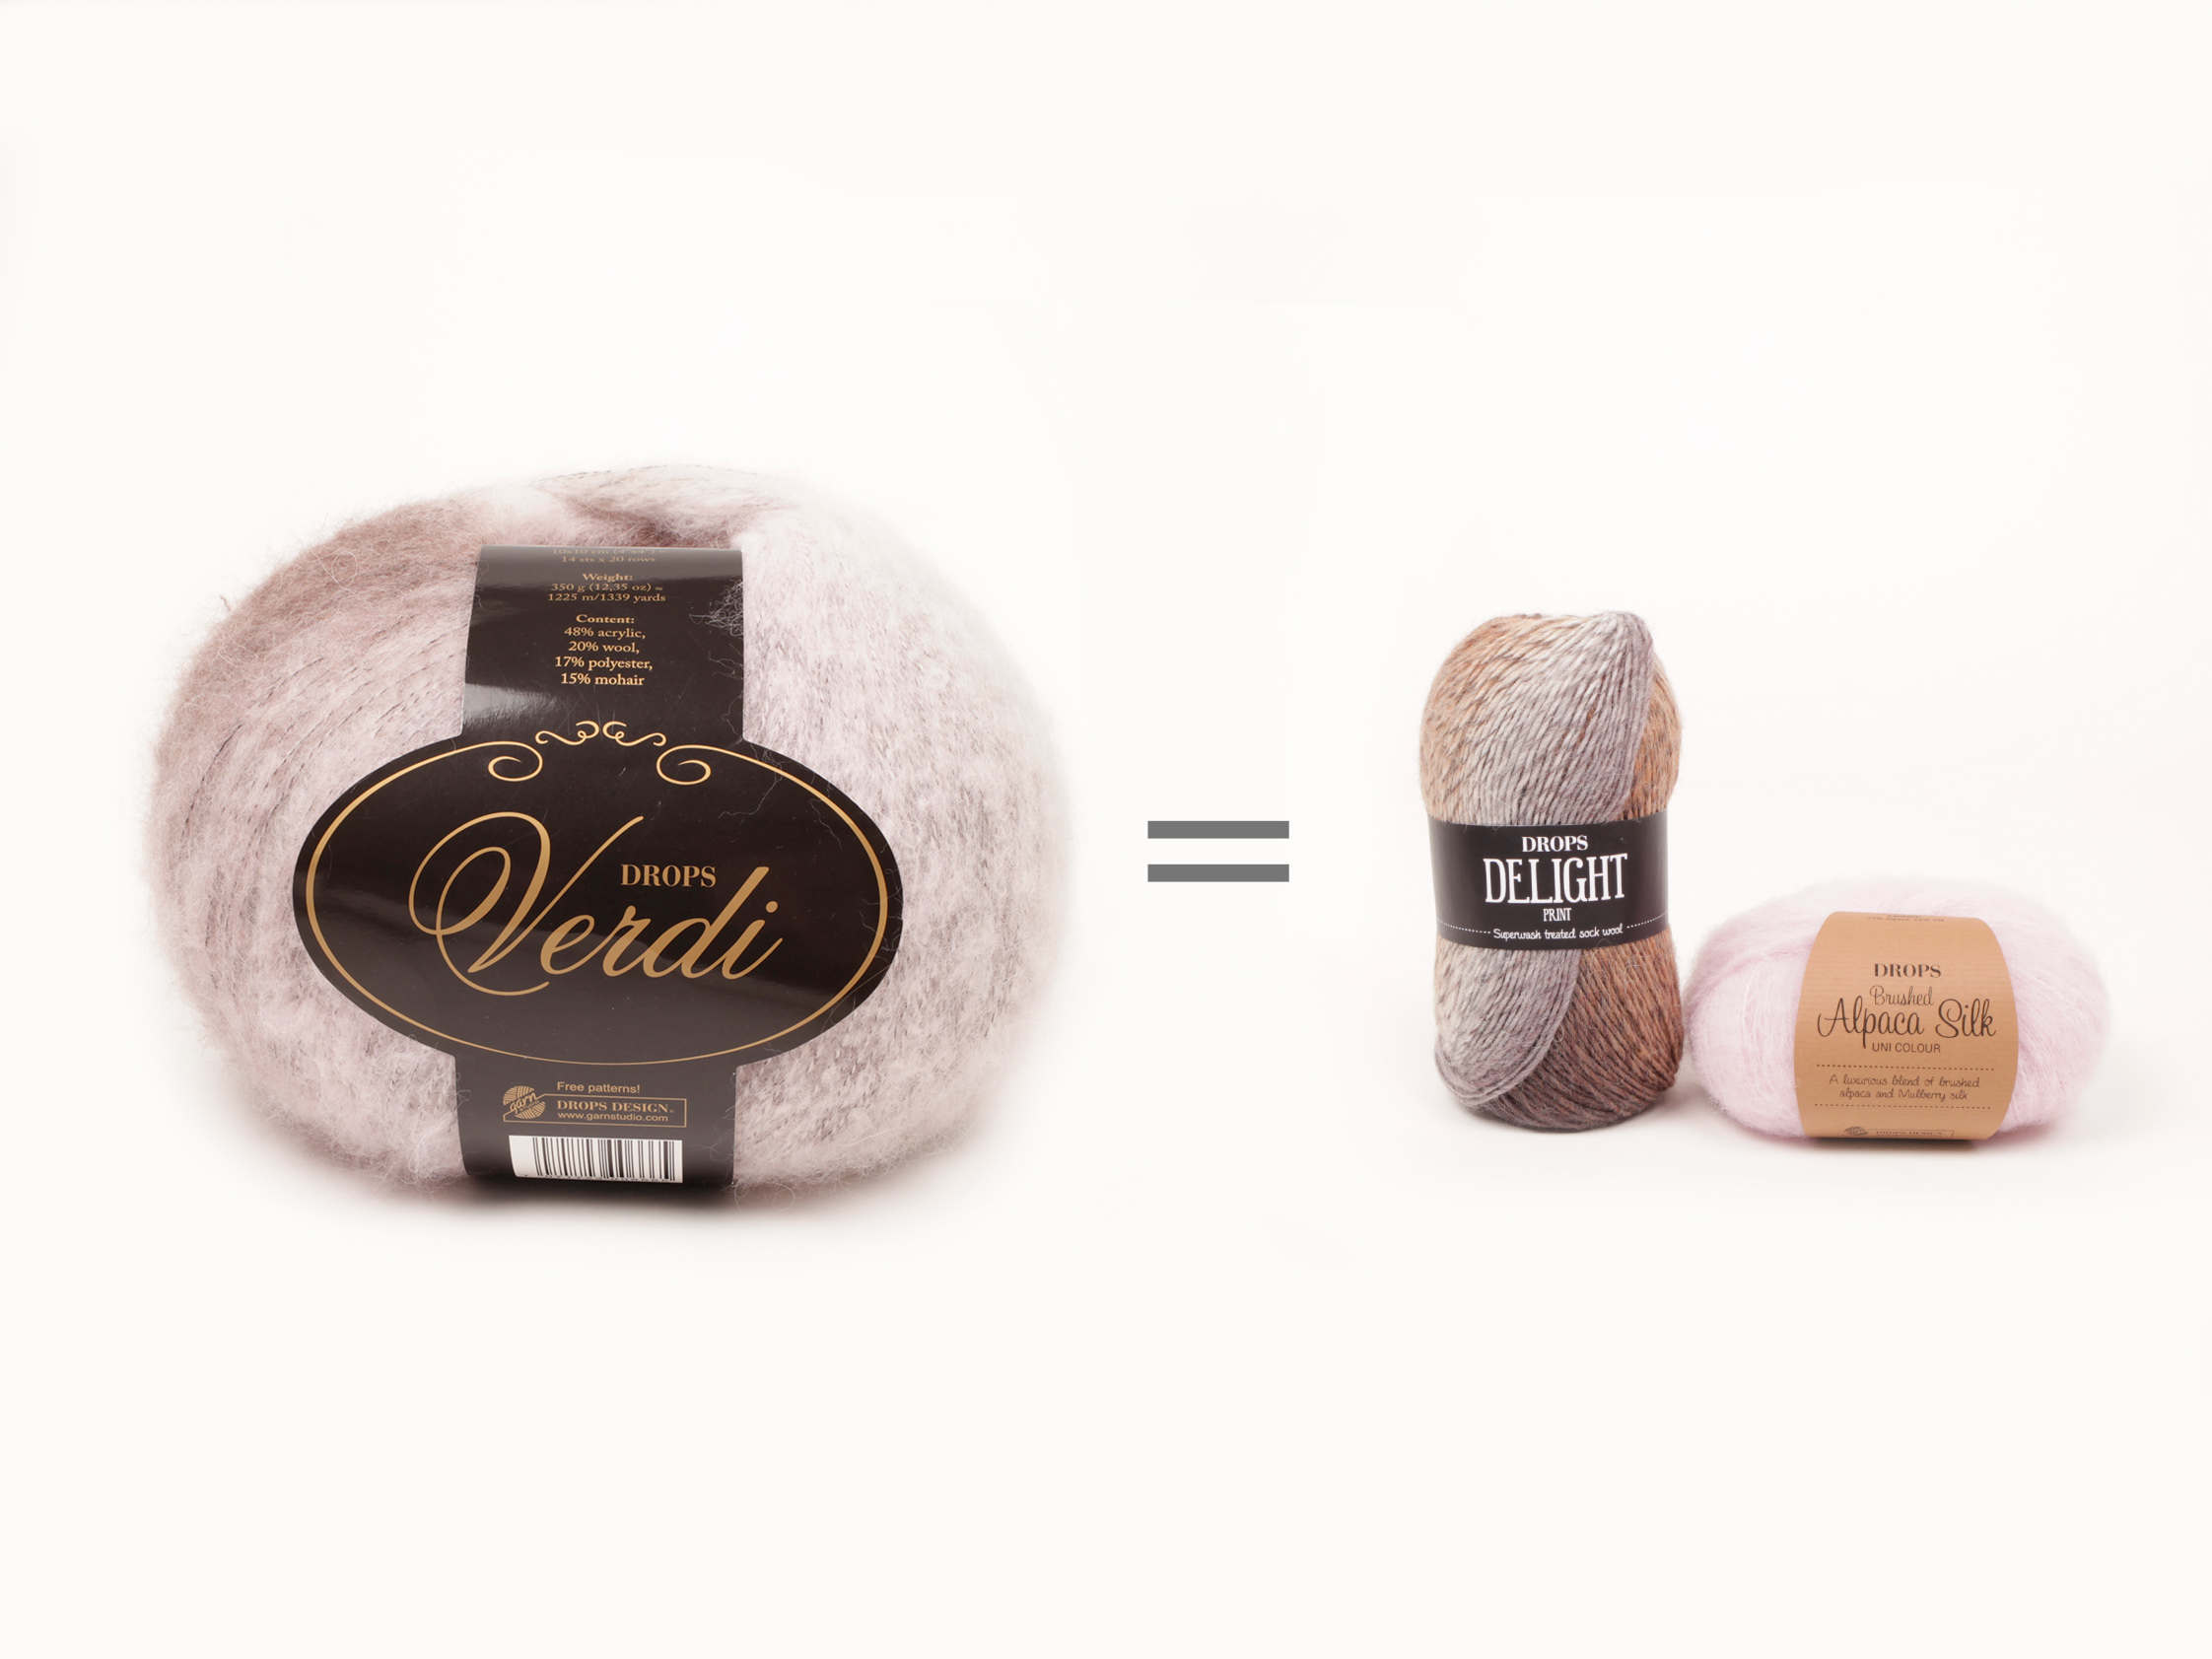
Bonjour Mamyfred, vous pouvez utiliser 1 fil Brushed Alpaca Silk + 1 fil Delight (ou 1 fil Fabel pour plus de choix de couleur) - comme le montrent cette vidéo ou cette leçon - retrouvez plus d'infos sur les alternatives ici. Bon tricot!
23.01.2023 - 09:18
![]() Preppy wrote:
Preppy wrote:
J'aimerais tricoter cette veste , mais drops verdi n 'existe plus . Par quel fil le remplacer ? Merci pour vos conseils !
20.01.2023 - 18:45
![]() Heidemarie Bauer wrote:
Heidemarie Bauer wrote:
Hallo!! Wie entsteht der "V-Ausschnitt" im Vorderteil obwohl keine Maschen abgenommen werden?? Bitte um Info danke heidi bauer
05.09.2018 - 09:07DROPS Design answered:
Liebe Frau Bauer, der V-Ausschnitt wird sich selbst enstehen wenn mann die Jacke trägt und die Schnürre zusammengebunden sind. Viel Spaß beim stricken!
05.09.2018 - 12:25Kyra wrote:
"When piece measures 46-47-48-49-50-51 cm (adjust so that next row is worked from RS), cast on 30-28-26-24-22-20 new sts at the end of row for sleeve. Turn and K the first 12 sts, P the rest of row, then cast on 30-28-26-24-22-20 new sts at the end of row for sleeve in the other side = 126-128-132-134-138-140 sts in total." Is this correct, "adjust so that next row is worked from RS"? Not on the WS? So, on right side we have a row not in the pattern, but worked on purl stiches.
31.03.2016 - 14:13DROPS Design answered:
Dear Kyra, yes that's correct that way, at the end of a RS row, cast on the new sts for sleeve, then turn and K the first 12 sts and P remaining sts on row, and at the end of this row from WS, cast on the new sts for sleeve. Next row will now be worked from RS. Happy knitting!
31.03.2016 - 15:56
![]() Aline wrote:
Aline wrote:
Bonjour, à nouveau! en haut du dos, il ne faut pas rabattre de mailles centrales pour l'encolure? Merci
10.09.2015 - 13:26DROPS Design answered:
Bonjour Aline, on ne rabat pas de mailles pour l'encolure, on continue chaque devant l'un après l'autre sur la moitié des mailles, avec la moitié des mailles tricotées au point mousse pour l'encolure dos en début/fin de rang (= bordure du devant). Bon tricot!
10.09.2015 - 14:08
![]() Aline wrote:
Aline wrote:
Bonjour, Je suis arrivée au montage des manches mais j'ai l'impression que les nombres de mailles sont inversés. Pour une taille L, c'est bien 22 mailles? ça me semble trop court, non?
06.09.2015 - 09:13DROPS Design answered:
Bonjour Aline, en taille L (3ème taille), on monte 26 m (et 22 m en taille XXL), moins de mailles que dans les plus petites tailles, car les épaules sont plus larges. Bon tricot!
07.09.2015 - 11:11
![]() Aline wrote:
Aline wrote:
Bonjour, Est-ce que je peux tricoté ce modèle en remplaçant le point ajouré par du jersey et en reprenant le même nombre de mailles? D'avance, un tout grand merci!
14.08.2015 - 10:20DROPS Design answered:
Bonjour Aline, tricotez avant tout un échantillon pour vérifier votre tension et avec une règle de 3, vérifiez la largeur à l'aide du schéma de mesure en bas de page. Bon tricot!
14.08.2015 - 14:13
![]() Marieke wrote:
Marieke wrote:
Hallo, mein Rückenteil (Gr. S) wurde leider ca. 20 cm zu breit. Da ich genau nach Anleitung gestrickt habe, verdächtige ich die Löcher als Fehlerquelle. Ich habe sie normal abgestrickt. Kann es sein, dass ich sie verschränkt abstricken muss, so dass die Löcher kleiner werden? Danke im Voraus!
02.06.2014 - 16:04DROPS Design answered:
Liebe Marieke, es ist richtig, dass Sie die Umschläge beim Lochmuster einfach normal abstricken, nicht verschränkt. Ich vermute, das Problem liegt in der Maschenprobe - sie ist in glatt rechts angegeben statt im Lochmuster, sie hätte wahrscheinlich im Lochmuster angefertigt werden müssen, da beim Lochmuster ja viel weniger M pro 10 cm benötigt werden. Ich werde das mal ans Design-Team weiterleiten, es kann allerdings dauern, bis eine Antwort kommt.
04.06.2014 - 09:37
![]() Johanna wrote:
Johanna wrote:
Und Garngruppe B doppelt wird zu dick?
09.05.2014 - 14:57DROPS Design answered:
Liebe Johanna, ja, das wird zu dick. Sie können ausprobieren, 1 Faden aus Gruppe B mit 1 Faden aus Gruppe A zu kombinieren und das dann recht locker stricken. Die Maschenprobe muss auf jeden Fall stimmen.
12.05.2014 - 14:42
|
||||||||||
Evening Blues#eveningbluescardigan |
||||||||||
 |
 |
|||||||||
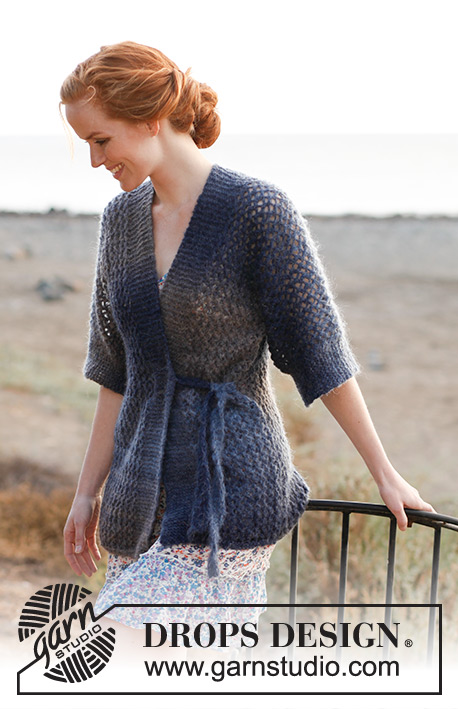
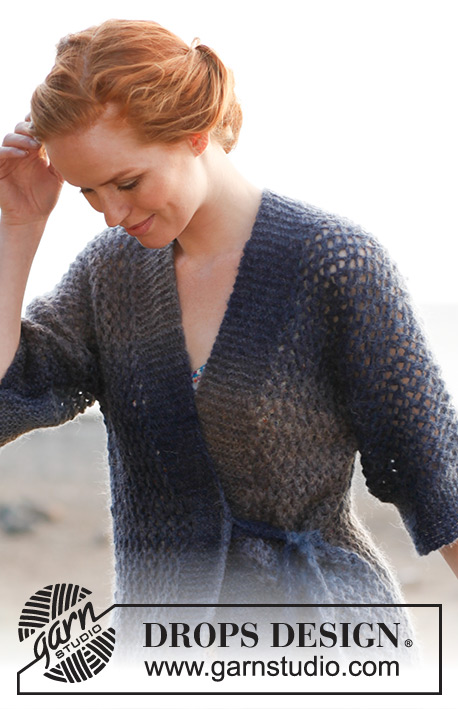
Knitted DROPS jacket with lace pattern and ¾ sleeves in ”Verdi”. Size: S - XXXL.
DROPS 137-19 |
||||||||||
|
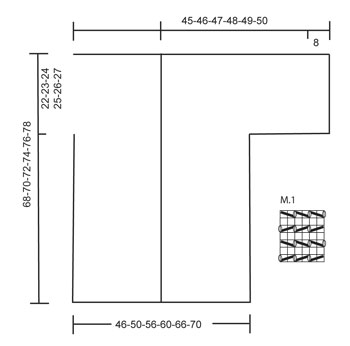
LACE PATTERN: See diagram M.1, diagram shows pattern from RS. 1st row = RS. GARTER ST (back and forth on needle): K all rows. -------------------------------------------------------- JACKET: Work first back piece, then cast on in each side for sleeves, work up to shoulder and down on each front piece. Worked back and forth on a circular needle to make room for all the sts. BACK PIECE: Cast on 66-72-80-86-94-100 sts (incl 1 edge st in each side) on circular needle size 6 mm with Verdi. K 3 rows (1st row = WS). Then work LACE PATTERN - according to diagram M.1 with 1 edge st in each side in GARTER ST - see explanation above! When piece measures 46-47-48-49-50-51 cm (adjust so that next row is worked from RS), cast on 30-28-26-24-22-20 new sts at the end of row for sleeve. Turn and K the first 12 sts, P the rest of row, then cast on 30-28-26-24-22-20 new sts at the end of row for sleeve in the other side = 126-128-132-134-138-140 sts in total. Continue as follows: 12 sts in garter st, diagram M.1 over 102-104-108-110-114-116 sts (make sure that the pattern fits over the middle 54-70-78-84-92-98 sts) and 12 sts in garter st. When piece measures 65-67-69-71-73-75 cm, K 6 rows over the middle 26-28-28-30-30-32 sts (work the other sts as before). Now divide the piece in the middle for neck and slip half the sts on a stitch holder. FIRST FRONT PIECE: = 63-64-66-67-69-70 sts. Continue diagram M.1 with 12 sts in garter st on the outer edge of sleeve and 13-14-14-15-15-16 sts in garter st towards mid front. When piece measures 68-70-72-74-76-78 cm, insert a marker (= mid on top of shoulder). NOW MEASURE PIECE FROM HERE! Work until piece measures 22-23-24-25-26-27 cm from marker on shoulder. On next row from the side, loosely cast off the first 30-28-26-24-22-20 sts = 33-36-40-43-47-50 sts remain on needle. Continue diagram M.1 with 13-14-14-15-15-16 sts in garter st towards mid front and 1 st in garter st towards the side. When piece measures approx. 66-68-70-72-74-76 cm from shoulder (adjust so that front and back piece have the same no of holes), K 3 rows over all sts before LOOSELY casting off. OTHER FRONT PIECE: Slip sts from stitch holder back on needle and work as first front piece. ASSEMBLY: Sew sleeve and side seams in one inside 1 edge st. TIES: Cast on 7 sts on circular needle size 6 mm and work in garter st back and forth for 40 cm, cast off. Work another tie the same way. Sew one tie on to right band, approx. 42 cm down from shoulder, and the other tie in the same height as the first, against left side seam. |
||||||||||
Diagram explanations |
||||||||||
|
||||||||||
|
||||||||||
Have you finished this pattern?Tag your pictures with #dropspattern #eveningbluescardigan or submit them to the #dropsfan gallery. Do you need help with this pattern?You'll find 8 tutorial videos, a Comments/Questions area and more by visiting the pattern on garnstudio.com. © 1982-2025 DROPS Design A/S. We reserve all rights. This document, including all its sub-sections, has copyrights. Read more about what you can do with our patterns at the bottom of each pattern on our site. |
||||||||||


With over 40 years in knitting and crochet design, DROPS Design offers one of the most extensive collections of free patterns on the internet - translated to 17 languages. As of today we count 314 catalogues and 11822 patterns translated into English (UK/cm).
We work hard to bring you the best knitting and crochet have to offer, inspiration and advice as well as great quality yarns at incredible prices! Would you like to use our patterns for other than personal use? You can read what you are allowed to do in the Copyright text at the bottom of all our patterns. Happy crafting!
Post a comment to pattern DROPS 137-19
We would love to hear what you have to say about this pattern!
If you want to leave a question, please make sure you select the correct category in the form below, to speed up the answering process. Required fields are marked *.