
Popular categories
Looking for a yarn?


Comments / Questions (13)
![]() Kirsi Zirel wrote:
Kirsi Zirel wrote:
Tere! Proovin siin heegeldada beebi mänguloomi. Tekkis küsimus, et kas täidetavate mänguasjade puhul on tõesti vatt ikka parim täitematerjal. Siis ei saa ju mängulooma pesta, vatt läheb n-ö klompi. Kas oskate soovitada ka mõnda muud täitematerjali?
05.04.2022 - 19:51DROPS Design answered:
Tere! Müügil on spetsiaalseid täidiseid, või taaskasutage (pestud) padja sisu. Head meisterdamist!
06.04.2022 - 18:02
![]() Ine wrote:
Ine wrote:
Hallo! Is er ergens een uitleg te vinden over: - waarom je 30cm draad moet overhouden en wat je daarmee moet doen? - hoe haak of naai je de ogen en benen aan de kikker? Dank!
01.04.2022 - 20:45DROPS Design answered:
Dag Ine,
Aan het eind bij de beschrijving staat dat je de ogen op de bovenkant van de kop naait. Hiervoor gebruik je het draadeinde van 30 cm. Je kunt de ogen met bijvoorbeeld stiksteken aan de kop naaien. Zie ook deze video
04.04.2022 - 11:57
![]() Lara Chipp wrote:
Lara Chipp wrote:
I was wondering if anyone had sent you any pictures of the frog in different colors. I'm making this for a girl and I'm thinkin pinks and whites.
05.05.2021 - 22:20DROPS Design answered:
Dear Lara, on Ravelry, you can see a number of different frogs, admittedly, most of them are green, and none pink, but there are some other colors, that can give you some ideas. Happy Crafting!
05.05.2021 - 23:07
![]() Bea wrote:
Bea wrote:
Me ha encantado este patrón. La ranita me ha quedado genial. ¡Muchas gracias!
02.04.2021 - 16:45
![]() Suzie wrote:
Suzie wrote:
This little frog is the perfect size for a toddler or baby. Supper easy to crochet and assemble. I used dk cotton yarn and enclosed fine poly stuffing in simple cotton fabric bags in case the baby mouths it. Recommend the pattern highly for a beginner!
05.08.2020 - 14:44
![]() Mercuri wrote:
Mercuri wrote:
Je vous remercie pour ce tuto crochet gratuit qui est un magnifique modèle. Je suis vraiment ravi.
16.12.2018 - 00:02
![]() Birgit Steffen wrote:
Birgit Steffen wrote:
Für eine Bekannte, die Fußballfan von BVB Dortmund ist, habe ich Frankie in gelb und schwarz (drops Paris) nachgearbeitet. Dank der guten Anleitung ist er wirklich gut geworden. Ich würde Ihnen sehr gerne ein Foto schicken. An welche Email Adresse kann ich das Foto schicken? Ich habe kein Facebook, Instagram oder Twitter.
17.10.2018 - 21:38
![]() Goyave wrote:
Goyave wrote:
Je suis débutante en crochet et j'ai trouvé les explications très claires d'autant plus que j'ai vu après réalisation que c'était un modèle pour intermédiaire. Egalement, je trouve votre site est très bien fait.
19.12.2016 - 18:56
![]() Anne-Marie wrote:
Anne-Marie wrote:
Hei, de magiske sirklene mine lager alltid små tupper, slik at hodet og rumpen ble litt spiss. Det ser dessverre litt dumt ut, synes jeg. Har dere et tips hvordan jeg kan unngå dette? Jeg har prøvd å trekke dem mindre stramme, men det hjalp bare litt.
07.04.2016 - 22:29DROPS Design answered:
Hej Anne-Marie, Har du set vor video med magisk cirkel? Ellers kan du sikkert justere det når du hæfter tråden. God fornøjelse!
08.04.2016 - 09:10
![]() Nicole wrote:
Nicole wrote:
Ihr habt recht! Die Naht sieht nicht schön aus! Ich habe es so gemacht wie angegeben, besser geht's nun mal in Runden nicht. Er ist toll geworden!
09.10.2013 - 08:39
|
|
Frankie#dropsfrankie |
|
 |
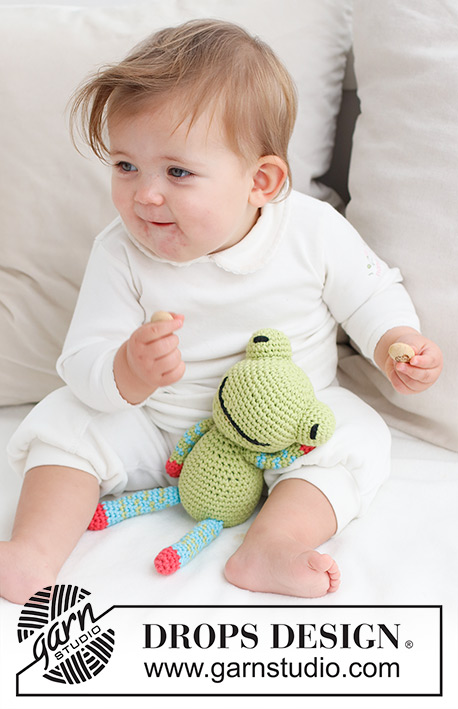 |
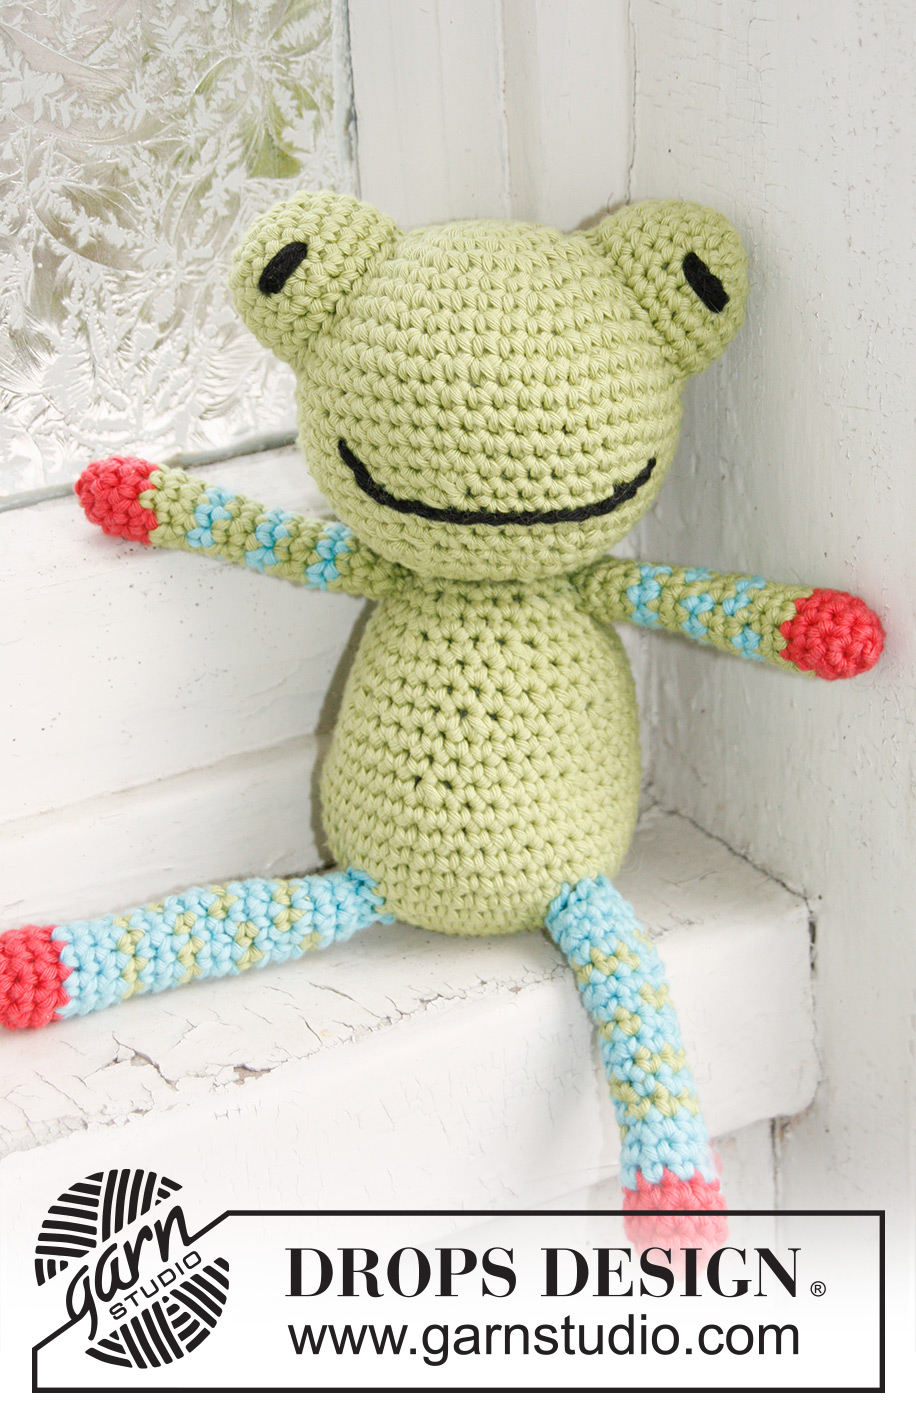
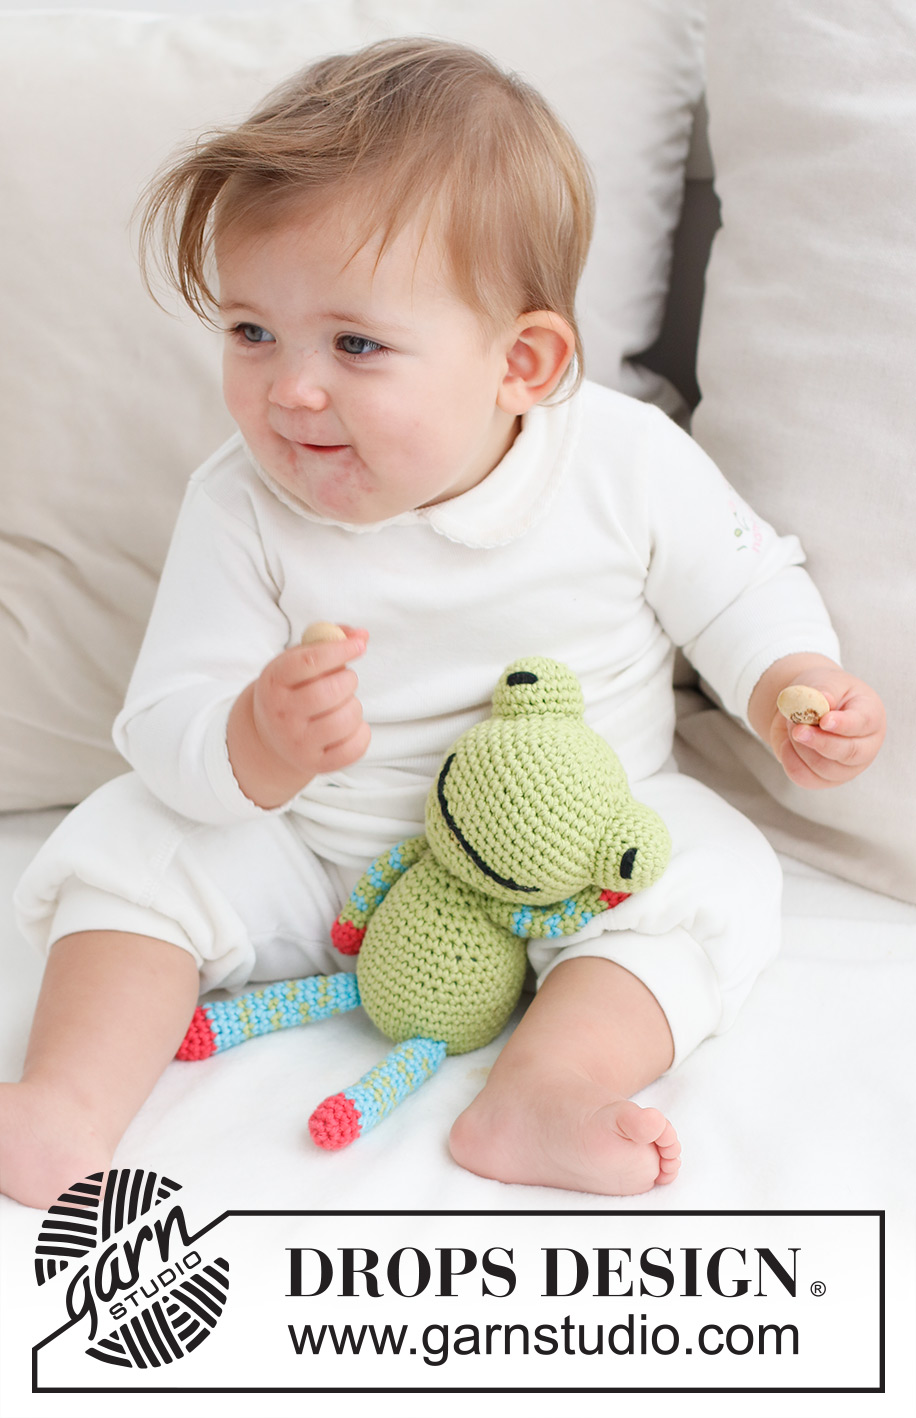
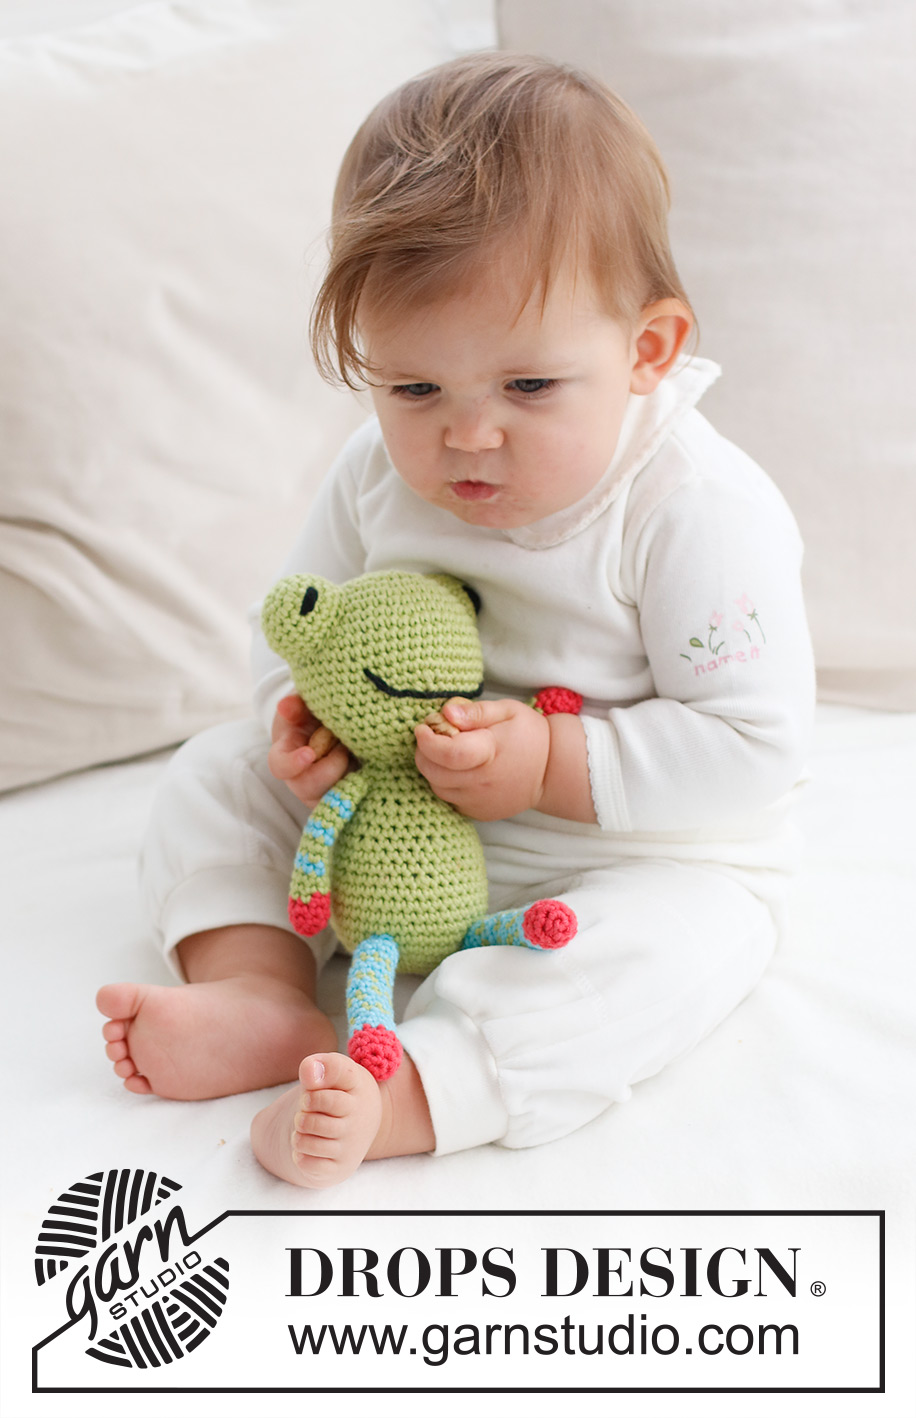
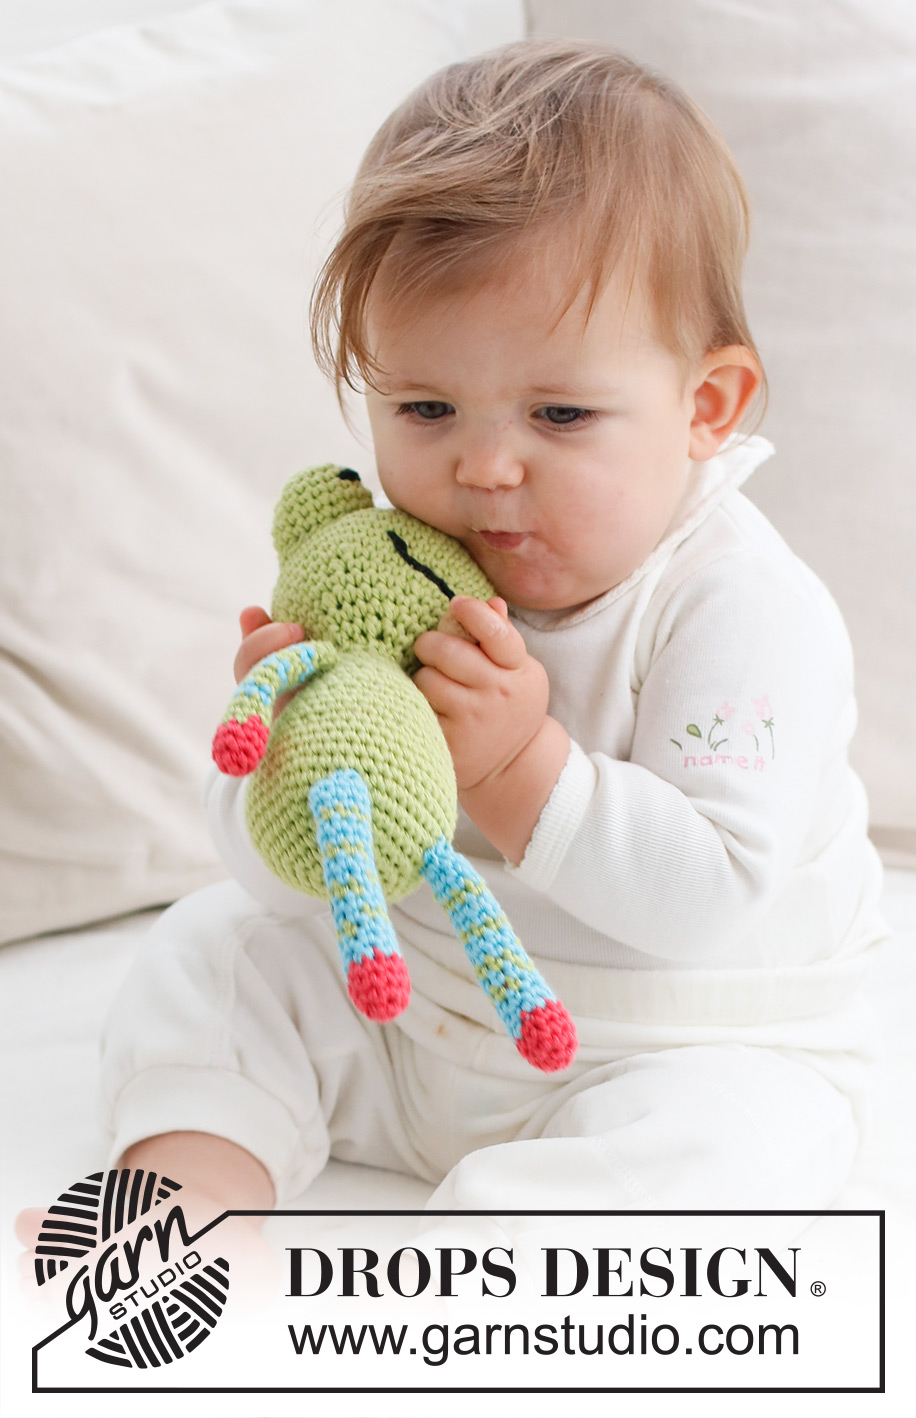
Crochet frog in DROPS Paris
DROPS Baby 21-45 |
|
|
CROCHET INFO: MAGIC CIRCLE: When piece is worked in the round, start with this technique to avoid holes in the middle (instead of ch-ring): Hold the yarn end and wind the yarn one time around the index finger to make a loop. Hold the loop with left thumb and middle finger, place the thread over left index finger. Insert hook through the loop, make a YO and pull thread through loop, work 1 ch, then work dc around the loop. When the desired no of dc have been reached, pull the yarn end to tighten the loop. Fasten the yarn end on the back side. Continue to work in the round in a circle. WORK IN THE ROUND IN A CIRCLE: After last dc on the round, continue to next round with 1 dc in next dc (= first dc from previous round). NOTE: Insert a marker at the beg of round between last dc and first dc on the round, move the marker upwards. WORKING 2 DC TOG: * Insert hook in next st, get thread *, repeat from *-* one more time, make a YO and pull thread through all 3 sts on hook. COLOUR CHANGE - DC: To get a nice colour change work last dc on round as follows: Insert hook in last st, get thread, make a YO with the new colour and pull it through all sts on hook. Continue on to next round with the new colour. -------------------------------------------------------- HEAD: Worked in the round in a circle with pistachio green on hook size 4 mm. Start at the top of head by making a magic circle - Read explanation above. ROUND 1: Work 8 dc in ch-ring. ROUND 2: 2 dc in every dc = 16 dc. Read WORK IN THE ROUND IN A CIRCLE above. ROUND 3: * 1 dc in next dc, 2 dc in next dc *, repeat from *-* the rest of the round = 24 dc. ROUND 4: * 1 dc in the next 2 dc, 2 dc in next dc *, repeat from *-* the rest of the round = 32 dc. ROUND 5: Work 1 dc in every dc = 32 dc. ROUND 6: * 1 dc in the next 3 dc, 2 dc in next dc *, repeat from *-* the rest of the round = 40 dc. ROUND 7: Work 1 dc in every dc = 40 dc. ROUND 8: * 1 dc in the next 4 dc, 2 dc in next dc *, repeat from *-* the rest of the round = 48 dc. ROUND 9-13: Work 1 dc in every dc = 48 dc. ROUND 14: * 1 dc in the next 6 dc, then crochet the next 2 dc tog * - Read explanation above, repeat from *-* the rest of the round = 42 dc. ROUND 15: * 1 dc in the next 5 dc, then crochet the next 2 dc tog *, repeat from *-* the rest of the round = 36 dc. ROUND 16: Work 1 dc in every dc = 36 dc. ROUND 17: * 1 dc in the next 4 dc, then crochet the next 2 dc tog *, repeat from *-* the rest of the round = 30 dc. ROUND 18: Work 1 dc in every dc = 30 dc. ROUND 19: * 1 dc in the next 3 dc, then crochet the next 2 dc tog *, repeat from *-* the rest of the round = 24 dc. ROUND 20: * 1 dc in the next 2 dc, then crochet the next 2 dc tog *, repeat from *-* the rest of the round = 18 dc. ROUND 21: * 1 dc in next dc, then crochet the next 2 dc tog *, repeat from *-* the rest of the round = 12 dc. Cut the thread and fill the head with some cotton wool. EYE: Worked in the round in a circle with pistachio green on hook size 4 mm. Start by making a magic circle. ROUND 1: Work 6 dc in the magic circle. ROUND 2: 2 dc in every dc = 12 dc. ROUND 3: * 1 dc in next dc, 2 dc in next dc *, repeat from *-* the rest of the round = 18 dc. ROUND 4: * 1 dc in the next 8 dc, 2 dc in next dc *, repeat from *-* one more time = 20 dc. ROUND 5-7: Work 1 dc in every dc = 20 dc. Cut the thread and keep 30 cm for assembly. Fill the eye with some cotton wool. Work another eye the same way. BODY: Worked in the round in a circle with pistachio green on hook size 4 mm. Start at the bottom of body by making a magic circle. ROUND 1: Work 6 dc in ch-ring. ROUND 2: 2 dc in every dc = 12 dc. ROUND 3: * 1 dc in next dc, 2 dc in next dc *, repeat from *-* the rest of the round = 18 dc. ROUND 4: * 1 dc in the next 2 dc, 2 dc in next dc *, repeat from *-* the rest of the round = 24 dc. ROUND 5: * 1 dc in the next 3 dc, 2 dc in next dc *, repeat from *-* the rest of the round = 30 dc. ROUND 6: * 1 dc in the next 4 dc, 2 dc in next dc *, repeat from *-* the rest of the round = 36 dc. ROUND 7: * 1 dc in the next 5 dc, 2 dc in next dc *, repeat from *-* the rest of the round = 42 dc. ROUND 8-12: Work 1 dc in every dc = 42 dc. ROUND 13: * 1 dc in the next 5 dc, then crochet the next 2 dc tog *, repeat from *-* the rest of the round = 36 dc. ROUND 14-15: Work 1 dc in every dc = 36 dc. ROUND 16: * 1 dc in the next 4 dc, then crochet the next 2 dc tog *, repeat from *-* the rest of the round = 30 dc. ROUND 17-18: Work 1 dc in every dc = 30 dc. ROUND 19: * 1 dc in the next 3 dc, then crochet the next 2 dc tog *, repeat from *-* the rest of the round = 24 dc. ROUND 20: Work 1 dc in every dc = 24 dc. ROUND 21: * 1 dc in the next 2 dc, then crochet the next 2 dc tog *, repeat from *-* the rest of the round = 18 dc. ROUND 22: Work 1 dc in every dc = 18 dc. ROUND 23: * 1 dc in next dc, then crochet the next 2 dc tog *, repeat from *-* the rest of the round = 12 dc. Cut the thread and keep 30 cm for assembly. Fill the body with some cotton wool. LEG: Worked in the round in a circle with raspberry on hook size 4 mm. Start at edge of leg by making a magic circle. ROUND 1: Work 5 dc in the magic circle. ROUND 2: 2 dc in every dc = 10 dc. ROUND 3-4: Work 1 dc in every dc - NOTE: Switch to light turquoise in last st on 4th round - Read COLOUR CHANGE - DC above = 10 dc on round. ROUND 5: * 1 dc in the next 3 dc, then crochet the next 2 dc tog *, repeat from *-* one more time = 8 dc. Then work 1 dc in every dc as follows: * Work 2 rounds with light turquoise, 1 round with pistachio green *, repeat from *-* a total of 4 times (= 12 rounds), then work 2 rounds with light turquoise. Remember to switch colour in last st on round. Cut the thread and keep 30 cm for assembly. Fill leg with some cotton wool. Work another leg the same way. ARM: Worked in the round in a circle with raspberry on hook size 4 mm. Start at edge of arm by making a magic circle. ROUND 1: Work 4 dc in the magic circle. ROUND 2: 2 dc in every dc = 8 dc. ROUND 3-4: Work 1 dc in every dc - NOTE: Switch to pistachio green in last st on 4th round = 8 dc on round. Then work 1 dc in every dc as follows: * Work 2 rounds with pistachio green, 1 round with light turquoise *, repeat from *-* a total of 3 times (= 9 rounds), then work 2 rounds with pistachio green. Remember to switch colour in last st on round. Cut the thread and keep 30 cm for assembly. Fill the arm with some cotton wool. Work another arm the same way. ASSEMBLY: Sew the eyes (pistachio green) at the top of head. Sew mouth and eyes with some left-over black, see picture. Sew the head on to body with neat little stitches. Sew the legs and arms on the body. |
|
Have you finished this pattern?Tag your pictures with #dropspattern #dropsfrankie or submit them to the #dropsfan gallery. Do you need help with this pattern?You'll find 5 tutorial videos, a Comments/Questions area and more by visiting the pattern on garnstudio.com. © 1982-2025 DROPS Design A/S. We reserve all rights. This document, including all its sub-sections, has copyrights. Read more about what you can do with our patterns at the bottom of each pattern on our site. |
|


With over 40 years in knitting and crochet design, DROPS Design offers one of the most extensive collections of free patterns on the internet - translated to 17 languages. As of today we count 314 catalogues and 11822 patterns translated into English (UK/cm).
We work hard to bring you the best knitting and crochet have to offer, inspiration and advice as well as great quality yarns at incredible prices! Would you like to use our patterns for other than personal use? You can read what you are allowed to do in the Copyright text at the bottom of all our patterns. Happy crafting!
Post a comment to pattern DROPS Baby 21-45
We would love to hear what you have to say about this pattern!
If you want to leave a question, please make sure you select the correct category in the form below, to speed up the answering process. Required fields are marked *.