
Popular categories
Looking for a yarn?


|
|
DROPS Baby 20-21 |
|
 |
 |
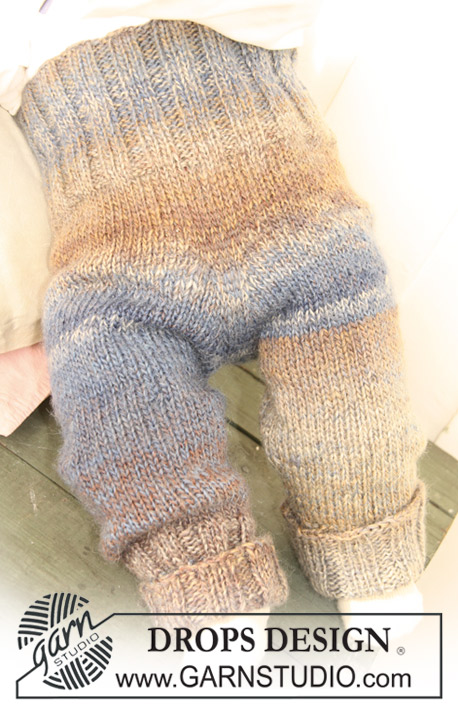
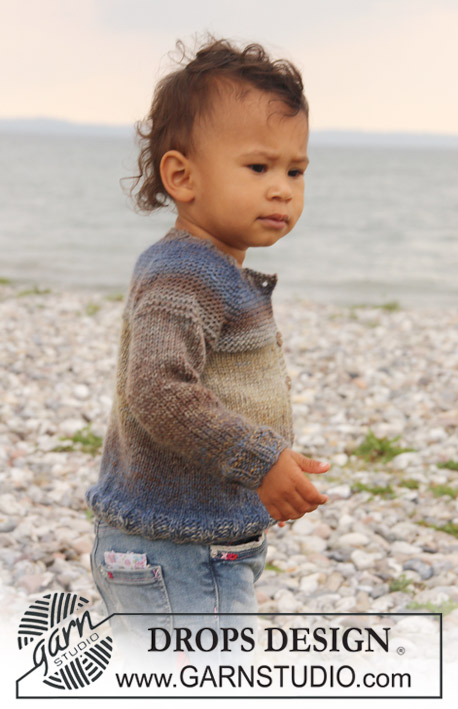
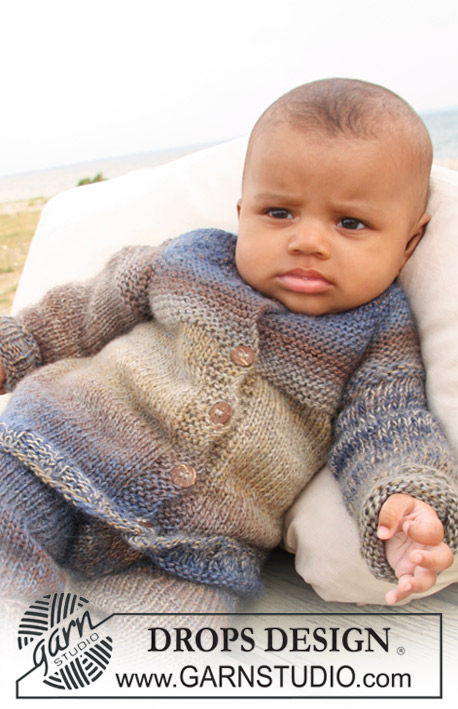
Knitted jacket with raglan and pants for baby and children in 2 threads DROPS Delight
DROPS Baby 20-21 |
|
|
JACKET: GARTER ST (back and forth on needle): K sts on every row. BUTTONHOLES: Bind off for buttonholes on right front band. 1 buttonhole = K tog 2nd and 3rd st from edge and make 1 YO. Bind off for buttonhole when piece measures: Size 1/3 months: 2, 8, 14 and 20 cm / ¾", 3⅛", 5½" and 8" Size 6/9 months: 2, 8, 15 and 21 cm / ¾", 3⅛", 6" and 8¼" Size 12/18 months: 2, 8, 14, 20 and 26 cm / ¾", 3⅛", 5½", 8" and 10¼" Size 2 years: 2, 9, 16, 23 and 30 cm / ¾", 3½", 6¼", 9" and 11¾" Size 3/4 years: 2, 10, 18, 26 and 34 cm / ¾", 4", 7", 10¼" and 13⅜". Size 5/6 years: 2, 9, 16, 23, 30 and 37 cm / ¾", 3½", 6¼", 9", 11¾" and 14½" NOTE: Bind off the last buttonhole on the neckline. DECREASE TIP (applies to raglan): All dec are done from RS! Dec as follows in each transition between sleeve and body piece (beg 3 sts before marker): K2 tog, K2 (marker is between these 2 sts), slip 1 st as if to K, K1, psso. -------------------------------------------------------- BODY: Worked back and forth on circular needle from mid front. Cast on 132-138-150 (162-168-192) sts (includes 5 band sts in each side towards mid front) on circular needle 4.5 mm/US 7 with 2 strands Delight. P 1 row from WS, then work next row as follows from RS: 5 band sts in garter st, * K2, P4 *, repeat from *-* and finish with K2 and 5 band sts in garter st. Continue rib as follows until 3-3-3 (4-4-4) cm / 1⅛"-1⅛"-1⅛" (1½"-1½"-1½"), remember button holes on right front band – see explanation above. Continue to work stockinette sts but work the 5 front band sts in each side in garter st until piece is completed. AT THE SAME TIME on 1st row after rib, adjust no of sts to 118-128-140 (146-158-168) sts – do not dec over the front bands. Insert 1 marker 32-34-38 (39-42-44) sts in from each side = 54-60-64 (68-74-80) sts between markers on the back piece. When piece measures 5-5-6 (6-6-6) cm / 2"-2"-2⅜" (2⅜"-2⅜"-2⅜"), dec 1 st on each side of the markers, repeat on every 3-3-3 (4-5-6) cm / 1⅛"-1⅛"-1⅛" (1½"-2"-2⅜") a total of 5 times = 98-108-120 (126-138-148) sts. When piece measures approx. 19-20-23 (27-30-32) cm / 7½"-8"-9" (10⅝"-11¾"-12½") - adjust so that next row is worked from WS - K 3 rows over all stitches. On next row bind off 6-8-8 (8-10-10) sts in each side for armhole (i.e. 3-4-4 (4-5-5) sts on each side of markers) = 38-42-46 (50-54-60) sts on back piece and 24-25-29 (30-32-34) sts on each front piece. Put piece aside and knit the sleeves. SLEEVE: Worked in the round. Cast on 30-30-36 (36-36-36) sts on double pointed needles size 4.5 mm / US 7 with 2 strands Delight. K 1 round. Then knit rib with K2/P4 until piece measures 3-3-3 (4-4-4) cm / 1⅛"-1⅛"-1⅛" (1½"-1½"-1½"). Continue with stockinette st AT THE SAME TIME dec evenly to 28-28-30 (30-32-32) sts on 1st round after rib. When piece measures 8-6-6 (6-6-7) cm / 3⅛"-2⅜"-2⅜" (2⅜"-2⅜"-2¾") inc 2 sts mid under each sleeve, repeat inc every 7-4-3 (3-3.5-3.5) cm / 2¾"-1½"-1⅛" (1⅛"-1¼"-1¼") a total of 2-4-5 (7-7-8) times = 32-36-40 (44-46-48) sts. When piece measures 18-20-21 (26-30-34) cm / 7"-8"-8¼" (10¼"-11¾"-13⅜"), P 1 round, K 1 round and P 1 round, then K 1 round AT THE SAME TIME bind off 6-8-8 (8-10-10) sts mid under each sleeve = 26-28-32 (36-36-38) sts left on the needle. Put piece aside and knit another sleeve. YOKE: Switch to circular needle size 4 mm / US 6 and slip sleeves onto same circular needle where it was bound off for armholes = 138-148-168 (182-190-204) sts. Insert a marker in all transitions between sleeves and body piece (= 4 markers). READ ALL OF THE FOLLOWING SECTION BEFORE CONTINUING! Work in garter st back and forth on needle over all sts – and K 1 row from WS before beg dec for raglan. RAGLAN: Dec 1 st on each side of all markers (= 8 dec) – read Decrease tip! Dec on every 4th row: 7-8-8 (9-10-11) times and then on every other row: 0-0-2 (2-2-2) times. NECK: At the same time when piece measures 25-27-31 (36-40-43) cm / 9¾"-10⅝"-12¼" (14¼"-15¾"-17") slip the 8-8-10 (10-10-12) outermost sts in each side towards mid front on a stitch holder for neck. Continue to bind off for neck towards mid front on every other row: 2 sts 2 times and 1 st 2 times. After all dec for raglan and neck there are 54-56-56 (62-62-64) sts left on the needle and piece measures approx. 30-32-36 (41-45-48) cm / 11¾"-12½"-14¼" (16⅛"-17¾"-19") up to shoulder. ASSEMBLY: Knit up approx. 80 to 105 sts around the neck (including sts on stitch holder at the front) on circular needle 4 mm/US 6 with 2 threads Delight. K 1 row from WS, then K 1 row from RS AT THE SAME TIME dec evenly to 54-60-60 (66-66-72) sts. Continue to work rib as follows (1st row = WS): 5 band sts in garter, * P2, K4 *, repeat from *-* and finish with P2 and 5 band sts in garter (from RS there are 5 band sts in garter and K2 on each side towards mid front). After 1 cm / ⅜" bind off for 1 buttonhole over the other holes on the right side. When rib measures 2 cm / ¾", loosely bind off with K over K and P over P. Sew the openings under the sleeves. Sew on buttons. ---------------------------------------------------------- PANTS: INCREASE TIP: Inc 1 st by picking up 1 st from previous round and knitting it. DECREASE TIP: Dec as follows before marker: K2 tog. Dec as follows after marker: Slip 1 st as if to K, K1, psso. ---------------------------------------------------------- PANTS: Worked in the round on circular needle from waist down. Cast on 114-120-120 (126-132-138) sts on circular needle size 3.5 mm / US 4 with 2 strands Delight. Work rib = K3/P3 for 8-9-9 (10-10-10) cm / 3⅛"-3½"-3½" (4"-4"-4"). Switch to circular needle size 4 mm / US 6 and K 1 round – AT THE SAME TIME dec 22-24-20 (22-24-26) sts evenly = 92-96-100 (104-108-112) sts. Insert a marker mid front and a marker mid back (= 46-48-50 (52-54-56) sts between markers). Continue in stockinette st until piece measures 12-14-15 (15.5-16-17) cm / 4¾"-5½"-6" (6⅛"-6¼"-6¾"). Now inc 1 st on each side of the 4 sts mid front (i.e 2 sts on each side of marker) – SEE INCREASE TIP. Repeat inc on every other round a total of 8-9-9 (10-11-11) times = 108-114-118 (124-130-134) sts. After all inc the piece measures approx. 18-21-22 (23-24-25) cm / 7"-8¼"-8¾" (9"-9½"-9¾"). On next round bind off 6 sts mid front and mid back (i.e 3 sts on each side of marker) = 48-51-53 (56-59-61) sts on each leg. LEG: Slip sts from one leg on a stitch holder and sts from the other leg on double pointed needles size 4 mm / US 6 = 48-51-53 (56-59-61) sts. Work stockinette in the round – insert a marker at beg of round = inside of leg. AT THE SAME TIME when the leg measures 4-4-4 (5-6-6) cm / 1½"-1½"-1½" (2"-2⅜"-2⅜") dec 1 sts on each side of marker – SEE DECREASE TIP. Repeat dec every 2-3-4 (5-6-8) cm / ¾"-1⅛"-1½" (2"-2⅜"-3⅛") a total of 4 times = 40-43-45 (48-51-53) sts. Switch to double pointed needles size 3.5 mm / US 4 when leg measures 12-15-18 (23-28-33) cm / 4¾"-6"-7" (9"-11"-13"). K 1 round – AT THE SAME TIME inc 8-5-9 (6-9-7) sts evenly = 48-48-54 (54-60-60) sts. Continue in rib = K3/P3 for 10 cm / 4". Then loosely bind off sts with K over K and P over P. The entire pants measures 40-46-50 (56-62-68) cm / 15¾"-18"-19¾" (22"-24⅜"-26¾"). Slip sts from stitch holder back on needle and knit another leg. ASSEMBLY: Sew tog the opening between the legs. Fold the legs at the bottom if needed. |
|

|
|
|
Have you made this or any other of our designs? Tag your pictures in social media with #dropsdesign so we can see them! Do you need help with this pattern?You'll find tutorial videos, a Comments/Questions area and more by visiting the pattern on garnstudio.com. © 1982-2024 DROPS Design A/S. We reserve all rights. This document, including all its sub-sections, has copyrights. Read more about what you can do with our patterns at the bottom of each pattern on our site. |
|


With over 40 years in knitting and crochet design, DROPS Design offers one of the most extensive collections of free patterns on the internet - translated to 17 languages. As of today we count 304 catalogs and 11422 patterns - 11417 of which are translated into English (US/in).
We work hard to bring you the best knitting and crochet have to offer, inspiration and advice as well as great quality yarns at incredible prices! Would you like to use our patterns for other than personal use? You can read what you are allowed to do in the Copyright text at the bottom of all our patterns. Happy crafting!
Comments / Questions (13)
Jeg har forsøgt at lave jakken eller cardiganen i str 6/9 måneder og 1/3. Men størrelserne virker meget store især 6/9. Bukserne er mega store i omkreds på 114 masker kan det være rigtigt?
18.01.2022 - 14:52Fragen zum Hosen stricken: Ich stricke an der Hose mit 114 Maschen. Das Bündchen mit 8 cm ist fertig. Jetzt mit Rundstricknadel Nr.4 weiter stricken und abnehmen, auf 92 Maschen kommen. Das abnehmen auf der Rundstricknadel geschieht in welcher Folge? Gibt es noch eine andere Anleitung oder vielleicht ein Video? Herzlichen Dank für Ihre Hilfe.
06.12.2020 - 11:51DROPS Design answered:
Liebe Doris, hier wird erklärt, wie man regelmäßig verteilt abnimmt. Viel Spaß beim stricken!
07.12.2020 - 08:26I am still intrigued that two strands from a wonderful, randomly coloured yarn can have produced this remarkably matched cardigan. I appreciate that the nuance of this yarn is in the colour changing, but there is not a standard repetition which would permit the knitting of this small garment using two continuous strands. I suppose I must cut the yarn into matching colours then knit leaving many ends to be sewn in .
01.05.2020 - 00:38Your illustrations show the colours in ‘blocks’ and matching on the fronts. How is this achieved with the recommended yarn, please?
30.04.2020 - 17:24DROPS Design answered:
Dear Thérèse, the color is there in blocks rather than stripes, because this small sweater has short rows, thus more rows can be knitted with the same color. However, if you ook closely, the colors on the sleeves do not match with the front, but this is just what is so wonderful about these yarns with long colorchanges... not two piece is the same, even if it is done with the same yarn. I hope this helps. Happy Knitting!
01.05.2020 - 00:16Bonjour, faut-il absolument des aiguilles circulaires pour faire ce modèle ? Et si oui, pourquoi ? Merci beaucoup !
09.10.2019 - 21:20DROPS Design answered:
Bonjour Pascale, seules les manches de cette veste se tricotent en rond (sur aiguilles doubles pointes), on utilise une aiguille circulaire pour le dos/les devants puis l'empiècement pour avoir suffisamment de place pour y loger toutes les mailles. plus d'infos sur les aiguilles circulaires ici. Bon tricot!
10.10.2019 - 08:37Jeg strikker str 6/9 mdr, men forstår ikke når jeg skal strikke 20 cm påtrøjen efter indtagningen, er det fra mærketråden?
15.07.2019 - 22:29DROPS Design answered:
Hei Karen. Du måler fra oppleggskanten. Dersom det har vært fra merketråden ville det ha stått, f.eks - HERFRA MÅLES ARBEIDET. God Fornøyelse.
26.08.2019 - 14:13Jakke, str 5/6 år, skal man legge opp hele 192 masker??? Den må jo da bli ekstra vid i forhold til de andre størrelsene.
16.04.2019 - 15:59DROPS Design answered:
Hei Kari. Rett etter vrangborden skal det felles til 168 masker, som gir 44 cm målt tvers over. Det strikkes med fler masker i vrangborden fordi denne natrulig trekker seg sammen, men skal være like vid som bolen. Om du ser på målskissen nederst ser du at den skal måle 44 cm i størrelse 5/6 år, så dette stemmer. Det er selvfølgelig ikke noe i veien for at du striker den i en mindre størrelse, og heller legger til på lengden om dette passer bedre. God fornøyelse
23.04.2019 - 14:23Bonjour, pour vos patrons qui se tricotent avec deux fils ensemble et que ceux -ci ont un eux mêmes un ensemble de couleur est-ce que vous chercher à trouver le début de la séquence pour que les couleurs se suivent à la même place ou vous n'en tenez pas compte du tout , merci !
12.06.2017 - 03:06DROPS Design answered:
Bonjour Nathalie, vous pouvez si les pelotes le permettent, les séquences des couleurs Delight peuvent différer d'une pelote à l'autre, même dans un bain identique (cf nuancier).Bon tricot!
12.06.2017 - 10:03Salve, cosa si intende per 2 fili? Devo accostare due fili di due gomitoli diversi e lavorarli insieme? Qual'è lo scopo?! Grazie
16.07.2016 - 19:40DROPS Design answered:
Buonasera Irene. Tutto il capo viene lavorato usando il filato messo doppio. Può usare due gomitoli contemporaneamente o lavorare usando il capo esterno e quello interno dello stesso gomitolo. In questo modo il capo risulta più caldo. Buon lavoro!
16.07.2016 - 20:41Das ist mein erstes strickstück mit so einer Wolle mit Farbverlauf, daher ist meine Frage vielleicht sehr grundlegend. Wie bekomme ich ein schönen Farbverlauf hin, wenn ich mit zwei Fäden stricke? Ich habe mir ein Knäuel in zwei gleiche kleinere geteilt und würde nun versuchen, ungefähr mit der gleichen Farbe anzufangen. Macht man das so??? Oder gibt es einen anderen Trick? Danke für die Antwort
14.12.2015 - 14:42DROPS Design answered:
Wenn Sie keine "Melierung" wünschen, wie man sie bei der Hose gut sieht, sondern der doppelte Faden die gleiche Farbe haben soll, schauen Sie am besten bei zwei Knäueln genau die Farbabfolge an (indem Sie es etwas abwickeln) und fangen dann an der Stelle mit dem einen Knäuel an, an der es mit der gleichen Farbe wie das andere Knäuel beginnt und den gleichen Farbverlauf hat. Den Rest des Knäuels können Sie dann später verwenden.
20.12.2015 - 16:54