
Popular categories
Looking for a yarn?


|
||||
Tamzyn |
||||
 |
 |
|||
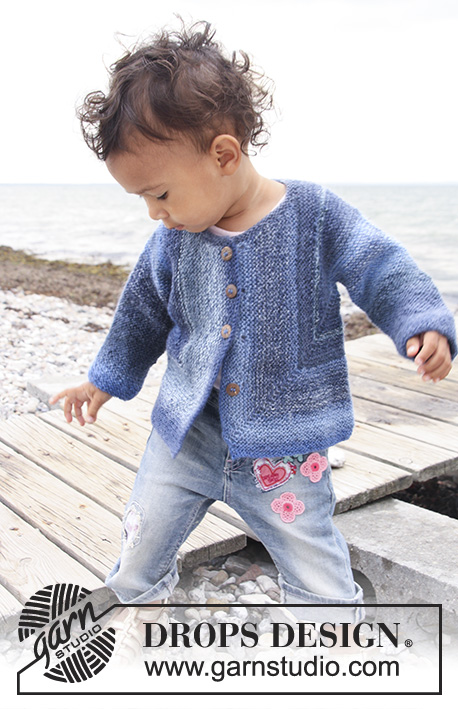
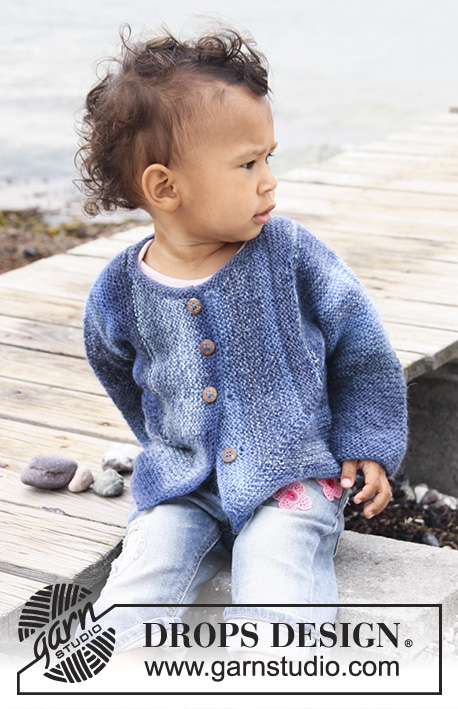
Knitted domino jacket in garter st for baby and children in DROPS Delight
DROPS Baby 20-15 |
||||
|
INCREASE TIP: Inc 1 st in each side of marker by making 1 YO. Work YO twisted on next row (i.e. knit in back loop of st instead of front loop) to avoid holes. ---------------------------------------------------------- JACKET: Work the piece sideways. Work 2 pieces and finish by sewing pieces tog in the back. Work the pieces from the sleeve towards the mid of jacket. RIGHT HALF: Worked back and forth on circular needle. Cast on 36-38-40 (40-42-44) sts on circular needle size 3 mm with Delight. K back and forth on all rows until completed (= garter st). REMEMBER THE KNITTING TENSION! AT THE SAME TIME when piece measures 6-6-5 (5-6-6) cm, inc 1 st in each side, repeat the inc on every 8th row a total of 6-7-9 (11-13-14) times = 48-52-58 (62-68-72) sts. Work until piece measures 17-19-20 (25-29-33) cm – adjust so that the last row is worked from WS. BODY: K 1 row (= RS), at end of row cast on 41-43-50 (53-58-60) sts (= towards the back) = 89-95-108 (115-126-132) sts. NOW MEASURE PIECE FROM HERE! K 1 row, turn, insert a marker in the 2nd st on needle from RS (= in right side). Continue – AT THE SAME TIME inc 1 st on each side of the st with marker every other row a total of 38-40-46 (48-50-52) times – SEE INCREASE TIP. AT THE SAME TIME when piece measures 8.5 - 9 - 10.5 (11 - 12 - 13) cm work only over the last 60-65-74 (79-86-91) sts in the left side seen from RS (= back piece), slip the remaining sts on a stitch holder. BACK PIECE: Work until piece measures 13-14-16 (17-18-19) cm (from where back piece sts was cast on), cast off. FRONT PIECE: Put sts from stitch holder back on needle but leave 9-10-10 (10-12-12) sts towards the back on the stitch holder for neckline. Continue inc on every other row – AT THE SAME TIME dec 1 st towards the neck (= towards sts on stitch holder) on every 4th row a total of 6-7-7 (7-7-7) times. AT THE SAME TIME when piece measures 14-15-17 (18-19-20 cm (from where inc on front piece started and towards mid front) cast off for 3-4-4 (5-5-5) button holes as follows (from neck, i.e. from WS): K 2, cast off 2 sts, * K 12-9-11 (9-10-10) sts, cast off 2 sts *, repeat from *-* a total of 2-3-3 (4-4-4) times, K rest of row. On next row cast on 2 new sts over the cast off sts. After all inc and dec there are 90-93-109 (115-121-126) sts on the needle. When finished with inc on right side, cast off 51-52-62 (66-70-74) sts from the neckline and down the front band of jacket (cast off from WS) = 39-41-47 (49-51-52) sts left on needle. K back and forth over these sts for approx. 1-1-2 (2-3-3) cm (fold piece at the shoulder and check that the front piece is the same length as back piece). Cast off. LEFT HALF: Work as right half but without button holes – this piece is assembled with wrong side out. ASSEMBLY: Put the 2 pieces towards each other and sew tog mid back – sew edge to edge to avoid a chunky seam. Fold the jacket and sew underarm and side seams in front loop of outermost sts. Sew on buttons. NECKLINE: Knit up 55 to 80 sts (including sts on stitch holder) around the neck on circular needle size 3 mm with Delight. K 3 rows back and forth, cast off. |
||||
Diagram explanations |
||||
|
||||

|
||||
|
Have you made this or any other of our designs? Tag your pictures in social media with #dropsdesign so we can see them! Do you need help with this pattern?You'll find tutorial videos, a Comments/Questions area and more by visiting the pattern on garnstudio.com. © 1982-2024 DROPS Design A/S. We reserve all rights. This document, including all its sub-sections, has copyrights. Read more about what you can do with our patterns at the bottom of each pattern on our site. |
||||


With over 40 years in knitting and crochet design, DROPS Design offers one of the most extensive collections of free patterns on the internet - translated to 17 languages. As of today we count 304 catalogues and 11422 patterns - 11422 of which are translated into English (UK/cm).
We work hard to bring you the best knitting and crochet have to offer, inspiration and advice as well as great quality yarns at incredible prices! Would you like to use our patterns for other than personal use? You can read what you are allowed to do in the Copyright text at the bottom of all our patterns. Happy crafting!
Comments / Questions (191)
Se puede realizar con dos agujas?
06.01.2021 - 13:21DROPS Design answered:
Hola Carmen, en la primera talla si, pero para otras tallas necesitas aguja circular. Buen trabajo!
03.02.2021 - 15:20Hallo, ich meine die Jacke: Knitted domino jacket in garter st for baby and children in DROPS Delight Im Netz gibt es Bilder dieser Jacke in blau bzw. in pink. Welche Farb-No. hat die pinke Wolle? Leider gibt es im Umkreis von 60 km kein Wollgeschäft, der DROPS vertreibt - daher hoffe ich auf Ihre HILFE. Danke im voraus!
05.01.2021 - 12:46DROPS Design answered:
Liebe Frau Voss, was meinen Sie mit dem Netz? Sollte es in unserer Facebook Seite oder unser Instagram sein? Ihr DROPS Laden kann Ihnen gerne auch telefonisch oder per mail damit helfen - hier finden Sie die Liste von DROPS Händlern in Deutschland. Viel Spaß beim stricken!
05.01.2021 - 14:41Hallo, liebes Drops-Team! Danke für die prompte Antwort. Es gibt bei Delight 2 Farben mit pink etc. Welche wurde für die Jacke verwendet? Möchte sie gerne genauso stricken wie das Foto im Netz, oder gibt es Fotos, auf denen man den Farbverlauf sehen kann? Liebe Grüße
05.01.2021 - 09:48DROPS Design answered:
Liebe Frau Voss, leider weiss ich nicht, von welcher Jacke Sie sprechen - Ihr DROPS Laden kann Ihnen aber sicher gerne damit helfen, die Farbe zu wählen. Viel Spaß beim stricken!
05.01.2021 - 11:49Hallo, habe im Netz dieses Jäckchen auch in rosa /pink mit blau gesehen. Welches Garn wurde hierfür verwendet (Nummer)? Danke für kurze Info!
03.01.2021 - 19:57DROPS Design answered:
Liebe Frau Voss, hier finden Sie die Farbkarte für Delight, vielleicht finden Sie dort die gewünschte Farbe - diese Jäckchen kann mit einem Garn der Garngruppe A gestrickt werden, dh auch Fabel, Alpaca usw... benutzen Sie unseren Garnumrechner um die Alternative zu sehen. Viel Spaß beim stricken!
05.01.2021 - 09:31ærmet er strikket, nye masker til ryg er strikket, afmaskning af ryg er sket. Udtag 2 m på hv a. pind 40 g= skrå linie, aflukning til hals og knaphuller ok. Problem: hvordan fremkommer forstykkets nederste skrå del fra den stiplede linie og ned? I skriver: efter alle ud- og indtagninger er der 90 masker???? jeg har ca 60
20.10.2020 - 19:53DROPS Design answered:
Hei Inger. Usikker på hvilken størrelse du strikker. Du skriver at det skal være 90 masker etter alle fellingene og økningene (= str. 1/3 mnd.), men også at du har økt 40 ganger (= str. 6/9 mnd.) Har du husker å øke med 1 masker på hver side av masken med merke på? mvh DROPS design
26.10.2020 - 12:51I think the needle size in the pattern is wrong. I had to start again, increasing the size from 3 to 3.75, and I noticed too late that the yarn label recommended 3.75. Apart from that, the pattern's ingenious and the finished product looks great.
12.09.2020 - 17:36DROPS Design answered:
Dear Janet, needle size is only a suggestion, depending on your own tension you might have to use smaller/larger needle - read more about tension here. Happy knitting!
14.09.2020 - 10:04Hallo an das Team von Drops Design, ich kann stricken, komme nicht so recht mit der Anleitung klar. Gibt es eine Möglichkeit mir aufzuzeigen wie ich quer (rechte Seite) anfange auf einem Bild zu zeigen wo ich zunehmen muss. Sorry, irgendwie hab ich einen Denkfehler. Ich benötige ihre Hilfe. Die Zeichnung hab ich mir schon aufgemalt und ausgeschnitten... Könnten sie mir helfen? Herzlichen Dank Elisabeth
17.04.2020 - 10:18DROPS Design answered:
Liebe Elliporelli, die Zunahmen bei dem Vorderteil wird beidseitig von der Masche mit der Markierung entstehen (immer die selbe Masche, dh davor und danach wird die Maschenanzahl zunehmen), diese Zunahme macht so eine Linie (= die gestrichte Linie in der Maßskizze). Die später am Vorderteil abgekettene Maschen werden dann für den unteren Rand (die ersten zugenommenen Maschen bis zur Markierung). Viel Spaß beim stricken!
17.04.2020 - 10:41Bonjour, après avoir terminé la 1ère manche et monté les mailles du côté, quand je tricote plusieurs rangs avec les augmentations, mon ouvrage ne correspond plus au croquis qui, lui, forme un angle plus que droit entre la manche et le côté. Mon ouvrage commence à faire un angle aigu. Est-ce normal, dois-je continuer? Merci pour votre éclairage.
06.03.2020 - 14:33DROPS Design answered:
Bonjour Catherine, dans le schéma, la ligne pointillé correspond à la maille avec le marqueur (= sur le devant du gilet). Les mailles avant le marqueur (= à droite de cette ligne) sont les augmentations faites + les mailles avant le marqueur. vous avez donc un angle droit qui va se former, et, quand vous rabattrez les 51-74 mailles du devant, il restera celles du bas (= les 39-52 m soit les 16-22 cm du bas du devant). Bon tricot!
06.03.2020 - 14:59Bonjour, je suis un peu perdue après le montage des mailles DOS-DEVANT. Quand on a monté les mailles à la suite du rang devant, on doit revenir, donc sur le dos. Est-ce à la fin de ce rang DOS qu'on met le marqueur? Je lis pourtant: tricoter un rang ENDROIT, tourner. A quel moment faut-il tourner? Après les nouvelles mailles montées? ou au bout de la manche?
01.03.2020 - 09:53DROPS Design answered:
Bonjour Catherine, quand la manche a atteint la longueur souhaitée, on va tricoter 1 rang sur l'endroit et monter les mailles du dos à la fin de ce rang. On tourne, on tricote 1 rang endroit. On met un marqueur dans la 2ème maille à droite sur l'endroit (= c'est la maille avec un marqueur qui va servir aux augmentations du devant = la ligne pointillé dans le schéma). Maintenant, vous augmentez tous les rangs sur l'endroit de chaque côté de cette maille avec un marqueur (le nombre de mailles avant le marqueur (et après) va augmenter). Bon tricot!
02.03.2020 - 10:33Guten Tag! Ich finde diese Baby-/Kinderjacke so toll, dass ich sie mir gerne selbst stricken würde. Fragen: Spricht etwas gegen diesen Schnitt für Erwachsene? Haben Sie einen Tipp zum umrechen/anpassen an die Damen-Kleidergröße 38? Das würde mich sehr freuen. Mit vielem Dank für die großartigen Seiten und Anleitungen! Bettina
09.02.2020 - 15:12DROPS Design answered:
Liebe Bettina, diese Jacke ist vielleicht die einige, die ähnliche ist, auch wenn sie nicht genauso gestrickt wird. Viel Spaß beim sticken!
10.02.2020 - 09:30