
Popular categories
Looking for a yarn?


Comments / Questions (24)
![]() Manon wrote:
Manon wrote:
Merci pour les beaux modèles, pour moi qui est malade, qui doit demeurer à la maison, c'est le tricot le crochet que je fais pour m'aider à passer mes temps longs
25.10.2021 - 02:26
![]() Lize Grahn wrote:
Lize Grahn wrote:
Hej! Jag undrar över M2 (i mönstret 26 m) och hur man ska sticka det över 65 m. 2x26=52 m och då får jag 13 över?! Fattar inte! Ska man sticka mönstret 2,5 gång? Tacksam för förklaring! //Lize
18.08.2019 - 14:05DROPS Design answered:
Hej, jo det stämmer att du ska sticka två och en halv rapport av M.2. Du får då 5 rapporter med likadana blad.
19.08.2019 - 18:00
![]() Irini Karistinos wrote:
Irini Karistinos wrote:
Want is heel mooi geworden! maar bij het minderen aan de bovenkant met hoeveel pennen werk je dan en hoeveel steken op iedere pen?ik snap de rechter kant van m4 niet helemaal aan de uiteinden de voorkant gaat prima...moet je eerst een paar steken breien en dan minderen en aan het uiteinde weer?
13.01.2017 - 10:17DROPS Design answered:
Hoi Irini. Je breit 2 st samen aan beide zijkanten = je mindert 2 st per keer. Je breit in de rondte volgens M.4 en je mindert aan beide zijkanten van het patroon op de bovenkant waar je breit 1 st met Fabel, Delight en Fabel.
17.01.2017 - 15:08
![]() Irini Karistinos wrote:
Irini Karistinos wrote:
Beste drops ik zit met een vraag in m2 zitten 26 steken en ik heb 65. dus hoe moet dat dan ? 3x 26 lukt dus niet... o sap ik het verkeerd? ze zijn heel mooi!
08.01.2017 - 15:21DROPS Design answered:
Beste Irini. Je breit 2 hele herhalingen van M.2: 52 st en dan de helft van een derde herhaling M.2: 13 st.
09.01.2017 - 14:50
![]() Ingela Björsmo wrote:
Ingela Björsmo wrote:
Masktäthet 24 m på 10 cm och 64 m på en damvante... Jag får plats med båda händerna... Hur är det tänkt?
29.09.2013 - 14:48DROPS Design answered:
Du får inte ändra på antal m, då går inte det fina mönster upp.
02.10.2013 - 11:20
![]() Jannicke wrote:
Jannicke wrote:
Kjempefine votter, men lengden på votten stemmer ikke. Og når jeg ser at første kommentar om dette er for flere år siden, så lurer jeg jo på hvorfor i all verden retter ikke Drops på oppskriften ?? Så kunne mange spart seg for mye frustrasjon og ekstra arbeid... Fint om dere kan rette på det.
11.05.2013 - 22:07DROPS Design answered:
Der er lagt et nyt diagram ud på opskriften. God fornøjelse!
28.11.2013 - 08:58
![]() Jorun Jane Lien wrote:
Jorun Jane Lien wrote:
Hei! Det er feil med lengden på votten fra tommelen og opp. Jeg er med i en "votta-long" hvor det er mange hundre medlemmer. I mai var denne votten ett av alternativene og inkludert meg selv så har vi hatt problemer med denne votten. Personlig kuttet jeg 7 omganger. Enten er mønsteret feil eller utrolig dårlig beskrevet.Det er dessuten en liten feil i selve mønsteret også hvor det er glemt markert for en farge.
05.05.2013 - 20:43Pernilla wrote:
English version of my comment: I did knit these in Baby Merino (not the recommended yarn), but saw that someone else besides me had the same problem with the thumb insert starting too high up toward the top, which makes the top of the glove too short. I'd recommend doing like Sigrun says and start the thumb insert immediately when you begin M4.
02.04.2013 - 22:46
![]() Pernilla wrote:
Pernilla wrote:
Jag stickade visserligen detta i Baby Merino, men såg att någon annan haft samma problem som jag, att tumkilen börjar för långt upp så att det blir för kort mellan tummen och fingertopparna. De blev lite för korta i handen för mig och då har jag ändå ganska små händer. Tumkilen ska nog flyttas ner ett snäpp. Själv tummen däremot fick jag korta av när jag stickade för att den inte skulle bli för lång, men det var ju lätt gjort.
02.04.2013 - 22:36
![]() DROPS Design wrote:
DROPS Design wrote:
Siri: Det må være det masketallet frodi eller går ikke Diagrammet opp. Ingela: Bare følge Diagrammet.
19.12.2011 - 08:42
|
|||||||
Circle Dance#circledancemittens |
|||||||
|
|
|||||||
DROPS mittens with pattern in ”Delight” and ”Fabel”.
DROPS 126-5 |
|||||||
|
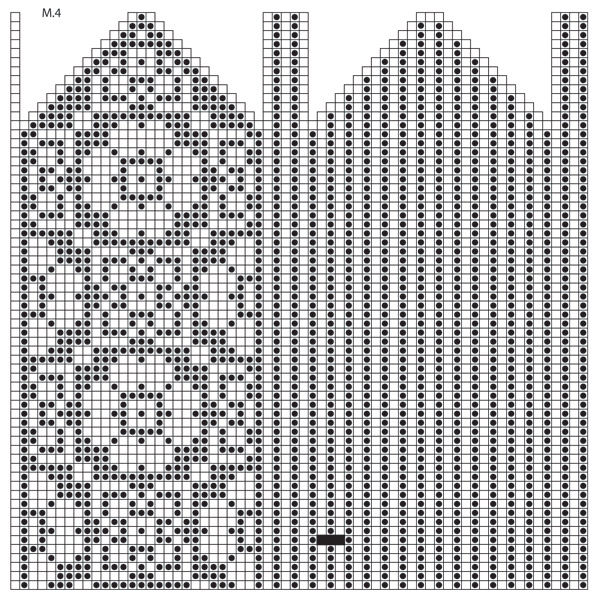
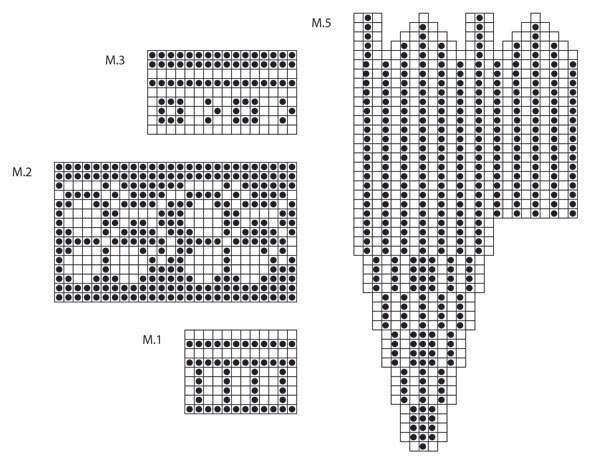
PATTERN: See diagrams M.1 to M.5. Diagrams show the pattern from RS. -------------------------------------------------------- LEFT MITTEN: Worked in the round. Cast on 64 sts on double pointed needles size 3 mm with Fabel. K 1 round, then work 4 rounds rib K1/P1. Continue in M.1, AT THE SAME TIME inc 2 sts evenly on first round of M.1 = 66 sts. After 1 vertical repeat of M.1 work M.2 AT THE SAME TIME dec 1 st on first round of M.2 = 65 sts. After 1 vertical repeat of M.2 work M.3, AT THE SAME TIME dec 1 st on first round of M.3 = 64 sts. After 1 vertical repeat of M.3 work M.4. REMEMBER THE KNITTING TENSION! When you reach the 3 black squares in M.4 continue in M.5 on these 3 sts (continue remaining sts in M.4 as before). Inc in M.5 with 1 YO each side of the middle st, on next round work YO into back of loop to avoid a hole. After 6 inc (there are now 15 sts in thumb gusset) work 4 rounds without inc (as shown in M.5), then slip the 15 thumb sts on a stitch holder. Cast on 3 new sts behind sts on stitch holder = 64 sts. Continue in M.4. When beg the dec at the top of mitten, dec each side of (Fabel, Delight, Fabel) each side by working 2 sts tog with Delight. Dec as follows before the 3 sts: K2 tog. Dec as follows after the 3 sts: slip 1 st as if to K, K1, psso. After all dec are complete there are 16 sts left on needle. Cut the thread and pull it through remaining sts, tighten tog and fasten. THUMB: Slip the 15 thumb sts back on double pointed needles size 3 mm. Pick up 9 sts in the edge behind the thumb = 24 sts. Continue in the round in M.5. When beg to dec for the top, dec each side of 1 st in Fabel each side by working 2 sts tog with Delight. Dec as follows before 1 st in Fabel: K2 tog. Dec as follows after 1 st in Fabel: slip 1 st as if to K, K1, psso. After all dec are complete there are 8 sts left on needle. Cut the thread and pull it through remaining sts, tighten tog and fasten. RIGHT MITTEN: Cast on and work like left mitten, but work the 3 black sts for thumb in 6th, 7th and 8th st from right side of diagram M.4. |
|||||||
Diagram explanations |
|||||||
|
|||||||
|
|||||||
|
|||||||
Have you finished this pattern?Tag your pictures with #dropspattern #circledancemittens or submit them to the #dropsfan gallery. Do you need help with this pattern?You'll find 16 tutorial videos, a Comments/Questions area and more by visiting the pattern on garnstudio.com. © 1982-2025 DROPS Design A/S. We reserve all rights. This document, including all its sub-sections, has copyrights. Read more about what you can do with our patterns at the bottom of each pattern on our site. |
|||||||


With over 40 years in knitting and crochet design, DROPS Design offers one of the most extensive collections of free patterns on the internet - translated to 17 languages. As of today we count 314 catalogues and 11822 patterns translated into English (UK/cm).
We work hard to bring you the best knitting and crochet have to offer, inspiration and advice as well as great quality yarns at incredible prices! Would you like to use our patterns for other than personal use? You can read what you are allowed to do in the Copyright text at the bottom of all our patterns. Happy crafting!
Post a comment to pattern DROPS 126-5
We would love to hear what you have to say about this pattern!
If you want to leave a question, please make sure you select the correct category in the form below, to speed up the answering process. Required fields are marked *.