


Komentáře / Otázky (10)
![]() Nancy napsala:
Nancy napsala:
Which stitches are 4-5-6 P-section? I cannot understand which stitches i need to decrease.
17.04.2024 - 00:14Odpověď DROPS Design :
Dear Nancy, P sections are those purl stitches you knit between the cables. Happy Knitting!
17.04.2024 - 04:17
![]() Sabine Motti napsala:
Sabine Motti napsala:
Danke für diese wirklich leichte Anleitung! :-) Anmerkung: Nach meinem Verständnis muss es nach der Fersenabnahme lauten: "die 2 letzten M. vor der ersten Markierung verschränkt re. zusammenstricken und die 2 ERSTEN M. NACH der zweiten Markierung re. zusammenstricken."
15.02.2021 - 18:29
![]() Patty Lou napsala:
Patty Lou napsala:
Can you do these socks in a worsted weight yarn?
28.01.2019 - 21:02Odpověď DROPS Design :
Dear Prety Lou, these socks are worked with DROPS Karisma, which is a worsted yarn - read more about the yarn here. Happy knitting!
29.01.2019 - 09:06
![]() Mari napsala:
Mari napsala:
Når det står «Når arb måler 5 cm strikkes det videre med M.1B over M.1A, M.2B over M.2A og de resterende m som før», skal M1B kunne ses høyere opp på sokken enn M1A når sokken er ferdig strikket? Får ikke mønsteret til å bli fire små og en stor flette når jeg strikker.
30.11.2018 - 13:29Odpověď DROPS Design :
Hei Mari. Flettemønstrene begynner på samme sted, men fordi M.1B er en mindre flette gjentas denne oftere i høyden og det vil virke som den flettes tidligere. Du vil se at når du har strikket M.2B et par ganger i høyden blir dette også et tydelig flettemønster. God fornøyelse.
03.12.2018 - 10:20
![]() Emmi Soinisalo napsala:
Emmi Soinisalo napsala:
Aloitetaanko tuo ruutupiirros (esim. M.2A) siten että ensin neulon kaksi oikein vai ensin yhden nurjan? En nyt ihan saa kiinne siitä kummin päin. Ja ilmeisesti alhaalta ylös?
20.09.2018 - 10:00Odpověď DROPS Design :
Hei, piirros luetaan alhaalta ylös ja oikealta vasemmalle, eli neulot aluksi 2 oikeaa silmukkaa.
21.09.2018 - 14:15
![]() Cajach napsala:
Cajach napsala:
Hallo! Ich möchte mich an diese Socke herantrauen, verstehe aber zwei Dinge nicht: a) was ist gemeint mit Partie ( Jetzt in den ersten 4-5-6 li.-Partien 1 M. abn.) und b) ich wundere mich über die ungeraden Maschenzahlen, z.B. sollen 55 Ma. aufgenommen werden, und das auf vier Nadeln?\r\nIch bedanke mich für Ihre Antwort! \r\nLiebe Grüße\r\nCajach
15.07.2018 - 11:47Odpověď DROPS Design :
Liebe Cajach, die "li.-Partie" sind die Maschen,, die links gestrickt werden, dh es wird in einigen 3-li-Maschen abgenommen = es gibt dann nur noch 2 li. Maschen an diesen Stellen (und immer noch 3 li Maschen wie zuvor an den anderen). Es wird hier 55 M in die 1. Größe angeschlagen, dh so können Sie die Maschen auf 4 Nadel verteilen: 13-14-13-15. Viel Spaß beim stricken!
16.07.2018 - 09:31Aka napsala:
There is an error i think! the main sts are 55.and there is no increasing in the pattern(but there is dec), you see that it says now you have 61 sts!(paragraph 4-row 1)
10.12.2013 - 01:24Odpověď DROPS Design :
Dear Aka, in 1st size, you dec to 51 sts when piece measures 21 cm. Then you work heel and pick up 11 sts each side of heel, you will then have a total of 61 sts and start dec for instep. Happy knitting!
10.12.2013 - 09:39
![]() Drops Design napsala:
Drops Design napsala:
Det stemmer, de siste 2 symboler er feil. Skal rette så fort som mugelig.
15.07.2010 - 11:48
![]() Heidi-Kristin napsala:
Heidi-Kristin napsala:
Er akkurat startet på disse sokkene. Det er feil i forklaringen til diagram. Det er tegnet inn over fire masker og ikke likt som i mønsteret hvor det i tillegg bare er over tre masker. Tekstforklaringen bak er riktig men dette er litt forvirrende.
13.07.2010 - 19:08
![]() Sue Roth napsala:
Sue Roth napsala:
I see these on my feet!
26.06.2010 - 15:00
|
|||||||||||||||||||
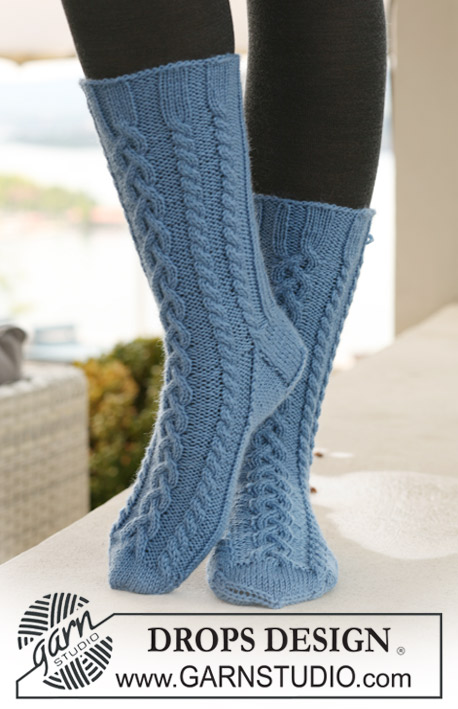
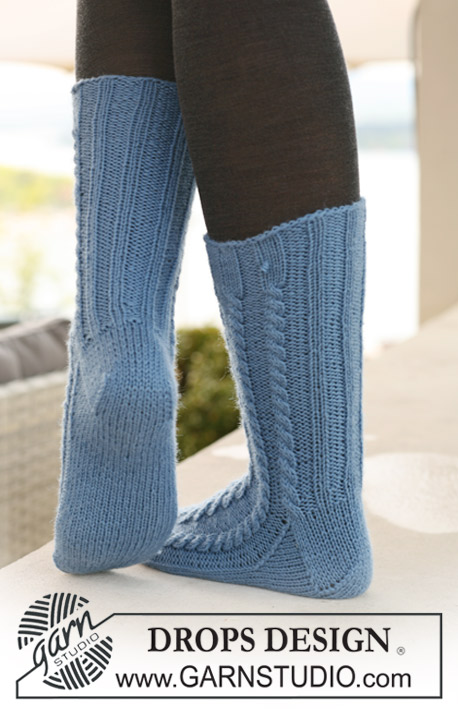
Twirls and Braids#twirlsandbraidssocks |
|||||||||||||||||||
 |
 |
||||||||||||||||||
DROPS ponožky s copánkovým vzorem z příze "Karisma".
DROPS 121-16 |
|||||||||||||||||||
|
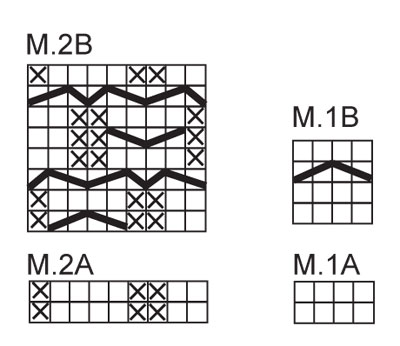
VZOR: Viz schémata M.1 a M.2; vzor je nahlížen z lícové strany. TIP - TVAROVÁNÍ PATY: Pleteme lícovým žerzejem. 1. řada (= lícová): pleteme po posledních 7-8-9 ok v řadě, 1 oko sejmeme hladce, 1 oko upleteme hladce a sejmuté přes ně přetáhneme, otočíme práci. 2.ř. (= rubová): pleteme po posledních 7-8-9 ok v řadě, 1 oko sejmeme obrace, 1 oko upleteme obrace a sejmuté přes ně přetáhneme, práci otočíme. 3.ř. (= lícová): pleteme po posledních 6-7-8 ok v řadě, 1 oko sejmeme hladce, 1 oko upleteme hladce a sejmuté přes ně přetáhneme, otočíme práci. 4.ř. (= rubová): pleteme po posledních 6-7-8 ok v řadě, 1 oko sejmeme obrace, 1 oko upleteme obrace a sejmuté přes ně přetáhneme, práci otočíme. Tímto způsobem pokračujeme v ujímání (vždy o 1 oko snížíme počet ok zbylých v řadě) dokud nám v řadě nezůstane 10-12-14 ok. ---------------------------------------------------------------------- PONOŽKA: Pleteme v kruhových řadách na ponožkových jehlicích. Na ponožkové jehlice č.3 nahodíme přízí Karisma 55-60-65 ok a upleteme 1 kruhovou řadu hladce. Pokračujeme takto: vzor M.1A (= 4 oka), 3 oka obrace, nad následujícími 10-15-20 oky pleteme žebrovým vzorem 2/3 (tj. 2 oka hladce, 3 obrace), 2 oka hladce, 3 obrace, vzor M.1A, 3 oka obrace, vzor M.1A, 3 oka obrace, vzor M.2A (= 9 ok), 3 oka obrace, vzor M.1A, 3 oka obrace. Ve výši 5 cm pleteme nad vzorem M.1A vzor M.1B a nad vzorem M.2A pleteme vzor M.2B, ostatní oka pleteme jako dosud. Takto pokračujeme do výše 21-22-23 cm. Nyní ujmeme 1 oko v každém z prvních 4-5-6 „žeber“ pletených obrace (pozn.: ujímáme spletením 2 ok obrace) = 51-55-59 ok. Pokračujeme žebrovým vzorem a vzorem M.1B, M.2B. Ve výši 23-24-25 cm necháme prvních 22-26-30 ok na jehlici (= pata) a zbylých 29 ok odložíme na pomocnou jehlici (= horní část, nárt). Nad oky na jehlici (= pata) upleteme v rovných řadách 5-5,5-6 cm lícovým žerzejem, pak umístíme do pleteniny značku. Nyní tvarujeme patu – viz TIP. Po dokončení tvarování paty nabereme po obou stranách paty 11-13-15 ok a odložených 29 ok z pomocné jehlice vrátíme zpět na jehlici = 61-67-73 ok. Po stranách nártové části (= 29 ok) umístíme značky. Pokračujeme vzorem jako dosud nad oky svrchní části ponožky (nártu), spodní část ponožky pleteme lícovým žerzejem. SOUČASNĚ ujímáme na obou stranách takto: na nártové části před 1. značkou spleteme 2 oka hladce anglicky a za 2. značkou spleteme 2 oka hladce; ujímání opakujeme v každé 2. kruhové řadě, celkem 8x = 45-51-57 ok. Pokračujeme do výše asi 18-19-21 cm od značky na patě (= zbývá asi 4-5-6 cm). Nyní vložíme do pleteniny na obou stranách značku tak, abychom na svrchní části (nártu) měli 22-25-28 ok a na spodní části (šlapce) ponožky 23-26-29 ok. Nad všemi oky pleteme lícovým žerzejem. SOUČASNĚ tvarujeme špičku – ujímáme 1 oko po obou stranách obou značek, takto: 2 oka před značkou spleteme hladce, 2 oka za značkou spleteme hladce anglicky. Ujímání opakujeme 4-6-7x na obou stranách v každé 2. kruhové řadě, pak ještě 5-4-5x v každé kruhové řadě = 9-11-9 zbylých ok. Pak přízi odstřihneme, protáhneme zbylými oky, utáhneme a zapošijeme. |
|||||||||||||||||||
Vysvětlivky ke schématu |
|||||||||||||||||||
|
|||||||||||||||||||
|
|||||||||||||||||||
Dokončili jste tento model?Pak označte své fotky tagem #dropspattern #twirlsandbraidssocks nebo je pošlete do galerie #dropsfan. Potřebujete s tímto návodem poradit?Otevřete-li si návod na stránce garnstudio.com, najdete tam 17 výukových video-ukázek, Komentáře/Dotazy a další užitečné informace. © 1982-2025 DROPS Design A/S. Vyhrazujeme si veškerá práva. Tento dokument, včetně všech jeho dílčích částí, podléhá autorským právům. Podrobnější komentář k možnostem užití našich návodů najdete dole pod každým návodem na našich stránkách. |
|||||||||||||||||||


V oblasti pletené a háčkované módy působí DROPS Design více než 40 let. Díky tomu vám můžeme nabídnout jednu z nejrozsáhlejších kolekcí modelů s bezplatnými návody dostupnými na internetu - navíc v 17 jazycích. K dnešnímu dni máme na 314 katalogů a 11822 návodů celkem - z nich je už 7048 dostupných v [češtině].
We work hard to bring you the best knitting and crochet have to offer, inspiration and advice as well as great quality yarns at incredible prices! Would you like to use our patterns for other than personal use? You can read what you are allowed to do in the Copyright text at the bottom of all our patterns. Happy crafting!
Přidejte komentář k návodu DROPS 121-16
Rádi bychom věděli, co si o tomto modelu myslíte!
Pokud se chcete na něco zeptat, dbejte prosím na to, abyste ve formuláři níže vybrali správnou kategorii - díky tomu se dříve dozvíte, co potřebujete vědět. Povinná pole jsou označena *.