DROPS Bomull-Lin
DROPS Bomull-Lin
53% Cotton, 47% Linen
from 14.00 RON /50g
Get the yarn to make this pattern from 196.00RON.

The yarn cost is calculated from the pattern’s smallest size and the yarn’s cheapest product type. Looking for an even better price? You might find it on the DROPS Deals!

DROPS SS24

Coast to Coast

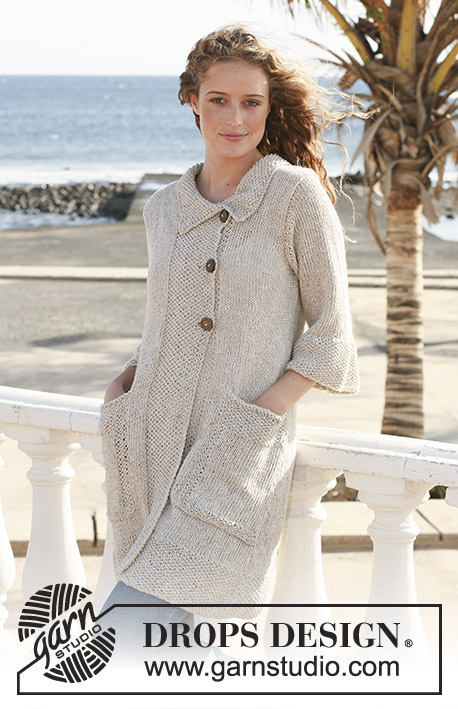
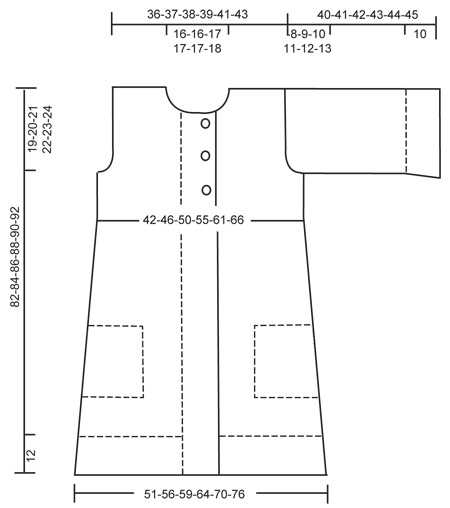
Long DROPS jacket in ”Bomull-Lin” with wide edges in moss st, large pockets and 3/4 sleeves. Size S to XXXL.

DROPS 113-18
Size: S – M – L – XL – XXL - XXXL
Materials: DROPS BOMULL-LIN from Garnstudio
700-750-800-900-1000-1100 g colour no 03, off-white mix

DROPS POINTED NEEDLES size 5 mm – or size needed to get 17 sts x 22 rows in stocking st = 10 x 10 cm.
DROPS Buffalo horn buttons no 538: 3 pcs.

-------------------------------------------------------

Alternative Yarn – See how to change yarns here
Yarn Groups A to F – Use the same pattern and change the yarn here
Yarn usage using an alternative yarn – Use our yarn converter here

-------------------------------------------------------

DROPS Bomull-Lin
DROPS Bomull-Lin
53% Cotton, 47% Linen
from 14.00 RON /50g
Get the yarn to make this pattern from 196.00RON.

The yarn cost is calculated from the pattern’s smallest size and the yarn’s cheapest product type. Looking for an even better price? You might find it on the DROPS Deals!

Pattern instructions

MOSS ST:
Row 1: * K1, P1 *, repeat from *-*.
Row 2: K over P and P over K
Repeat row 2.

BUTTONHOLES:
Make buttonholes on right front band. 1 buttonhole = K tog 4th and 5th st from mid front and make 1 YO.
Make buttonholes when piece measures:
SIZE S: 52, 62 and 72 cm.
SIZE M: 54, 64 and 74 cm.
SIZE L: 56, 66 and 76 cm.
SIZE XL: 58, 68 and 78 cm.
SIZE XXL: 60, 70 and 80 cm.
SIZE XXXL: 62, 72 and 82 cm.
----------------------------------------------------------
----------------------------------------------------------
BACK PIECE: Cast on 89-97-103-111-121-131 sts (includes 1 edge st each side) on needle size 5 mm with Bomull-Lin. K 1 row from WS and continue in MOSS ST – see above – for 12 cm. Now complete piece in stocking st.
REMEMBER THE KNITTING TENSION!
AT THE SAME TIME when piece measures 15 cm dec 1 st each side and repeat the dec on every 6 cm a total of 8 times = 73-81-87-95-105-115 sts.
When piece measures 63-64-65-66-67-68 cm cast off for armhole each side at the beg of every row: 4 sts 1-1-1-1-2-2 times, 2 sts 0-1-2-3-3-4 times and 1 st 2-3-3-4-4-5 times = 61-63-65-67-69-73 sts. Continue until piece measures 80-82-84-86-88-90 cm. Now cast off the middle 25-25-27-27-27-29 sts for neck and complete each shoulder separately. Cast off 1 st on neckline on next row = 17-18-18-19-20-21 sts left on shoulder. Cast off when piece measures 82-84-86-88-90-92 cm.

LEFT FRONT PIECE: Cast on 54-58-61-65-70-75 sts (includes 1 edge st at the side and 18 front band sts towards mid front) on needle size 5 mm with Bomull-Lin. K 1 row from WS and continue in moss st for 12 cm. Now complete piece in stocking st with 18 front band sts towards mid front in moss st. When piece measures 15 cm dec at the side as described for back piece = 46-50-53-57-62-67 sts. When piece measures 63-64-65-66-67-68 cm cast off for armhole at the side as described for back piece = 40-41-42-43-44-46 sts. When piece measures 74-76-78-80-82-84 cm slip 12-12-13-13-13-14 sts from mid front on a stitch holder for neck. Cast off to shape the neckline at the beg of every row from mid front: 3 sts 1 time, 2 sts 2 times and 1 st 4 times = 17-18-18-19-20-21 sts left on shoulder. Cast off when piece measures 82-84-86-88-90-92 cm.

RIGHT FRONT PIECE: Cast on and work like left front piece, but mirrored. Remember BUTTONHOLES on front band – see above.

SLEEVE: Worked back and forth on needle. Cast on 64-68-72-76-80-84 sts (includes 1 edge st each side) on needle size 5 mm with Bomull-Lin. K 1 row from WS and continue in moss st for 10 cm. Now complete piece in stocking st, AT THE SAME TIME on first row dec 6 sts evenly = 58-62-66-70-74-78 sts. When piece measures 32 cm cast off for sleeve cap each side at the beg of every row: 4 sts 1 time, 2 sts 3 times and 1 st 1-2-3-4-5-6 times, then 2 sts each side until piece measures 39-40-41-42-43-44 cm, now cast off 3 sts each side 1 time and cast off remaining sts. Piece measures approx 40-41-42-43-44-45 cm.

POCKET: Cast on 30-30-32-32-34-34 sts on needle size 5 mm with Bomull-Lin. K 1 row from WS and then work 4 rows moss st. Continue in stocking st with 4 sts at one side (= towards mid front) in moss st. AT THE SAME TIME when piece measures 6 cm dec 1 st at the side with no moss sts – dec inside 1 edge st by K2 tog. Repeat the dec on every 6 cm a total of 3 times = 27-27-29-29-31-31 sts. AT THE SAME TIME when piece measures18-18-18-19-19-19 cm work 6 rows moss st on all sts and cast off. Pocket measures approx 24-24-24-25-25-25 cm. Knit one more pocket, but with moss sts and dec at the opposite side.

ASSEMBLY: Sew shoulder seams.

COLLAR: Pick up approx 85 to 95 sts (incl sts on stitch holders at front) round neckline on needle size 5 mm. K 1 row from WS and K 1 row from RS, AT THE SAME TIME inc evenly to 101-101-105-105-109-109 sts. Continue in moss st for 10 cm. K 1 row from WS and cast off on next row in K sts.

FURTHER ASSEMBLY: Set in sleeves. Sew side and sleeve seams inside 1 edge st. Sew on pockets – cast on row on pocket should sit approx 20 cm from bottom edge of jacket and the side with dec on the side seam. Sew on buttons.

Diagram

diagram measurements

Each of our patterns has specific tutorial videos to help you.

Do you have a question? See a list of frequently asked questions (FAQ)

Knitting tension is what determines the final measurements of your work, and is usually measured per 10 x 10 cm. It is provided like so: number of stitches in width x number of rows in height - eg: 19 stitches x 26 rows = 10 x 10 cm.

The knitting tension is very individual; some people knit/crochet loosely while others work tightly. You adjust the knitting tension with the needle size, which is why the suggested needle size is only meant as a guide! You need to adjust this (up or down) to ensure that YOUR knitting tension matches the knitting tension provided in the pattern. If you work with a different knitting tension than provided you will have a different yarn consumption, and your work will have different measurements than what the pattern suggests.

The knitting tension also determines which yarns can replace each other. As long as you achieve the same knitting tension you can replace one yarn with another.

See DROPS lesson: How to measure your tension/gauge

See DROPS video: How to make a gauge tension swatch

The required amount of yarn is provided in grams, eg: 450 g. To calculate how many balls you’ll need you first need to know how many grams are in 1 ball (25g, 50g or 100g). This information is available if you click on the individual yarn quality on our pages. Divide the amount required with the amount of each ball. For example, if each ball is 50g (the most common amount), the calculation will be as follows: 450 / 50 = 9 balls.

The important thing when changing from one yarn to another is that the knitting/crochet tension remains the same. This is so that the measurements of the finished piece will be the same as on the sketch provided. It is easier to achieve the same knitting tension using yarns from the same yarn group. It is also possible to work with multiple strands of a thinner yarn to achieve the knitting tension of a thicker one. Please try our yarn converter. We recommend you to always work a test swatch.

Please NOTE: when changing yarn the garment might have a different look and feel to the garment in the photo, due to individual properties and qualities of each yarn.

See DROPS lesson: Can I use a different yarn than the one mentioned in the pattern?

All our yarns are categorised into yarn groups (from A to F) according to thickness and knitting tension – group A contains the thinnest yarns and group F the thickest. This makes it easier for you to find alternative yarns to our patterns, should you wish to switch yarn. All yarns within the same group have a similar knitting tension and can easily replace each other. However, different yarn qualities have different structures and properties which will give the finished work a unique look and feel.

Click here for an overview of the yarns in each yarn group

At the top of all our patterns you’ll find a link to our yarn calculator, which is a helpful tool should you wish to use a different yarn than suggested. By filling in the yarn quality you wish to replace, the amount (in your size) and number of strands, the calculator will present good alternative yarns with the same knitting tension. Additionally it will tell you how much you’ll require in the new qualities and whether you’ll need to work with multiple strands. Most skeins are 50g (some are 25g or 100g).

If the pattern is worked with multiple colours, every colour will have to be calculated separately. Similarly, if the pattern is worked with several strands of different yarns (for example 1 strand Alpaca and 1 strand Kid-Silk) you will have to find alternatives for each, individually.

Click here to see our yarn calculator

Since different yarns have different qualities and textures we have chosen to keep the original yarn in our patterns. However, you can easily find options among our available qualities by using our yarn calculator, or simply pick a yarn from the same yarn group.

It is possible that some retailers still have discontinued yarns in stock, or that someone has a few skeins at home that they would like to find patterns for.

The yarn calculator will provide both alternative yarn as well as required amount in the new quality.

If you think it's hard to decide what size to make, it can be a good idea to measure a garment you own already and like the size of. Then you can pick the size by comparing those measures with the ones available in the pattern's size chart.

You'll find the size chart at the bottom of the pattern.

See DROPS lesson: How to read size chart

The needle size provided in the pattern serves only as a guide, the important thing is to follow the knitting tension. And since knitting tension is very individual, you will have to adjust the needle size to ensure that YOUR tension is the same as in the pattern – maybe you’ll have to adjust 1, or even 2 needle sizes, up or down to achieve the correct tension. For this, we recommend that you work test swatches.

Should you work with a different knitting tension than the one provided, the measurements of the finished garment might deviate from the measurement sketch.

See DROPS lesson: How to measure your tension/gauge

See DROPS video: How to make a tension/gauge swatch

Working a garment top-down provides more flexibility and room for personal adjustment. For example it is easier to try the garment on while working, as well as making adjustments to length of yoke and shoulder caps.

The instructions are carefully explaining every step, in the correct order. Diagrams are adjusted to the knitting direction and are worked as usual.

The diagram depicts all rows/rounds, and every stitch seen from the right side. It is read from bottom to top, from right to left. 1 square = 1 stitch.

When working back and forth, every other row is worked from the right side and every other row is worked from the wrong side. When working from the wrong side, the diagram will have to be worked reversed: from left to right, knit stitches are purled, purl stitches are knit etc.

When working in the round every round is worked from the right side and the diagram are worked from right to left on all rounds.

See DROPS lesson: How to read knitting diagrams

The diagram depicts all rows/rounds, and every stitch seen from the right side. It is worked from bottom to top, from right to left.

When working back and forth every other row is worked from the right side: from right to left and every other row is worked from the wrong side: from left to right.

When working in the round, every row in the diagram are worked from the right side, from right to left.

When working a circular diagram you start in the middle and work your way outwards, counter clockwise, row by row.

The rows usually start with a given number of chain stitches (equivalent to the height of the following stitch), this will either be depicted in the diagram or explained in the pattern.

See DROPS lesson: How to read crochet diagrams

Instructions for working several diagrams after each other on the same row/round, will often be written like so: “work A.1, A.2, A.3 a total of 0-0-2-3-4 times". This means you work A.1 once, then A.2 is worked once, and A.3 is repeated (in width) the number of times provided for your size – in this case like so: S = 0 times, M = 0 times, L=2 times, XL= 3 times and XXL = 4 times.

The diagrams are worked as usual: begin with the first row in A.1, then work the first row in A.2 etc.

See DROPS lesson: How to read knitting diagrams

See DROPS lesson: How to read crochet diagrams

The total width of the garment (from wrist-to-wrist) will be larger in the larger sizes, despite the actual sleeves being shorter. The larger sizes have longer sleeve caps and wider shoulders, so there will be a good fit in all sizes.

The measurement sketch/schematic drawing provides information regarding the full length of the garment. If it’s a jumper or a jacket the length is measured from the highest point on the shoulder closest to the neckline, and straight down to the bottom of the garment. It is NOT measured from the tip of shoulder. Similarly, the length of yoke is measured from the highest point on the shoulder and down to where yoke is split into body and sleeves.

On a jacket measures are never taken along bands, unless specifically stated. Always measure inside band stitches when measuring the length.

See DROPS lesson: How to read a schematic drawing

Diagrams are often repeated on the round or in height. 1 repeat is the diagram the way it appears in the pattern. If it says to work 5 repeats of A.1 in the round, then you work A.1 a total of 5 times after/next to each other in the round. If it says to work 2 repeats of A.1 vertically/in height you work the entire diagram once, then begin again at the start and work the entire diagram one more time.

Chain stitches are slightly narrower than other stitches and to avoid working the cast-on edge too tight, we simply chain more stitches to begin with. The stitch count will be adjusted on the following row to fit the pattern and measurement sketch.

The rib edge is more elastic and will contract slightly compared to, for example, stocking stitch. By increasing before the rib edge, you avoid a visible difference in width between the rib edge and the rest of the body.

It’s very easy to cast off too tightly, and by making yarn overs while casting off (and simultaneously casting these off) you avoid a too tight cast off edge.

See DROPS video: How to bind off with yarn overs (yo)

To achieve an even increase (or decrease) you can increase on, for example: every 3rd and 4th row alternately, like so: work 2 rows and increase on the 3rd row, work 3 rows and increase on the 4th. Repeat this until the increase is complete.

See DROPS lesson: Increase or decrease 1 st on every 3rd and 4th row alternately

Should you prefer to work in the round instead of back and forth, you may of course adjust the pattern. You’ll need to add steeks mid-front (usually 5 stitches), and follow the instructions. When you would normally turn and work from the wrong side, simply work across the steek and continue in the round. At the end you’ll cut the piece open, pick up stitches to work bands, and cover the cut edges.

See DROPS video: How to knit steeks and cut open

Should you prefer to work back and forth instead of in the round, you may of course adjust the pattern so you work the pieces separately and then assemble them at the end. Divide the stitches for the body in 2, add 1 edge stitch in each side (for sewing) and work the front and back pieces separately.

See DROPS lesson: Can I adapt a pattern for circular needles into straight needles?

Pattern repeats can vary slightly in the different sizes, in order to get the correct proportions. If you’re not working the exact same size as the garment in the photo, yours might deviate slightly. This has been carefully developed and adjusted so that the complete impression of the garment is the same in all sizes.

Make sure to follow instructions and diagrams for your size!

If you have found a pattern you like which is available in women’s size it’s not very difficult to convert it to men’s size. The biggest difference will be the length of sleeves and body. Start working on the women size that you think would fit across the chest. The additional length will be worked right before you cast off for the armhole/sleeve cap. If the pattern is worked top-down you can add the length right after the armhole or before the first decrease on sleeve.

Regarding additional yarn amount, this will depend on how much length you add, but it is better with a skein too many than too few.

All yarns will have excess fibres (from production) that might come off as lint or shedding. Brushed yarns (ie hairier yarns) have more of these loose, excess fibres, causing more shedding.

Shedding also depends on what is worn under or over the garment, and whether this pulls at the yarn fibres. It’s therefore not possible to guarantee that there will be no shedding

Below are some tips on how to get the best result when working with hairier yarns:

1. When the garment is finished (before you wash it) shake it vigorously so the looser hairs come off. NOTE: do NOT use a lint roller, brush or any method that pulls at the yarn.

2. Place the garment in a plastic bag and put it in your freezer - the temperature will cause the fibres to become less attached to each other, and excess fibres will come off easier.

3. Leave in the freezer for a few hours before taking it out and shaking it again.

4. Wash the garment according to the instructions on the yarn label.

Pilling is a natural process that happens to even the most exclusive of fibers. It's a natural sign of wear and tear that is hard to avoid, and that is most visible in high friction areas of your garment like a sweater's arms and cuffs.

You can make your garment look as new by removing the pilling, using a fabric comb or a pill/lint remover.

Still can't find the answer you need? Then scroll down and leave your question so one of our experts can try to help you. This will be done normally within 5 to 10 working days.
In the meantime, you can read the questions and answers that others have left to this pattern or join the DROPS Workshop on Facebook to get help from fellow knitters/crocheters!

You might also like...

Post a comment to pattern DROPS 113-18

We would love to hear what you have to say about this pattern!

If you want to leave a question, please make sure you select the correct category in the form below, to speed up the answering process. Required fields are marked *.

Comments / Questions (45)

country flag Konstanze Burger wrote:

Eine wunderschöne Jacke! Spricht eigentlich etwas dagegen alle drei Teile zusammen auf eine Nadel zu nehmen und erst ab Armausschnitt getrennt zu stricken? Die Abnahmen am Rumpf/Seiten kann man durch Markierer an den richtigen Stellen setzen. So erspart man sich die Seitennähte.

08.03.2021 - 13:54

country flag Anja wrote:

Beim Rückenteil beginnt die Abnahme für die Seitenschrägung nach 5 cm. Bei den Vorderteilen nach 15 cm. Ist da beim Rückenteil ein Druckfehler oder soll das so unterschiedlich sein?

29.05.2020 - 23:59

DROPS Design answered:

Liebe Anja, es sollte beim 15 cm auf beiden Teilen sein - eine Korrektur erfolgt gleich, danke für den Hinweis. Viel Spaß beim stricken!

02.06.2020 - 09:03

country flag Eliza wrote:

The number on the diagram, is it cm? I can't match it with the written instructions.

07.05.2020 - 16:19

DROPS Design answered:

Hi Eliza, If you are using the US version, the numbers are in inches. If you are using the Euopean English, then they are in cms. Happy knitting!

08.05.2020 - 07:58

country flag Dagmar wrote:

Der Schnitt der Jacke ist sehr gelungen, die Anleitung sehr gut nach zu vollziehen. Hätte das Potential zu einem Lieblingsstück, allerdings habe ich das Drops Bomull-Lin-Garn verwendet und das ist das schlechteste Garn mit dem ich seit Langem gearbeitet habe. Ergibt ein ungleiches Strickbild, hat selbst im 50g-Knäuel immer wieder dicke Verknotungen und fusselt extrem. Nach einem halben Arbeitstag ist der Schreibtisch voll von Fusseln der Jacke. Schade ums Geld und die Arbeit.

11.04.2019 - 06:53

DROPS Design answered:

Liebe Dagmar, alle Garne haben überschüssige, nicht fest verzwirnte Fasern, aber wenn diese Fasern ausgefallen sind, soll das nicht mehr passieren. Gerne nehmen Sie bitte Kontakt mit Ihrem DROPS Laden auf. Viel Spaß beim stricken!

11.04.2019 - 10:04

country flag Beverly Conran wrote:

Hello : When you are shaping armhole on side panels . you say to dec as for back. I have 67 sts and will dec down to 46. When I dec as for back (both sides), I cannot get all dec in before I reach 46 sts. I tried to dec for one side ,not two (as for back)and it don't work out. You need to dec 21 sts to get 46 sts. Can you clarify?

07.04.2016 - 00:32

DROPS Design answered:

Dear Mrs Conran, on front pieces you will shape armhole as on back piece but only on 1 side (= towards armhole) - in larger size you have 67 sts, then bind off 4 sts 2 times + 2 sts 4 times + 1 st 5 times = 21 sts - 67-21= 46 sts. Happy knitting!

07.04.2016 - 09:23

country flag Beverly Conran wrote:

When dec on the front panels, it says to follow as for back when piece measures 6 ins. On the back you dec 1 st on both sides for a total of 2 per row ,till 8 dec's are reached. My uestion is do you have to dec on both sides for the panels or only on the side edge for a total of 1 st per row? Thanks

03.04.2016 - 05:05

DROPS Design answered:

Dear Mrs Conran, on front piece you will dec only on the side (the one sewn tog with back piece afterwards), ie only 1 st per dec row at beg of row from RS on left front piece. Happy knitting!

04.04.2016 - 08:45

country flag Regina Scrivener wrote:

I have finished this jacket. I did in fact have to do short rows on the band. It is complimented on every time I wear it. Thank you for such original and interesting patterns. And they're free. Unbelievable.

25.08.2015 - 21:54

country flag Regina Scrivener wrote:

Hi, Please help I am really stuck. I have finished the back of this coat and all is well. My tension in correct. However on the front pieces the moss stitch bands going up the front are shorter than the sides. So the fronts are pulling up and look like they need stretching. When I match the side pieces my armholes meet but I cannot make the buttonholes because the front band isn't long enough. I hope you can put me on the right track. I love this coat and am desperate to get it finished. Regina

22.03.2015 - 21:22

DROPS Design answered:

Dear Mrs Scrivener, this may come from the different tension between front bands and whole piece. You can block your jacket at finished measurement. Remember you will get all tips & advices from your DROPS store. Happy knitting!

23.03.2015 - 10:30

country flag Annie Brown wrote:

I have nearly finished this garment. However my pockets look much smaller than the picture. Is 30st the right amount?

12.02.2014 - 08:46

DROPS Design answered:

Dear Mrs Brown, with a tension of 17 sts / 10 cm, pocket will be approx. 18 cm with 30 sts at the bottom edge. Happy knitting!

12.02.2014 - 09:23

country flag ELENA MUÑOZ wrote:

Buenos días. He tejido la espalda y los delanteros y muy bien.Pero la manga es muy estrecha, creo que tiene muy poco puntos comparado con la anchura donde hay que coserla. Me gustaría que me lo aclarasen si es posible. Muy agradecida.Un saludo

11.06.2013 - 10:44

DROPS Design answered:

Hola Elena! He repasado los puntos del patrón y están correctos. Podría ser una cuestión de tensión del tejido (que los puntos de la manga estén demasiado prietos o los de la sisa demasiado flojos) si no es este el caso podrías acercarte a la tienda donde compraste la lana para que te asesoren.

23.06.2013 - 20:23