DROPS Alpaca
DROPS Alpaca
100% Alpaca
from 3.65 € /50g
Get the yarn to make this pattern from 29.20€.

The yarn cost is calculated from the pattern’s smallest size and the yarn’s cheapest product type. Looking for an even better price? You might find it on the DROPS Deals!

DROPS SS24

Himmelblå

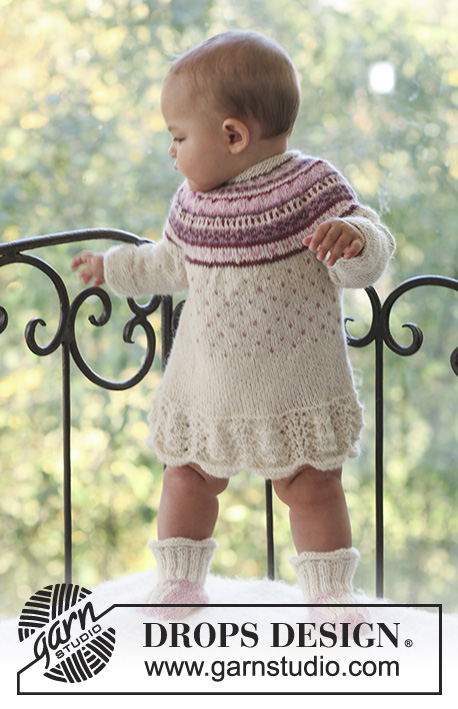
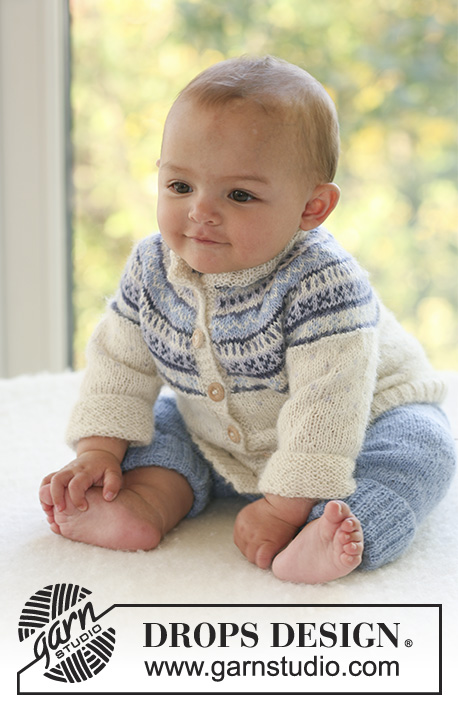
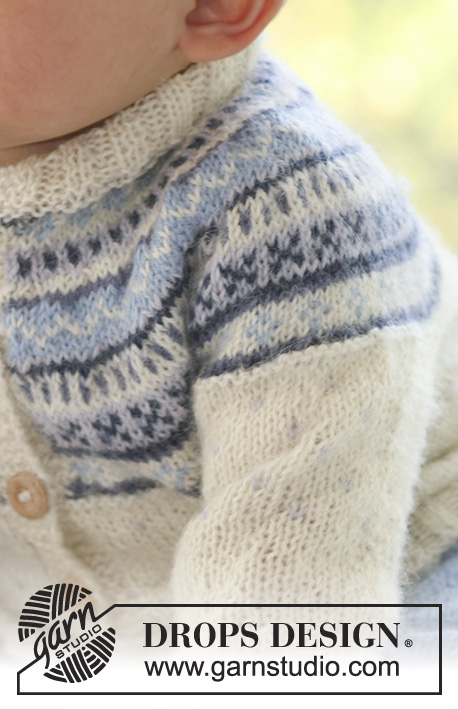
Set of knitted cardigan with round yoke and Nordic pattern plus pants, for baby and children in DROPS Alpaca

DROPS Baby 16-10
Size: 1/3 - 6/9 - 12/18 months (2 - 3/4) years
Size in cm: 50/56-62/68-74/80 (86/92-98/104)
Materials: DROPS ALPACA
JACKET:
100-100-150 (150-200) g colour no 0100, off-white
50 g for all sizes colour no 8105, light steel blue
50 g for all sizes colour no 6360, steel blue mix
50 g for all sizes colour no 6347, dark steel blue
50 g for all sizes colour no 6205, light blue
PANTS:
100-100-150 (150-200) g colour no 6205, light blue

JACKET:
DROPS DOUBLE POINTED AND CIRCULAR NEEDLE (60 cm) size 3 mm – or size needed to get 24 sts x 32 rows in stocking st = 10 x 10 cm.
DROPS DOUBLE POINTED AND CIRCULAR NEEDLE (60 cm) size 2.5 mm – for rib
DROPS WOODEN BUTTON no 503: 5-5-6 (6-6) pcs.

PANTS:
DROPS DOUBLE POINTED AND CIRCULAR NEEDLE (40 cm) size 2.5 mm – or size needed to get 26 sts x 34 rows in stocking st = 10 x 10 cm.

-------------------------------------------------------

Alternative Yarn – See how to change yarns here
Yarn Groups A to F – Use the same pattern and change the yarn here
Yarn usage using an alternative yarn – Use our yarn converter here

-------------------------------------------------------

DROPS Alpaca
DROPS Alpaca
100% Alpaca
from 3.65 € /50g
Get the yarn to make this pattern from 29.20€.

The yarn cost is calculated from the pattern’s smallest size and the yarn’s cheapest product type. Looking for an even better price? You might find it on the DROPS Deals!

Pattern instructions

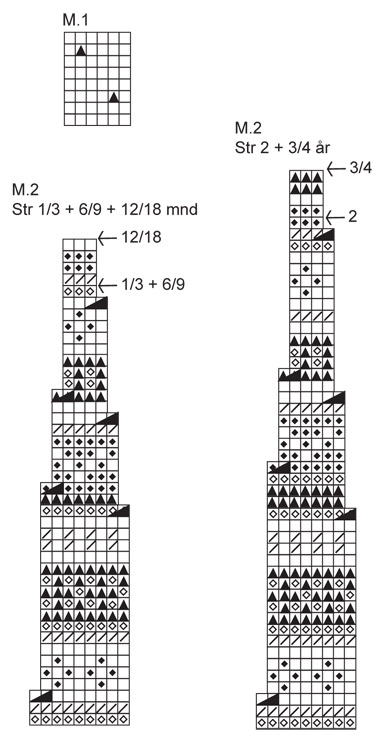
JACKET:

GARTER ST (back and forth on needle):
K all rows.

GARTER ST (in the round):
K 1 round, P 1 round.

BUTTONHOLES: Make buttonholes on right front band. 1 buttonhole = cast off 3rd and 4th st from mid front and cast on 2 new sts on return row.
Make buttonholes when piece measures: SIZE 1/3 months: 4, 10, 16, 22 and 27 cm
SIZE 6/9 months: 4, 10, 16, 22 and 28 cm
SIZE 12/18 months: 4, 10, 16, 21, 27 and 32 cm
SIZE 2 years: 4, 10, 17, 23, 30 and 36 cm
SIZE 3/4 years: 4, 11, 18, 25, 32 and 39 cm

PATTERN: See diagram M.1 and M.2, the diagrams are seen from the RS.

KNITTING TIP: When working M.2 the last st in repeat does not fit pattern. Work this st as if it was the first st in the next repeat to make the pattern identical on both sides of front bands. NOTE: Do not dec on this st.
----------------------------------------------------------
JACKET

BODY PIECE: Worked back and forth on circular needle from mid front.
Cast on 172-192-212 (232-256) sts (includes 5 front band sts each side towards mid front) on circular needle size 2.5 mm with off-white. P 1 row from WS and continue as follows from RS: 5 front band sts in garter st – SEE ABOVE, * K2, P2 *, repeat from *-* and finish with K2 and 5 front band sts in garter st. When rib measures 3 cm K 1 row from RS, AT THE SAME TIME dec 42-50-52 (60-66) sts evenly = 130-142-160 (172-190) sts. Change to circular needle size 3 mm. Insert 2 markers in piece, 35-38-42 (45-50) sts in from each side (= 60-66-76 (82-90) sts between markers on back piece). K 1 row from WS and continue in stocking st. AT THE SAME TIME when piece measures 4 cm make buttonhole on right front band – SEE ABOVE.
REMEMBER THE KNITTING TENSION!
When piece measures approx 7-7-9 (10-11) cm continue in M.1 with 5 garter sts each side. When piece measures 16-17-20 (23-25) cm cast off 10 sts each side for armhole (= 5 sts on each side of both markers) = 110-122-140 (152-170) sts. Put piece aside and knit the sleeves.

SLEEVES: Worked in the round on double pointed needles.
Cast on 36-36-42 (42-46) sts on double pointed needles size 2.5 mm with off-white. Work 4 cm garter st – SEE ABOVE. Change to double pointed needles size 3 mm and insert a marker at beg of round = mid under arm. Continue in stocking st. When piece measures 5-5-5 (6-7) cm inc 1 st on each side of marker and repeat the inc on every 4-4-5 (5-6) round a total of 7-8-8 (10-10) times = 50-52-58 (62-66) sts. AT THE SAME TIME when piece measures 10-11-11 (14-16) cm continue in M.1. When piece measures 14-17-19 (23-27) cm cast off 10 sts mid under arm (= 5 sts on each side of marker) = 40-42-48 (52-56) sts. Put piece aside and knit the other sleeve.

YOKE: Slip sleeves on the same circular needle as body piece where cast off for armholes = 190-206-236 (256-282) sts. K 1 row off-white from RS, AT THE SAME TIME dec 8-6-0 (2-10) sts evenly = 182-200-236 (254-272) sts. K 1 row from WS and now slip the 5 front band sts each side on stitch holders = 172-190-226 (244-262) sts left on row. Continue in M.2 – SEE KNITTING TIP – and see diagram for size. After M.2 – see arrow in diagram for size – there are 58-64-76 (82-88) sts on row and piece measures approx 28-29-33 (37-40) cm. K 1 row off-white from RS, AT THE SAME TIME dec 0-2-6 (4-6) sts evenly = 58-62-70 (78-82) sts.
Slip sts from stitch holder on the left side on needle size 3 mm and work garter st back and forth on needle until front band is the same length as jacket – finish after a row from RS. Repeat on right front band, remember buttonhole!
Slip sts on front bands on the same circular needle as jacket = 68-72-80 (88-92) sts. Now complete piece in off-white: K 1 row from WS, K 1 row from RS, K 1 row from WS and continue in rib as follows: 5 garter sts, * K2, P2 *, repeat from *-* and finish with K2 and 5 garter sts. When rib measures 4-4-4 (5-5) cm cast off loosely in rib. Fold rib double towards WS and fasten.

ASSEMBLY:
Sew front bands to jacket at the top, edge to edge. Sew openings under arms and sew on buttons. Fold sleeve edges if needed.
----------------------------------------------------------
PANTS:

DECREASING TIP:
Dec as follows 3 sts before marker: K2 tog
Dec as follows after marker: K1, slip 1 st as if to K, K1, psso.
----------------------------------------------------------
LEG:
Worked in the round on double pointed needles.
Loosely cast on 64-68-72 (76-80) sts on double pointed needles size 2.5 mm with Alpaca. Insert a marker at beg of round = inside of leg. Work 8-8-9 (9-10) cm rib, K2/P2 and continue in stocking st, AT THE SAME TIME dec 8-8-10 (12-12) sts evenly = 56-60-62 (64-68) sts.
REMEMBER THE KNITTING TENSION!
When piece measures 9-10-11 (11-12) cm inc 1 st on each side of marker and repeat the inc on every 3-4-5 (6-8) round a total of 8 times = 72-76-78 (80-84) sts. When piece measures 16-20-23 (25-32) cm divide piece on the inside of leg and continue back and forth on needle (to make it easier to slip both legs on the same circular needle afterwards). Cast on 1 new st each side for seam = 74-78-80 (82-86) sts. When piece measures 18-22-25 (29-34) cm cast off 3 sts each side = 68-72-74 (76-80) sts. Put piece aside and knit the other leg.

PANTS:
Slip both legs on the same circular needle size 2.5 mm = 136-144-148 (152-160) sts. Insert 1 marker mid front. Continue in the round, AT THE SAME TIME dec 1 st on each side of marker mid front– SEE DECREASING TIP – on every other row a total of 6 times = 124-132-136 (140-148) sts.
When piece measures 29-35-38 (43-50) cm inc 24-24-24 (28-28) sts evenly on round = 148-156-160 (168-176) sts. Continue in rib, K2/P2 and cast off loosely when rib measures 7-7-8 (9-9) cm.
Pants measures approx 36-42-46 (52-59) cm.

ASSEMBLY:
Sew split at the top of leg inside 1 edge st and sew opening between legs.

Diagram

symbols = 6360, steel blue mix
symbols = 6347, dark steel blue
symbols = 0100, off-white
symbols = 6205, light blue
symbols = 8105, light steel blue
symbols = K2 tog
diagram
diagram
Do you have a question? See a list of frequently asked questions (FAQ)

Knitting tension is what determines the final measurements of your work, and is usually measured per 10 x 10 cm. It is provided like so: number of stitches in width x number of rows in height - eg: 19 stitches x 26 rows = 10 x 10 cm.

The knitting tension is very individual; some people knit/crochet loosely while others work tightly. You adjust the knitting tension with the needle size, which is why the suggested needle size is only meant as a guide! You need to adjust this (up or down) to ensure that YOUR knitting tension matches the knitting tension provided in the pattern. If you work with a different knitting tension than provided you will have a different yarn consumption, and your work will have different measurements than what the pattern suggests.

The knitting tension also determines which yarns can replace each other. As long as you achieve the same knitting tension you can replace one yarn with another.

See DROPS lesson: How to measure your tension/gauge

See DROPS video: How to make a gauge tension swatch

The required amount of yarn is provided in grams, eg: 450 g. To calculate how many balls you’ll need you first need to know how many grams are in 1 ball (25g, 50g or 100g). This information is available if you click on the individual yarn quality on our pages. Divide the amount required with the amount of each ball. For example, if each ball is 50g (the most common amount), the calculation will be as follows: 450 / 50 = 9 balls.

The important thing when changing from one yarn to another is that the knitting/crochet tension remains the same. This is so that the measurements of the finished piece will be the same as on the sketch provided. It is easier to achieve the same knitting tension using yarns from the same yarn group. It is also possible to work with multiple strands of a thinner yarn to achieve the knitting tension of a thicker one. Please try our yarn converter. We recommend you to always work a test swatch.

Please NOTE: when changing yarn the garment might have a different look and feel to the garment in the photo, due to individual properties and qualities of each yarn.

See DROPS lesson: Can I use a different yarn than the one mentioned in the pattern?

All our yarns are categorised into yarn groups (from A to F) according to thickness and knitting tension – group A contains the thinnest yarns and group F the thickest. This makes it easier for you to find alternative yarns to our patterns, should you wish to switch yarn. All yarns within the same group have a similar knitting tension and can easily replace each other. However, different yarn qualities have different structures and properties which will give the finished work a unique look and feel.

Click here for an overview of the yarns in each yarn group

At the top of all our patterns you’ll find a link to our yarn calculator, which is a helpful tool should you wish to use a different yarn than suggested. By filling in the yarn quality you wish to replace, the amount (in your size) and number of strands, the calculator will present good alternative yarns with the same knitting tension. Additionally it will tell you how much you’ll require in the new qualities and whether you’ll need to work with multiple strands. Most skeins are 50g (some are 25g or 100g).

If the pattern is worked with multiple colours, every colour will have to be calculated separately. Similarly, if the pattern is worked with several strands of different yarns (for example 1 strand Alpaca and 1 strand Kid-Silk) you will have to find alternatives for each, individually.

Click here to see our yarn calculator

Since different yarns have different qualities and textures we have chosen to keep the original yarn in our patterns. However, you can easily find options among our available qualities by using our yarn calculator, or simply pick a yarn from the same yarn group.

It is possible that some retailers still have discontinued yarns in stock, or that someone has a few skeins at home that they would like to find patterns for.

The yarn calculator will provide both alternative yarn as well as required amount in the new quality.

If you think it's hard to decide what size to make, it can be a good idea to measure a garment you own already and like the size of. Then you can pick the size by comparing those measures with the ones available in the pattern's size chart.

You'll find the size chart at the bottom of the pattern.

See DROPS lesson: How to read size chart

The needle size provided in the pattern serves only as a guide, the important thing is to follow the knitting tension. And since knitting tension is very individual, you will have to adjust the needle size to ensure that YOUR tension is the same as in the pattern – maybe you’ll have to adjust 1, or even 2 needle sizes, up or down to achieve the correct tension. For this, we recommend that you work test swatches.

Should you work with a different knitting tension than the one provided, the measurements of the finished garment might deviate from the measurement sketch.

See DROPS lesson: How to measure your tension/gauge

See DROPS video: How to make a tension/gauge swatch

Working a garment top-down provides more flexibility and room for personal adjustment. For example it is easier to try the garment on while working, as well as making adjustments to length of yoke and shoulder caps.

The instructions are carefully explaining every step, in the correct order. Diagrams are adjusted to the knitting direction and are worked as usual.

The diagram depicts all rows/rounds, and every stitch seen from the right side. It is read from bottom to top, from right to left. 1 square = 1 stitch.

When working back and forth, every other row is worked from the right side and every other row is worked from the wrong side. When working from the wrong side, the diagram will have to be worked reversed: from left to right, knit stitches are purled, purl stitches are knit etc.

When working in the round every round is worked from the right side and the diagram are worked from right to left on all rounds.

See DROPS lesson: How to read knitting diagrams

The diagram depicts all rows/rounds, and every stitch seen from the right side. It is worked from bottom to top, from right to left.

When working back and forth every other row is worked from the right side: from right to left and every other row is worked from the wrong side: from left to right.

When working in the round, every row in the diagram are worked from the right side, from right to left.

When working a circular diagram you start in the middle and work your way outwards, counter clockwise, row by row.

The rows usually start with a given number of chain stitches (equivalent to the height of the following stitch), this will either be depicted in the diagram or explained in the pattern.

See DROPS lesson: How to read crochet diagrams

Instructions for working several diagrams after each other on the same row/round, will often be written like so: “work A.1, A.2, A.3 a total of 0-0-2-3-4 times". This means you work A.1 once, then A.2 is worked once, and A.3 is repeated (in width) the number of times provided for your size – in this case like so: S = 0 times, M = 0 times, L=2 times, XL= 3 times and XXL = 4 times.

The diagrams are worked as usual: begin with the first row in A.1, then work the first row in A.2 etc.

See DROPS lesson: How to read knitting diagrams

See DROPS lesson: How to read crochet diagrams

The total width of the garment (from wrist-to-wrist) will be larger in the larger sizes, despite the actual sleeves being shorter. The larger sizes have longer sleeve caps and wider shoulders, so there will be a good fit in all sizes.

The measurement sketch/schematic drawing provides information regarding the full length of the garment. If it’s a jumper or a jacket the length is measured from the highest point on the shoulder closest to the neckline, and straight down to the bottom of the garment. It is NOT measured from the tip of shoulder. Similarly, the length of yoke is measured from the highest point on the shoulder and down to where yoke is split into body and sleeves.

On a jacket measures are never taken along bands, unless specifically stated. Always measure inside band stitches when measuring the length.

See DROPS lesson: How to read a schematic drawing

Diagrams are often repeated on the round or in height. 1 repeat is the diagram the way it appears in the pattern. If it says to work 5 repeats of A.1 in the round, then you work A.1 a total of 5 times after/next to each other in the round. If it says to work 2 repeats of A.1 vertically/in height you work the entire diagram once, then begin again at the start and work the entire diagram one more time.

Chain stitches are slightly narrower than other stitches and to avoid working the cast-on edge too tight, we simply chain more stitches to begin with. The stitch count will be adjusted on the following row to fit the pattern and measurement sketch.

The rib edge is more elastic and will contract slightly compared to, for example, stocking stitch. By increasing before the rib edge, you avoid a visible difference in width between the rib edge and the rest of the body.

It’s very easy to cast off too tightly, and by making yarn overs while casting off (and simultaneously casting these off) you avoid a too tight cast off edge.

See DROPS video: How to bind off with yarn overs (yo)

To achieve an even increase (or decrease) you can increase on, for example: every 3rd and 4th row alternately, like so: work 2 rows and increase on the 3rd row, work 3 rows and increase on the 4th. Repeat this until the increase is complete.

See DROPS lesson: Increase or decrease 1 st on every 3rd and 4th row alternately

Should you prefer to work in the round instead of back and forth, you may of course adjust the pattern. You’ll need to add steeks mid-front (usually 5 stitches), and follow the instructions. When you would normally turn and work from the wrong side, simply work across the steek and continue in the round. At the end you’ll cut the piece open, pick up stitches to work bands, and cover the cut edges.

See DROPS video: How to knit steeks and cut open

Should you prefer to work back and forth instead of in the round, you may of course adjust the pattern so you work the pieces separately and then assemble them at the end. Divide the stitches for the body in 2, add 1 edge stitch in each side (for sewing) and work the front and back pieces separately.

See DROPS lesson: Can I adapt a pattern for circular needles into straight needles?

Pattern repeats can vary slightly in the different sizes, in order to get the correct proportions. If you’re not working the exact same size as the garment in the photo, yours might deviate slightly. This has been carefully developed and adjusted so that the complete impression of the garment is the same in all sizes.

Make sure to follow instructions and diagrams for your size!

If you have found a pattern you like which is available in women’s size it’s not very difficult to convert it to men’s size. The biggest difference will be the length of sleeves and body. Start working on the women size that you think would fit across the chest. The additional length will be worked right before you cast off for the armhole/sleeve cap. If the pattern is worked top-down you can add the length right after the armhole or before the first decrease on sleeve.

Regarding additional yarn amount, this will depend on how much length you add, but it is better with a skein too many than too few.

All yarns will have excess fibres (from production) that might come off as lint or shedding. Brushed yarns (ie hairier yarns) have more of these loose, excess fibres, causing more shedding.

Shedding also depends on what is worn under or over the garment, and whether this pulls at the yarn fibres. It’s therefore not possible to guarantee that there will be no shedding

Below are some tips on how to get the best result when working with hairier yarns:

1. When the garment is finished (before you wash it) shake it vigorously so the looser hairs come off. NOTE: do NOT use a lint roller, brush or any method that pulls at the yarn.

2. Place the garment in a plastic bag and put it in your freezer - the temperature will cause the fibres to become less attached to each other, and excess fibres will come off easier.

3. Leave in the freezer for a few hours before taking it out and shaking it again.

4. Wash the garment according to the instructions on the yarn label.

Pilling is a natural process that happens to even the most exclusive of fibers. It's a natural sign of wear and tear that is hard to avoid, and that is most visible in high friction areas of your garment like a sweater's arms and cuffs.

You can make your garment look as new by removing the pilling, using a fabric comb or a pill/lint remover.

Still can't find the answer you need? Then scroll down and leave your question so one of our experts can try to help you. This will be done normally within 5 to 10 working days.
In the meantime, you can read the questions and answers that others have left to this pattern or join the DROPS Workshop on Facebook to get help from fellow knitters/crocheters!

You might also like...

Post a comment to pattern DROPS Baby 16-10

We would love to hear what you have to say about this pattern!

If you want to leave a question, please make sure you select the correct category in the form below, to speed up the answering process. Required fields are marked *.

Comments / Questions (48)

country flag Norma Deckers wrote:

Ik begrijp deze zin niet. Kunt u me uitleggen hoe dit wordt bedoeld. (TIP VOOR HET BREIEN: Als u M.2 breit, past de laatst st van de herhaling niet in het patroon. Brei deze st alsof het de eerste st van de volgende herhaling is zodat het patroon gelijk is aan beide kanten naast de voorbiezen. LET OP: Minder niet over deze st.)

01.12.2019 - 20:20

DROPS Design answered:

Dag Norma,

Bij de laatste steek van de laatste herhaling van M.2 op de toer brei je de steek niet volgens het laatste vierkantje in het telpatroon, maar volgens het eerste vierkantje in het telpatroon.

07.12.2019 - 10:47

country flag Balkema wrote:

Als ik de voorbies evenveel toeren heb gebreid als de pas hoog is, is de bies nog veel korter dan de pas. Moet ik hem evenveel toeren hoogmaken (dus zo laten) of evenveel centimeter hoog breien (dan heeft de bies dus meer toeren dan de pas)? Met vriendelijke groet Jacelien

30.10.2019 - 10:51

DROPS Design answered:

Dag Balkema,

Het is inderdaad de bedoeling dat je de bies even hoog maakt in centimeters als de pas en waarschijnlijk brei je dan dus meer toeren op de bies.

05.11.2019 - 14:22

country flag Norma Deckers wrote:

Is dit patroon ook aanwezig als trui in plaats van vest. Dank voor uw antwoord. Een compliment voor jullie site.

18.10.2019 - 11:13

DROPS Design answered:

Dag Norma,

Nee, helaas is deze alleen in vestvariant.

23.10.2019 - 20:28

country flag Line wrote:

On nous dit de voir "astuce" lorsque l'on va commencer M2 dans le gilet, qu'est-ce que c'est ou où la trouver ? Merci

25.04.2019 - 03:55

DROPS Design answered:

Bonjour Line, vous la trouverez dans la 1ère partie des explications, après JACQUARD et juste au-dessus de VESTE / DOS & DEVANT. Bon tricot!

25.04.2019 - 09:14

country flag Line Larose wrote:

Comment savoir quel rang doit être suivi à l'endroit pour commencer les motifs au M2 ?

12.04.2019 - 15:49

DROPS Design answered:

Bonjour Mme Larose, le 1er rang de M.2 se tricote sur l'endroit = commencez en bas à droite du diagramme et lisez de droite à gauche sur l'endroit, sur l'envers, lisez le diagramme de gauche à droite - plus d'infos sur les diagrammes ici.. Bon tricot!

12.04.2019 - 16:15

country flag Line wrote:

À 14-17-19 (23-27) cm de hauteur totale, rabattre 10 m sous la manche (soit 5 m de chaque côté du marqueur). Mettre en attente et tricoter l'autre manche. Comme je fait grandeur 2 ans, est-ce que ça veut dire que je rabats avant le marqueur (alors j'aurai 40 m chaque côté) ou plutôt après avoir passé le marqueur ?

12.04.2019 - 15:45

DROPS Design answered:

Bonjour Line, vous rabattez pour les emmanchures 5 m avant le 1er marqueur + 5 m après le 1er marqueur et 5 m avant le 2ème marqueur + 5 m après le 2ème marqueur = vous avez rabattu 2 x 10 mailles pour les emmanchures. Bon tricot!

12.04.2019 - 16:13

country flag Maria Kassalia wrote:

Vielen DanK !!!!!!

24.09.2018 - 14:54

Maria Kassalia wrote:

Hallo ich komme nicht klar mit den zentimeter muß ich immer gesamthöhe messen vielen dank

23.09.2018 - 16:54

DROPS Design answered:

Liebe Frau Kassalia, ja genau, es wird immer von der Anschlagskante (= gesamthöhe) gemessen. Viel Spaß beim stricken!

24.09.2018 - 10:18

country flag Lise Andreasen wrote:

Jeg forstår ikke M1, kan det passe, at maskerne med isblå, alle strikkes fra retsiden? \r\nEn firkant markerer vel en strikket pind, og tæller jeg firkantede, bliver de alle strikket på retpinden. Vil det siges, at garnet brydes for hver pind med isblå?\r\nMvh Lise A.

21.06.2018 - 23:34

DROPS Design answered:

Hei Lise. Det stemmer at alle «lusene» med isblå strikkes fra rettsiden. Det er opp til deg om du ønsker å klippe og feste tråden mellom hver omgang med isblå eller om du vil plukke den opp de omgangene du trenger den. Det er også 5 masker mellom hver maske med isblå på omgangen, så det kan være du vil tvinne tråden på baksiden for å unngå lange tråder. Vedlagt er en video av hvordan å strikke med 2 farger – på 0.1:55 viser vi hvordan å tvinne tråden. God fornøyelse.

25.06.2018 - 08:30

country flag Lise Andreasen wrote:

Jeg vil gerne spørge, kan det være rigtigt,at mønsterfarven isblå i M.1 strikkes på hver 4. Pind, altså kun på retpinden? Skal garnet så brydes for hver mønster række? Eller er det mig der læser diagrammet forkert? Mvh Lise

16.06.2018 - 11:09