
Popular categories
Looking for a yarn?


Comments / Questions (8)
![]() Marie wrote:
Marie wrote:
Bonjour, Le pull se tricote avec les aiguilles 2,5 et 3,5. Est-ce normal que le pantalon se tricote avec les aiguilles 2,5 et 3 au lieu de 3,5 ? Merci 🙂.
01.09.2024 - 13:31DROPS Design answered:
Bonjour Marie, tout à fait, notez que la tension pour le pull est de 21 m x 28 rangs jersey avec les aiguilles 3,5 mais de 22 m x 30 rangs avec les aiguilles 3. Bon tricot!
02.09.2024 - 08:36
![]() Susanne wrote:
Susanne wrote:
Beim stricken der Hose in Größe 12/18 habe ich am Ende des rechten bzw. linken Beines nach dem aufnehmen der 3 Maschennach 23 cm 78 Maschen und nicht 66 wie in der Anleitung beschrieben. Was geschieht mit den Maschen, damit ich auf der Rundnadel wieder auf 132 Maschen komme? Bitte um euren Rat.
17.12.2020 - 13:59DROPS Design answered:
Liebe Susanne, die 3 Maschen sollen auf beide Seite abgekettet werden und nicht aufgenommen - eine Korrektur erfolgt, danke für den Hinweis, so haben Sie 72 M - 6 = 66 Maschen übrig. Viel Spaß beim stricken!
17.12.2020 - 17:05
![]() Angela wrote:
Angela wrote:
Il maglione è per la misura 2anni
25.01.2020 - 20:36
![]() Angela wrote:
Angela wrote:
Sto realizzando il maglione, ma non trovo a che altezza, o a quante passate dal bordo a coste sistemate il ricamo e le palle a punto nocciolina. Grazie per l'aiuto e conto di una risposta celere.
25.01.2020 - 20:34DROPS Design answered:
Buonasera Angela, il motivo non è ricamato, ma lavorato seguendo il diagramma A.2. Per la posizione, segua le indicazioni riportate nelle spiegazioni. Buon lavoro!
25.01.2020 - 22:56
![]() Rita Johansen wrote:
Rita Johansen wrote:
Hvorfor er der ikke angivet hvilke størrelser, som mystret til blusen dækker? Hvorfor er der 2 forskellige tegninger med målangivelser af blusen? Den ene tegning ser ud til at dække 5 størrelser, mens den anden dækker mål for 6 størrelser. - Hvilke størrelser?
19.06.2016 - 07:58DROPS Design answered:
Hej Rita. Det maa vaere en fejl, da mönstret blev tilföjet. Jeg har givet det videre og afventer rettelse.
20.06.2016 - 14:25
![]() Louise Edlinger wrote:
Louise Edlinger wrote:
Ich werde dieses Model aus Cotton Merino stricken. Diese Qualität kenne ich und bin sehr zufrieden. Das richtige Garn für Kinder und alle, die bei Wolle empfindlich sind. Ich werde es auf dem Heimstricker stricken und das Motiv im Maschenstich aufsticken.
06.02.2015 - 19:16
![]() Touloulouze wrote:
Touloulouze wrote:
Bonjour Comment mettre le motif (clown)à la mesure (2ans) merci d'avoir la gentillesse de m'informer cordialement toulouze
26.09.2012 - 09:21DROPS Design answered:
Bonjour Madame Touloulouze, pour centrer le motif, repérez la m centrale et calculez où elle doit se situer par rapport au devant. Vous pouvez ainsi calculer le nombre de mailles et savoir où commencer votre diagramme. Pour toute aide personnalisée, je vous remercie de bien vouloir vous adresser à votre magasin DROPS. Bon tricot !
26.09.2012 - 09:51
![]() Anne-Beate Dokken wrote:
Anne-Beate Dokken wrote:
Jeg skal strikke denne buksen i merino ekstra fin. Bør jeg bruke tykkere pinner.Takk for hjelpen.
17.06.2012 - 18:26DROPS Design answered:
Strikk en prøvelapp med Merino Extra Fine for å finne din strikkefasthet. Strikkefastheten på denne oppskriften er: 21 m x 28 p på p 3,5 og glstrikk = 10 x 10 cm. Stemmer ikke det med din strikkefasthet, må du prøve mindre eller større strikkepinner.
26.06.2012 - 16:28
|
||||||||||||||||||||||
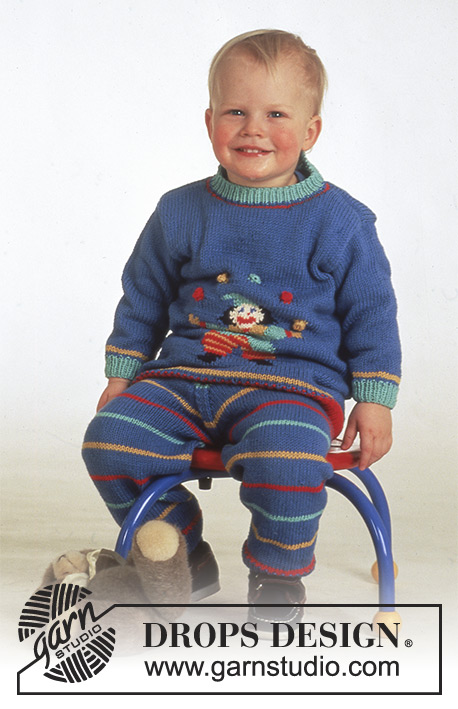
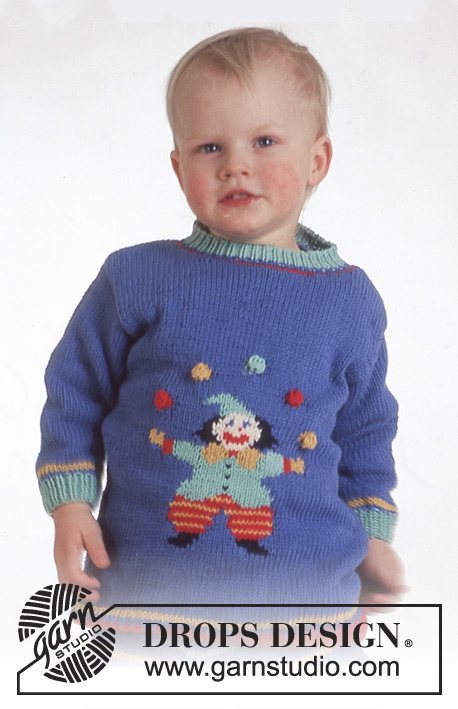
Clown in Town#clownintownsweater |
||||||||||||||||||||||
 |
 |
|||||||||||||||||||||
DROPS jumper with clown motif and trousers in Muskat or Lima.
DROPS Baby 4-5 |
||||||||||||||||||||||
|
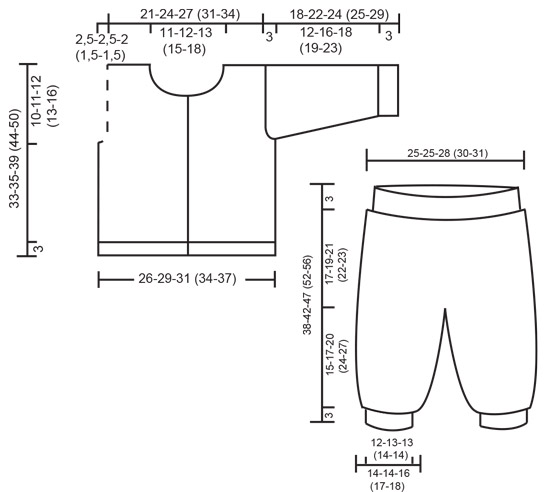
JUMPER: Knitting tension: 21 sts x 28 rows on needles size 3.5 mm in stocking sts = 10 x 10 cm. Rib: *K1, P1*, repeat from *-*. Bobble: Knit in the colour shown. Knit 4 sts in 1 st, knit 4 rows stocking st on these 4 sts, then lift the first, second and third st over the fourth = 1 st left. Pattern: See diagram. The diagram shows the pattern from the RS. Front and back piece: Knitted in the round on circular needle. Cast on 108-120-132 (144-156) sts on circular needle size 2.5 mm with red /red and knit 3 cm Rib. Change to needle size 3.5 mm and continue in M.1. After M.1 continue in blue / grey blue until piece measures 6-7-8 (10-12) cm. Now divide the piece as follows: 54-60-66 (72-78) sts = front piece and 54-60-66 (72-78) sts = back piece, at the same time inc 1 st each side on both pieces for seam, and complete front and back pieces separately. Front piece: = 56-62-68 (74-80) sts (incl 1 st each side for seam). Continue in pattern as follows: 11-14-17 (20-23) sts in blue / grey blue, M.2, 10-13-16 (19-22) sts in blue / grey blue. When piece measures 23-24-27 (31-34) cm dec each side for armhole on every other row as follows: 2 sts 2 times, 1 st 2-2-2 (0-0) times = 44-50-56 (66-72) sts. After M.2, complete piece in blue / grey blue. When piece measures 29-31-35 (40-46) cm cast off the middle 8-10-12 (16-22) sts for neck and dec to shape the neckline on every other row as follows: 3 sts 1 time, 2 sts 2 times, 1 st 1 time. Cast off when piece measures 33-35-39 (44-50) cm. Back piece: = 56-62-68 (74-80) sts (incl 1 st each side for seam). Complete piece in blue / grey blue. Dec for armhole as described for front piece = 44-50-56 (66-72) sts. When piece measures 28-30-34 (39-45) cm divide piece for split as follows: Right side (with button): knit on the first 25-28-31 (36-39) sts with the 2 sts towards neckline in garter st. After 3 cm dec to shape the neckline on every other row as follows: 11-12-13 (15-18) sts 1 time, 2 sts 1 time and 1 st 2 times. Cast off when piece measures 33-35-39 (44-50) cm. Left side (with buttonhole): Inc 6 sts towards the middle = 25-28-31 (36-39) sts and knit on all sts with the 2 sts towards neckline in garter st. After 2 cm make a buttonhole by casting off third and fourth st and casting on 2 new sts on return row. After 3 cm dec to shape the neckline on every other row as follows: 11-12-13 (15-18) sts 1 time, 2 sts 1 time and 1 st 2 times. Cast off when piece measures 33-35-39 (44-50) cm. Sleeve: Cast on 34-34-36 (36-36) sts on double pointed needles size 2.5 mm with green / sea green and knit 3 cm Rib. Change to needle size 3.5 mm and continue in M.1 and after M.1 complete sleeve in blue / grey blue, at the same time inc 2-4-4 (6-6) sts evenly distributed on first round = 36-38-40 (42-42) sts. At the same time after the Rib, inc 2 sts mid under arm a total of 3-4-5 (6-13) times as follows: Size 3 + 6/9 months: on every 10th round Size 12/18 months: on every 9th round Size 2 years: on every 8th round Size 3/4 years: on every 4th and 5th round alternately = 42-46-50 (54-68) sts. When piece measures 15-19-21 (22-26) cm cast off 6 sts mid under arm and complete sleeve back and forth on needle. Dec to shape the sleeve cap each side on every other row: 4 sts 3 times. Cast off, sleeve measures approx 18-22-24 (25-29) cm. Assembly: Sew shoulder and side seams. Pick up approx 74-78 sts round neck on needle size 2.5 mm with red /red and knit stocking st as follows: 1 row red / red, 2 rows blue/grey blue. Now knit 3 cm Rib in green / sea green, but after 0.5 cm make a buttonhole over the others on body piece. 1 buttonhole = cast of third and fourth st and cast on 2 new sts on return row. Set in sleeves and sew on buttons. TROUSERS: Size: 3 – 6/9 – 12/18 months (2 – 3/4) years DROPS circular needle and double pointed needles size 2.5 mm and 3 mm Knitting tension: 22 sts x 30 rows on needles size 3 mm in stocking sts = 10 x 10 cm. Rib: *K1, P1*, repeat from *-*. Pattern: see diagram. Right leg: Cast on 52-56-56 (60-60) sts on double pointed needles size 2.5 mm with blue / grey blue and knit 3 cm. Change to double pointed needles size 3 mm and continue in M.3 and stocking st, at the same time inc on inside leg on every 2-4-3 (2-2) cm: 2 sts 5-3-7 (8-10) times = 62-62-70 (76-80) sts. Remember the knitting tension. When piece measures 15-17-20 (23-29) cm divide piece at inside leg (= split) and complete piece back and forth on needle. Inc 1 st each side for seam = 64-64-72 (78-82) sts. When piece measures 18-20-23 (27-30) cm cast off 3 sts each side = 58-58-66 (72-76) sts. Put piece aside and knit the other leg. Left leg: knit as right leg. Trousers: Put left and right leg in on the same circular needle = 116-116-132 (144-152) sts. Knit 3 rounds and insert a MT mid front and mid back. Now inc mid back on both sides of MT, 1 st 6 times, and dec on both sides of MT, 1 st 8-8-10 (12-13) times mid front on every other row as follows: before MT: K2 tog, after MT: slip 1 st as if to knit, psso = 122-112-124 (132-138) sts. When piece measures 35-39-44 (49-53) cm change to needle size 2.5 mm and knit 3 cm stocking st, P 1 round = folding edge, and knit 3 cm stocking st, cast off. Assembly: Sew tog split on inside of legs and sew tog the opening between legs from mid front to mid back. Fold edge double towards WS and fasten, leave an opening and pull through a ribbon. |
||||||||||||||||||||||
Diagram explanations |
||||||||||||||||||||||
|
||||||||||||||||||||||
|
||||||||||||||||||||||

|
||||||||||||||||||||||
Have you finished this pattern?Tag your pictures with #dropspattern #clownintownsweater or submit them to the #dropsfan gallery. Do you need help with this pattern?You'll find 27 tutorial videos, a Comments/Questions area and more by visiting the pattern on garnstudio.com. © 1982-2025 DROPS Design A/S. We reserve all rights. This document, including all its sub-sections, has copyrights. Read more about what you can do with our patterns at the bottom of each pattern on our site. |
||||||||||||||||||||||


With over 40 years in knitting and crochet design, DROPS Design offers one of the most extensive collections of free patterns on the internet - translated to 17 languages. As of today we count 314 catalogues and 11822 patterns translated into English (UK/cm).
We work hard to bring you the best knitting and crochet have to offer, inspiration and advice as well as great quality yarns at incredible prices! Would you like to use our patterns for other than personal use? You can read what you are allowed to do in the Copyright text at the bottom of all our patterns. Happy crafting!
Post a comment to pattern DROPS Baby 4-5
We would love to hear what you have to say about this pattern!
If you want to leave a question, please make sure you select the correct category in the form below, to speed up the answering process. Required fields are marked *.