
Popular categories
Looking for a yarn?


Comments / Questions (77)
![]() Natalie wrote:
Natalie wrote:
Hei. Hvilken størrelse er på bildet?
08.04.2026 - 19:03DROPS Design answered:
Hei Natalie, Du finner en målskisse på bunnen av oppskriften, med målene til de 2 størrelsene. Hilsen, Drops Team.
09.04.2026 - 07:40
![]() Christine wrote:
Christine wrote:
Bonjour, je souhaiterais tricoter ce modèle uniquement en kid-silk, pensez vous que cela donnerait un bon résultat ? Si oui, avec deux ou trois fils de kid-silk ? Merci pour votre réponse, Christine
16.03.2026 - 12:53DROPS Design answered:
Bonjour Christine, pourquoi pas, mais vous aurez probablement moins de "tenue" car Daisy apporte ici quand même une certaine épaisseur; essayez de tricoter un échantillon (avec 3 fils, 2 risquent de ne pas vous permettre d'avoir la bonne tension) et regardez si la texture vous convient. Bon tricot!
16.03.2026 - 16:41
![]() Selma wrote:
Selma wrote:
Mir gefiel es nicht die Naht im Nacken zusammenzunähen, deshalb habe ich mich entschieden, die Maschen aus der rechten Seite zu nehmen. Ich habe bei der Kapuze angefangen und konnte dann mit der Rückreihe starten. Ich finde das Ergebnis seh gelungen. Ich kann es kaum erwarten die Hood zu beenden...
08.02.2026 - 20:35
![]() Dominika wrote:
Dominika wrote:
Die Winter Hug Hood sieht traumhaft aus. Leider schaffe ich es trotz mehrerer Versuche nicht einmal den Anfang zu stricken. Mein Problem sind die ersten Maschen in der jeweiligen Reihe. Die Verwirrung entsteht durch den Begriff „kraus rechts“, statt linke oder rechte Masche. Wird die Hinreihe so gestrickt: 1 linke Masche, 2 rechte Maschen, 1 linke Masche? & die Rückreihe: 1 rechte Masche, 2 linke Maschen, 1 rechte Masche? Wenn nein, wie ist es demnach richtig?
05.02.2026 - 22:31DROPS Design answered:
Liebe Dominika, "kraus rechts" bedeutet beim Stricken in Hin- und Rück-Reihen, dass Sie immer rechte Maschen stricken, egal, ob Hin- oder Rück-Reihe. Sie stricken die 1. Reihe wie folgt: 1 Masche rechts (kraus rechts), 2 Maschen rechts (glatt rechts), 1 Masche rechts (kraus rechts), 2 Maschen rechts (glatt rechts), 1 Masche rechts (kraus rechts) usw.., d.h. es ist ganz einfach: Sie stricken nur rechte Maschen - die Aufteilung erfolgt, um das Muster (Perlrippen) zu verdeutlichen. In der Rück-Reihe stricken Sie dann wie folgt: 1 Masche rechts, 2 Maschen links, 1 Masche rechts, 2 Maschen links, 1 Masche rechts usw. Diese beiden Reihen im Wechsel. Viel Spaß beim Stricken!
05.02.2026 - 23:00
![]() Linda wrote:
Linda wrote:
Når jeg skal strikke venstre side af tørklæde, hvor jeg skal skal strikke masker over ( hvor jeg strikker 2 masker sammen fra selve huen over på selve tørklædet. Skal dette gøre fra vrangen?
04.02.2026 - 13:11DROPS Design answered:
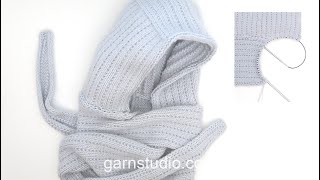
Hej Linda har du set videoen vi har lavet til tørklædet?
05.02.2026 - 11:33
![]() Jody wrote:
Jody wrote:
Bonjour, je viens de finir ce modèle et j'ai fait l'écharpe en un seul morceaux en augmentant, puis en attachant la capuche et enfin en diminuant. Cela me semble plus simple et cela évite la couture au milieu du dos.
01.02.2026 - 16:31
![]() Theresa wrote:
Theresa wrote:
I need clarification on how to knit left side of scarf I am having trouble reversing the directions. Is there a video of the left side?
24.01.2026 - 22:49DROPS Design answered:
Dear Theresa, the instructions written are already reversed for the left side of the scarf, where you start working on the wrong side, as opposed to the right side in the right side of the scarf. The video only shows how to work the right side. Happy knitting!
25.01.2026 - 20:49
![]() Theresa wrote:
Theresa wrote:
Can you please have a video showing the left scraf I have attempted 3x and cannot get it to work Thank you
23.01.2026 - 22:30DROPS Design answered:
Dear Theresa, the video only shows how to work the right side. You can indicate which part of the left side of the scarf is giving you trouble and we may be able to help you more. Happy knitting!
25.01.2026 - 20:51
![]() Patricia wrote:
Patricia wrote:
I hope to clarify something for the creators of this pattern. In English, stockinette and garter stitches are patterns, not stitches. You never describe an individual stitch in this way. "K2, work garter stitch," —in English this means K3. Rather that use "garter" or "stockinette" to describe individual stitches, just use "Knit" or "Purl", this will be super helpful to English speakers. I think, thus, when you say "K2, work garter stitch" what is meant is K2, P1. I hope this helps.
18.01.2026 - 19:33
![]() Patricia wrote:
Patricia wrote:
Can you confirm that this pattern calls for 4 skeins of DROPS DAISY from Garnstudio (belongs to yarn group B) 200-200 g colour 09, ice blue And 2 skeins of: DROPS KID-SILK from Garnstudio (belongs to yarn group A) 50-50 g colour 59, ice crystal ??? It would be very helpful if you could include the number of skeins in the direction for beginners.
18.01.2026 - 19:25DROPS Design answered:
Hi Patricia, Yes, Drops Daisy is sold in 50 g skeins and Drops Kid Silk is sold in 25 g skeins, so you need 4 skeins of Daisy and 2 skeins of Kid Silk. Regards, Drops Team.
21.01.2026 - 08:31
|
||||||||||
Winter Hug Hood#winterhughood |
||||||||||
 |
 |
|||||||||
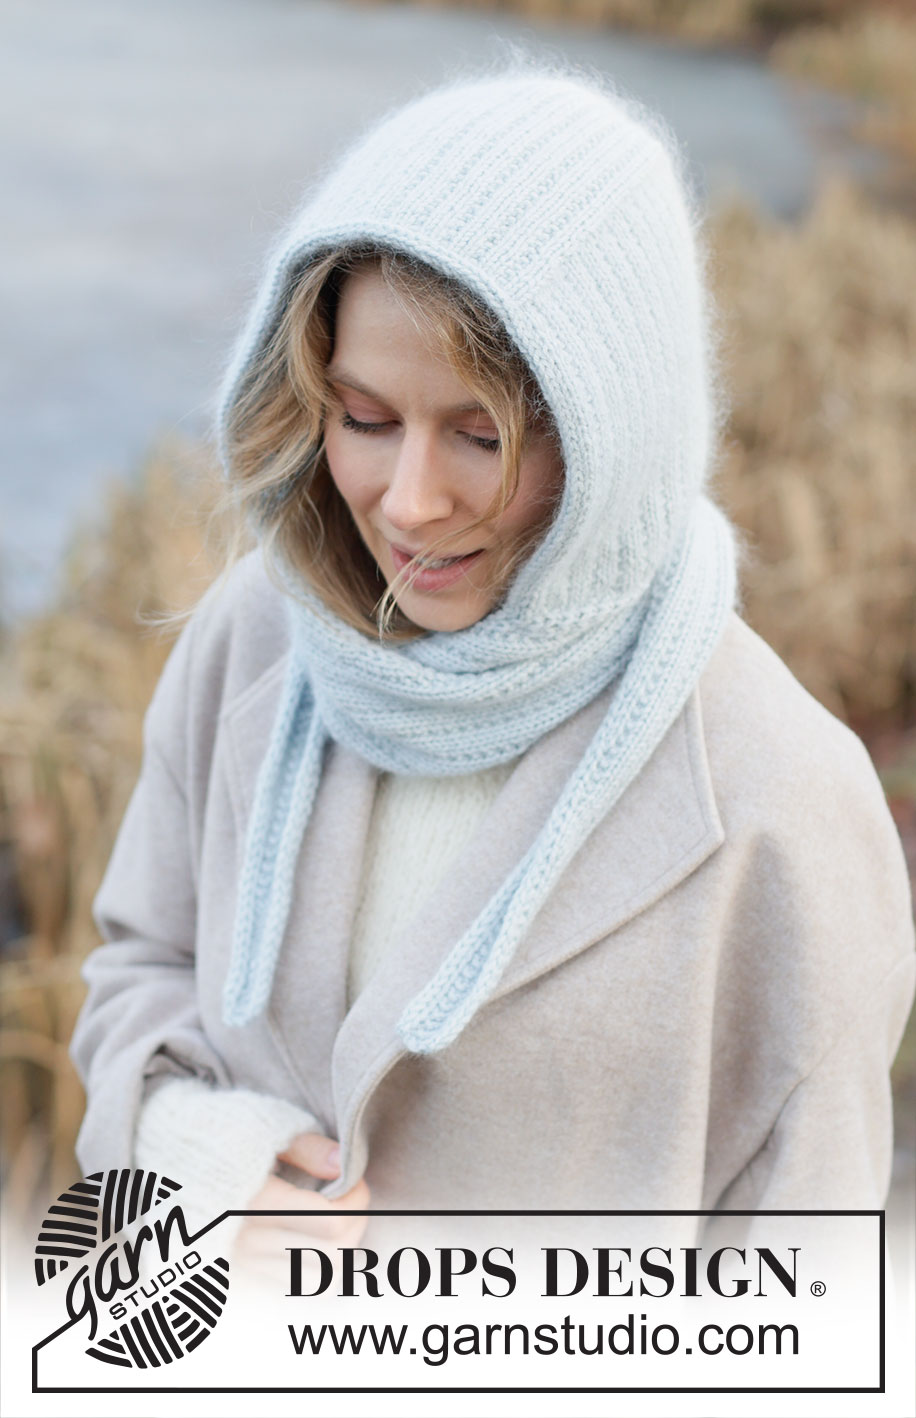
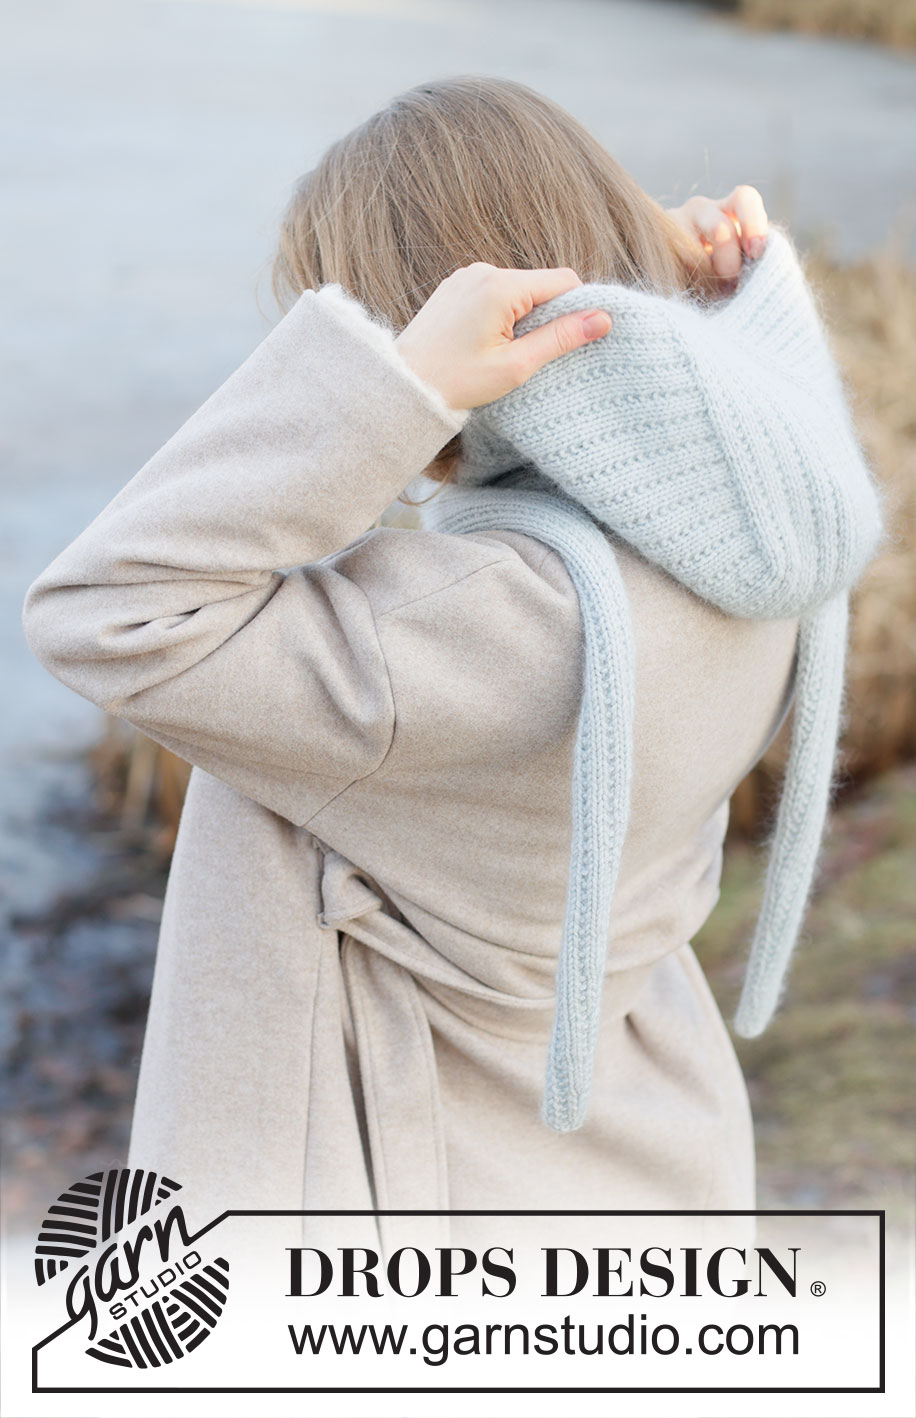
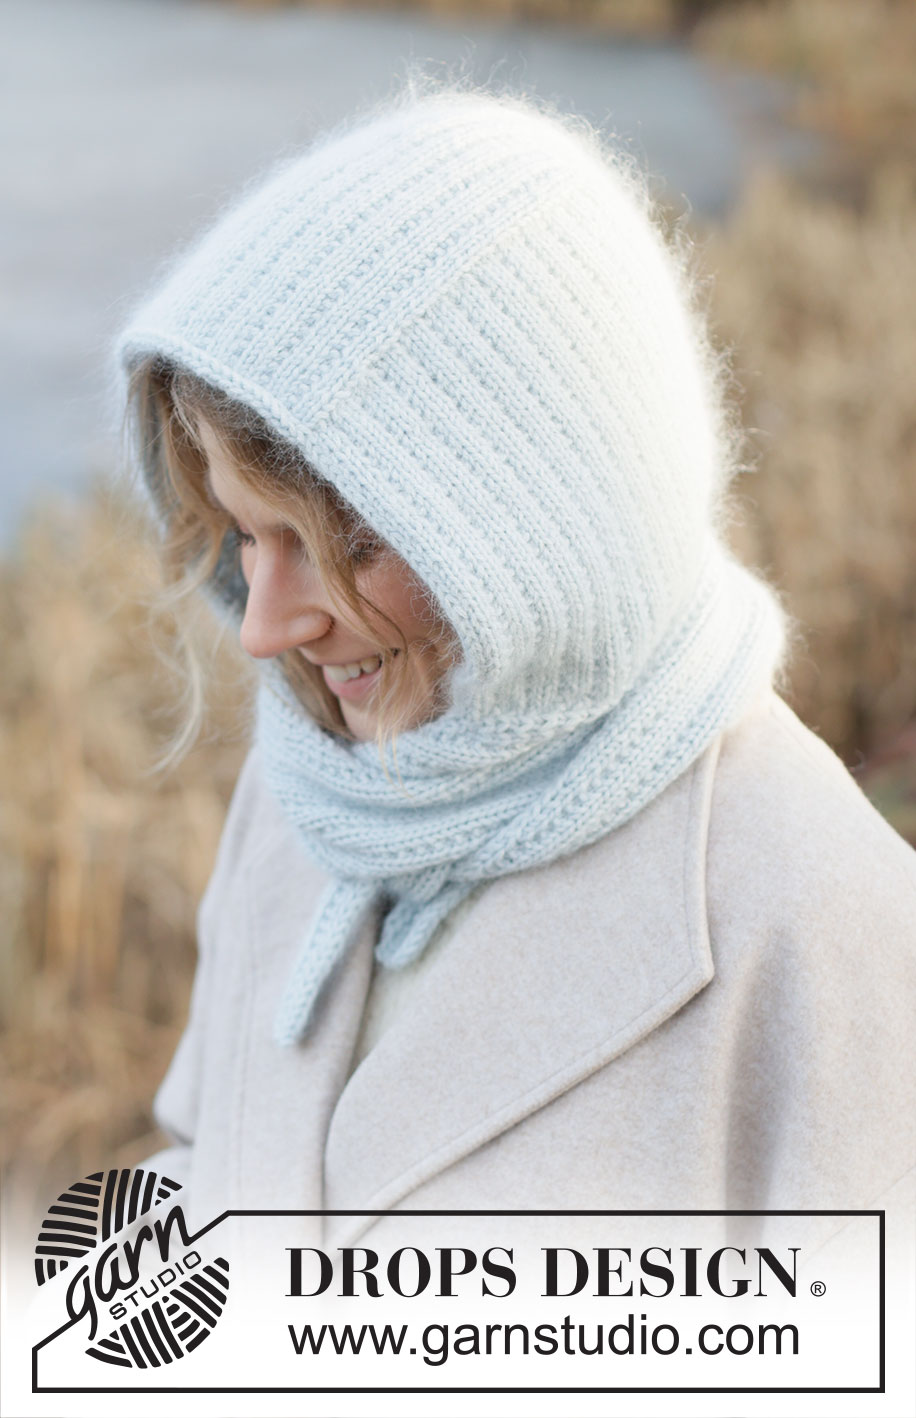
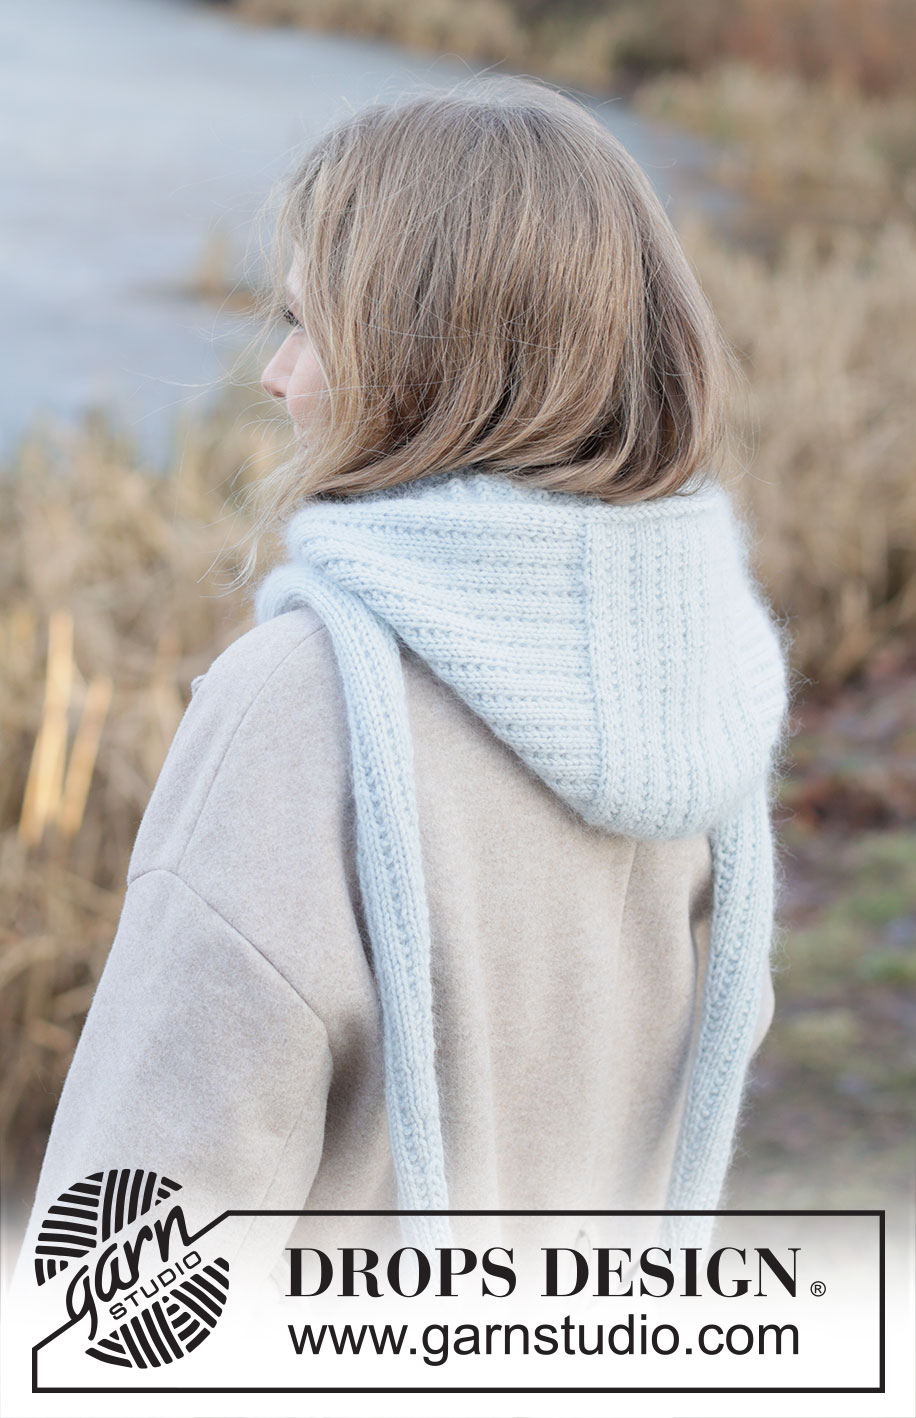
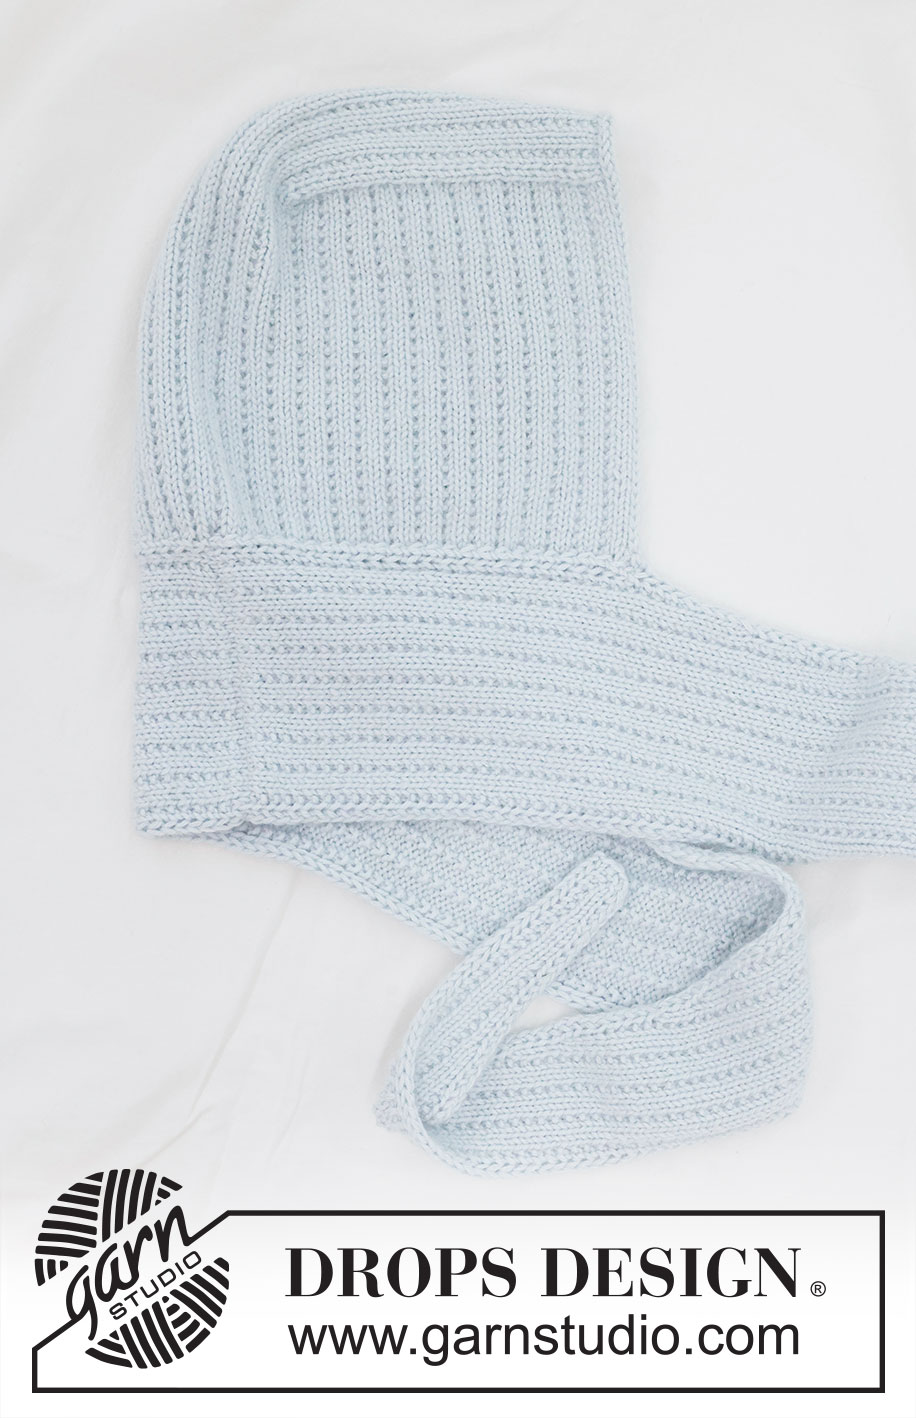
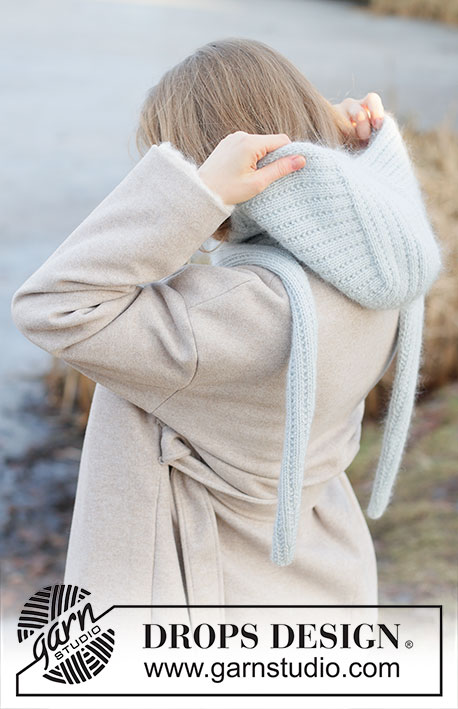
Knitted hooded scarf in DROPS Daisy and DROPS Kid-Silk. The piece is worked with pearl rib and I-cord. Sizes S - XL.
DROPS 253-61 |
||||||||||
|
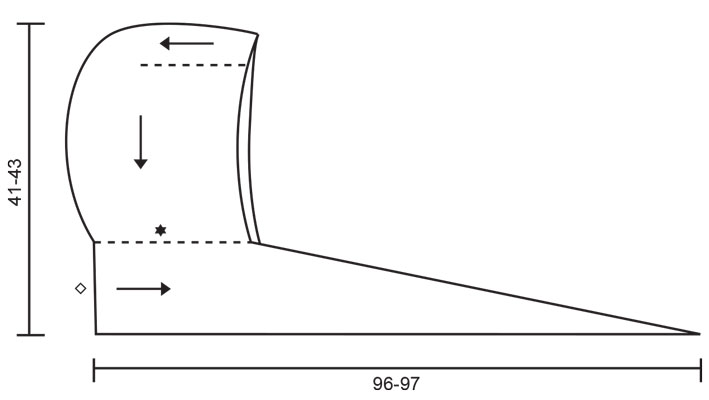
------------------------------------------------------- EXPLANATIONS FOR THE PATTERN: ------------------------------------------------------- GARTER STITCH (worked back and forth): Knit all rows, from both the right and wrong side. 1 ridge in height = knit 2 rows. I-CORD CAST OFF: Cast on 2 stitches on the right needle, slip these 2 stitches onto the left needle with the strand 2 stitches in on the left needle, * knit 1, knit the next 2 stitches twisted together, slip the 2 stitches from the right needle back onto the left needle *, work from *-* until there are 2 stitches left on the row. I-CORD EDGE STITCHES (= 2 stitches): BEGINNING OF ROW: Slip 1 stitch purl-wise with strand in front, knit 1. END OF ROW: Work until there are 2 stitches left on the row, slip 1 stitch purl-wise with strand in front, knit 1. Work like this from both the right and wrong side. ------------------------------------------------------- START THE PIECE HERE: ------------------------------------------------------- HOODED SCARF - SHORT OVERVIEW OF THE PIECE: The hood is worked back and forth with circular needle, from mid-front and backwards. Stitches are picked up on each side and the piece is continued downwards. When the hood is finished the stitches are placed on a stitch holder. An edge is knitted up around the face-opening which is cast off with I-cord. Stitches are cast on for the scarf, starting mid-back. These stitches are worked together with the stitches from the hood. When all stitches are knitted up on one side from mid-back (half the hood), one side of the scarf is finished back and forth. This is then repeated on the other side. The scarf is sewn together mid-back to finish. HOOD: Cast on 22-28 stitches with circular needle size 5 mm, 1 strand DROPS Daisy and 1 strand DROPS Kid-Silk (2 strands). Cast-on edge = mid-front of hood. Work back and forth as follows: ROW 1 (right side): 1 GARTER STITCH – read description above, work pearl rib (knit 2, 1 garter stitch) to end of row. ROW 2 (wrong side): 1 garter stitch, work pearl rib (purl 2, 1 garter stitch) to end of row. Work ROWS 1 and 2 for 19-19 cm, with the last row from the wrong side. Cut the strand and slip stitches on another needle; this piece is top front of hood. You now knit up stitches along both sides, inside the 1 garter stitch: From the right side, start from the corner by the cast-on edge and knit up 36-36 stitches along one side (left side of piece), work across the 22-28 stitches with pearl rib as before (back of hood), knit up 36-36 stitches along the other side (right side of piece) = 94-100 stitches. Further measurements are taken from this knitted-up row. ROW 1 (wrong side): 1 garter stitch, work pearl rib (purl 2, 1 garter stitch) to end of row. ROW 2 (right side): 1 garter stitch, work pearl rib (knit 2, 1 garter stitch) to end of row Work ROWS 1 and 2 until the piece measures 20-21 cm from the knitted-up row. Cut the strand; the hood is finished. Place the first 47-50 stitches on a stitch holder and the last 47-50 stitches on a second stitch holder (divided mid-back). The stitches are for each scarf-length. Now work an I-cord edge around the hood as follows: I-CORD EDGE: Start bottom right of hood (when worn), knit up 34-36 stitches inside the 1 garter stitch as far as the knitted up row, 20-24 stitches along the cast-on edge mid-front and 34-36 stitches down the left side of the hood = 88-96 stitches around the opening. Cut the strand. Start bottom right and work I-CORD CAST OFF – read description above. Cut the strand. Place the remaining 2 stitches on the stitch holder together with the 47-50 stitches on the left side of the hood = 49-52 stitches for left scarf. Pick up 2 stitches where 2 stitches were cast on for the I-cord edge on the opposite side, place these 2 stitches on the stitch holder with the 47-50 stitches on the right side of the hood = 49-52 stitches for right scarf. RIGHT SCARF: Stitches are cast-on for the scarf, AT THE SAME TIME as stitches are knitted together 2 and 2 from the hood. Start with the stitches at the division mid-back and work together with the right side of the hood as follows. Cast on 30-30 stitches with 1 strand of each quality (2 strands) – this is the cast-on edge that will be sewn afterwards to left part of scarf = mid back. ROW 1 (right side): Work 2 I-CORD EDGE STITCHES – read description above, knit 1, work pearl rib (1 garter stitch, knit 2) until there are 3 stitches left, 1 garter stitch, knit 1, slip 1 stitch knit-wise (= last stitch), knit 2 stitches together from the hood, pass the slipped stitch over the knitted together stitches from the hood = 30-30 stitches. ROW 2 (wrong side): Work pearl rib (purl 2, 1 garter stitch) until there are 3 stitches left, purl 1, 2 I-cord edge stitches. Work ROWS 1 and 2 until the first 46-50 stitches from the hood are picked up (= 46-50 rows worked). There are 3-2 stitches left on the stitch holder (including the 2 stitches picked up in I-cord). Work as follows from the right side: 2 I-cord edge stitches, knit 1, 1 garter stitch, work pearl rib (knit 2, 1 garter stitch) to end of row, knit 1-2 stitches from the stitch holder, knit together 2 and 2 the last stitches 1-0 time = 32-32 stitches. Work as follows from the wrong side: 2 I-cord edge stitches, purl 2 together, 1 garter stitch, work pearl rib (purl 2, 1 garter stitch) until there are 3 stitches left, purl 1, 2 I-cord edge stitches = 31-31 stitches. Work 8 rows of pearl rib as before, with 2 I-cord edge stitches + 1 stocking stitch on each side. On the next row (right side) decrease 1 stitch as follows: Work as before until there are 4 stitches left, knit 2 together, 2 I-cord edge stitches. Continue as before back and forth decreasing like this every 8th row (approx. each 3 cm) until there are 7-7 stitches left. Cast off at the same time as the first and last 2 stitches on the row are knitted together. The scarf measures approx. 96-98 cm from the cast-on edge mid-back. LEFT SCARF: Work in the same way as the right scarf, working along the left side of the hood at the same time as 2 and 2 stitches from the hood are worked together with the first stitch on the row as follows: Cast on 30-30 stitches with 1 strand of each quality (2 strands). ROW 1 (wrong side): Work 2 I-cord edge stitches, purl 1, 1 garter stitch, work pearl rib (purl 2, 1 garter stitch) until there are 2 stitches left, purl 2. ROW 2 (right side): Place 2 stitches from the stitch holder on the left needle, knit 3 together (2 stitches from stitch holder + 1 stitch from scarf), knit 1, work pearl rib (1 garter stitch, knit 2) until there are 4 stitches left, 1 garter stitch, knit 1, 2 I-cord edge stitches = 30-30 stitches. Work ROWS 1 and 2 until the first 46-50 stitches from the hood are picked up (= 46-50 rows worked). There are 3-2 stitches left on the stitch holder (including the 2 stitches from the I-cord cast off). Work as follows from the wrong side: 2 I-cord edge stitches, purl 1, 1 garter stitch, work pearl rib (purl 2, 1 garter stitch) to end of row, purl 1-2 stitches from the stitch holder, purl together 2 and 2 the last stitches 1-0 time = 32-32 stitches. Work as follows from the right side: 2 I-cord edge stitches, slip 1 stitch knit-wise, knit 1, pass the slipped stitch over the knitted stitch, 1 garter stitch, work pearl rib (knit 2, 1 garter stitch) until there are 3 stitches left on the row, knit 1, 2 I-cord edge stitches = 31-31 stitches. Work 7 rows of pearl rib as before, with 2 I-cord edge stitches + 1 stocking stitch on each side. On the next row (right side) decrease 1 stitch as follows: 2 I-cord edge stitches, slip 1 stitch knit-wise, knit 1, pass the slipped stitch over the knitted stitch, work to end of row. Continue as before back and forth decreasing like this every 8th row (approx. each 3 cm) until there are 7-7 stitches left. Cast off at the same time as the first and last 2 stitches are knitted together. The scarf measures approx. 96-98 cm from the cast-on edge mid-back. ASSEMBLY: Sew the cast-on edge of right and left sides of the scarf together mid-back with grafting stitches. |
||||||||||
Diagram explanations |
||||||||||
|
||||||||||
 |
||||||||||
Have you finished this pattern?Tag your pictures with #dropspattern #winterhughood or submit them to the #dropsfan gallery. Do you need help with this pattern?You'll find 21 tutorial videos, a Comments/Questions area and more by visiting the pattern on garnstudio.com. © 1982-2026 DROPS Design A/S. We reserve all rights. This document, including all its sub-sections, has copyrights. Read more about what you can do with our patterns at the bottom of each pattern on our site. |
||||||||||


With over 40 years in knitting and crochet design, DROPS Design offers one of the most extensive collections of free patterns on the internet - translated to 17 languages. As of today we count 324 catalogues and 12284 patterns translated into English (UK/cm).
We work hard to bring you the best knitting and crochet have to offer, inspiration and advice as well as great quality yarns at incredible prices! Would you like to use our patterns for other than personal use? You can read what you are allowed to do in the Copyright text at the bottom of all our patterns. Happy crafting!
Post a comment to pattern DROPS 253-61
We would love to hear what you have to say about this pattern!
If you want to leave a question, please make sure you select the correct category in the form below, to speed up the answering process. Required fields are marked *.