DROPS Karisma
DROPS Karisma
100% Wool
from 3.00 $ /50g
Get the yarn to make this pattern from 45.00$.

The yarn cost is calculated from the pattern’s smallest size and the yarn’s cheapest product type. Looking for an even better price? You might find it on the DROPS Deals!

DROPS SS24

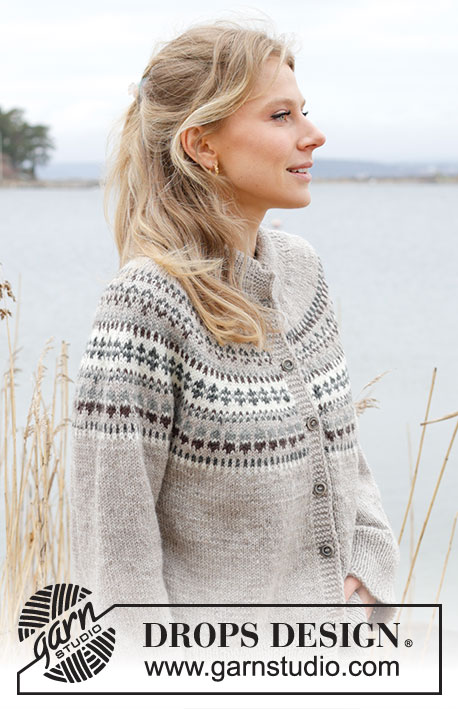
Boreal Circle Cardigan

Knitted jacket for men in DROPS Karisma. The piece is worked top down with round yoke and Nordic pattern. Sizes S - XXXL.

DROPS 246-10
DROPS Design: Pattern u-972
Yarn group B
-------------------------------------------------------

SIZES:
S - M - L - XL - XXL – XXXL

Finished measurements:
Chest measurements: 100-108-116-126-138-150 cm = 39⅜"-42½"-45¾"-49½"-54¼"-59"
Full length: 68-70-72-74-76-78 cm = 26¾"-27½"-28⅜"-29⅛"-29½"-30¾"
All measurements in charts are in cm.

YARN:
DROPS KARISMA fra Garnstudio (belongs to yarn group B)
600-650-750-800-850-950 g color 55, light beige brown
50-50-50-50-50-50 g color 57, olive
50-50-50-50-50-50 g color 56, dark brown
50-50-50-50-50-50 g color 01, off white

BUTTONS:
DROPS BUTTONS NO 629: 7-7-7-8-8-8 items.

NEEDLES:
DROPS CIRCULAR NEEDLES SIZE 4 MM = US 6: Length 40 cm = 16" and 80 cm = 32".
DROPS CIRCULAR NEEDLE SIZE 3 MM = US 2.5: Length 80 cm = 32".
DROPS DOUBLE POINTED NEEDLES SIZE 4 MM = US 6.
DROPS DOUBLE POINTED NEEDLES SIZE 3 MM = US 2.5.
The technique MAGIC LOOP can be used – you then only need 80 cm = 32" circular needle in each size.

KNITTING GAUGE:
21 stitches in width and 28 rows in height with stockinette stitch = 10 x 10 cm = 4" x 4".
NOTE: Needle size is only a guide. If you get too many stitches on 10 cm = 4", change to a larger needle size. If you get too few stitches on 10 cm = 4", change to a smaller needle size.

-------------------------------------------------------

Alternative Yarn – See how to change yarns here
Yarn Groups A to F – Use the same pattern and change the yarn here
Yarn usage using an alternative yarn – Use our yarn converter here

-------------------------------------------------------

DROPS Karisma
DROPS Karisma
100% Wool
from 3.00 $ /50g
Get the yarn to make this pattern from 45.00$.

The yarn cost is calculated from the pattern’s smallest size and the yarn’s cheapest product type. Looking for an even better price? You might find it on the DROPS Deals!

Pattern instructions

NOTE: This pattern is written in American English. All measurements in charts are in cm. For conversion from inches to cm - click here. There are different terms for crocheting in American and British English. If this pattern includes crochet, click for "crochet terms" here. For this pattern in British English, please click here.
-------------------------------------------------------

EXPLANATIONS FOR THE PATTERN:
-------------------------------------------------------

GARTER STITCH (worked back and forth):
Knit all rows.
1 ridge = knit 2 rows.

PATTERN:
See diagram A.1. The diagram is worked in stockinette stitch.

INCREASE/DECREASE TIP (evenly spaced):
To work out how to increase/decrease evenly, count the total number of stitches on needle (e.g., 139 stitches), minus the bands (e.g., 14 stitches) and divide the remaining stitches by the number of increases/decreases to be made (e.g., 16) = 7.8. In this example, increase by making 1 yarn over after alternately each 7th and 8th stitch (approx.). Do not increase over the bands. On the next row work the yarn overs twisted to avoid holes. When decreasing, knit together approx. each 7th and 8th stitch.
EDGE STITCHES:
Work 2 edge stitches at the beginning of the row as follows:
Slip 1 stitch purl-wise with the strand in front, knit 1.
Work 2 edge stitches at the end of the row as follows:
Work until there are 2 stitches left on the row, slip 1 stitch purl-wise with the strand in front, knit 1.
Repeat at the beginning and end of each row.

BUTTONHOLES:
Work buttonholes on the right band (when the garment is worn). Work from the right side when there are 4 stitches left on the row as follows: Make 1 yarn over, knit 2 together and knit 2. On the next row (wrong side), knit the yarn over to leave a hole.
The first buttonhole is worked on the first row from the right side after the neck is finished. Then work the other 6-6-6-7-7-7 buttonholes with approx. 9-9½-10-8½-9-9 cm = 3½"-3 5/9"-4"-3¼"-3½"-3½" between each one. The bottom buttonhole is worked in the transition between the stockinette stitch and rib.

KNITTING TIP:
To avoid the knitting gauge losing its elasticity when working pattern, it is important that the strands at the back are not tight. Use a size larger needle when working pattern if the piece becomes tight.

DECREASE TIP (for sleeves):
Decrease 1 stitch on each side of the marker-thread as follows: Work until there are 3 stitches left before the marker-thread, knit 2 together, knit 2 (marker-thread sits between these 2 stitches), slip 1 stitch knit-wise, knit 1 and pass the slipped stitch over the knitted stitch.

-------------------------------------------------------

START THE PIECE HERE:

-------------------------------------------------------

JACKET – SHORT OVERVIEW OF THE PIECE.
The neck and yoke are worked back and forth with circular needle, from mid front and top down. The yoke is divided for body and sleeves and the body continued back and forth with circular needle. The sleeves are worked in the round with double pointed needles/short circular needle.

DOUBLE NECK:
Cast on 127-135-141-145-151-155 stitches with the short circular needle size 3 MM = US 2.5 and color light beige brown DROPS Karisma. Purl 1 row (= wrong side).
Work as follows from the right side: 1 GARTER STITCH – read description above, * knit 1, purl 1 *, work from *-* until there are 2 stitches left, knit 1 and 1 garter stitch. Continue this rib.
When rib measures 6 cm = 2⅜", cast on 6 new stitches at the end of the next 2 rows = 139-147-153-157-163-167 stitches. Continue the rib but now with 2 EDGE STITCHES outermost on each side and 5 garter stitches inside these edge stitches = 7 band stitches. The band stitches are always worked with color light beige brown. When the rib measures a total of 12 cm = 4¾", knit 1 row from the right side and decrease 16-16-18-18-20-20 stitches evenly spaced (do not decrease over the bands) - read INCREASE/DECREASE TIP. In addition, on this row work the first BUTTONHOLE – read description above = 123-131-135-139-143-147 stitches. Purl 1 row from the wrong side with the bands worked as before.

Work yoke as explained below.

YOKE:
Change to circular needle size 4 MM = US 6. Read KNITTING TIP!
Work as follows from the right side: 7 band stitches as before, work A.1 until there are 8 stitches left, work the first stitch in A.1 (so the pattern is symmetrical), 7 band stitches as before. REMEMBER THE KNITTING GAUGE!
AT THE SAME TIME on each row with an arrow in the diagram, increase as follows:
ARROW-1: Increase 24-28-28-32-36-40 stitches evenly spaced = 147-159-163-171-179-187 stitches.
ARROW-2: Increase 24-28-32-36-36-40 stitches evenly spaced = 171-187-195-207-215-227 stitches.
ARROW-3: Increase 24-28-32-36-36-40 stitches evenly spaced = 195-215-227-243-251-267 stitches.
ARROW-4: Increase 24-28-32-36-36-40 stitches evenly spaced = 219-243-259-279-287-307 stitches.
ARROW-5: Increase 28-28-32-36-40-40 stitches evenly spaced = 247-271-291-315-327-347 stitches.
ARROW-6: Increase 28-28-32-36-40-40 stitches evenly spaced = 275-299-323-351-367-387 stitches.
ARROW-7: Increase 28-32-32-36-40-44 stitches evenly spaced = 303-331-355-387-407-431 stitches.
ARROW-8: Increase 31-31-31-35-39-43 stitches evenly spaced = 334-362-386-422-446-474 stitches.

Continue with stockinette stitch and 7 band stitches on each side, using color light beige brown. When the yoke measures 21-24-25-26-28-30 cm = 8¼"-9½"-9¾"-10¼"-11"-11¾" from the neck, divide for the body and sleeves as follows:
Work 56-61-64-69-74-80 stitches as before (front piece), place the next 62-66-72-80-82-84 stitches on a thread for the sleeve, cast on 6-6-8-8-10-12 stitches (in side under sleeve), work 98-108-114-124-134-146 stitches in stockinette stitch (back piece), place the next 62-66-72-80-82-84 stitches on a thread for the sleeve, cast on 6-6-8-8-10-12 stitches (in side under sleeve), work the last 56-61-64-69-74-80 stitches as before (front piece). The body and sleeves are finished separately. THE PIECE IS NOW MEASURED FROM HERE!

BODY:
= 222-242-258-278-302-330 stitches. Continue stockinette stitch with 7 band stitches on each side and color light beige brown until the body measures 37-36-37-38-38-38 cm = 14½"-14¼"-14½"-15"-15"-15" from the division. Work 1 row from the right side and increase 23-25-25-27-31-33 stitches evenly spaced (do not increase over the bands) = 245-267-283-305-333-363 stitches.
Change to circular needle size 3 MM = US 2.5 and work as follows from the wrong side: 7 band stitches as before, * purl 1, knit 1 *, work from *-* until there are 8 stitches left, purl 1 and 7 band stitches as before. Continue this rib for 6 cm = 2⅜". Bind off a little loosely with knit from the right side. The jacket measures approx. 68-70-72-74-76-78 cm = 26¾"-27½"-28⅜"-29⅛"-29½"-30¾" from the shoulder.

SLEEVES:
Place the 62-66-72-80-82-84 stitches from the thread on the one side of the piece on short circular needle/double pointed needles size 4 MM = US 6 and knit up 1 stitch in each of the 6-6-8-8-10-12 stitches cast on under the sleeve = 68-72-80-88-92-96 stitches. Insert a marker-thread in the middle of the new stitches under the sleeve.
Start at the marker-thread and work stockinette stitch in the round with color light beige brown.
When the sleeve measures 3 cm = 1⅛", decrease 2 stitches mid under the sleeve – read DECREASE TIP. Decrease like this every 5-5-3½-2½-2½-2 cm = 2"-2"-1¼"-1"-1"-¾" a total of 8-8-11-14-15-16 times = 52-56-58-60-62-64 stitches. Continue working until the sleeve measures 44-41-41-40-39-37 cm = 17¼"-16⅛"-16⅛"-15¾"-15¼"-14½" from the division (or to desired length. There is approx. 4 cm left). Knit 1 round and increase 6-6-6-6-6-6 stitches evenly spaced = 58-62-64-66-68-70 stitches. Change to double pointed needles size 3 MM = US 2.5 and work rib (knit 1, purl 1) for 4 cm = 1½". Bind off a little loosely. The sleeve measures approx. 48-45-45-44-43-41 cm = 19"-17¾"-17¾"-17¼"-17"-16⅛".
Work the other sleeve in the same way.

ASSEMBLY:
Fold the neck double to the inside and sew down. To avoid the neck being tight and rolling outwards, it is important that the seam is elastic.
Sew together the openings on the bands with small stitches. Sew the buttons onto the left band.

Diagram

All measurements in charts are in cm.

symbols = light beige brown
symbols = off white
symbols = olive
symbols = dark brown
diagram
diagram

Each of our patterns has specific tutorial videos to help you.

Do you have a question? See a list of frequently asked questions (FAQ)

Knitting tension is what determines the final measurements of your work, and is usually measured per 10 x 10 cm. It is provided like so: number of stitches in width x number of rows in height - eg: 19 stitches x 26 rows = 10 x 10 cm.

The knitting tension is very individual; some people knit/crochet loosely while others work tightly. You adjust the knitting tension with the needle size, which is why the suggested needle size only serve as a guide! You need to adjust this (up or down) to ensure that YOUR knitting tension matches the knitting tension provided in the pattern. If you work with a different knitting tension than provided you will have a different yarn consumption, and your work will have different measurements than what the pattern suggests.

The knitting tension also determines which yarns can replace each other. As long as you achieve the same knitting tension you can replace one yarn with another.

See DROPS lesson: How to measure your tension/gauge

See DROPS video: How to make a gauge tension swatch

The required amount of yarn is provided in grams, eg: 450 g. To calculate how many balls you’ll need you first need to know how many grams are in 1 ball (25g, 50g or 100g). This information is available if you click on the individual yarn quality on our pages. Divide the amount required with the amount of each ball. For example, if each ball is 50g (the most common amount), the calculation will be as follows: 450 / 50 = 9 balls.

The important thing when changing from one yarn to another is that the knitting/crochet tension remains the same. This is so that the measurements of the finished piece will be the same as on the sketch provided. It is easier to achieve the same knitting tension using yarns from the same yarn group. It is also possible to work with multiple strands of a thinner yarn to achieve the knitting tension of a thicker one. Please try our yarn converter. We recommend you to always work a test swatch.

Please NOTE: when changing yarn the garment might have a different look and feel to the garment in the photo, due to individual properties and qualities of each yarn.

See DROPS lesson: Can I use a different yarn than the one mentioned in the pattern?

All our yarns are categorised into yarn groups (from A to F) according to thickness and knitting tension – group A contains the thinnest yarns and group F the thickest. This makes it easier for you to find alternative yarns to our patterns, should you wish to switch yarn. All yarns within the same group have a similar knitting tension and can easily replace each other. However, different yarn qualities have different structures and properties which will give the finished work a unique look and feel.

Click here for an overview of the yarns in each yarn group

At the top of all our patterns you’ll find a link to our yarn converter, which is a helpful tool should you wish to use a different yarn than suggested. By filling in the yarn quality you wish to replace, the amount (in your size) and number of strands, the converter will present good alternative yarns with the same knitting tension. Additionally it will tell you how much you’ll require in the new qualities and whether you’ll need to work with multiple strands. Most skeins are 50g (some are 25g or 100g).

If the pattern is worked with multiple colours, every colour will have to be converted separately. Similarly, if the pattern is worked with several strands of different yarns (for example 1 strand Alpaca and 1 strand Kid-Silk) you will have to find alternatives for each, individually.

Click here to see our yarn converter

Since different yarns have different qualities and textures we have chosen to keep the original yarn in our patterns. However, you can easily find options among our available qualities by using our yarn converter, or simply pick a yarn from the same yarn group.

It is possible that some retailers still have discontinued yarns in stock, or that someone has a few skeins at home that they would like to find patterns for.

The yarn converter will provide both alternative yarn as well as required amount in the new quality.

If you think it's hard to decide what size to make, it can be a good idea to measure a garment you own already and like the size of. Then you can pick the size by comparing those measures with the ones available in the pattern's size chart.

You'll find the size chart at the bottom of the pattern.

See DROPS lesson: How to read size chart

The needle size provided in the pattern serves only as a guide, the important thing is to follow the knitting tension. And since knitting tension is very individual, you will have to adjust the needle size to ensure that YOUR tension is the same as in the pattern – maybe you’ll have to adjust 1, or even 2 needle sizes, up or down to achieve the correct tension. For this, we recommend that you work test swatches.

Should you work with a different knitting tension than the one provided, the measurements of the finished garment might deviate from the measurement sketch.

See DROPS lesson: How to measure your tension/gauge

See DROPS video: How to make a gauge tension swatch

Working a garment top-down provides more flexibility and room for personal adjustment. For example it is easier to try the garment on while working, as well as making adjustments to length of yoke and shoulder caps.

The instructions are carefully explaining every step, in the correct order. Diagrams are adjusted to the knitting direction and are worked as usual.

The diagram depicts all rows/rounds, and every stitch seen from the right side. It is read from bottom to top, from right to left. 1 square = 1 stitch.

When working back and forth, every other row is worked from the right side and every other row is worked from the wrong side. When working from the wrong side, the diagram will have to be worked reversed: from left to right, knit stitches are purled, purl stitches are knit etc.

When working in the round every round is worked from the right side and the diagram are worked from right to left on all rounds.

See DROPS lesson: How to read knitting diagrams

The diagram depicts all rows/rounds, and every stitch seen from the right side. It is worked from bottom to top, from right to left.

When working back and forth every other row is worked from the right side: from right to left and every other row is worked from the wrong side: from left to right.

When working in the round, every row in the diagram are worked from the right side, from right to left.

When working a circular diagram you start in the middle and work your way outwards, counter clockwise, row by row.

The rows usually start with a given number of chain stitches (equivalent to the height of the following stitch), this will either be depicted in the diagram or explained in the pattern.

See DROPS lesson: How to read crochet diagrams

Instructions for working several diagrams after each other on the same row/round, will often be written like so: “work A.1, A.2, A.3 a total of 0-0-2-3-4 times". This means you work A.1 once, then A.2 is worked once, and A.3 is repeated (in width) the number of times provided for your size – in this case like so: S = 0 times, M = 0 times, L=2 times, XL= 3 times and XXL = 4 times.

The diagrams are worked as usual: begin with the first row in A.1, then work the first row in A.2 etc.

See DROPS lesson: How to read knitting diagrams

See DROPS lesson: How to read crochet diagrams

The total width of the garment (from wrist-to-wrist) will be larger in the larger sizes, despite the actual sleeves being shorter. The larger sizes have longer sleeve caps and wider shoulders, so there will be a good fit in all sizes.

The measurement sketch/schematic drawing provides information regarding the full length of the garment. If it’s a jumper or a jacket the length is measured from the highest point on the shoulder (usually closest to the neckline), and straight down to the bottom of the garment. It is NOT measured from the tip of shoulder. Similarly, the length of yoke is measured from the highest point on the shoulder and down to where yoke is split into body and sleeves.

See DROPS lesson: How to read a schematic drawing

Diagrams are often repeated on the round or in height. 1 repeat is the diagram the way it appears in the pattern. If it says to work 5 repeats of A.1 in the round, then you work A.1 a total of 5 times after/next to each other in the round. If it says to work 2 repeats of A.1 vertically/in height you work the entire diagram once, then begin again at the start and work the entire diagram one more time.

Chain stitches are slightly narrower than other stitches and to avoid working the cast-on edge too tight, we simply chain more stitches to begin with. The stitch count will be adjusted on the following row to fit the pattern and measurement sketch.

The rib edge is more elastic and will contract slightly compared to, for example, stocking stitch. By increasing before the rib edge, you avoid a visible difference in width between the rib edge and the rest of the body.

It’s very easy to cast off too tightly, and by making yarn overs while casting off (and simultaneously casting these off) you avoid a too tight cast off edge.

See DROPS video: How to bind off with yarn overs (yo)

To achieve an even increase (or decrease) you can increase on, for example: every 3rd and 4th row alternately, like so: work 2 rows and increase on the 3rd row, work 3 rows and increase on the 4th. Repeat this until the increase is complete.

See DROPS lesson: Increase or decrease 1 st on every 3rd and 4th row alternately

Should you prefer to work in the round instead of back and forth, you may of course adjust the pattern. You’ll need to add steeks mid-front (usually 5 stitches), and follow the instructions. When you would normally turn and work from the wrong side, simply work across the steek and continue in the round. At the end you’ll cut the piece open, pick up stitches to work bands, and cover the cut edges.

See DROPS video: How to knit steeks and cut open

Should you prefer to work back and forth instead of in the round, you may of course adjust the pattern so you work the pieces separately and then assemble them at the end. Divide the stitches for the body in 2, add 1 edge stitch in each side (for sewing) and work the front and back pieces separately.

See DROPS lesson: Can I adapt a pattern for circular needles into straight needles?

Pattern repeats can vary slightly in the different sizes, in order to get the correct proportions. If you’re not working the exact same size as the garment in the photo, yours might deviate slightly. This has been carefully developed and adjusted so that the complete impression of the garment is the same in all sizes.

Make sure to follow instructions and diagrams for your size!

If you have found a pattern you like which is available in women’s size it’s not very difficult to convert it to men’s size. The biggest difference will be the length of sleeves and body. Start working on the women size that you think would fit across the chest. The additional length will be worked right before you cast off for the armhole/sleeve cap. If the pattern is worked top-down you can add the length right after the armhole or before the first decrease on sleeve.

Regarding additional yarn amount, this will depend on how much length you add, but it is better with a skein too many than too few.

All yarns will have excess fibres (from production) that might come off as lint or shedding. Brushed yarns (ie hairier yarns) have more of these loose, excess fibres, causing more shedding.

Shedding also depends on what is worn under or over the garment, and whether this pulls at the yarn fibres. It’s therefore not possible to guarantee that there will be no shedding

Below are some tips on how to get the best result when working with hairier yarns:

1. When the garment is finished (before you wash it) shake it vigorously so the looser hairs come off. NOTE: do NOT use a lint roller, brush or any method that pulls at the yarn.

2. Place the garment in a plastic bag and put it in your freezer - the temperature will cause the fibres to become less attached to each other, and excess fibres will come off easier.

3. Leave in the freezer for a few hours before taking it out and shaking it again.

4. Wash the garment according to the instructions on the yarn label.

Pilling is a natural process that happens to even the most exclusive of fibers. It's a natural sign of wear and tear that is hard to avoid, and that is most visible in high friction areas of your garment like a sweater's arms and cuffs.

You can make your garment look as new by removing the pilling, using a fabric comb or a pill/lint remover.

Still can't find the answer you need? Then scroll down and leave your question so one of our experts can try to help you. This will be done normally within 5 to 10 working days.
In the meantime, you can read the questions and answers that others have left to this pattern or join the DROPS Workshop on Facebook to get help from fellow knitters/crocheters!

You might also like...

Post a comment to pattern DROPS 246-10

We would love to hear what you have to say about this pattern!

If you want to leave a question, please make sure you select the correct category in the form below, to speed up the answering process. Required fields are marked *.

Comments / Questions (4)

country flag Marita Brockhoff wrote:

Hallo möchte diese Jacke stricken aber ohne Muster. Wieviel Wolle brauche ich dann? MfG M. Brockhoff

17.04.2024 - 16:30

DROPS Design answered:

Liebe Frau Brockhoff, da diese Jacke mit Muster gestrickt wurde, haben wir leider nur die Garnmenge für das Farbige Muster und die Jacke haben wir nicht mehr; am besten zählen Sie alle Farben zusammen, wahrscheinlich brauchen Sie etwas weniger. Gerne kann Ihnen damit ihr DROPS Händler - auch per E-Mail or Telefon - weiter helfen. Viel Spaß beim Stricken!

18.04.2024 - 07:52

country flag Marie-Laure Bougant wrote:

Bonjour, Pouvons-nous remplacer les augmentations avec jeté par une augmentation intercalaire envers ? Merci d’avance. Marie-Laure

24.02.2024 - 14:38

DROPS Design answered:

Bonjour Mme Bougant, vous pouvez tout à fait utiliser la technique que vous souhaitez pour augmenter. Bon tricot!

26.02.2024 - 08:17

country flag Marie-Laure wrote:

Bonjour, Pour le diagramme, chaque ligne représente un rang endroit puis envers? Dans ce cas devons nous faire les augmentations sur l'envers? Merci pour votre aide.

02.02.2024 - 19:08

DROPS Design answered:

Bonjour Marie-Laure, effectivement, les diagrammes montrent tous les rangs, ceux sur l'endroit (que l'on doit lire de droite à gauche) mais aussi ceux sur l'envers (que l'on doit lire de gauche à droite); augmentez comme indiqué dans le diagramme, si c'est un rang sur l'envers, faites les jeté sur l'envers et tricotez les torse à l'endroit au rang suivant sur l'endroit. Bon tricot!

05.02.2024 - 08:00

country flag Ewa wrote:

Om jag följer mönstret för knapphål, står det att knapphålen blir på höger sida om koftan sitter på. Då mönstret är en herrtröja borde väl knapphålen vara på vänster sida? Tacksam för svar då jag ska börja sticka koftan.

13.01.2024 - 23:33

DROPS Design answered:

Hej Ewa, på den her model er knaphullerne på højre forkant og passer med billedet. MEN det stemmer, de fleste sætter knapperne på højre forkant på herrejakker, så gør du bare det :)

16.01.2024 - 12:23