DROPS Kid-Silk
DROPS Kid-Silk
75% Mohair, 25% Silk
from 6.75 $ /25g
Get the yarn to make this pattern from 54.00$.

The yarn cost is calculated from the pattern’s smallest size and the yarn’s cheapest product type. Looking for an even better price? You might find it on the DROPS Deals!

DROPS SS24

Autumn Sea

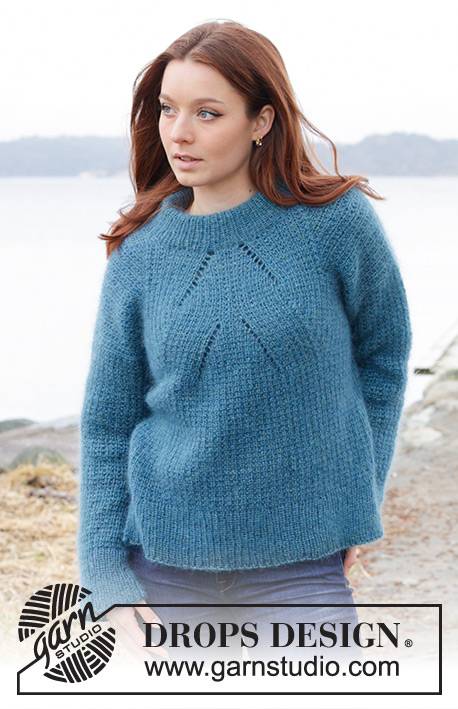
Knitted sweater in 2 strands DROPS Kid-Silk. The piece is worked top down with relief-pattern, double neck and split in sides. Sizes S - XXXL.

DROPS 245-2
DROPS Design: Pattern ks-210
Yarn group A + A or C
-------------------------------------------------------

SIZES:
S - M - L - XL - XXL – XXXL

Finished measurements:
Chest measurements: 98-108-116-126-138-152 cm = 38½"-42½"-45¾"-49½"-54¼"-59¾"
Full length: 56-58-60-62-64-66 cm = 22"-22¾"-23⅝"-24⅜"-25¼"-26"
All measurements in charts are in cm.

YARN:
DROPS KID-SILK from Garnstudio (belongs to yarn group A)
100-125-125-150-150-175 g color 27, jeans blue
100-125-125-150-150-175 g color 37, north sea

NEEDLES:
DROPS CIRCULAR NEEDLES SIZE 4.5 MM = US 7: Length 40 cm = 16" and 80 cm = 32".
DROPS CIRCULAR NEEDLES SIZE 3.5 MM = US 4: Length 40 cm = 16" and 80 cm = 32".
DROPS DOUBLE POINTED NEEDLES SIZE 4.5 MM = US 7.
DROPS DOUBLE POINTED NEEDLES SIZE 3.5 MM = US 4.
The technique MAGIC LOOP can be used – you then only need 80 cm = 32" circular needle in each size.

KNITTING GAUGE:
18 stitches in width and 23 rows in height with stockinette stitch and 2 strands = 10 x 10 cm = 4" x 4".
NOTE: Needle size is only a guide. If you get too many stitches on 10 cm = 4", change to a larger needle size. If you get too few stitches on 10 cm = 4", change to a smaller needle size.

-------------------------------------------------------

Alternative Yarn – See how to change yarns here
Yarn Groups A to F – Use the same pattern and change the yarn here
Yarn usage using an alternative yarn – Use our yarn converter here

-------------------------------------------------------

DROPS Kid-Silk
DROPS Kid-Silk
75% Mohair, 25% Silk
from 6.75 $ /25g
Get the yarn to make this pattern from 54.00$.

The yarn cost is calculated from the pattern’s smallest size and the yarn’s cheapest product type. Looking for an even better price? You might find it on the DROPS Deals!

Pattern instructions

NOTE: This pattern is written in American English. All measurements in charts are in cm. For conversion from inches to cm - click here. There are different terms for crocheting in American and British English. If this pattern includes crochet, click for "crochet terms" here. For this pattern in British English, please click here.
-------------------------------------------------------

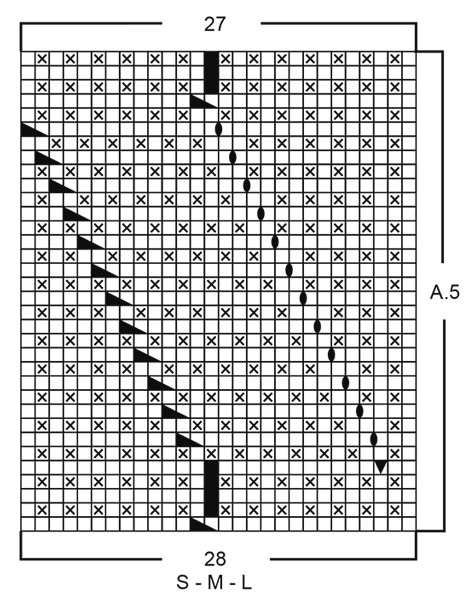
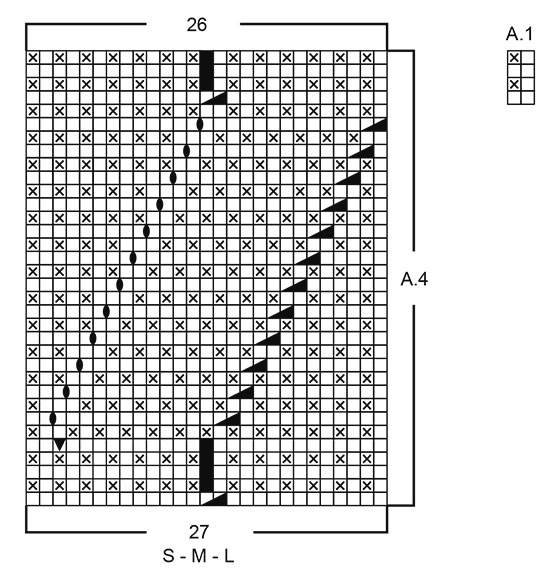
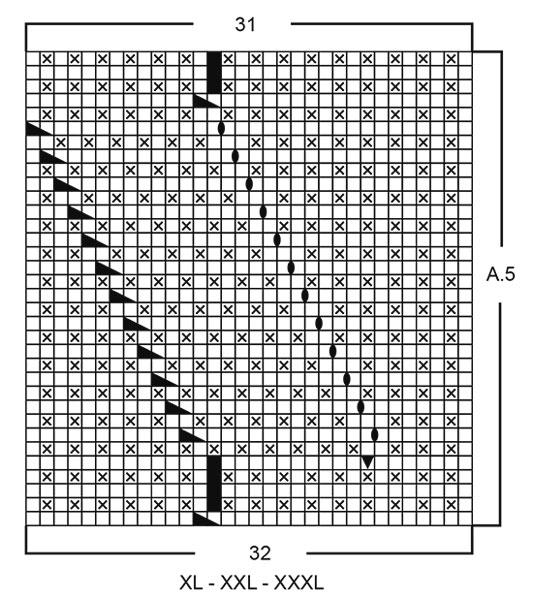
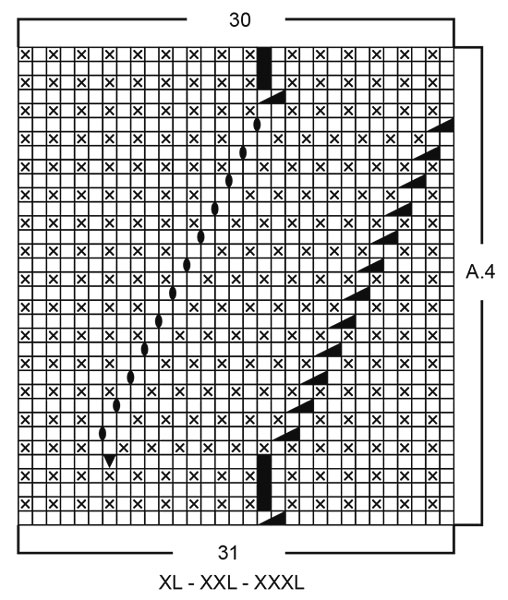
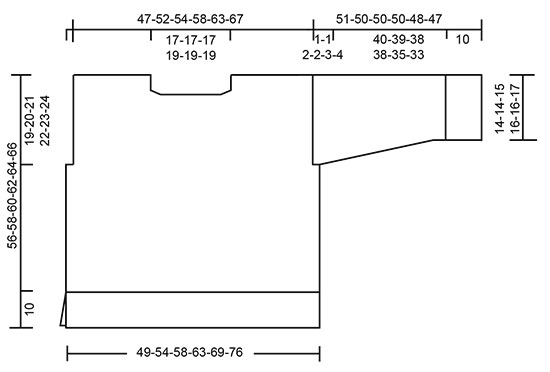
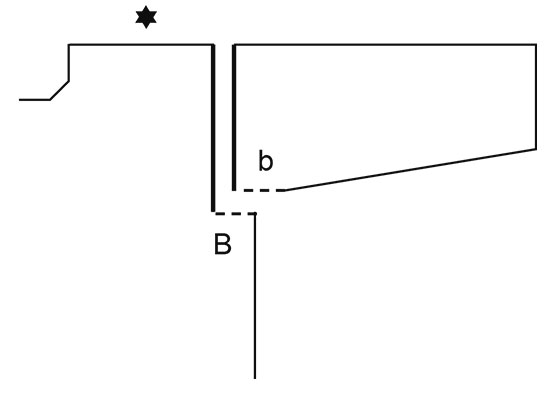
EXPLANATIONS FOR THE PATTERN:
-------------------------------------------------------

GARTER STITCH (worked back and forth):
Knit all rows.
1 ridge = knit 2 rows.

PATTERN:
See diagrams A.1 to A.5. The diagrams show all rows in the pattern from the right side.
Choose diagram for your size (applies to A.2, A.3, A.4 and A.5).

INCREASE TIP:
Increase 2 stitches by knitting 1, purling 1 and knitting 1 in the same stitch.

DECREASE TIP (for sleeves):
All decreases are worked on a knitted round. Start 2 stitches before the marker-stitch, knit 2 together, knit 1 (marker-stitch), slip 1 stitch knit-wise, knit 1 and pass the slipped stitch over the knitted stitch (2 stitches decreased).
-------------------------------------------------------

START THE PIECE HERE:

-------------------------------------------------------

SWEATER - SHORT OVERVIEW OF THE PIECE:
The front and back pieces are worked separately, back and forth with circular needle and top down. The piece is sewn together. Stitches are knitted up along each armhole and the sleeve cap is worked back and forth then the sleeve is finished in the round with short circular needle/double pointed needles. Stitches are knitted up around the neckline and the double neck is worked in the round to finish.

FRONT PIECE:
The left shoulder is worked first, then the right shoulder. Stitches are cast on for the neckline. The front piece is continued back and forth over all stitches. REMEMBER THE KNITTING GAUGE!

LEFT SHOULDER:
Cast on 27-31-33-35-39-43 stitches with circular needle size 4.5 MM = US 7 and 1 strand of each color DROPS Kid-Silk (2 strands). Purl 1 row from the wrong side.
Work as follows from the right side: 1 GARTER STITCH – read description above, work A.1 until there are 2 stitches left, work the first stitch in A.1, so the pattern is symmetrical, and 1 garter stitch. Continue this pattern back and forth for 4-4-4-5-5-5 cm = 1½"-1½"-1½"-2"-2"-2" – with the next row from the wrong side:
ROW 1 (wrong side): 1 garter stitch, work as before to the end of the row, cast on 1 stitch (towards the neck) = 28-32-34-36-40-44 stitches.
ROW 2 (right side): Work the pattern with 1 garter stitch on each side.
ROW 3 (wrong side): 1 garter stitch, work as before to the end of the row, cast on 1 stitch = 29-33-35-37-41-45 stitches.
ROW 4 (right side): Work the pattern with 1 garter stitch on each side.
ROW 5 (wrong side): Work the pattern with 1 garter stitch on each side.
Lay the piece to one side.

RIGHT SHOULDER:
Cast on 27-31-33-35-39-43 stitches with circular needle size 4.5 MM = US 7 and 1 strand of each color (2 strands). Purl 1 row from the wrong side.
Work as follows from the right side: 1 garter stitch, work A.1 until there are 2 stitches left, work the first stitch in A.1, so the pattern is symmetrical, and 1 garter stitch. Continue this pattern back and forth for 4-4-4-5-5-5 cm = 1½"-1½"-1½"-2"-2"-2" – with the next row from the right side:
ROW 1 (right side): 1 garter stitch, work as before to the end of the row, cast on 1 stitch (towards the neck) = 28-32-34-36-40-44 stitches.
ROW 2 (wrong side): Work the pattern with 1 garter stitch on each side.
ROW 3 (right side): 1 garter stitch, work as before to the end of the row, cast on 1 stitch = 29-33-35-37-41-45 stitches.
ROW 4 (wrong side): Work the pattern with 1 garter stitch on each side.

FRONT PIECE CONTINUES:
Now join the two shoulders from the right side as follows:
Work as before over the 29-33-35-37-41-45 stitches on the right shoulder, cast on 27-27-27-31-31-31 stitches for the neckline, work the 29-33-35-37-41-45 stitches from the left shoulder = 85-93-97-105-113-121 stitches on the needle.
Work back from the wrong side with 1 garter stitch on each side (purl the cast-on stitches along the neckline).

Now work pattern from the right side as follows: 1 garter stitch, work A.1 as before over the next 14-18-20-20-24-28 stitches, A.2, A.3, start with stitch 2 in A.1 and work A.1 over the next 14-18-20-20-24-28 stitches, 1 garter stitch. Continue this pattern back and forth. When A.2 and A.3 have been worked in height, work A.4 over stitches in A.2 and A.5 over stitches in A.3.
When the piece measures 19-20-21-22-23-24 cm = 7½"-8"-8¼"-8¾"-9"-9½" from the cast-on edge on the shoulder, cast on 4-4-6-6-8-10 stitches for the armholes at the end of the next 2 rows = 93-101-109-117-129-141 stitches.

Continue back and forth with 1 garter stitch on each side (work the new stitches into the pattern). When A.4 and A.5 are finished in height, 2 stitches have been decreased in the diagram = 91-99-107-115-127-139 stitches. Continue A.1 over all stitches with 1 garter stitch on each side.

When the piece measures 46-48-50-52-54-56 cm = 18"-19"-19¾"-20½"-21¼"-22" from the cast-on edge on the shoulder, change to circular needle size 3.5 MM = US 4 and work as follows from the right side: Bind off 1 stitch, knit 1 in both the front and back loop of the next stitch (1 stitch increased), purl 1, * increase 2 stitches in the next stitch – read INCREASE TIP, purl 1, knit 1, purl 1, knit 1, purl 1, knit 1, purl 1 *, work from *-* a total of 10-11-12-13-14-16 times, increase 2 stitches in the next stitch, work rib without increasing until there are 2 stitches left on the row, knit 1 in both the front and back loop of the next stitch (1 stitch increased), 1 garter stitch. You have increased 24-26-28-30-32-36 stitches and there are 114-124-134-144-158-174 stitches on the needle.
Turn, bind off 1 stitch, work the rib until there is 1 stitch left, 1 garter stitch = 113-123-133-143-157-173 stitches.
Continue the rib (knit 1, purl 1) with 1 garter stitch on each side, until the rib measures 10 cm = 4". Bind off – or work Italian bind-off.
The front piece measures approx. 56-58-60-62-64-66 cm = 22"-22¾"-23⅝"-24⅜"-25¼"-26" from the cast-on edge on the shoulder.

BACK PIECE:
The left shoulder is worked first, then the right shoulder. Stitches are cast on for the neckline. The back piece is continued back and forth over all stitches.

LEFT SHOULDER:
Cast on 27-31-33-35-39-43 stitches with circular needle size 4.5 MM = US 7 and 1 strand of each color (2 strands). Purl 1 row from the wrong side.
Work as follows from the right side: 1 garter stitch, work A.1 until there are 2 stitches left, work the first stitch in A.1, so the pattern is symmetrical, and 1 garter stitch. Continue this pattern back and forth for 2 cm = ¾" – with the next row from the wrong side:
ROW 1 (wrong side): 1 garter stitch, work as before to the end of the row, cast on 2 stitches (towards the neck) = 29-33-35-37-41-45 stitches.
ROW 2 (right side): Work the pattern with 1 garter stitch on each side.
ROW 3 (wrong side): Work the pattern with 1 garter stitch on each side.

RIGHT SHOULDER:
Cast on 27-31-33-35-39-43 stitches with circular needle size 4.5 MM = US 7 and 1 strand of each color (2 strands). Purl 1 row from the wrong side.
Work as follows from the right side: 1 garter stitch, work A.1 until there are 2 stitches left, work the first stitch in A.1, so the pattern is symmetrical, and 1 garter stitch. Continue this pattern back and forth for 2 cm = ¾" – with the next row from the right side:
ROW 1 (right side): 1 garter stitch, work as before to the end of the row, cast on 2 stitches (towards the neck) = 29-33-35-37-41-45 stitches.
ROW 2 (wrong side): Work the pattern with 1 garter stitch on each side.

BACK PIECE CONTINUES:
Now join the two shoulders as follows, from the right side:
Work as before over the 29-33-35-37-41-45 stitches on the right shoulder, cast on 27-27-27-31-31-31 stitches for the neckline, work the 29-33-35-37-41-45 stitches from the left shoulder = 85-93-97-105-113-121 stitches on the needle.
Work back from the wrong side with 1 garter stitch on each side (purl the cast-on stitches on the neckline).
Continue with A.1 over all stitches with 1 garter stitch on each side.

When the piece measures 19-20-21-22-23-24 cm = 7½"-8"-8¼"-8¾"-9"-9½" from the cast-on edge on the shoulder, cast on 3-3-5-5-7-9 stitches for the armholes at the end of the next 2 rows = 91-99-107-115-127-139 stitches.
Continue A.1 back and forth with 1 garter stitch on each side (work the new stitches into the pattern).
When the piece measures 46-48-50-52-54-56 cm = 18"-19"-19¾"-20½"-21¼"-22" from the cast-on edge on the shoulder, change to circular needle size 3.5 MM = US 4.
Work as follows from the right side: Bind off the 1 garter stitch, knit 1 in both the front and back loop of the next stitch (1 stitch increased), purl 1, * increase 2 stitches in the next stitch – remember INCREASE TIP, purl 1, knit 1, purl 1, knit 1, purl 1, knit 1, purl 1 *, work from *-* a total of 10-11-12-13-14-16 times, increase 2 stitches in the next stitch, work rib without increasing until there are 2 stitches left, knit 1 in both the front and back loop of the next stitch (1 stitch increased), 1 garter stitch. You have increased 24-26-28-30-32-36 stitches and there are 114-124-134-144-158-174 stitches on the needle.
Turn, bind off 1 stitch, continue the rib until there is 1 stitch left, 1 garter stitch = 113-123-133-143-157-173 stitches.
Continue the rib (knit 1, purl 1) with 1 garter stitch on each side until the rib measures 10 cm = 4". Bind off in the same way as on the front piece.

ASSEMBLY-1:
Sew the shoulder seams. Sew the side seams inside the 1 edge stitch, from the armholes down to the beginning of the rib (= 10 cm = 4" split on each side).

SLEEVES:
Start at the bottom of the armhole and knit up from the right side 68-72-76-80-82-86 stitches around the armhole, inside the 1 edge stitch, with short circular needle size 4.5 MM = US 7 and 1 strand of each color (2 strands). Work A.1 back and forth with 1 garter stitch on each side.
When the sleeve measures 1-1-2-2-3-4 cm = ⅜"-⅜"-¾"-¾"-1⅛"-1½", join the sleeve and continue A.1 in the round.
Insert 1 marker in the first stitch on the round.
When the sleeve measures 6-6-8-7-9-11 cm = 2⅜"-2⅜"-3⅛"-2¾"-3½"-4⅜", decrease 2 stitches under the sleeve – read DECREASE TIP. Decrease like this every 4-3½-3-3-2½-2 cm = 1½"-1¼"-1⅛"-1⅛"-1"-¾" a total of 9-10-11-12-12-13 times = 50-52-54-56-58-60 stitches.
Work until the sleeve measures 41-40-40-40-38-37 cm = 16⅛"-15¾"-15¾"-15¾"-15"-14½". There is approx. 10 cm = 4" left; try the sweater on and work to desired length before the rib.
Change to double pointed needles size 3.5 MM = US 4 and work the next round as follows: Knit 1, purl 1, knit 1, purl 1, * increase 2 stitches in the next stitch – remember INCREASE TIP, purl 1, knit 1, purl 1, knit 1, purl 1, knit 1, purl 1 *, work from *-* a total of 5-5-5-6-6-6 times, increase 2 stitches in the next stitch, work rib to the end of the round without increasing. You have increased 12-12-12-14-14-14 stitches = 62-64-66-70-72-74 stitches.
Continue the rib (knit 1, purl 1) for 10 cm = 4". Bind off in the same way as the front and back pieces. The sleeve measures approx. 51-50-50-50-48-47 cm = 20"-19¾"-19¾"-19¾"-19"-18½" from the knitted-up stitches. Work the other sleeve in the same way.

ASSEMBLY-2:
Sew the openings at the bottom of the armholes – see sketch.

NECK:
Use short circular needle size 3.5 MM = US 4 and 1 strand of each color (2 strands). Start by one shoulder seam and knit up from the right side 80 to 90 stitches around the neck. Work rib in the round (knit 1, purl 1) – making sure the rib matches the stitches on the front piece. Bind off a little loosely when the neck measures 12-12-13-13-14-14 cm = 4¾"-4¾"-5⅛"-5⅛"-5½"-5½".
Fold the neck double to the inside and sew down. To avoid the neck being tight and rolling outwards, it is important that the seam is elastic.

Diagram

All measurements in charts are in cm.

symbols = knit from right side, purl from wrong side
symbols = knit from wrong side
symbols = between 2 stitches make 1 yarn over which is purled on the next row to leave a hole
symbols = knit 1, make 1 yarn over, which is purled twisted on the next row to avoid a hole
symbols = slip 1 stitch knit-wise, knit 1 and pass the slipped stitch over the knitted stitch
symbols = knit 2 together
symbols = this square has no stitch as it was decreased earlier; go straight to the next symbol in the diagram
symbols = sew b to B
diagram
diagram
diagram
diagram
diagram
diagram
diagram
diagram
diagram
diagram

Each of our patterns has specific tutorial videos to help you.

Do you have a question? See a list of frequently asked questions (FAQ)

Knitting tension is what determines the final measurements of your work, and is usually measured per 10 x 10 cm. It is provided like so: number of stitches in width x number of rows in height - eg: 19 stitches x 26 rows = 10 x 10 cm.

The knitting tension is very individual; some people knit/crochet loosely while others work tightly. You adjust the knitting tension with the needle size, which is why the suggested needle size only serve as a guide! You need to adjust this (up or down) to ensure that YOUR knitting tension matches the knitting tension provided in the pattern. If you work with a different knitting tension than provided you will have a different yarn consumption, and your work will have different measurements than what the pattern suggests.

The knitting tension also determines which yarns can replace each other. As long as you achieve the same knitting tension you can replace one yarn with another.

See DROPS lesson: How to measure your tension/gauge

See DROPS video: How to make a gauge tension swatch

The required amount of yarn is provided in grams, eg: 450 g. To calculate how many balls you’ll need you first need to know how many grams are in 1 ball (25g, 50g or 100g). This information is available if you click on the individual yarn quality on our pages. Divide the amount required with the amount of each ball. For example, if each ball is 50g (the most common amount), the calculation will be as follows: 450 / 50 = 9 balls.

The important thing when changing from one yarn to another is that the knitting/crochet tension remains the same. This is so that the measurements of the finished piece will be the same as on the sketch provided. It is easier to achieve the same knitting tension using yarns from the same yarn group. It is also possible to work with multiple strands of a thinner yarn to achieve the knitting tension of a thicker one. Please try our yarn converter. We recommend you to always work a test swatch.

Please NOTE: when changing yarn the garment might have a different look and feel to the garment in the photo, due to individual properties and qualities of each yarn.

See DROPS lesson: Can I use a different yarn than the one mentioned in the pattern?

All our yarns are categorised into yarn groups (from A to F) according to thickness and knitting tension – group A contains the thinnest yarns and group F the thickest. This makes it easier for you to find alternative yarns to our patterns, should you wish to switch yarn. All yarns within the same group have a similar knitting tension and can easily replace each other. However, different yarn qualities have different structures and properties which will give the finished work a unique look and feel.

Click here for an overview of the yarns in each yarn group

At the top of all our patterns you’ll find a link to our yarn converter, which is a helpful tool should you wish to use a different yarn than suggested. By filling in the yarn quality you wish to replace, the amount (in your size) and number of strands, the converter will present good alternative yarns with the same knitting tension. Additionally it will tell you how much you’ll require in the new qualities and whether you’ll need to work with multiple strands. Most skeins are 50g (some are 25g or 100g).

If the pattern is worked with multiple colours, every colour will have to be converted separately. Similarly, if the pattern is worked with several strands of different yarns (for example 1 strand Alpaca and 1 strand Kid-Silk) you will have to find alternatives for each, individually.

Click here to see our yarn converter

Since different yarns have different qualities and textures we have chosen to keep the original yarn in our patterns. However, you can easily find options among our available qualities by using our yarn converter, or simply pick a yarn from the same yarn group.

It is possible that some retailers still have discontinued yarns in stock, or that someone has a few skeins at home that they would like to find patterns for.

The yarn converter will provide both alternative yarn as well as required amount in the new quality.

If you think it's hard to decide what size to make, it can be a good idea to measure a garment you own already and like the size of. Then you can pick the size by comparing those measures with the ones available in the pattern's size chart.

You'll find the size chart at the bottom of the pattern.

See DROPS lesson: How to read size chart

The needle size provided in the pattern serves only as a guide, the important thing is to follow the knitting tension. And since knitting tension is very individual, you will have to adjust the needle size to ensure that YOUR tension is the same as in the pattern – maybe you’ll have to adjust 1, or even 2 needle sizes, up or down to achieve the correct tension. For this, we recommend that you work test swatches.

Should you work with a different knitting tension than the one provided, the measurements of the finished garment might deviate from the measurement sketch.

See DROPS lesson: How to measure your tension/gauge

See DROPS video: How to make a gauge tension swatch

Working a garment top-down provides more flexibility and room for personal adjustment. For example it is easier to try the garment on while working, as well as making adjustments to length of yoke and shoulder caps.

The instructions are carefully explaining every step, in the correct order. Diagrams are adjusted to the knitting direction and are worked as usual.

The diagram depicts all rows/rounds, and every stitch seen from the right side. It is read from bottom to top, from right to left. 1 square = 1 stitch.

When working back and forth, every other row is worked from the right side and every other row is worked from the wrong side. When working from the wrong side, the diagram will have to be worked reversed: from left to right, knit stitches are purled, purl stitches are knit etc.

When working in the round every round is worked from the right side and the diagram are worked from right to left on all rounds.

See DROPS lesson: How to read knitting diagrams

The diagram depicts all rows/rounds, and every stitch seen from the right side. It is worked from bottom to top, from right to left.

When working back and forth every other row is worked from the right side: from right to left and every other row is worked from the wrong side: from left to right.

When working in the round, every row in the diagram are worked from the right side, from right to left.

When working a circular diagram you start in the middle and work your way outwards, counter clockwise, row by row.

The rows usually start with a given number of chain stitches (equivalent to the height of the following stitch), this will either be depicted in the diagram or explained in the pattern.

See DROPS lesson: How to read crochet diagrams

Instructions for working several diagrams after each other on the same row/round, will often be written like so: “work A.1, A.2, A.3 a total of 0-0-2-3-4 times". This means you work A.1 once, then A.2 is worked once, and A.3 is repeated (in width) the number of times provided for your size – in this case like so: S = 0 times, M = 0 times, L=2 times, XL= 3 times and XXL = 4 times.

The diagrams are worked as usual: begin with the first row in A.1, then work the first row in A.2 etc.

See DROPS lesson: How to read knitting diagrams

See DROPS lesson: How to read crochet diagrams

The total width of the garment (from wrist-to-wrist) will be larger in the larger sizes, despite the actual sleeves being shorter. The larger sizes have longer sleeve caps and wider shoulders, so there will be a good fit in all sizes.

The measurement sketch/schematic drawing provides information regarding the full length of the garment. If it’s a jumper or a jacket the length is measured from the highest point on the shoulder (usually closest to the neckline), and straight down to the bottom of the garment. It is NOT measured from the tip of shoulder. Similarly, the length of yoke is measured from the highest point on the shoulder and down to where yoke is split into body and sleeves.

See DROPS lesson: How to read a schematic drawing

Diagrams are often repeated on the round or in height. 1 repeat is the diagram the way it appears in the pattern. If it says to work 5 repeats of A.1 in the round, then you work A.1 a total of 5 times after/next to each other in the round. If it says to work 2 repeats of A.1 vertically/in height you work the entire diagram once, then begin again at the start and work the entire diagram one more time.

Chain stitches are slightly narrower than other stitches and to avoid working the cast-on edge too tight, we simply chain more stitches to begin with. The stitch count will be adjusted on the following row to fit the pattern and measurement sketch.

The rib edge is more elastic and will contract slightly compared to, for example, stocking stitch. By increasing before the rib edge, you avoid a visible difference in width between the rib edge and the rest of the body.

It’s very easy to cast off too tightly, and by making yarn overs while casting off (and simultaneously casting these off) you avoid a too tight cast off edge.

See DROPS video: How to bind off with yarn overs (yo)

To achieve an even increase (or decrease) you can increase on, for example: every 3rd and 4th row alternately, like so: work 2 rows and increase on the 3rd row, work 3 rows and increase on the 4th. Repeat this until the increase is complete.

See DROPS lesson: Increase or decrease 1 st on every 3rd and 4th row alternately

Should you prefer to work in the round instead of back and forth, you may of course adjust the pattern. You’ll need to add steeks mid-front (usually 5 stitches), and follow the instructions. When you would normally turn and work from the wrong side, simply work across the steek and continue in the round. At the end you’ll cut the piece open, pick up stitches to work bands, and cover the cut edges.

See DROPS video: How to knit steeks and cut open

Should you prefer to work back and forth instead of in the round, you may of course adjust the pattern so you work the pieces separately and then assemble them at the end. Divide the stitches for the body in 2, add 1 edge stitch in each side (for sewing) and work the front and back pieces separately.

See DROPS lesson: Can I adapt a pattern for circular needles into straight needles?

Pattern repeats can vary slightly in the different sizes, in order to get the correct proportions. If you’re not working the exact same size as the garment in the photo, yours might deviate slightly. This has been carefully developed and adjusted so that the complete impression of the garment is the same in all sizes.

Make sure to follow instructions and diagrams for your size!

If you have found a pattern you like which is available in women’s size it’s not very difficult to convert it to men’s size. The biggest difference will be the length of sleeves and body. Start working on the women size that you think would fit across the chest. The additional length will be worked right before you cast off for the armhole/sleeve cap. If the pattern is worked top-down you can add the length right after the armhole or before the first decrease on sleeve.

Regarding additional yarn amount, this will depend on how much length you add, but it is better with a skein too many than too few.

All yarns will have excess fibres (from production) that might come off as lint or shedding. Brushed yarns (ie hairier yarns) have more of these loose, excess fibres, causing more shedding.

Shedding also depends on what is worn under or over the garment, and whether this pulls at the yarn fibres. It’s therefore not possible to guarantee that there will be no shedding

Below are some tips on how to get the best result when working with hairier yarns:

1. When the garment is finished (before you wash it) shake it vigorously so the looser hairs come off. NOTE: do NOT use a lint roller, brush or any method that pulls at the yarn.

2. Place the garment in a plastic bag and put it in your freezer - the temperature will cause the fibres to become less attached to each other, and excess fibres will come off easier.

3. Leave in the freezer for a few hours before taking it out and shaking it again.

4. Wash the garment according to the instructions on the yarn label.

Pilling is a natural process that happens to even the most exclusive of fibers. It's a natural sign of wear and tear that is hard to avoid, and that is most visible in high friction areas of your garment like a sweater's arms and cuffs.

You can make your garment look as new by removing the pilling, using a fabric comb or a pill/lint remover.

Still can't find the answer you need? Then scroll down and leave your question so one of our experts can try to help you. This will be done normally within 5 to 10 working days.
In the meantime, you can read the questions and answers that others have left to this pattern or join the DROPS Workshop on Facebook to get help from fellow knitters/crocheters!

You might also like...

Post a comment to pattern DROPS 245-2

We would love to hear what you have to say about this pattern!

If you want to leave a question, please make sure you select the correct category in the form below, to speed up the answering process. Required fields are marked *.

Comments / Questions (4)

country flag Sophie wrote:

Bonjour, J'ai vu quelqu'un avec un pull présentant le même genre de motif, mais il me semble en côtes simples, et en plus je ne suis pas très à l'aise avec les "top down". Je n'ai pas trouvé sur votre site un autre modèle présentant le même genre de motif (que je trouve très beau), en commençant par le bas. En avez-vous un ? Merci pour votre réponse

08.02.2024 - 18:22

DROPS Design answered:

Bonjour Sophie, retrouvez ici nos modèles de pulls tricotés de bas en haut avec un décalage de côtes, vous y trouverez peut-être l'inspiration. Bon tricot!

09.02.2024 - 07:41

country flag Maria Luisa wrote:

Modello molto bello, ma non riesco a trovare lo schema A.1.

30.12.2023 - 22:32

DROPS Design answered:

Buongiorno Maria Luisa, lo schema A.1 è in fondo alla pagina di fianco allo schema A.4. Buon lavoro!

31.12.2023 - 13:33

country flag Maria Schraven wrote:

Mooie modellen maar weer gebreid van boven naar beneden. Jammer, niet voor mij weggelegd.

29.08.2023 - 13:10

country flag Patricia wrote:

Océan

03.08.2023 - 14:34