
Popular categories
Looking for a yarn?


|
||||||||||||||||||||||
Snowy Bee Cardigan |
||||||||||||||||||||||
 |
 |
|||||||||||||||||||||
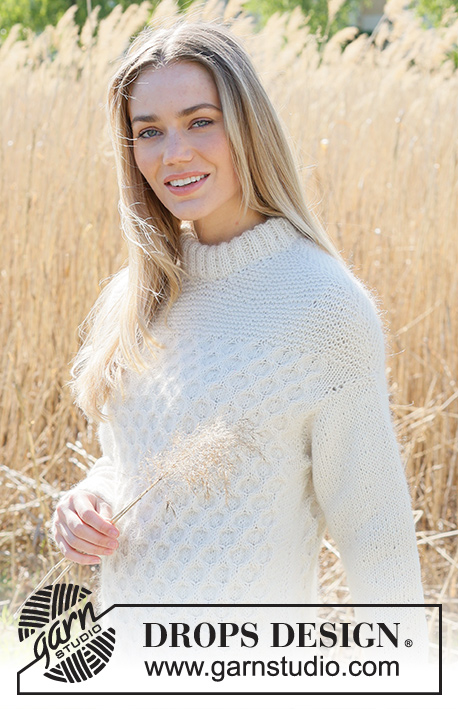
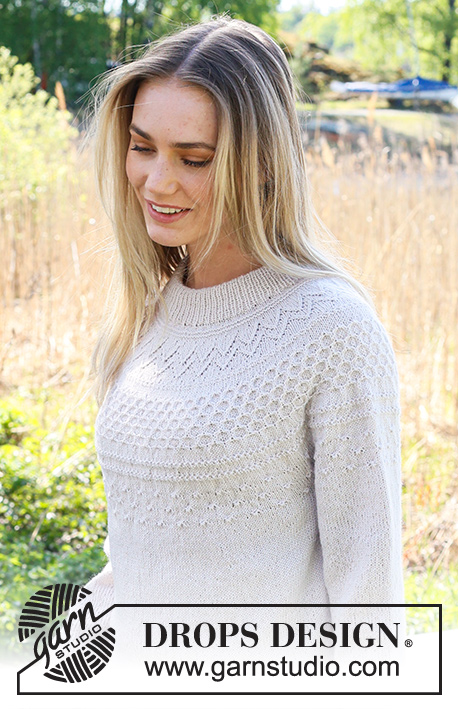
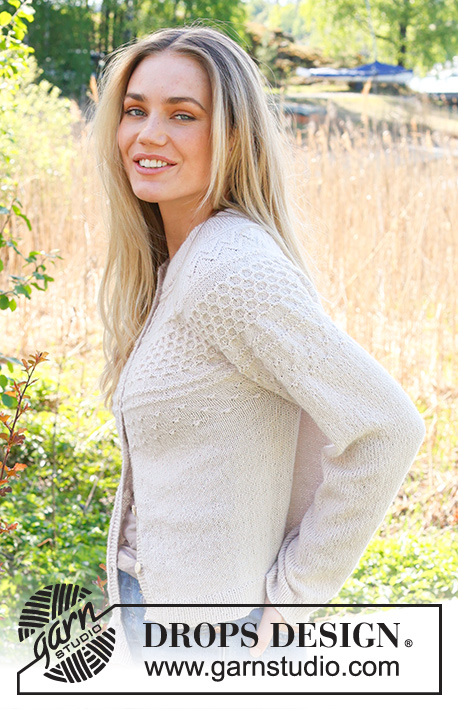
Knitted jacket in DROPS Puna and DROPS Kid-Silk. Piece is knitted top down with honeycomb pattern, garter stitch and double neck edge. Size: S - XXXL
DROPS 237-29 |
||||||||||||||||||||||
|
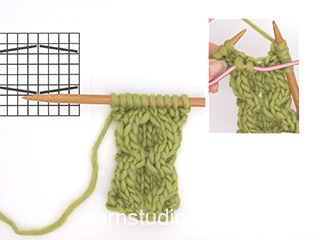
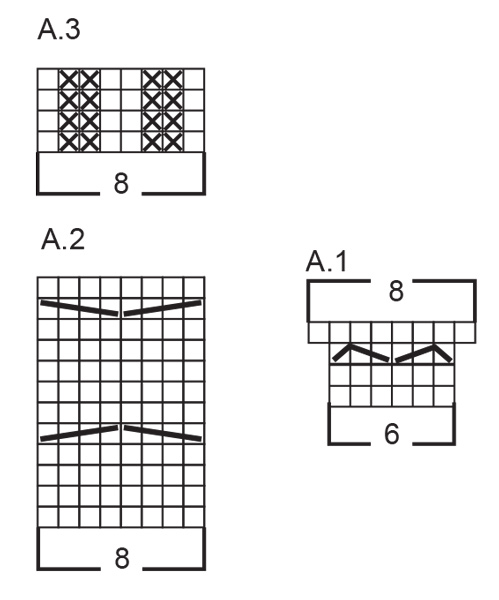
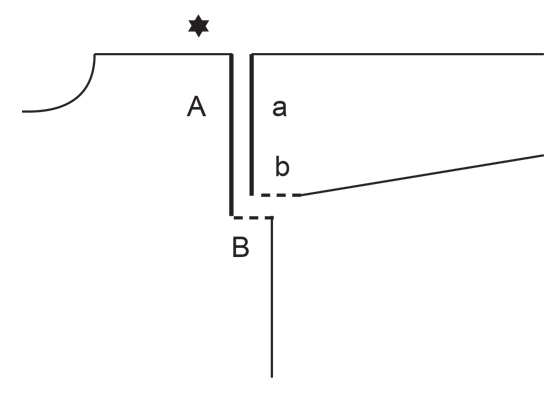
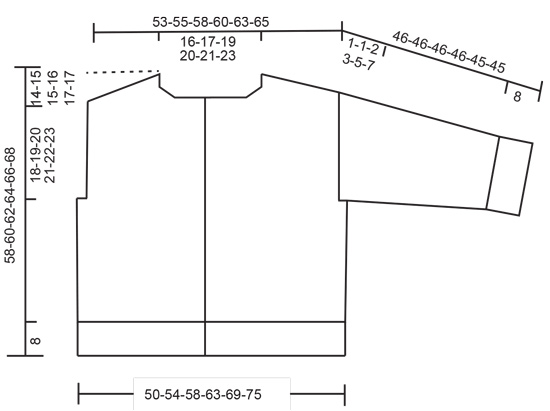
---------------------------------------------------------- EXPLANATION FOR THE PATTERN: ---------------------------------------------------------- GARTER STITCH (back and forth): Knit all rows. 1 ridge vertically = knit 2 rows. PATTERN: See diagrams A.1, A.2 and A.3. Diagrams show all rows in pattern seen from the right side. INCREASE TIP-1: Increase by making 1 yarn over on each side of stitch with marker. (middle stitch) On next row knit yarn over twisted to avoid hole. INCREASE TIP-2 (applies to sleeves): Begin 1 stitch before marker thread, make 1 yarn over, knit 2 (marker thread is between these 2 stitches), make 1 yarn over. On next round knit yarns over twisted to avoid holes. BUTTONHOLES: Decrease for buttonholes on right band (when garment is worn). Decrease from right side when 3 stitches remain on row as follows: Make 1 yarn over, knit the next 2 stitches together, knit last stitch. On next row (wrong side) knit the yarn over to make a hole. Decrease first buttonhole when piece measures approx. 2 cm = ¾" from neck edge at the front. Then bind off the next 5-5-6-6-6-6 buttonholes approx. 7-7-7-7½-7½-7½ cm = 2¾"-2¾"-2¾"-2⅞"-2⅞"-2⅞" apart. ---------------------------------------------------------- START THE PIECE HERE: ---------------------------------------------------------- JACKET - SHORT OVERVIEW OF THE PIECE: Work each shoulder back and forth separately. Increase and cast on new stitches in each side to form a neck line. Put the parts together, and increase stitches on each shoulder. Then divide the piece and finish each part separately. Work sleeves in the round on double pointed needles/a short circular needle, from the bottom up. Then work a neck edge. RIGHT SHOULDER: Cast on 3 stitches on circular needle size 5.5 MM = US 9 with 1 strand in each quality (2 strands). Insert 1 marker in the middle stitch. Work stitch with marker in stockinette stitch, work the remaining stitches in GARTER STITCH - read explanation above. Work back and forth over these stitches AT THE SAME TIME increase stitches like this: ROW 1 (= RIGHT SIDE): Increase 1 stitch on each side of middle stitch - read INCREASE TIP-1, and cast on 1 new stitch at the end of row (towards mid front) = 6 stitches. ROW 2 (= WRONG SIDE): Increase 1 stitch on each side of middle stitch, and cast on 1 new stitch at the end of row (towards mid back) = 9 stitches Row 3: Increase 1 stitch on each side of middle stitch = 11 stitches. Row 4: Increase 1 stitch on each side of middle stitch = 13 stitches. Work these 4 rows 4 more times. For every time these 4 rows are worked, increase 10 stitches. When 20 rows have been worked in total, there are 53 stitches on row in all sizes. Row 21: Knit 26, increase 1 stitch as before, work middle stitch, increase 1 stitch as before, knit 26, cast on 12-13-14-15-16-17 new stitches (neck + band on front piece) = 67-68-69-70-71-72 stitches. Row 22: Knit 39-40-41-42-43-44, increase 1 stitch as before, purl middle stitch, increase 1 stitch as before, knit 27, cast on 4-5-6-7-8-9 new stitches (neck on back piece) = 73-75-77-79-81-83 stitches. Put piece aside. LEFT SHOULDER: Cast on as right shoulder and work the same way until 20 rows have been worked = 53 stitches. Row 21: Knit 26, increase 1 stitch as before, work middle stitch, increase 1 stitch as before, knit 26, cast on 4-5-6-7-8-9 new stitches (neck on back piece) = 59-60-61-62-63-64 stitches. Row 22: Knit 31-32-33-34-35-36, increase 1 stitch as before, purl middle stitch, increase 1 stitch as before, knit 27, cast on 12-13-14-15-16-17 new stitches (neck + band on front piece) = 73-75-77-79-81-83 stitches. Put piece aside. Work next row as follows from right side: Work from right side over stitches from left shoulder, work stitches from right shoulder on row, AT THE SAME TIME increase 1 stitch on each side of middle stitches = 150-154-158-162-166-170 stitches. Decrease for BUTTONHOLES on right band - read explanation above. Continue back and forth with stockinette stitch over stitches with marker, and garter stitch over the remaining stitches, AT THE SAME TIME increase 1 stitch on each side of every middle stitch but increase only from right side. Increase on every row from right side 9-10-11-12-13-14 times in total = 186-194-202-210-218-226 stitches. There are now 84-88-92-96-100-104 stitches between middle stitch on back piece and 50-52-54-56-58-60 stitches on each front piece. On next row from wrong side bind off both middle stitches. Finish each part separately. BACK PIECE: = 84-88-92-96-100-104 stitches. Now work pattern, begin from right side: 6-8-4-6-8-4 stitches in stockinette stitch, work A.1 12-12-14-14-14-16 times, work 6-8-4-6-8-4 stitches in stockinette stitch. When A.1 has been worked 1 time vertically, there are 108-112-120-124-128-136 stitches on needle. Continue with A.2 over every A.1 AT THE SAME TIME when piece measures 4 cm = 1½", decrease 1 stitch in each side, decrease every 3 cm = 1⅛" 3 times in total, decrease by knitting 2 stitches together inside 1 stitch in each side = 102-106-114-118-122-130 stitches. Work until piece measures 18-19-20-21-22-23 cm = 7"-7½"-8"-8¼"-8¾"-9" from edge on shoulder (where the middle stitches were bind off). Cast on 2-3-4-6-9-12 new stitches at the end of the next 2 rows = 106-112-122-130-140-154 stitches. Work the new stitches in stockinette stitch, continue pattern as before. Work until piece measures 18-18-19-19-19-20 cm = 7"-7"-7½"-7½"-7½"-8" from where new stitches were cast on. Increase 1-2-1-1-0-1 stitches evenly over the 5-8-5-9-14-13 stitches in each side = 108-116-124-132-140-156 stitches. Switch to circular needle size 4.5 MM = US 7. Now work rib over all stitches as follows from right side: Work 1 edge stitch in garter stitch, * knit 2, purl 2 *, work from *-* until 3 stitches remain, knit 2 and 1 edge stitch in garter stitch. Continue rib like this for 8 cm = 3⅛". Bind off stitches with knit over knit and purl over purl. Jacket measures approx. 58-60-62-64-66-68 cm = 22¾"-23⅝"-24⅜"-25¼"-26"-26¾", measured from the top point on shoulder. LEFT FRONT PIECE: = 50-52-54-56-58-60 stitches. Work pattern as follows : from right side: 8 band stitches in garter stitch, work A.1 6-6-7-7-7-8 times, 6-8-4-6-8-4 stitches in stockinette stitch. When A.1 has been worked 1 time vertically, there are 62-64-68-70-72-76 stitches on needle. Continue with A.2 over every A.1. AT THE SAME TIME when piece measures 4 cm = 1½", decrease 1 stitch in the side, decrease every 3 cm = 1⅛" 3 times in total, decrease by knitting 2 stitches together inside 1 stitch = 59-61-65-67-69-73 stitches. Work until piece measures 18-19-20-21-22-23 cm = 7"-7½"-8"-8¼"-8¾"-9" from edge on shoulder (where middle stitch was bind off). Cast on 2-3-4-6-9-12 new stitches at the end of next row from right side = 61-64-69-73-78-85 stitches. Work the new stitches in stockinette stitch, continue pattern as before. Work until piece measures 18-18-19-19-19-20 cm = 7"-7"-7½"-7½"-7½"-8" from where new stitches were cast on. Increase 1-2-1-1-0-1 stitches evenly over the 5-8-5-9-14-13 stitches in the side = 62-66-70-74-78-86 stitches. Switch to circular needle size 4.5 MM = US 7. Now work rib over all stitches as follows: Work 8 band stitches as before, work A.3 6-6-6-7-7-8 times, knit 1, * 2 purl, 2 knit *, work from *-* 1-2-1-2-3-3 times, 1 edge stitch in garter stitch. Continue rib like this for 8 cm = 3⅛". Bind off stitches with knit over knit and purl over purl. RIGHT FRONT PIECE: = 50-52-54-56-58-60 stitches. Work pattern as follows : from right side: 6-8-4-6-8-4 stitches in stockinette stitch, work A.1 6-6-7-7-7-8 times, 8 band stitch in garter stitch, when A.1 has been worked 1 time vertically, there are 62-64-68-70-72-76 stitches on row. Continue with A.2 over every A.1. AT THE SAME TIME when piece measures 4 cm = 1½", decrease 1 stitch in the side, decrease every 3 cm = 1⅛" 3 times in total, decrease by knitting 2 stitches together inside 1 stitch = 59-61-65-67-69-73 stitches. Work until piece measures 18-19-20-21-22-23 cm = 7"-7½"-8"-8¼"-8¾"-9" from edge on shoulder (where the middle stitch was bind off). Cast on 2-3-4-6-9-12 new stitches at the end of next row from wrong side = 61-64-69-73-78-85 stitches. Work the new stitches in stockinette stitch, continue pattern as before. Work until piece measures 18-18-19-19-19-20 cm = 7"-7"-7½"-7½"-7½"-8" from where new stitches were cast on. Increase 1-2-1-1-0-1 stitches evenly over the 5-8-5-9-14-13 stitches in the side = 62-66-70-74-78-86 stitches. Switch to circular needle size 4.5 MM = US 7. Now work rib over all stitches as follows from right side: Work 1 edge stitch in garter stitch, * knit 2, purl 2 *, work from *-* 1-2-1-2-3-3 times, knit 1, work A.3 6-6-6-7-7-8 times, work 8 band stitches as before. Continue rib like this for 8 cm = 3⅛". Bind off stitches with knit over knit and purl over purl. SLEEVE: Work sleeves in the round from the bottom up on double pointed needles/a short circular needle. Cast on 44-44-48-48-52-52 stitches on circular needle size 4.5 MM = US 7 with 1 strand of each quality (2 strands). Knit 1 round, then work rib (knit 2/purl 2). When piece measures 8 cm = 3⅛", switch to double pointed needles size 5.5 MM = US 9. Insert a marker thread at beginning of round = mid under sleeve. Then work in stockinette stitch. AT THE SAME TIME when piece measures 12 cm = 4¾", increase 1 stitch on each side of marker thread - read INCREASE TIP-2. Increase like this every 5-5-4-3½-3-2½ cm = 2"-2"-1½"-1¼"-1⅛"-1" 7-7-8-9-9-10 times in total = 58-58-64-66-70-72 stitches. When sleeve measures 45-45-44-43-40-38 cm = 17¾"-17¾"-17¼"-17"-15¾"-15", work sleeve cap back and forth (from mid under sleeve) on circular needle until finished measurements. Work until sleeve measures approx. 46-46-46-46-45-45 cm = 18"-18"-18"-18"-17¾"-17¾", i.e. there is a vent of 1-1-2-3-5-7 cm = ⅜"-⅜"-¾"-1⅛"-2"-2¾" at the top of sleeve. Work another sleeve the same way. ASSEMBLY: Sew sleeve cap to armhole. Then sew vent at the top of sleeve to bottom of armhole - see chart. Sew side seams inside an edge stitch until 8 cm = 3⅛" remain = vents. DOUBLE NECK EDGE: Pick up from right side approx. 92-112 stitches around the neck on jacket on a short circular needle size 4.5 MM = US 7 with a strand of each quality. Number of stitches must be divisible by 4. Work as follows - work first row as follows from wrong side: 5 stitches in garter stitch, * purl 2, knit 2 *, repeat from **-* until 7 stitches remain, purl 2 and 5 stitches in garter stitch. Work rib like this for 4 cm = 1½", bind off band stitch in each side, continue with rib as before until piece measures 8 cm = 3⅛". Bind off. Fold rib at the top of neck down on inside of garment. Fasten rib to get a double neck edge. To avoid a tight neck edge that sticks out it is important to keep the seam elastic. Sew opening towards mid front together on bands with neat little stitches. Sew buttons on to left front piece. |
||||||||||||||||||||||
Diagram explanations |
||||||||||||||||||||||
|
||||||||||||||||||||||
|
||||||||||||||||||||||
|
||||||||||||||||||||||
|
||||||||||||||||||||||
|
Have you made this or any other of our designs? Tag your pictures in social media with #dropsdesign so we can see them! Do you need help with this pattern?You'll find tutorial videos, a Comments/Questions area and more by visiting the pattern on garnstudio.com. © 1982-2024 DROPS Design A/S. We reserve all rights. This document, including all its sub-sections, has copyrights. Read more about what you can do with our patterns at the bottom of each pattern on our site. |
||||||||||||||||||||||


With over 40 years in knitting and crochet design, DROPS Design offers one of the most extensive collections of free patterns on the internet - translated to 17 languages. As of today we count 304 catalogs and 11422 patterns - 11417 of which are translated into English (US/in).
We work hard to bring you the best knitting and crochet have to offer, inspiration and advice as well as great quality yarns at incredible prices! Would you like to use our patterns for other than personal use? You can read what you are allowed to do in the Copyright text at the bottom of all our patterns. Happy crafting!
Comments / Questions (10)
Bonjour ! , tricoter la tête de manche en allers et retours (à partir du milieu sous la manche) sur aiguille circulaire jusqu’à la fin.Sur le vidéo il sépare les mailles en deux ça veut tu dire selon vous, que je tricote après le fil marqueur 4 m au point mousse et je tricote le reste des mailles en jersey, jusqu à 4 m avant le fil marqueur et je tourne ! . .?ect..merci !
12.04.2024 - 00:59DROPS Design answered:
Bonjour Gaetane, procédez comme dans cette vidéo autrement dit, à la hauteur indiquée, au lieu de continuer en rond, tournez et tricotez alternativement sur l'endroit et sur l'envers à partir du milieu sous la manche jusqu'à la hauteur indiquée pour la longueur totale de la manche. Les manches se tricotent entièrement en jersey après les côtes, autrement dit, vous tricotez maintenant à l'endroit sur l'endroit et à l'envers sur l'envers. Bon tricot!
12.04.2024 - 08:29Bonjour ! Hé bien me suis trompé j ai tricoter l inverse , maintenant je comprends votre point de vue merci 🙏
18.03.2024 - 16:22Bonjour! J ai compris pour les boutonnières merci ! Une question, la bande des boutonnières se tricote en jersey, et l autre côté au point mousse ok mais lorsqu’on remonte 2 m, d un côté, vous dites les tricoter en jersey ces 2 m, mais c est du même côté que les m au point mousse ? Merci
18.03.2024 - 11:22DROPS Design answered:
Bonjour Gaetane, la bordure des devants se tricote au point mousse = ce sont les 8 mailles au point mousse côté ouverture du gilet., mais je ne suis pas bien sûre de comprendre à quel niveau vous en êtes exactement, pouvez-vous préciser si besoin? Merci pour votre compréhension.
18.03.2024 - 15:13Bonjour ! Je suis rendu au devant gauche ok, puis au début on a commencé à faire une boutonnière côté gauche de l épaule ok , alors je ne vois aucune indication lorsqu’on commence devant gauche pour la suite des boutonnières ? On procède comment ? Merci 🙏
16.03.2024 - 11:58DROPS Design answered:
Bonjour Gaetane, les boutonnières doivent être sur la bordure du devant droit (en fin de rang sur l'endroit). Bon tricot!
18.03.2024 - 08:17Bonjour! Concernant les jetés, on tricote cette maille endroit torse sur endroit ,et sur l envers doit-on les tricoter torse envers ou torse endroit? Car torse endroit sûr envers ça fait des ouvertures ( trou) ? Merci 🙏
09.03.2024 - 13:34DROPS Design answered:
Bonjour Gaetane, les jetés des augmentations se tricotent torse au rang suivant pour éviter les trous - cf . veillez à ce que les jetés ne soient pas trop lâches pour que les trous soient plus petits. Bon tricot!
11.03.2024 - 08:05Bonjour! DROPS PUNA de Garnstudio (appartient au groupe de fils B) 550-600-650-700-800-850 g coloris 01, naturel Et: DROPS KID-SILK de Garnstudio (appartient au groupe de fils A) 150-175-175-200-200-225 g coloris 01, naturel Pourquoi 2 groupe de fil ? Peut-on en prendre qu un fil ? Merci
02.03.2024 - 14:14DROPS Design answered:
Bonjour Gaetane, on tricote ici avec les 2 laines: Puna du groupe de fils B et Kid-Silk du groupe de fils A - retrouvez cette combinaison de laines ici; ainsi, vous pouvez utiliser une laine du groupe C, tant que votre tension en largeur et en hauteur est correcte. Bon tricot!
04.03.2024 - 07:56"Jeżeli masz za dużo oczek na 10 cm, użyj większych drutów. Jeżeli masz za dużo oczek na 10 cm, użyj mniejszych drutów. " Dla razy "za dużo" w tym zdaniu.
13.10.2023 - 12:20DROPS Design answered:
Już poprawione. Bardzo dziękuję za wiadomość. Pozdrawiam!
13.10.2023 - 14:00Bonjour. Je suis en train de faire la taille M. Après les 10 augmentations sur l'end du travail et après avoir rabattu les 2 m centrales il reste 192 m. Vous dites que pour le dos il y a 88 m. Dois je mettre 52 m en attente pour le devant et tricoter les 88 m du dos en sachant que les 2 m centrales rabattues feront un trou pour travailler le dos ? Merci pour votre aide
06.07.2023 - 17:48DROPS Design answered:
Bonjour Sylvie, tout est correct. Bon tricot!
15.07.2023 - 20:06Gjelder erme. Står helt på slutten strikk et erme til, regner med at maskene skal felles av etter at erme er ferdigstrikket, står ikke noe om det.
30.05.2023 - 14:47DROPS Design answered:
Hei Mette, Ja, det skal felles av på toppen av ermet. God fornøyelse!
01.06.2023 - 06:39Bonjour, J'aimerais avant de continuer être sûre:. 1) Pour assembler les deux épaules (qui ont été tricotées séparément) il faut d'abord l'épaule gauche puis la droite. Si c'est vraiment ainsi, pourquoi dites vous de mettre les mailles de l'épaule gauche en attente? 2) Sur le diagramme, la légende peut porter à confusion pour les torsades, le trait n'apparaît pas comme sur les dessins. Merci pour vos futures réponses.
10.01.2023 - 12:04DROPS Design answered:
Bonjour Christel, dans ce modèle, il n' y a pas de couture d'épaule à proprement parler, vous commencez par tricoter l'épaule droite en augmentant côté devant (en fin de rang sur l'endroit) ou côté dos (en fin de rang sur l'envers), quand l'épaule droite est terminée, on fait l'épaule gauche en sens inverse et on reprend les mailles ensemble - on aura une couture au milieu dos. Merci pour le symbole, la modification a été faite. Bon tricot!
11.01.2023 - 08:56