DROPS Puna
DROPS Puna
100% Alpaca
from 4.65 $ /50g
DROPS Kid-Silk
DROPS Kid-Silk
75% Mohair, 25% Silk
from 6.75 $ /25g
Get the yarn to make this pattern from 91.65$.

The yarn cost is calculated from the pattern’s smallest size and the yarn’s cheapest product type. Looking for an even better price? You might find it on the DROPS Deals!

DROPS SS24

Snowy Bee

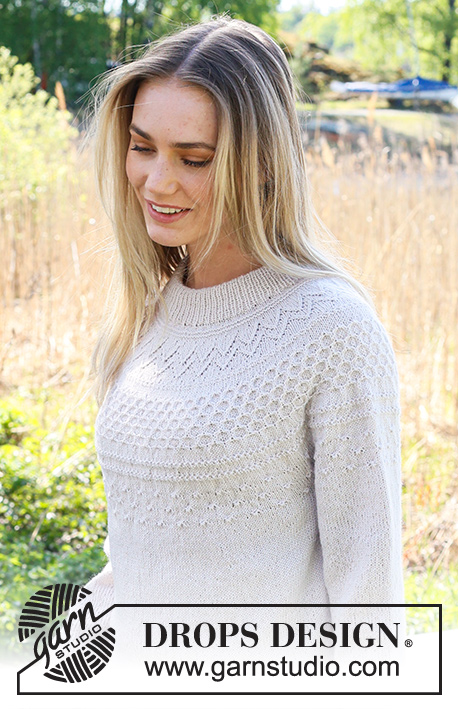
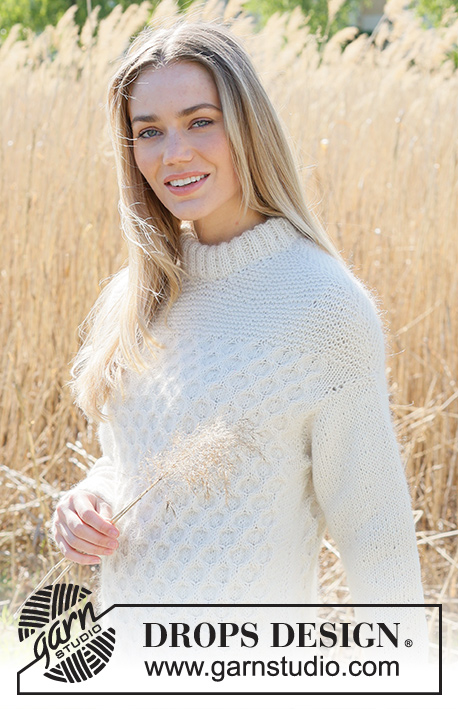
Knitted sweater in DROPS Puna and DROPS Kid-Silk. Piece is knitted top down with honeycomb pattern and garter stitch. Size: S - XXXL

DROPS 237-30
DROPS design: Pattern pu-063
Yarn group B and A
----------------------------------------------------------

SIZE:
S - M - L - XL - XXL – XXXL

Finished measurements:
Chest measurements: 100-108-116-126-138-150 cm = 39 3/8"-42 1/2"-45 3/4"-49 1/2"-54 1/4"-59"
Full length: 58-60-62-64-66-68 cm = 22 3/4"-23 5/8"-24 3/8"-25 1/4"-26"-26 3/4"
All measurements in charts are in cm.

MATERIALS:
DROPS PUNA from Garnstudio (belongs to yarn group B)
550-600-650-700-800-850 g color 01, off white
And use:
DROPS KID-SILK from Garnstudio (belongs to yarn group A)
150-175-175-200-200-225 g color 01, off white

NEEDLES:
DROPS CIRCULAR NEEDLE SIZE 5.5 MM = US 9: Length 40 and 80 cm = 16” and 32”.
DROPS CIRCULAR NEEDLE SIZE 4.5 MM = US 7: Length 40 and 80 cm = 16” and 32”.
DROPS DOUBLE POINTED NEEDLES SIZE 5.5 MM = US 9
DROPS DOUBLE POINTED NEEDLES SIZE 4.5 MM = US 7
DROPS CABLE NEEDLE.
The technique MAGIC LOOP can be used – you then only need circular needle of 80 cm = 32”.

KNITTING GAUGE:
16 stitches in width and 20 rows vertically in stockinette stitch and 1 strand of each quality = 10 x 10 cm = 4” x 4”.
NOTE! Remember that needle size is only a suggestion. If you have too many stitches on 10 cm = 4” switch to larger needles. If you have too few stitches on 10 cm = 4” switch to smaller needles.

-------------------------------------------------------

Alternative Yarn – See how to change yarns here
Yarn Groups A to F – Use the same pattern and change the yarn here
Yarn usage using an alternative yarn – Use our yarn converter here

-------------------------------------------------------

DROPS Puna
DROPS Puna
100% Alpaca
from 4.65 $ /50g
DROPS Kid-Silk
DROPS Kid-Silk
75% Mohair, 25% Silk
from 6.75 $ /25g
Get the yarn to make this pattern from 91.65$.

The yarn cost is calculated from the pattern’s smallest size and the yarn’s cheapest product type. Looking for an even better price? You might find it on the DROPS Deals!

Pattern instructions

NOTE: This pattern is written in American English. All measurements in charts are in cm. For conversion from inches to cm - click here. There are different terms for crocheting in American and British English. If this pattern includes crochet, click for "crochet terms" here. For this pattern in British English, please click here.
----------------------------------------------------------

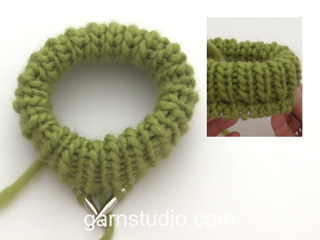
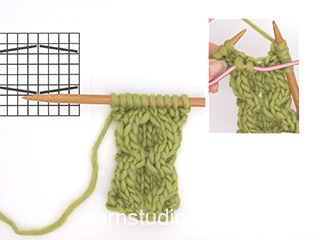
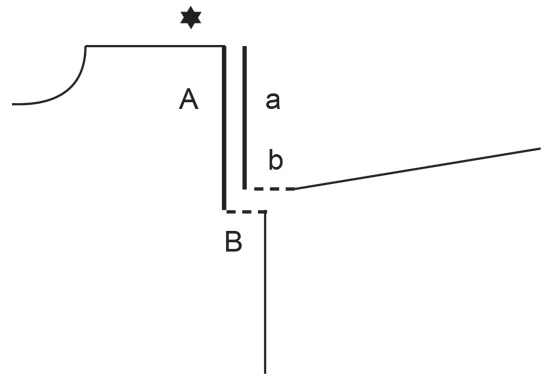
EXPLANATION FOR THE PATTERN:

----------------------------------------------------------

GARTER STITCH (back and forth):
Knit all rows.
1 ridge vertically = knit 2 rows.

GARTER STITCH (worked in the round):
1 ridge vertically = 2 rounds, i.e. knit 1 round and purl 1 round.

PATTERN:
See diagrams A.1 and A.2. Diagrams show all rows in pattern seen from the right side.

INCREASE TIP-1:
Increase by making 1 yarn over on each side of stitch with marker. (middle stitch) On next row/round work yarn overs twisted to avoid hole.

INCREASE TIP-2 (applies to sleeves):
Begin 1 stitch before marker thread, make 1 yarn over, knit 2 (marker thread is between these 2 stitches), make 1 yarn over. On next round knit yarns over twisted to avoid holes.

----------------------------------------------------------

START THE PIECE HERE:

----------------------------------------------------------

SWEATER - SHORT OVERVIEW OF THE PIECE:
Work each shoulder back and forth separately, i.e. work over back piece/front piece at the same time. Cast on new stitches in each side to form a neck line. Put the parts together, and increase stitches on each shoulder. Then divide the piece and finish each part separately. Work sleeves in the round on double pointed needles/a short circular needle, from the bottom up. Then work a neck edge.

LEFT SHOULDER:
Cast on 3 stitches on circular needle size 5.5 MM = US 9 with 1 strand in each quality (2 strands). Insert 1 marker in the middle stitch. Work stitch with marker in stockinette stitch, work the remaining stitches in GARTER STITCH - read explanation above. Work back and forth over these stitches AT THE SAME TIME increase stitches like this:

ROW 1 (= RIGHT SIDE): Increase 1 stitch on each side of middle stitch - read INCREASE TIP-1, and cast on 1 new stitch at the end of row (towards mid back) = 6 stitches.
ROW 2 (= WRONG SIDE): Increase 1 stitch on each side of middle stitch, and cast on 1 new stitch at the end of row (towards mid front) = 9 stitches
Row 3: Increase 1 stitch on each side of middle stitch = 11 stitches.
Row 4: Increase 1 stitch on each side of middle stitch = 13 stitches.

Work these 4 rows 4 more times. For every time these 4 rows are worked, increase 10 stitches. When 20 rows have been worked in total, there are 53 stitches on row in all sizes.

Row 21: Knit 26, increase 1 stitch, work middle stitch, increase 1 stitch, knit 26, cast on 4-5-6-7-8-9 new stitches (neck on back piece) = 59-60-61-62-63-64 stitches.
Row 22: Knit 31-32-33-34-35-36, increase 1 stitch, purl middle stitch, increase 1 stitch, knit 27, cast on 4-5-6-7-8-9 new stitches (neck on front piece) = 65-67-69-71-73-75 stitches. Put piece aside.

RIGHT SHOULDER:
Cast on as left shoulder and work the same way until 20 rows have been worked = 53 stitches.
Row 21: Knit 26, increase 1 stitch as before, work middle stitch, increase 1 stitch as before, knit 26, cast on 4-5-6-7-8-9 new stitches (neck on front piece) = 59-60-61-62-63-64 stitches.
Row 22: Knit 31-32-33-34-35-36, increase 1 stitch as before, purl middle stitch, increase 1 stitch as before, knit 27, cast on 4-5-6-7-8-9 new stitches (neck on back piece) = 65-67-69-71-73-75 stitches.

Work next row as follows - from right side and mid back:
Work from right side over stitches from right shoulder, work stitches from left shoulder on row, AT THE SAME TIME increase 1 stitch on each side of middle stitch as before = 134-138-142-146-150-154 stitches. Continue working in the round over all stitches. Continue with stockinette stitch over stitches with marker, and GARTER STITCH over the remaining stitches - read explanation above. AT THE SAME TIME increase 1 stitch on each side of middle stitch. Increase every other round 9-10-11-12-13-14 times in total = 170-178-186-194-202-210 stitches. There are now 84-88-92-96-100-104 stitches between middle stitch on back piece and front piece.

On next round, bind off both middle stitches. Cut the yarn. Finish each part separately.

BACK PIECE:
= 84-88-92-96-100-104 stitches.
Now work pattern, begin from right side: 6-8-4-6-8-4 stitches in stockinette stitch, work A.1 12-12-14-14-14-16 times, work 6-8-4-6-8-4 stitches in stockinette stitch. When A.1 has been worked 1 time vertically, there are 108-112-120-124-128-136 stitches on needle. Continue with A.2 over every A.1 AT THE SAME TIME when piece measures 4 cm = 1 1/2", decrease 1 stitch in each side, decrease every 3 cm = 1 1/8" 3 times in total, decrease by knitting 2 stitches together inside 1 stitch in each side = 102-106-114-118-122-130 stitches. Work until piece measures 18-19-20-21-22-23 cm = 7"-7 1/2"-8"-8 1/4"-8 3/4"-9" from edge on shoulder (where the shoulder stitches were bind off). Cast on 2-3-4-6-9-12 new stitches at the end of the next 2 rows = 106-112-122-130-140-154 stitches. Work the new stitches in stockinette stitch, continue pattern as before.

Work until piece measures 18-18-19-19-19-20 cm = 7"-7"-7 1/2"-7 1/2"-7 1/2"-8" from where new stitches were cast on. Increase 1-2-1-1-0-1 stitches evenly over the 5-8-5-9-14-13 stitches in each side = 108-116-124-132-140-156 stitches. Switch to circular needle size 4.5 MM = US 7. Now work rib over all stitches as follows from right side: Work 1 edge stitch in garter stitch, * knit 2, purl 2 *, work from *-* until 3 stitches remain, knit 2 and 1 edge stitch in garter stitch. Continue rib like this for 8 cm = 3 1/8". Bind off stitches with knit over knit and purl over purl. Sweater measures approx. 58-60-62-64-66-68 cm = 22 3/4"-23 5/8"-24 3/8"-25 1/4"-26"-26 3/4", measured from the top point on shoulder.

FRONT PIECE:
Work as on back piece.

SLEEVE:
Work sleeves in the round from the bottom up on double pointed needles/a short circular needle.
Cast on 44-44-48-48-52-52 stitches on circular needle size 4.5 MM = US 7 with 1 strand of each quality (2 strands). Knit 1 round, then work rib (knit 2/purl 2). When piece measures 8 cm = 3 1/8", switch to double pointed needles size 5.5 MM = US 9. Insert a marker thread at beginning of round = mid under sleeve. Then work in stockinette stitch. AT THE SAME TIME when piece measures 12 cm = 4 3/4", increase 1 stitch on each side of marker thread - read INCREASE TIP-2. Increase like this every 5-5-4-3½-3-2½ cm = 2"-2"-1 1/2"-1 1/4"-1 1/8"-1" 7-7-8-9-9-10 times in total = 58-58-64-66-70-72 stitches. When sleeve measures 45-45-44-43-40-38 cm = 17 3/4"-17 3/4"-17 1/4"-17"-15 3/4"-15", work sleeve cap back and forth (from mid under sleeve) on circular needle until finished measurements. Work until sleeve measures approx. 46-46-46-46-45-45 cm = 18"-18"-18"-18"-17 3/4"-17 3/4", i.e. there is a vent of 1-1-2-3-5-7 cm = 3/8"-3/8"-3/4"-1 1/8"-2"-2 3/4" at the top of sleeve. Work another sleeve the same way.

ASSEMBLY:
Sew sleeve cap to armhole. Then sew vent at the top of sleeve to bottom of armhole - see chart. Sew side seams inside 1 edge stitch until 8 cm = 3 1/8" remain = vents.

DOUBLE NECK EDGE:
Pick up from right side approx. 80-100 stitches around the neck on sweater on a short circular needle size 4.5 MM = US 7 with a strand of each quality. Number of stitches must be divisible by 4. Work rib (knit 2/purl 2) for 8 cm = 3 1/8". Bind off. Fold rib at the top of neck down on inside of garment. Fasten rib to get a double neck edge. To avoid a tight neck edge that sticks out it is important to keep the seam elastic.

Diagram

All measurements in charts are in cm.

symbols = knit from the right side, purl from the wrong side
symbols = slip 1 stitch on cable needle behind piece, knit 2, knit 2 in stitch from cable needle (= 1 stitch increased)
symbols = slip 2 stitches on cable needle in front of piece, knit 2 in next stitch (= 1 stitch increased), knit 2 from cable needle
symbols = slip 2 stitches on cable needle in front of piece, knit 2, knit 2 from cable needle
symbols = slip 2 stitches on cable needle behind piece, knit 2, knit 2 from cable needle
symbols = sew sleeve cap to armhole as follows: Sew a against A and b against B.
diagram
diagram
diagram

Each of our patterns has specific tutorial videos to help you.

Do you have a question? See a list of frequently asked questions (FAQ)

Knitting tension is what determines the final measurements of your work, and is usually measured per 10 x 10 cm. It is provided like so: number of stitches in width x number of rows in height - eg: 19 stitches x 26 rows = 10 x 10 cm.

The knitting tension is very individual; some people knit/crochet loosely while others work tightly. You adjust the knitting tension with the needle size, which is why the suggested needle size only serve as a guide! You need to adjust this (up or down) to ensure that YOUR knitting tension matches the knitting tension provided in the pattern. If you work with a different knitting tension than provided you will have a different yarn consumption, and your work will have different measurements than what the pattern suggests.

The knitting tension also determines which yarns can replace each other. As long as you achieve the same knitting tension you can replace one yarn with another.

See DROPS lesson: How to measure your tension/gauge

See DROPS video: How to make a gauge tension swatch

The required amount of yarn is provided in grams, eg: 450 g. To calculate how many balls you’ll need you first need to know how many grams are in 1 ball (25g, 50g or 100g). This information is available if you click on the individual yarn quality on our pages. Divide the amount required with the amount of each ball. For example, if each ball is 50g (the most common amount), the calculation will be as follows: 450 / 50 = 9 balls.

The important thing when changing from one yarn to another is that the knitting/crochet tension remains the same. This is so that the measurements of the finished piece will be the same as on the sketch provided. It is easier to achieve the same knitting tension using yarns from the same yarn group. It is also possible to work with multiple strands of a thinner yarn to achieve the knitting tension of a thicker one. Please try our yarn converter. We recommend you to always work a test swatch.

Please NOTE: when changing yarn the garment might have a different look and feel to the garment in the photo, due to individual properties and qualities of each yarn.

See DROPS lesson: Can I use a different yarn than the one mentioned in the pattern?

All our yarns are categorised into yarn groups (from A to F) according to thickness and knitting tension – group A contains the thinnest yarns and group F the thickest. This makes it easier for you to find alternative yarns to our patterns, should you wish to switch yarn. All yarns within the same group have a similar knitting tension and can easily replace each other. However, different yarn qualities have different structures and properties which will give the finished work a unique look and feel.

Click here for an overview of the yarns in each yarn group

At the top of all our patterns you’ll find a link to our yarn converter, which is a helpful tool should you wish to use a different yarn than suggested. By filling in the yarn quality you wish to replace, the amount (in your size) and number of strands, the converter will present good alternative yarns with the same knitting tension. Additionally it will tell you how much you’ll require in the new qualities and whether you’ll need to work with multiple strands. Most skeins are 50g (some are 25g or 100g).

If the pattern is worked with multiple colours, every colour will have to be converted separately. Similarly, if the pattern is worked with several strands of different yarns (for example 1 strand Alpaca and 1 strand Kid-Silk) you will have to find alternatives for each, individually.

Click here to see our yarn converter

Since different yarns have different qualities and textures we have chosen to keep the original yarn in our patterns. However, you can easily find options among our available qualities by using our yarn converter, or simply pick a yarn from the same yarn group.

It is possible that some retailers still have discontinued yarns in stock, or that someone has a few skeins at home that they would like to find patterns for.

The yarn converter will provide both alternative yarn as well as required amount in the new quality.

If you think it's hard to decide what size to make, it can be a good idea to measure a garment you own already and like the size of. Then you can pick the size by comparing those measures with the ones available in the pattern's size chart.

You'll find the size chart at the bottom of the pattern.

See DROPS lesson: How to read size chart

The needle size provided in the pattern serves only as a guide, the important thing is to follow the knitting tension. And since knitting tension is very individual, you will have to adjust the needle size to ensure that YOUR tension is the same as in the pattern – maybe you’ll have to adjust 1, or even 2 needle sizes, up or down to achieve the correct tension. For this, we recommend that you work test swatches.

Should you work with a different knitting tension than the one provided, the measurements of the finished garment might deviate from the measurement sketch.

See DROPS lesson: How to measure your tension/gauge

See DROPS video: How to make a gauge tension swatch

Working a garment top-down provides more flexibility and room for personal adjustment. For example it is easier to try the garment on while working, as well as making adjustments to length of yoke and shoulder caps.

The instructions are carefully explaining every step, in the correct order. Diagrams are adjusted to the knitting direction and are worked as usual.

The diagram depicts all rows/rounds, and every stitch seen from the right side. It is read from bottom to top, from right to left. 1 square = 1 stitch.

When working back and forth, every other row is worked from the right side and every other row is worked from the wrong side. When working from the wrong side, the diagram will have to be worked reversed: from left to right, knit stitches are purled, purl stitches are knit etc.

When working in the round every round is worked from the right side and the diagram are worked from right to left on all rounds.

See DROPS lesson: How to read knitting diagrams

The diagram depicts all rows/rounds, and every stitch seen from the right side. It is worked from bottom to top, from right to left.

When working back and forth every other row is worked from the right side: from right to left and every other row is worked from the wrong side: from left to right.

When working in the round, every row in the diagram are worked from the right side, from right to left.

When working a circular diagram you start in the middle and work your way outwards, counter clockwise, row by row.

The rows usually start with a given number of chain stitches (equivalent to the height of the following stitch), this will either be depicted in the diagram or explained in the pattern.

See DROPS lesson: How to read crochet diagrams

Instructions for working several diagrams after each other on the same row/round, will often be written like so: “work A.1, A.2, A.3 a total of 0-0-2-3-4 times". This means you work A.1 once, then A.2 is worked once, and A.3 is repeated (in width) the number of times provided for your size – in this case like so: S = 0 times, M = 0 times, L=2 times, XL= 3 times and XXL = 4 times.

The diagrams are worked as usual: begin with the first row in A.1, then work the first row in A.2 etc.

See DROPS lesson: How to read knitting diagrams

See DROPS lesson: How to read crochet diagrams

The total width of the garment (from wrist-to-wrist) will be larger in the larger sizes, despite the actual sleeves being shorter. The larger sizes have longer sleeve caps and wider shoulders, so there will be a good fit in all sizes.

The measurement sketch/schematic drawing provides information regarding the full length of the garment. If it’s a jumper or a jacket the length is measured from the highest point on the shoulder (usually closest to the neckline), and straight down to the bottom of the garment. It is NOT measured from the tip of shoulder. Similarly, the length of yoke is measured from the highest point on the shoulder and down to where yoke is split into body and sleeves.

See DROPS lesson: How to read a schematic drawing

Diagrams are often repeated on the round or in height. 1 repeat is the diagram the way it appears in the pattern. If it says to work 5 repeats of A.1 in the round, then you work A.1 a total of 5 times after/next to each other in the round. If it says to work 2 repeats of A.1 vertically/in height you work the entire diagram once, then begin again at the start and work the entire diagram one more time.

Chain stitches are slightly narrower than other stitches and to avoid working the cast-on edge too tight, we simply chain more stitches to begin with. The stitch count will be adjusted on the following row to fit the pattern and measurement sketch.

The rib edge is more elastic and will contract slightly compared to, for example, stocking stitch. By increasing before the rib edge, you avoid a visible difference in width between the rib edge and the rest of the body.

It’s very easy to cast off too tightly, and by making yarn overs while casting off (and simultaneously casting these off) you avoid a too tight cast off edge.

See DROPS video: How to bind off with yarn overs (yo)

To achieve an even increase (or decrease) you can increase on, for example: every 3rd and 4th row alternately, like so: work 2 rows and increase on the 3rd row, work 3 rows and increase on the 4th. Repeat this until the increase is complete.

See DROPS lesson: Increase or decrease 1 st on every 3rd and 4th row alternately

Should you prefer to work in the round instead of back and forth, you may of course adjust the pattern. You’ll need to add steeks mid-front (usually 5 stitches), and follow the instructions. When you would normally turn and work from the wrong side, simply work across the steek and continue in the round. At the end you’ll cut the piece open, pick up stitches to work bands, and cover the cut edges.

See DROPS video: How to knit steeks and cut open

Should you prefer to work back and forth instead of in the round, you may of course adjust the pattern so you work the pieces separately and then assemble them at the end. Divide the stitches for the body in 2, add 1 edge stitch in each side (for sewing) and work the front and back pieces separately.

See DROPS lesson: Can I adapt a pattern for circular needles into straight needles?

Pattern repeats can vary slightly in the different sizes, in order to get the correct proportions. If you’re not working the exact same size as the garment in the photo, yours might deviate slightly. This has been carefully developed and adjusted so that the complete impression of the garment is the same in all sizes.

Make sure to follow instructions and diagrams for your size!

If you have found a pattern you like which is available in women’s size it’s not very difficult to convert it to men’s size. The biggest difference will be the length of sleeves and body. Start working on the women size that you think would fit across the chest. The additional length will be worked right before you cast off for the armhole/sleeve cap. If the pattern is worked top-down you can add the length right after the armhole or before the first decrease on sleeve.

Regarding additional yarn amount, this will depend on how much length you add, but it is better with a skein too many than too few.

All yarns will have excess fibres (from production) that might come off as lint or shedding. Brushed yarns (ie hairier yarns) have more of these loose, excess fibres, causing more shedding.

Shedding also depends on what is worn under or over the garment, and whether this pulls at the yarn fibres. It’s therefore not possible to guarantee that there will be no shedding

Below are some tips on how to get the best result when working with hairier yarns:

1. When the garment is finished (before you wash it) shake it vigorously so the looser hairs come off. NOTE: do NOT use a lint roller, brush or any method that pulls at the yarn.

2. Place the garment in a plastic bag and put it in your freezer - the temperature will cause the fibres to become less attached to each other, and excess fibres will come off easier.

3. Leave in the freezer for a few hours before taking it out and shaking it again.

4. Wash the garment according to the instructions on the yarn label.

Pilling is a natural process that happens to even the most exclusive of fibers. It's a natural sign of wear and tear that is hard to avoid, and that is most visible in high friction areas of your garment like a sweater's arms and cuffs.

You can make your garment look as new by removing the pilling, using a fabric comb or a pill/lint remover.

Still can't find the answer you need? Then scroll down and leave your question so one of our experts can try to help you. This will be done normally within 5 to 10 working days.
In the meantime, you can read the questions and answers that others have left to this pattern or join the DROPS Workshop on Facebook to get help from fellow knitters/crocheters!

You might also like...

Post a comment to pattern DROPS 237-30

We would love to hear what you have to say about this pattern!

If you want to leave a question, please make sure you select the correct category in the form below, to speed up the answering process. Required fields are marked *.

Comments / Questions (4)

country flag Claudia wrote:

Guten Tag, wenn ich diesen Pullover nur mit Alpaca Puno stricken möchte, wieviel Gramm mehr benötige ich da zusätzlich? Danke + MfG

14.12.2022 - 13:48

DROPS Design answered:

Liebe Claudia, bei diesem Modell stricken Sie am Besten Puna und Kid-Silk zusammen, sonnst wird Ihre Maschenprobe nicht stimmen. Hier finden Sie alle Pullover, die, mit nur Puna stricken können (Garnumrechner benutzen, wenn nötig wird). Viel Spaß beim stricken!

14.12.2022 - 15:51

country flag Heidi wrote:

Hallo, kan ik deze trui ook in 1 soort garen breien? Welk garen kan ik dan kiezen en hoeveel heb ik dan nodig?

25.11.2022 - 15:41

country flag Minke wrote:

Hoe wordt de mouwkop gebreid? Ik vind dit niet terug in de beschrijving.

19.10.2022 - 18:02

DROPS Design answered:

Dag Minke,

Je breit geen ronding als mouwkop, het is alleen zo dat je een split breit midden onder de mouw. Deze split wordt in het armsgat genaaid. (Zie ook de maattekening onderaan het patroon.) Je breit dus nog een stukje heen en weer (in plaats van in de rondte) voor de 'mouwkop'

19.10.2022 - 19:50

country flag Pia wrote:

Älskar den här. Fint mönster, rolig att sticka då den varierar med olika tekniker.

07.08.2022 - 09:18