DROPS Soft Tweed
DROPS Soft Tweed
50% Wool, 25% Alpaca, 25% Viscose
from 22.00 RON /50g
DROPS Kid-Silk
DROPS Kid-Silk
75% Mohair, 25% Silk
from 25.00 RON /25g
Get the yarn to make this pattern from 332.00RON.

The yarn cost is calculated from the pattern’s smallest size and the yarn’s cheapest product type. Looking for an even better price? You might find it on the DROPS Deals!

DROPS SS24

Sweet Weekend

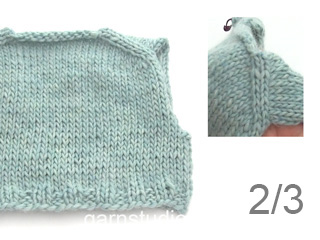
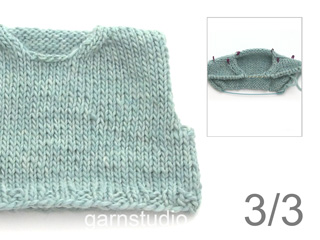
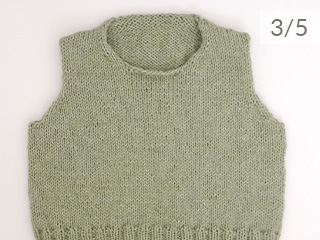
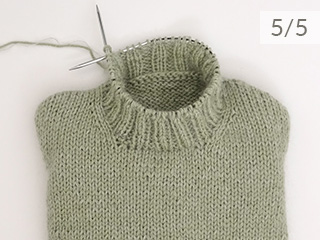
Knitted jumper in 1 strand DROPS Soft Tweed and 2 strands DROPS Kid-Silk. The piece is worked top down with stocking stitch, European shoulder / diagonal shoulders and high neck. Sizes S - XXXL.

DROPS 237-2
DROPS Design: Pattern st-026
Yarn group B + A + A
-------------------------------------------------------

SIZES:
S - M - L - XL - XXL - XXXL

MATERIALS:
DROPS SOFT TWEED from Garnstudio (belongs to yarn group B)
300-350-350-400-450-500 g colour 02, marzipan
DROPS KID-SILK from Garnstudio (belongs to yarn group A)
100-100-125-125-150-150 g colour 40, pink pearl
DROPS KID-SILK from Garnstudio (belongs to yarn group A)
100-100-125-125-150-150 g colour 41, powder

NEEDLES:
DROPS CIRCULAR NEEDLE SIZE 7 MM: Length 40 cm and 80 cm.
DROPS CIRCULAR NEEDLE SIZE 6 MM: Length 40 cm and 80 cm.
DROPS DOUBLE POINTED NEEDLES SIZE 7 MM.
DROPS DOUBLE POINTED NEEDLES SIZE 6 MM.
The technique MAGIC LOOP can be used – you then only need circular needle of 80 cm in each size.

KNITTING TENSION:
14 stitches in width and 17 rows in height with stocking stitch and 3 strands = 10 x 10 cm.
NOTE: Needle size is only a guide. If you get too many stitches on 10 cm, change to a larger needle size. If you get too few stitches on 10 cm, change to a smaller needle size.

-------------------------------------------------------

Alternative Yarn – See how to change yarns here
Yarn Groups A to F – Use the same pattern and change the yarn here
Yarn usage using an alternative yarn – Use our yarn converter here

-------------------------------------------------------

DROPS Soft Tweed
DROPS Soft Tweed
50% Wool, 25% Alpaca, 25% Viscose
from 22.00 RON /50g
DROPS Kid-Silk
DROPS Kid-Silk
75% Mohair, 25% Silk
from 25.00 RON /25g
Get the yarn to make this pattern from 332.00RON.

The yarn cost is calculated from the pattern’s smallest size and the yarn’s cheapest product type. Looking for an even better price? You might find it on the DROPS Deals!

Pattern instructions

-------------------------------------------------------

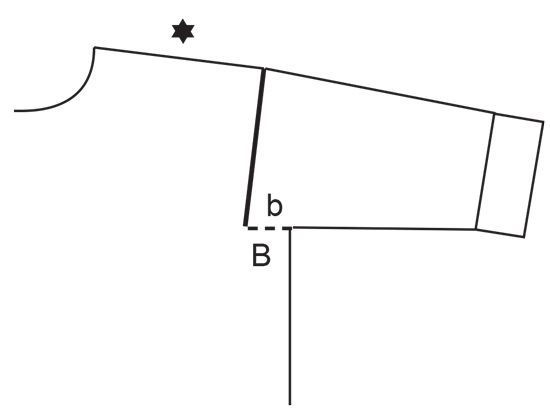
EXPLANATIONS FOR THE PATTERN:
-------------------------------------------------------

INCREASE TIP FROM THE RIGHT SIDE:
Increase towards the left AFTER MARKER:
Use left needle to pick up thread between 2 stitches from row below, pick up thread from front and knit stitch in back loop.
Increase towards the right BEFORE MARKER:
Use left needle to pick up thread between 2 stitches from row below, pick up thread from behind and knit stitch in front loop.

INCREASE TIP FROM THE WRONG SIDE:
Increase towards the left AFTER MARKER:
Use left needle to pick up thread between 2 stitches from row below, pick up thread from behind and purl stitch in front loop.
Increase towards the right BEFORE MARKER:
Use left needle to pick up thread between 2 stitches from row below, pick up thread from front and purl stitch in back loop.

DECREASE TIP (for sleeves):
Decrease 1 stitch on either side of the marker as follows: Work until there are 3 stitches left before the marker, knit 2 together, knit 2 (marker sits between these 2 stitches), slip 1 stitch as if to knit, knit 1 and pass the slipped stitch over the knitted stitch.

-------------------------------------------------------

START THE PIECE HERE:

-------------------------------------------------------

JUMPER – SHORT OVERVIEW OF THE PIECE:
The back piece is worked back and forth with circular needle, top down until the armholes are finished. Stitches are knitted up on each shoulder and increased for the neck, then the front piece is worked back and forth with circular needle, top down until the armholes are finished.
The front and back pieces are joined and the body continued in the round with circular needle. Stitches are knitted up around the armholes, the sleeve-cap is worked back and forth then the rest of the sleeve is worked in the round with short circular needle/double pointed needles. The neck is worked in the round to finish.

BACK PIECE:
Cast on 26-28-28-30-32-32 stitches with circular needle size 7 mm and 1 strand DROPS Soft Tweed and 2 strands DROPS Kid-Silk (3 strands).
Purl 1 row from the wrong side.
Insert 1 marker inside 3 stitches on each side. The markers should sit inside the 3 outermost stitches on every row onwards.
Work stocking stitch back and forth.
AT THE SAME TIME increase AFTER the marker at the beginning of the first row from the right side) and BEFORE the marker at the end of the row – read INCREASE TIP FROM THE RIGHT SIDE.
On the next row (wrong side) increase in the same way – read INCREASE TIP FROM THE WRONG SIDE.
Increase from both the right and wrong side a total of 26-28-30-32-32-34 times. After the last increase there are 78-84-88-94-96-100 stitches.
The piece is measured from here!
Continue with stocking stitch until the piece measures 15-15-16-17-18-19 cm (measured outermost along the armhole). Cut the yarn, lay the piece to one side on a thread or on an extra needle and work the front piece.

FRONT PIECE:
Start with the left shoulder (when the garment is worn).
Knit up 26-28-30-32-32-34 stitches along the left shoulder on the back piece, inside the outermost stitch (i.e. knit up 1 stitch in each row along the top). Work stocking stitch back and forth for 5 cm. Now increase for the neck after the first 3 stitches at the beginning of each row from the right side – remember INCREASE TIP FROM THE RIGHT SIDE: Increase 1 stitch 4 times = 30-32-34-36-36-38 stitches. Purl 1 row from the wrong side. Cut the yarn, lay the piece to one side on a thread or an extra needle. Work the right shoulder as follows:

Knit up 26-28-30-32-32-34 stitches along the right shoulder on the back piece, inside the outermost stitch. Work stocking stitch back and forth for 5 cm. Now increase for the neck before the last 3 stitches at the end of each row from the right side – remember INCREASE TIP FROM THE RIGHT SIDE: Increase 1 stitch 4 times = 30-32-34-36-36-38 stitches. Purl back from the wrong side after the last increase.
Work as follows from the right side: Knit the 30-32-34-36-36-38 stitches from the right front piece, cast on 18-20-20-22-24-24 stitches for the neck and knit the 30-32-34-36-36-38 stitches from the left front piece = 78-84-88-94-96-100 stitches.
Work stocking stitch back and forth until the piece measures 23-25-26-27-28-29 cm down the armhole.

BODY:
Work the 78-84-88-94-96-100 stitches from the front piece, cast on 4-6-8-8-14-18 at the end of the row (side), work the 78-84-88-94-96-100 stitches from the back piece, cast on 4-6-8-8-14-18 stitches at the end of the row = 164-180-192-204-220-236 stitches.
Work stocking stitch in the round until the piece measures 48-50-52-54-56-58 cm, from the highest point on the front shoulder. Change to circular needle size 6 mm. Knit 1 round and increase 16-16-16-16-20-20 stitches evenly spaced = 180-196-208-220-240-256 stitches. Work rib (knit 2, purl 2) for 10 cm. Cast off. The jumper measures approx. 58-60-62-64-66-68 cm, measured from the top of the shoulder.

LEFT SLEEVE:
Use circular needle size 7 mm, 1 strand DROPS Soft Tweed and 2 strands DROPS Kid-Silk (3 strands). Knit up from the right side 33-35-36-38-40-41 stitches from the bottom of the armhole and up the front piece to the shoulder, then 21-21-22-24-24-27 stitches down the back piece to the bottom of the armhole = 54-56-58-62-64-68 stitches. Insert 1 marker in the middle of the row – the sleeve is measured from this marker.
Work stocking stitch back and forth for 1-2-3-3-4-6 cm.
Now join the sleeve using circular needle/double pointed needles size 7 mm. Insert 1 marker at the beginning of the round (mid-under sleeve). Allow the marker to follow your work onwards.
Start at the marker and work stocking stitch in the round until the sleeve measures 4-4-4-4-5-7 cm, now decrease 2 stitches mid-under the sleeve – read DECREASE TIP.
Decrease like this every 5-5-5-4-4-3 cm a total of 6-6-6-7-7-8 times = 42-44-46-48-50-52 stitches.
Continue working until the sleeve measures 34-34-34-33-33-33 cm from the marker. There is 10 cm left. Try the jumper on and work to desired length. Knit 1 round and increase 2-4-2-4-2-4 stitches evenly spaced = 44-48-48-52-52-56 stitches. Change to double pointed needles size 6 mm. Work rib (knit 2, purl 2) for 10 cm. Cast off a little loosely. The sleeve measures approx. 44-44-44-43-43-43 cm from the marker.

RIGHT SLEEVE:
Work the in the same way as the left sleeve, but knit up 21-21-22-24-24-27 stitches from the bottom of the armhole up the back piece and 33-35-36-38-40-41 stitches from the shoulder down the front piece to the bottom of the armhole. Sew the bottom of the armhole together – see sketch.

NECK:
Start on one shoulder and knit up from the right side, inside the 1 edge stitch, 68 to 84 stitches using short circular needle size 6 mm and 3 strands. The stitch-number should be divisible by 4. Work rib in the round (knit 2, purl 2) for 22-22-22-24-24-24 cm. Cast off a little loosely.

Diagram

symbols = Sew the bottom of the armhole together: Sew b to B
diagram
diagram

Each of our patterns has specific tutorial videos to help you.

Do you have a question? See a list of frequently asked questions (FAQ)

Knitting tension is what determines the final measurements of your work, and is usually measured per 10 x 10 cm. It is provided like so: number of stitches in width x number of rows in height - eg: 19 stitches x 26 rows = 10 x 10 cm.

The knitting tension is very individual; some people knit/crochet loosely while others work tightly. You adjust the knitting tension with the needle size, which is why the suggested needle size is only meant as a guide! You need to adjust this (up or down) to ensure that YOUR knitting tension matches the knitting tension provided in the pattern. If you work with a different knitting tension than provided you will have a different yarn consumption, and your work will have different measurements than what the pattern suggests.

The knitting tension also determines which yarns can replace each other. As long as you achieve the same knitting tension you can replace one yarn with another.

See DROPS lesson: How to measure your tension/gauge

See DROPS video: How to make a gauge tension swatch

The required amount of yarn is provided in grams, eg: 450 g. To calculate how many balls you’ll need you first need to know how many grams are in 1 ball (25g, 50g or 100g). This information is available if you click on the individual yarn quality on our pages. Divide the amount required with the amount of each ball. For example, if each ball is 50g (the most common amount), the calculation will be as follows: 450 / 50 = 9 balls.

The important thing when changing from one yarn to another is that the knitting/crochet tension remains the same. This is so that the measurements of the finished piece will be the same as on the sketch provided. It is easier to achieve the same knitting tension using yarns from the same yarn group. It is also possible to work with multiple strands of a thinner yarn to achieve the knitting tension of a thicker one. Please try our yarn converter. We recommend you to always work a test swatch.

Please NOTE: when changing yarn the garment might have a different look and feel to the garment in the photo, due to individual properties and qualities of each yarn.

See DROPS lesson: Can I use a different yarn than the one mentioned in the pattern?

All our yarns are categorised into yarn groups (from A to F) according to thickness and knitting tension – group A contains the thinnest yarns and group F the thickest. This makes it easier for you to find alternative yarns to our patterns, should you wish to switch yarn. All yarns within the same group have a similar knitting tension and can easily replace each other. However, different yarn qualities have different structures and properties which will give the finished work a unique look and feel.

Click here for an overview of the yarns in each yarn group

At the top of all our patterns you’ll find a link to our yarn calculator, which is a helpful tool should you wish to use a different yarn than suggested. By filling in the yarn quality you wish to replace, the amount (in your size) and number of strands, the calculator will present good alternative yarns with the same knitting tension. Additionally it will tell you how much you’ll require in the new qualities and whether you’ll need to work with multiple strands. Most skeins are 50g (some are 25g or 100g).

If the pattern is worked with multiple colours, every colour will have to be calculated separately. Similarly, if the pattern is worked with several strands of different yarns (for example 1 strand Alpaca and 1 strand Kid-Silk) you will have to find alternatives for each, individually.

Click here to see our yarn calculator

Since different yarns have different qualities and textures we have chosen to keep the original yarn in our patterns. However, you can easily find options among our available qualities by using our yarn calculator, or simply pick a yarn from the same yarn group.

It is possible that some retailers still have discontinued yarns in stock, or that someone has a few skeins at home that they would like to find patterns for.

The yarn calculator will provide both alternative yarn as well as required amount in the new quality.

If you think it's hard to decide what size to make, it can be a good idea to measure a garment you own already and like the size of. Then you can pick the size by comparing those measures with the ones available in the pattern's size chart.

You'll find the size chart at the bottom of the pattern.

See DROPS lesson: How to read size chart

The needle size provided in the pattern serves only as a guide, the important thing is to follow the knitting tension. And since knitting tension is very individual, you will have to adjust the needle size to ensure that YOUR tension is the same as in the pattern – maybe you’ll have to adjust 1, or even 2 needle sizes, up or down to achieve the correct tension. For this, we recommend that you work test swatches.

Should you work with a different knitting tension than the one provided, the measurements of the finished garment might deviate from the measurement sketch.

See DROPS lesson: How to measure your tension/gauge

See DROPS video: How to make a tension/gauge swatch

Working a garment top-down provides more flexibility and room for personal adjustment. For example it is easier to try the garment on while working, as well as making adjustments to length of yoke and shoulder caps.

The instructions are carefully explaining every step, in the correct order. Diagrams are adjusted to the knitting direction and are worked as usual.

The diagram depicts all rows/rounds, and every stitch seen from the right side. It is read from bottom to top, from right to left. 1 square = 1 stitch.

When working back and forth, every other row is worked from the right side and every other row is worked from the wrong side. When working from the wrong side, the diagram will have to be worked reversed: from left to right, knit stitches are purled, purl stitches are knit etc.

When working in the round every round is worked from the right side and the diagram are worked from right to left on all rounds.

See DROPS lesson: How to read knitting diagrams

The diagram depicts all rows/rounds, and every stitch seen from the right side. It is worked from bottom to top, from right to left.

When working back and forth every other row is worked from the right side: from right to left and every other row is worked from the wrong side: from left to right.

When working in the round, every row in the diagram are worked from the right side, from right to left.

When working a circular diagram you start in the middle and work your way outwards, counter clockwise, row by row.

The rows usually start with a given number of chain stitches (equivalent to the height of the following stitch), this will either be depicted in the diagram or explained in the pattern.

See DROPS lesson: How to read crochet diagrams

Instructions for working several diagrams after each other on the same row/round, will often be written like so: “work A.1, A.2, A.3 a total of 0-0-2-3-4 times". This means you work A.1 once, then A.2 is worked once, and A.3 is repeated (in width) the number of times provided for your size – in this case like so: S = 0 times, M = 0 times, L=2 times, XL= 3 times and XXL = 4 times.

The diagrams are worked as usual: begin with the first row in A.1, then work the first row in A.2 etc.

See DROPS lesson: How to read knitting diagrams

See DROPS lesson: How to read crochet diagrams

The total width of the garment (from wrist-to-wrist) will be larger in the larger sizes, despite the actual sleeves being shorter. The larger sizes have longer sleeve caps and wider shoulders, so there will be a good fit in all sizes.

The measurement sketch/schematic drawing provides information regarding the full length of the garment. If it’s a jumper or a jacket the length is measured from the highest point on the shoulder closest to the neckline, and straight down to the bottom of the garment. It is NOT measured from the tip of shoulder. Similarly, the length of yoke is measured from the highest point on the shoulder and down to where yoke is split into body and sleeves.

On a jacket measures are never taken along bands, unless specifically stated. Always measure inside band stitches when measuring the length.

See DROPS lesson: How to read a schematic drawing

Diagrams are often repeated on the round or in height. 1 repeat is the diagram the way it appears in the pattern. If it says to work 5 repeats of A.1 in the round, then you work A.1 a total of 5 times after/next to each other in the round. If it says to work 2 repeats of A.1 vertically/in height you work the entire diagram once, then begin again at the start and work the entire diagram one more time.

Chain stitches are slightly narrower than other stitches and to avoid working the cast-on edge too tight, we simply chain more stitches to begin with. The stitch count will be adjusted on the following row to fit the pattern and measurement sketch.

The rib edge is more elastic and will contract slightly compared to, for example, stocking stitch. By increasing before the rib edge, you avoid a visible difference in width between the rib edge and the rest of the body.

It’s very easy to cast off too tightly, and by making yarn overs while casting off (and simultaneously casting these off) you avoid a too tight cast off edge.

See DROPS video: How to bind off with yarn overs (yo)

To achieve an even increase (or decrease) you can increase on, for example: every 3rd and 4th row alternately, like so: work 2 rows and increase on the 3rd row, work 3 rows and increase on the 4th. Repeat this until the increase is complete.

See DROPS lesson: Increase or decrease 1 st on every 3rd and 4th row alternately

Should you prefer to work in the round instead of back and forth, you may of course adjust the pattern. You’ll need to add steeks mid-front (usually 5 stitches), and follow the instructions. When you would normally turn and work from the wrong side, simply work across the steek and continue in the round. At the end you’ll cut the piece open, pick up stitches to work bands, and cover the cut edges.

See DROPS video: How to knit steeks and cut open

Should you prefer to work back and forth instead of in the round, you may of course adjust the pattern so you work the pieces separately and then assemble them at the end. Divide the stitches for the body in 2, add 1 edge stitch in each side (for sewing) and work the front and back pieces separately.

See DROPS lesson: Can I adapt a pattern for circular needles into straight needles?

Pattern repeats can vary slightly in the different sizes, in order to get the correct proportions. If you’re not working the exact same size as the garment in the photo, yours might deviate slightly. This has been carefully developed and adjusted so that the complete impression of the garment is the same in all sizes.

Make sure to follow instructions and diagrams for your size!

If you have found a pattern you like which is available in women’s size it’s not very difficult to convert it to men’s size. The biggest difference will be the length of sleeves and body. Start working on the women size that you think would fit across the chest. The additional length will be worked right before you cast off for the armhole/sleeve cap. If the pattern is worked top-down you can add the length right after the armhole or before the first decrease on sleeve.

Regarding additional yarn amount, this will depend on how much length you add, but it is better with a skein too many than too few.

All yarns will have excess fibres (from production) that might come off as lint or shedding. Brushed yarns (ie hairier yarns) have more of these loose, excess fibres, causing more shedding.

Shedding also depends on what is worn under or over the garment, and whether this pulls at the yarn fibres. It’s therefore not possible to guarantee that there will be no shedding

Below are some tips on how to get the best result when working with hairier yarns:

1. When the garment is finished (before you wash it) shake it vigorously so the looser hairs come off. NOTE: do NOT use a lint roller, brush or any method that pulls at the yarn.

2. Place the garment in a plastic bag and put it in your freezer - the temperature will cause the fibres to become less attached to each other, and excess fibres will come off easier.

3. Leave in the freezer for a few hours before taking it out and shaking it again.

4. Wash the garment according to the instructions on the yarn label.

Pilling is a natural process that happens to even the most exclusive of fibers. It's a natural sign of wear and tear that is hard to avoid, and that is most visible in high friction areas of your garment like a sweater's arms and cuffs.

You can make your garment look as new by removing the pilling, using a fabric comb or a pill/lint remover.

Still can't find the answer you need? Then scroll down and leave your question so one of our experts can try to help you. This will be done normally within 5 to 10 working days.
In the meantime, you can read the questions and answers that others have left to this pattern or join the DROPS Workshop on Facebook to get help from fellow knitters/crocheters!

You might also like...

Sweet Weekend

Edyta, Poland

Sweet Weekend

Silke, Netherlands

Sweet Weekend

Clarissa

Sweet Weekend

knitwerka, Poland

Post a comment to pattern DROPS 237-2

We would love to hear what you have to say about this pattern!

If you want to leave a question, please make sure you select the correct category in the form below, to speed up the answering process. Required fields are marked *.

Comments / Questions (52)

country flag Weronika wrote:

Dzień dobry, jaki rozmiar ma na sobie modelka że zdjęcia?

15.10.2022 - 20:21

DROPS Design answered:

Witaj Weroniko, modelka na zdjęciu nosi rozmiar S lub M. Zobacz kurs DROPS TUTAJ, jak wybrać dla siebie odpowiedni rozmiar. Pozdrawiamy!

17.10.2022 - 08:19

country flag Birgit Büscher wrote:

Guten Tag, ich würde den Pullover gerne mit Rollkragen Stricken, geht das? Wenn ja, wie gehe Ichform. Vielen Dank für Ihre Mühe Birgit

11.10.2022 - 14:59

DROPS Design answered:

Liebe Frau Büscher, diese Anleitung enthält einen Rollkragen, wenn Sie ihn aber noch länger möchten, stricken Sie einfach länger - den Pullover können Sie dann anziehen um die Länge vom Kragen anzupassen. Viel Spaß beim stricken!

11.10.2022 - 16:03

country flag Anita wrote:

Holder på med denne nå, og blir veldig usikker på hvor øverst på skulderen er -i forhold til hvor lang den skal strikkes?

09.10.2022 - 21:35

DROPS Design answered:

Hei Anita, Du måler fra toppen av skulderen (ved siden av halsen), hvor skulderen er høyest. God fornøyelse!

10.10.2022 - 06:48

country flag Laurence wrote:

Bonjour, il me manque un élément de précision s'il vous plait: Devant, dernière ligne "tricotez en jersey en AR jusqu'à ce que l'ouvrage mesure 26cm (pour ma taille) le long de l'emmanchure": quel est le point de départ de la mesure, à partir de ce rang ou à partir du haut de l'emmanchure du devant? Merci par avance pour votre retour.

07.10.2022 - 09:37

DROPS Design answered:

Bonjour Laurence, mesurez sur le côté, le long de l'emmanchure devant, c'est à partir des mailles relevées sur le côté, mais bien le long de ce côté (pas niveau encolure ni au milieu). Bon tricot!

07.10.2022 - 13:52

country flag Inese wrote:

I want to knit the same sweater from Drops Andes or Wish yarn, what stitches calculation should I do please?

06.10.2022 - 10:40

DROPS Design answered:

Dear Ineses, this pattern cannot be worked with a yarn group E such as Andes or Wish, you will have to work with a yarn group D such as Melody - see other possible combinations for 14 sts = 10 cm here. Read more about alternatives here. Happy knitting!

06.10.2022 - 11:31

country flag Stéphanie wrote:

Bonjour, Pour être certain avant de commander :) pour une taille M, il faut bien 7pelotes de DROPS SOFT TWEED ? Merci de votre réponse

26.09.2022 - 09:17

DROPS Design answered:

Bonjour Stéphanie, il faut effectivement 7 pelotes DROPS Soft Tweed + 4 pelotes DROPS Kid-Silk de chaque couleur (8 au total), en taille M - vous tricotez avec 3 fils (1 Soft Tweed + 2 Kid-Silk, 1 de chaque couleur), pensez à bien vérifier votre tension - cf FAQ.) Bon tricot!

26.09.2022 - 11:37

country flag Quashie wrote:

Je souhaiterais tricoter ce modèle dans des ton plus foncés. (pas de tons pastels). Pouvez-vous m'indiquer les associations possibles pour 1 fil soft tweed et 2 fils kid silk de deux tons de couleur différents. Merci

22.09.2022 - 22:04

DROPS Design answered:

Bonjour Mme Quashie, pour toute aide et conseil dans le choix des couleurs, merci de bien vouloir directement contacter votre magasin DROPS, ce sera bien plus facile pour eux de pouvoir vous conseiller directement (même par mail ou téléphone) en fonction de ce que vous recherchez. Bon tricot!

23.09.2022 - 07:51

country flag Sophie wrote:

Bonjour, quelle est l'aisance prévue pour ce modèle ? merci ! 19.09.2022 - 10:32 DROPS Design answered: Bonjour Sophie, pour savoir quelle taille tricoter, mesurez un vêtement similaire dont vous aimez la forme et comparez ces mesures à celles du schéma en bas de page, vous trouverez ainsi la taille correspondante. Retrouvez plus d'infos ici. Bon tricot! Bonjour, je m'excuse mais vous ne répondez pas à ma question : quelle est l'aisance prévue ?

20.09.2022 - 18:05

DROPS Design answered:

Bonjour Sophie, parce que nous ne travaillons pas avec un système d'aisance, chacune va pouvoir ainsi choisir l'aisance qu'elle souhaite en fonction de sa propre morphologie en se basant sur un pull similaire qu'elle possède et qui lui plaît en se basant sur les mesures du schéma; si vous êtes entre 2 tailles, choisissez la plus petite si vous le le souhaitez un peu plus serré ou bien la plus grande si vous le voulez plus grand. Bon tricot!

21.09.2022 - 09:08

country flag Karolina wrote:

A gdyby tak zacząć tył robić od nabrania 78 oczek (rozmiar S) i przerabiać od środkowych oczek metodą skróconych rzędów niemieckich?

19.09.2022 - 12:55

DROPS Design answered:

Witaj Karolino, możesz zmodyfikować wzór, ale pamiętaj, że konstrukcja góry swetra będzie nieco inna. Powodzenia!

19.09.2022 - 14:58

country flag Monika Hapun wrote:

Witam, ile włóczki Wish potrzeba na ten sweterek? I jaki rozmiar drutów? Dziękuję Rozmiar M 16.09.2022 - 22:37

19.09.2022 - 10:39

DROPS Design answered:

Witaj Moniko, na wszelki wypadek wzięłabym 650 g włóczki, gdyż sweter jest dosyć szeroki. Co do rozmiaru drutów to między 8 a 9 na część główną, a o 1 rozmiar mniejsze na ściągacze. Najpierw zrób próbkę i zobacz czy jest dokładnie taka jak we wzorze (14 oczek na szerokość i 16 rzędów na wysokość, dżersejem = 10 x 10 cm). Jeżeli masz za dużo oczek na 10 cm, użyj większych drutów. Jeżeli jest za mało oczek na 10 cm, użyj mniejszych drutów. Powodzenia!

19.09.2022 - 11:08