DROPS Air
DROPS Air
65% Alpaca, 28% Polyamide, 7% Wool
from 4.35 £ /50g
Get the yarn to make this pattern from 4.35£.

The yarn cost is calculated from the pattern’s smallest size and the yarn’s cheapest product type. Looking for an even better price? You might find it on the DROPS Deals!

DROPS SS24

Chilly Day Balaclava

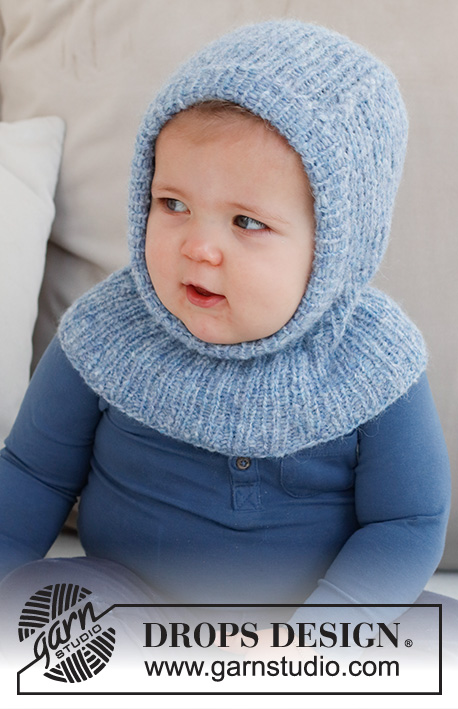
Knitted hat / balaclava for baby and children in DROPS Air. Piece is knitted in rib. Size 0 - 4 years

DROPS Baby 42-20
DROPS design: Pattern ai-007-by
Yarn group C or A + A
----------------------------------------------------------

SIZE:
0/1 - 1/3 - 6/9 - 12/18 months (2 - 3/4) years
Fits head circumference in cm:
Approx. 34/38 - 40/42 - 42/44 - 44/46 (48/50 - 50/52)

MATERIALS:
DROPS AIR from Garnstudio (belongs to yarn group C)
50-50-50-50 (50-100) g colour no 10, fog

NEEDLES:
DROPS CIRCULAR NEEDLE SIZE 5 mm: Length: 80 cm
DROPS CIRCULAR NEEDLE SIZE 4 mm: Length: 40 cm
DROPS DOUBLE POINTED NEEDLES SIZE 4 mm
The technique MAGIC LOOP can be used – you then only need circular needle of 80 cm in each size.

KNITTING TENSION:
17 stitches in width and 22 rows vertically in stocking stitch = 10 x 10 cm.
NOTE! Remember that needle size is only a suggestion. If you have too many stitches on 10 cm switch to larger needles. If you have too few stitches on 10 cm switch to smaller needles.

-------------------------------------------------------

Alternative Yarn – See how to change yarns here
Yarn Groups A to F – Use the same pattern and change the yarn here
Yarn usage using an alternative yarn – Use our yarn converter here

-------------------------------------------------------

DROPS Air
DROPS Air
65% Alpaca, 28% Polyamide, 7% Wool
from 4.35 £ /50g
Get the yarn to make this pattern from 4.35£.

The yarn cost is calculated from the pattern’s smallest size and the yarn’s cheapest product type. Looking for an even better price? You might find it on the DROPS Deals!

Pattern instructions

NOTE: This pattern is written in British English. All measurements in charts are in cm. For conversion from cm to inches - click here. There are different terms for crocheting in British and American English. If this pattern includes crochet, click for "crochet terms" here. For this pattern in American English, please click here.
----------------------------------------------------------

EXPLANATION FOR THE PATTERN:

----------------------------------------------------------

GARTER STITCH (back and forth):
Knit all rows.
1 ridge vertically = knit 2 rows.

INCREASE TIP:
All increases are done from the right side.
Increase 1 stitch by making a yarn over. On next row purl yarn over twisted to avoid hole.

DECREASE TIP:
All decreases are done from the right side!
WORK 2 STITCHES TOGETHER AT THE BEGINNING OF ROW AS FOLLOWS:
Slip 1 stitch knitwise, knit 1, pass slipped stitch over stitch worked (= 1 stitch decreased).
WORK 2 STITCHES TOGETHER AT THE END OF ROW AS FOLLOWS:
Knit 2 together.

----------------------------------------------------------

START THE PIECE HERE:

----------------------------------------------------------

HAT - SHORT SUMMARY OF GARMENT:
Worked in the round on circular needle, bottom up. Decrease stitches mid front and continue piece back and forth. Finish with a double edge around the opening for face.

HAT:
Cast on 88-96-104-108 (124-128) stitches on circular needle size 4 mm with DROPS Air. Knit 1 round. Then work rib (purl 2/knit 2) for 2-2-3-3 (4-4) cm.
On next round work all 2 purl together into 1 purl stitch = 66-72-78-81 (93-96) stitches. Continue rib with purl 1/knit 2.
When piece measures 6-6-7-8 (10-12) cm from cast-on edge, work all 2 knit together into 1 knit stitch = 44-48-52-54 (62-64) stitches. Switch to double pointed needles size 4 mm.
Continue rib with purl 1/knit 1.
When piece measures 8-8-9-10 (12-14) cm from cast-on edge, switch to circular needle size 5 mm and work back and forth as follows:
Cast off the first 6-6-6-8 (10-10) stitches, work 1 edge stitch in GARTER STITCH – read explanation above, knit 17-19-21-21 (24-25), make 1 yarn over, knit 1, insert 1 marker around needle (mid back), knit 1, make a yarn over, knit 17-19-21-21 (24-25) and 1 edge stitch in garter stitch = 40-44-48-48 (54-56) stitches.
Continue piece in stocking stitch back and forth with 1 edge stitch in garter stitch in each side (on next row work yarn overs twisted).
AT THE SAME TIME on next row from right side decrease stitches on each side of opening mid front and increase stitches mid back as follows:
Work 1 edge stitch in garter stitch, work 2 stitches together (= 1 stitch decreased) - read DECREASE TIP, work until 1 stitch remains before marker mid back, increase 1 stitch - read INCREASE TIP, knit 2, increase 1 stitch, work until 3 stitches remain on needle, work 2 stitches together (= 1 stitch decreased) and finish with 1 edge stitch in garter stitch.
Decrease like this in each side mid front on every row from right side 3 times in total.
Increase like this on each side of marker on every row from right side 7-7-7-7 (7-8) times in total (including increase done when casting off stitches mid front).
REMEMBER THE KNITTING TENSION!
When all increases and decreases are done, there are 48-52-56-56 (62-66) stitches on row.
Continue in stocking stitch with 1 edge stitch in garter stitch in each side.
When piece measures 10-10-11-11 (11-12) cm from where stitches were cast off mid front, slip the outermost 18-19-21-20 (22-24) stitches in each side on separate double pointed needle size 5 mm, i.e. 12-14-14-16 (18-18) stitches on circular needle.
Cut the yarn.
Stitches from double pointed needle in each side should be worked together with the outermost stitch in each side on circular needle at the end of every row as follows:
FROM RIGHT SIDE:
Knit until 1 stitch remains on needle, slip last stitch knitwise, knit 1 from pointed needle and pass slipped stitch from circular needle on to stitch worked (= 1 stitch decreased double pointed needle). Turn piece.
FROM WRONG SIDE:
Purl 1 twisted (i.e. work in back loop of stitch), purl until 1 stitch remain on circular needle, slip 1 stitch purlwise, purl 1 from double pointed needle and pass the slipped stitch over stitch worked. Turn piece.
Work and decrease like this until all stitches from double pointed needles in each side have been decreased.
There are 12-14-14-16 (18-18) stitches on circular piece and no stitches on double pointed needles in the side.
Now work an edge around the opening as follows:

DOUBLE EDGE:
Pick up approx. 52 to 68 stitches (including stitches from circular needle) inside 1 edge stitch on double pointed needles size 4 mm. Adjust so that number of stitches is divisible by 2 and to avoid a tight/loose edge.
Work rib (knit 1/purl 1) for 5 cm. Cast off with circular needle size 5 mm.
Fold the edge double towards inside of hat and fasten cast-off edge to where stitches were picked up around the opening for face. To avoid a tight edge that sticks out it is important to keep the seam elastic.

Each of our patterns has specific tutorial videos to help you.

Do you have a question? See a list of frequently asked questions (FAQ)

Knitting tension is what determines the final measurements of your work, and is usually measured per 10 x 10 cm. It is provided like so: number of stitches in width x number of rows in height - eg: 19 stitches x 26 rows = 10 x 10 cm.

The knitting tension is very individual; some people knit/crochet loosely while others work tightly. You adjust the knitting tension with the needle size, which is why the suggested needle size is only meant as a guide! You need to adjust this (up or down) to ensure that YOUR knitting tension matches the knitting tension provided in the pattern. If you work with a different knitting tension than provided you will have a different yarn consumption, and your work will have different measurements than what the pattern suggests.

The knitting tension also determines which yarns can replace each other. As long as you achieve the same knitting tension you can replace one yarn with another.

See DROPS lesson: How to measure your tension/gauge

See DROPS video: How to make a gauge tension swatch

The required amount of yarn is provided in grams, eg: 450 g. To calculate how many balls you’ll need you first need to know how many grams are in 1 ball (25g, 50g or 100g). This information is available if you click on the individual yarn quality on our pages. Divide the amount required with the amount of each ball. For example, if each ball is 50g (the most common amount), the calculation will be as follows: 450 / 50 = 9 balls.

The important thing when changing from one yarn to another is that the knitting/crochet tension remains the same. This is so that the measurements of the finished piece will be the same as on the sketch provided. It is easier to achieve the same knitting tension using yarns from the same yarn group. It is also possible to work with multiple strands of a thinner yarn to achieve the knitting tension of a thicker one. Please try our yarn converter. We recommend you to always work a test swatch.

Please NOTE: when changing yarn the garment might have a different look and feel to the garment in the photo, due to individual properties and qualities of each yarn.

See DROPS lesson: Can I use a different yarn than the one mentioned in the pattern?

All our yarns are categorised into yarn groups (from A to F) according to thickness and knitting tension – group A contains the thinnest yarns and group F the thickest. This makes it easier for you to find alternative yarns to our patterns, should you wish to switch yarn. All yarns within the same group have a similar knitting tension and can easily replace each other. However, different yarn qualities have different structures and properties which will give the finished work a unique look and feel.

Click here for an overview of the yarns in each yarn group

At the top of all our patterns you’ll find a link to our yarn calculator, which is a helpful tool should you wish to use a different yarn than suggested. By filling in the yarn quality you wish to replace, the amount (in your size) and number of strands, the calculator will present good alternative yarns with the same knitting tension. Additionally it will tell you how much you’ll require in the new qualities and whether you’ll need to work with multiple strands. Most skeins are 50g (some are 25g or 100g).

If the pattern is worked with multiple colours, every colour will have to be calculated separately. Similarly, if the pattern is worked with several strands of different yarns (for example 1 strand Alpaca and 1 strand Kid-Silk) you will have to find alternatives for each, individually.

Click here to see our yarn calculator

Since different yarns have different qualities and textures we have chosen to keep the original yarn in our patterns. However, you can easily find options among our available qualities by using our yarn calculator, or simply pick a yarn from the same yarn group.

It is possible that some retailers still have discontinued yarns in stock, or that someone has a few skeins at home that they would like to find patterns for.

The yarn calculator will provide both alternative yarn as well as required amount in the new quality.

If you think it's hard to decide what size to make, it can be a good idea to measure a garment you own already and like the size of. Then you can pick the size by comparing those measures with the ones available in the pattern's size chart.

You'll find the size chart at the bottom of the pattern.

See DROPS lesson: How to read size chart

The needle size provided in the pattern serves only as a guide, the important thing is to follow the knitting tension. And since knitting tension is very individual, you will have to adjust the needle size to ensure that YOUR tension is the same as in the pattern – maybe you’ll have to adjust 1, or even 2 needle sizes, up or down to achieve the correct tension. For this, we recommend that you work test swatches.

Should you work with a different knitting tension than the one provided, the measurements of the finished garment might deviate from the measurement sketch.

See DROPS lesson: How to measure your tension/gauge

See DROPS video: How to make a tension/gauge swatch

Working a garment top-down provides more flexibility and room for personal adjustment. For example it is easier to try the garment on while working, as well as making adjustments to length of yoke and shoulder caps.

The instructions are carefully explaining every step, in the correct order. Diagrams are adjusted to the knitting direction and are worked as usual.

The diagram depicts all rows/rounds, and every stitch seen from the right side. It is read from bottom to top, from right to left. 1 square = 1 stitch.

When working back and forth, every other row is worked from the right side and every other row is worked from the wrong side. When working from the wrong side, the diagram will have to be worked reversed: from left to right, knit stitches are purled, purl stitches are knit etc.

When working in the round every round is worked from the right side and the diagram are worked from right to left on all rounds.

See DROPS lesson: How to read knitting diagrams

The diagram depicts all rows/rounds, and every stitch seen from the right side. It is worked from bottom to top, from right to left.

When working back and forth every other row is worked from the right side: from right to left and every other row is worked from the wrong side: from left to right.

When working in the round, every row in the diagram are worked from the right side, from right to left.

When working a circular diagram you start in the middle and work your way outwards, counter clockwise, row by row.

The rows usually start with a given number of chain stitches (equivalent to the height of the following stitch), this will either be depicted in the diagram or explained in the pattern.

See DROPS lesson: How to read crochet diagrams

Instructions for working several diagrams after each other on the same row/round, will often be written like so: “work A.1, A.2, A.3 a total of 0-0-2-3-4 times". This means you work A.1 once, then A.2 is worked once, and A.3 is repeated (in width) the number of times provided for your size – in this case like so: S = 0 times, M = 0 times, L=2 times, XL= 3 times and XXL = 4 times.

The diagrams are worked as usual: begin with the first row in A.1, then work the first row in A.2 etc.

See DROPS lesson: How to read knitting diagrams

See DROPS lesson: How to read crochet diagrams

The total width of the garment (from wrist-to-wrist) will be larger in the larger sizes, despite the actual sleeves being shorter. The larger sizes have longer sleeve caps and wider shoulders, so there will be a good fit in all sizes.

The measurement sketch/schematic drawing provides information regarding the full length of the garment. If it’s a jumper or a jacket the length is measured from the highest point on the shoulder closest to the neckline, and straight down to the bottom of the garment. It is NOT measured from the tip of shoulder. Similarly, the length of yoke is measured from the highest point on the shoulder and down to where yoke is split into body and sleeves.

On a jacket measures are never taken along bands, unless specifically stated. Always measure inside band stitches when measuring the length.

See DROPS lesson: How to read a schematic drawing

Diagrams are often repeated on the round or in height. 1 repeat is the diagram the way it appears in the pattern. If it says to work 5 repeats of A.1 in the round, then you work A.1 a total of 5 times after/next to each other in the round. If it says to work 2 repeats of A.1 vertically/in height you work the entire diagram once, then begin again at the start and work the entire diagram one more time.

Chain stitches are slightly narrower than other stitches and to avoid working the cast-on edge too tight, we simply chain more stitches to begin with. The stitch count will be adjusted on the following row to fit the pattern and measurement sketch.

The rib edge is more elastic and will contract slightly compared to, for example, stocking stitch. By increasing before the rib edge, you avoid a visible difference in width between the rib edge and the rest of the body.

It’s very easy to cast off too tightly, and by making yarn overs while casting off (and simultaneously casting these off) you avoid a too tight cast off edge.

See DROPS video: How to bind off with yarn overs (yo)

To achieve an even increase (or decrease) you can increase on, for example: every 3rd and 4th row alternately, like so: work 2 rows and increase on the 3rd row, work 3 rows and increase on the 4th. Repeat this until the increase is complete.

See DROPS lesson: Increase or decrease 1 st on every 3rd and 4th row alternately

Should you prefer to work in the round instead of back and forth, you may of course adjust the pattern. You’ll need to add steeks mid-front (usually 5 stitches), and follow the instructions. When you would normally turn and work from the wrong side, simply work across the steek and continue in the round. At the end you’ll cut the piece open, pick up stitches to work bands, and cover the cut edges.

See DROPS video: How to knit steeks and cut open

Should you prefer to work back and forth instead of in the round, you may of course adjust the pattern so you work the pieces separately and then assemble them at the end. Divide the stitches for the body in 2, add 1 edge stitch in each side (for sewing) and work the front and back pieces separately.

See DROPS lesson: Can I adapt a pattern for circular needles into straight needles?

Pattern repeats can vary slightly in the different sizes, in order to get the correct proportions. If you’re not working the exact same size as the garment in the photo, yours might deviate slightly. This has been carefully developed and adjusted so that the complete impression of the garment is the same in all sizes.

Make sure to follow instructions and diagrams for your size!

If you have found a pattern you like which is available in women’s size it’s not very difficult to convert it to men’s size. The biggest difference will be the length of sleeves and body. Start working on the women size that you think would fit across the chest. The additional length will be worked right before you cast off for the armhole/sleeve cap. If the pattern is worked top-down you can add the length right after the armhole or before the first decrease on sleeve.

Regarding additional yarn amount, this will depend on how much length you add, but it is better with a skein too many than too few.

All yarns will have excess fibres (from production) that might come off as lint or shedding. Brushed yarns (ie hairier yarns) have more of these loose, excess fibres, causing more shedding.

Shedding also depends on what is worn under or over the garment, and whether this pulls at the yarn fibres. It’s therefore not possible to guarantee that there will be no shedding

Below are some tips on how to get the best result when working with hairier yarns:

1. When the garment is finished (before you wash it) shake it vigorously so the looser hairs come off. NOTE: do NOT use a lint roller, brush or any method that pulls at the yarn.

2. Place the garment in a plastic bag and put it in your freezer - the temperature will cause the fibres to become less attached to each other, and excess fibres will come off easier.

3. Leave in the freezer for a few hours before taking it out and shaking it again.

4. Wash the garment according to the instructions on the yarn label.

Pilling is a natural process that happens to even the most exclusive of fibers. It's a natural sign of wear and tear that is hard to avoid, and that is most visible in high friction areas of your garment like a sweater's arms and cuffs.

You can make your garment look as new by removing the pilling, using a fabric comb or a pill/lint remover.

Still can't find the answer you need? Then scroll down and leave your question so one of our experts can try to help you. This will be done normally within 5 to 10 working days.
In the meantime, you can read the questions and answers that others have left to this pattern or join the DROPS Workshop on Facebook to get help from fellow knitters/crocheters!

You might also like...

Post a comment to pattern DROPS Baby 42-20

We would love to hear what you have to say about this pattern!

If you want to leave a question, please make sure you select the correct category in the form below, to speed up the answering process. Required fields are marked *.

Comments / Questions (33)

country flag Marjorie Brand wrote:

This is a very pretty pattern. My question today is about the your note at the end of the pattern about what you can do with your pattern. I want my friend to knit this for my little one because I cant knit in the round. She dont have the facility to print the pattern from the site. Can I share this pattern via media? Thank you very much.

03.04.2024 - 08:54

DROPS Design answered:

Dear Marjorie, you could always send a link to the pattern to her. Happy Knitting!

03.04.2024 - 11:41

country flag Eirin Josefine Sødal Blomberg wrote:

Hei. Skal strikke denne til baby 9-12 mnd. men jeg ser det kun er oppskrift til eldre/yngre. Finnes det er for gruppe 9-12 mnd?

20.02.2024 - 20:50

DROPS Design answered:

Hei Eirin Josefine, Da anbefaler vi at du strikker størrelse 12/18 mnd. Hettelua skal sitte løst på slik at det er behagelig. God fornøyelse!

21.02.2024 - 06:48

country flag Bella wrote:

It would be very helpful if you stated the restarting place after cutting the yarn to work the crown. I’m guessing that it is, with right side facing, at the start of the second needle, knitting across and back over the central stitches which will continue to cover the top of the head. Is that correct?

13.01.2024 - 20:47

DROPS Design answered:

Dear Bella, yes, you will work over the central stitches in the circular needle, working them together with one stitch of each of the double pointed needles each time. Happy knitting!

14.01.2024 - 23:08

country flag Maria wrote:

3 domande in 1: 1) Pensate sua un progetto troppo difficile per un beginner? 2) Come adatto le misure ad un adulto con misura della testa di 56cm di circonferenza? 3) Le istruzioni dicono: "lavorare tutte le sezioni con 2 maglie rovescio a 1 maglia rovescio [...]" E poi: "Quando il lavoro misura 6-6-7-8 (10-12) cm dal bordo di avvio, lavorare tutte le sezioni con 2 maglie diritto a 1 maglia diritto [...]" Se è scritto correttamente, non capisco come si faccia.

07.01.2024 - 16:12

DROPS Design answered:

Buonasera Maria, questo è un progetto lavorato in tondo con aumenti e diminuzioni, ma può seguire le istruzioni e i video riportati. Questo modello in particolare è per bambini, ci sono altri modelli di passamontagna per adulti sul sito. Per la parte delle sezioni a rovescio e diritto deve diminuire le maglie. Buon lavoro!

09.01.2024 - 20:11

country flag Cheryl Farthing wrote:

Hello, 1. Do I start the hat with circular needles using magic loop and in the round? 2. I’m using KATIA, MERINO BABY, Baby Love : 50gr 165mts. Size of hat 9 months. Is this yarn equivalent? I intend on knitting 3 . 11.12.2023 - 19:51: DROPS Design answered: Dear Mrs Farthing, could you please tell us which pattern you are working on? 12.12.2023 - 09:54:

12.12.2023 - 13:43

country flag Anne-Beate Dokken wrote:

Er første felling når de tre delene strikkes sammen på retten eller vrangen. Takk for hjelpen.

20.11.2023 - 12:34

DROPS Design answered:

Hei Anne-Beate. Fra retten, men er du da på vrangen, følger du bare forklaringen på hvordan maskene strikkes sammen fra vrangen. mvh DROPS Designb

20.11.2023 - 14:18

country flag Marit Signe Fjæreide wrote:

No lurte eg på når eg er begynt på 18 masker på rundpinnen og22 masker på settpinnene på hver side.Er det bare rundpinnen eg skal bruke og felle maske på settpinnene? Skal vel ikkje strikke alle hele tiden

11.11.2023 - 10:50

DROPS Design answered:

Hei Marit. Nei, du strikke ikke alle samtidig. Du strikker maskene på rundpinnen og strikker første og siste maske sammen med med maskene på settpinene. De 18 maskene du har på rundpinnen blir som et "lokk" som festes sammen med sidenen av luen. mvh DROPS Design

13.11.2023 - 14:04

country flag Anne-Beate Dokken wrote:

Nydelig lue. Men burde det ikke strikkes lenger før arbeidet deles i 3 og strikkes sammen. Virker som åpningen for ansiktet blir veldig liten/kort.

10.11.2023 - 15:04

DROPS Design answered:

Hei Anne-Beate. Målene skal stemme, luen bli jo en del tøyelig og skal den sitte pent på, samtidig som den skal være "tett" og varme små hoder. mvh DROPS Design

13.11.2023 - 13:19

country flag Sara Barth wrote:

Ihre Anleitung wird auf Etsy verkauft.

08.11.2023 - 10:34

country flag Marit Signe Fjæreide wrote:

Lurte bare på om chilly day balaklava skal strikkes på rundpinn etter opplegget eller att og fram

31.10.2023 - 15:56

DROPS Design answered:

Hei Marit Signe, Du strikker halsen rundt på rundpinne, men etter du har fellet av til åpningen rundt ansiktet, fortsetter du fram og tilbake. God fornøyelse!

01.11.2023 - 07:05