


Komentáře / Otázky (21)
![]() Monika Klein napsala:
Monika Klein napsala:
Kann ich bis zu den Armausschnitten das Rumpfteil auch in einem Stück stricken (ich nähe äußerst ungern zusammen). Muß ich dann bei dem Zopf umdenken, eine Seite wie beschrieben und die andere seitenverkehrt? Ich weiß, das die Beschreibung das nicht so vorsieht, wäre aber trotzdem für Hilfe sehr dankbar.
13.02.2025 - 09:32Odpověď DROPS Design :
Liebe Frau Klein, beachten Sie, daß es hier Schlitze auf beiden Seiten gibt, so strickt man am Anfang die ersten 10 cm separat, dann einfach die Maschenanzhal von den 3 Stück zusammenstricken (hier braucht dann man auch 4 Maschenweniger = die 4 Randmaschen für die Seiten) und jedes Teil wie unter jeden Absatz (von oben nach unten bei den Hinreihen): rechtes Vorderteil, Rückenteil, linkes Vorderteil. Viel Spaß beim Stricken!
13.02.2025 - 15:12
![]() GIL Anne napsala:
GIL Anne napsala:
Bonjour, je ne comprends pas pourquoi après les côtes ( en bas du dos ou pour les devants) il faut diminuer?
16.01.2025 - 20:29Odpověď DROPS Design :
Bonjour Mme Gil, pour la même largeur, il faudra plus de mailles pour les côtes avec les aiguilles 8 que pour le jersey envers/les torsades avec les aiguilles 8, raison pour laquelle on doit diminuer avant de commencer le point fantaisie. Bon tricot!
17.01.2025 - 08:25
![]() Tavernier napsala:
Tavernier napsala:
Les aiguilles circulaires sont elles obligatoires car je ne sais pas m'en servir je tricote avec des aiguilles normales
11.08.2024 - 13:34Odpověď DROPS Design :
Bonjour Mme Tavernier, le dos et les devants se tricotent séparément en allers et retours sur aiguille circulaire pour avoir suffisamment de place pour y loger toutes les mailles, vous pouvez donc les tricoter sur aiguilles droites, vos mailles seront juste plus serrées; relevez les mailles pour la bordure des emmanchures avant de coudre les côtés pour éviter de tricoter en rond. Retrouvez plus d'infos sur les aiguilles circulaires ici. Bon tricot!
12.08.2024 - 08:23
![]() Tatiana napsala:
Tatiana napsala:
Hello! When I’m knitting the back piece, should I continue using garter stitch on the edges after I casted off 2 stitches for the armholes or should it be purl on the right side and knit on the back instead from that point?
29.03.2024 - 00:38Odpověď DROPS Design :
Dear Tatiana, the edge stitch should be knitted as a garter stitch all through the piece. Happy Knitting!
29.03.2024 - 08:31
![]() Astrid Brandau napsala:
Astrid Brandau napsala:
Hallo, danke für die schnelle Rückmeldung. Meine Frage bezog sich eher auf das Zopfmuster. Ist das ab der 11. Reihe im Schulterbereich weiter zu stricken oder stricke ich die nächsten 3 cm A 1 nur noch glatt rechts ?
15.01.2024 - 11:29Odpověď DROPS Design :
Liebe Frau Brandau, die 5 Maschen nach 53 cm in S sind für den Halsausschnitt, die anderen Maschen/Zöpfe stricken Sie wie zuvor bis die Arbeit 56 cm misst. Viel Spaß beim stricken!
15.01.2024 - 16:15
![]() Astrid Brandau napsala:
Astrid Brandau napsala:
Ich bin am Rückenteil und habe bei 53 cm die 5 Maschen im mittleren Rapport abgenommen. Nun wäre in der nächsten 11. Reihe wieder das Zopfmuster einzuarbeiten. Oder entfällt das jetzt, wenn ich die Schultern separat weiterstricke? Vermutlich ja. Sieht aber dann komisch aus.
14.01.2024 - 20:45Odpověď DROPS Design :
Liebe Frau Brandau, wenn die 5 Maschen abegnommen werden, werden die mittleren Maschen für den Halsausschnitt abgekettet, und jede Schulter separat gestrickt. Viel Spaß beim stricken!
15.01.2024 - 09:46
![]() Marie Auffret napsala:
Marie Auffret napsala:
Bonjour, Pour la taille S, quand je tricote le dos, j'arrive à 53 cm pour diminuer juste avant la deuxième torsade de A1. Que me conseillez-vous ? Finir la torsade et diminuer après ou diminuer juste avant ? Merci d'avance pour vos explications qui me sont précieuses.
21.11.2023 - 10:14Odpověď DROPS Design :
Bonjour Mme Auffret, vous pouvez faire les deux au choix, vous pouvez aussi diminuer en faisant la torsade et ainsi rabattre les mailles centrales de l'encolure au rang suivant. Bon tricot!
21.11.2023 - 15:58
![]() AUFFRET Marie napsala:
AUFFRET Marie napsala:
Bonjour, Je ne comprends pas pourquoi vous conseillez la laine DROPS BRUSHED ALPACA SILK qui se tricote avec des aiguilles numéro 5 de préférence alors que les aiguilles conseillées sont les aiguilles 8 ? Merci d'avance pour vos explications.
05.11.2023 - 11:07Odpověď DROPS Design :
Bonjour Mme Auffret, c'est ainsi que ce modèle a été tricoté, mais avec 2 fils Brushed Alpaca Silk, pas 1 seul. Pensez à bien vérifier votre tension au préalable et ajustez la taille des aiguilles si besoin, vous devez avoir 11 mailles x 15 rangs jersey = 10 x 10 cm. Bon tricot!
06.11.2023 - 08:29
![]() Trudi Heffley napsala:
Trudi Heffley napsala:
I'm going to be making this from my own hand spun Leicester Longwool. Mine is a DK weight, but I'm not sure how many yards this pattern would take.
28.08.2023 - 22:33Odpověď DROPS Design :
Dear Mrs Helffley, this pattern is worked with either 2 strands yarn group C (aran/worsted) or 1 strand yarn group E (super bulky), so that a dk yarn might not be suitable - it might be wiser to check similar pattern matching your tension. Happy knitting!
29.08.2023 - 09:13
![]() Denise Fontaine napsala:
Denise Fontaine napsala:
Que veut dire dans : Assemblage : mais arrêter quand il reste environ 10cm = fentes ? Merci beaucoup.
26.11.2022 - 11:53Odpověď DROPS Design :
Bonjour Mme Fontaine, vous commencez la couture des côtés à partir de sous les emmanchures et la terminez quand il reste environ 10 cm pour former les fentes des côtés, autrement dit, les 10 cm du bas du gilet ne sont pas cousus. Bon tricot!
28.11.2022 - 09:08
|
||||||||||
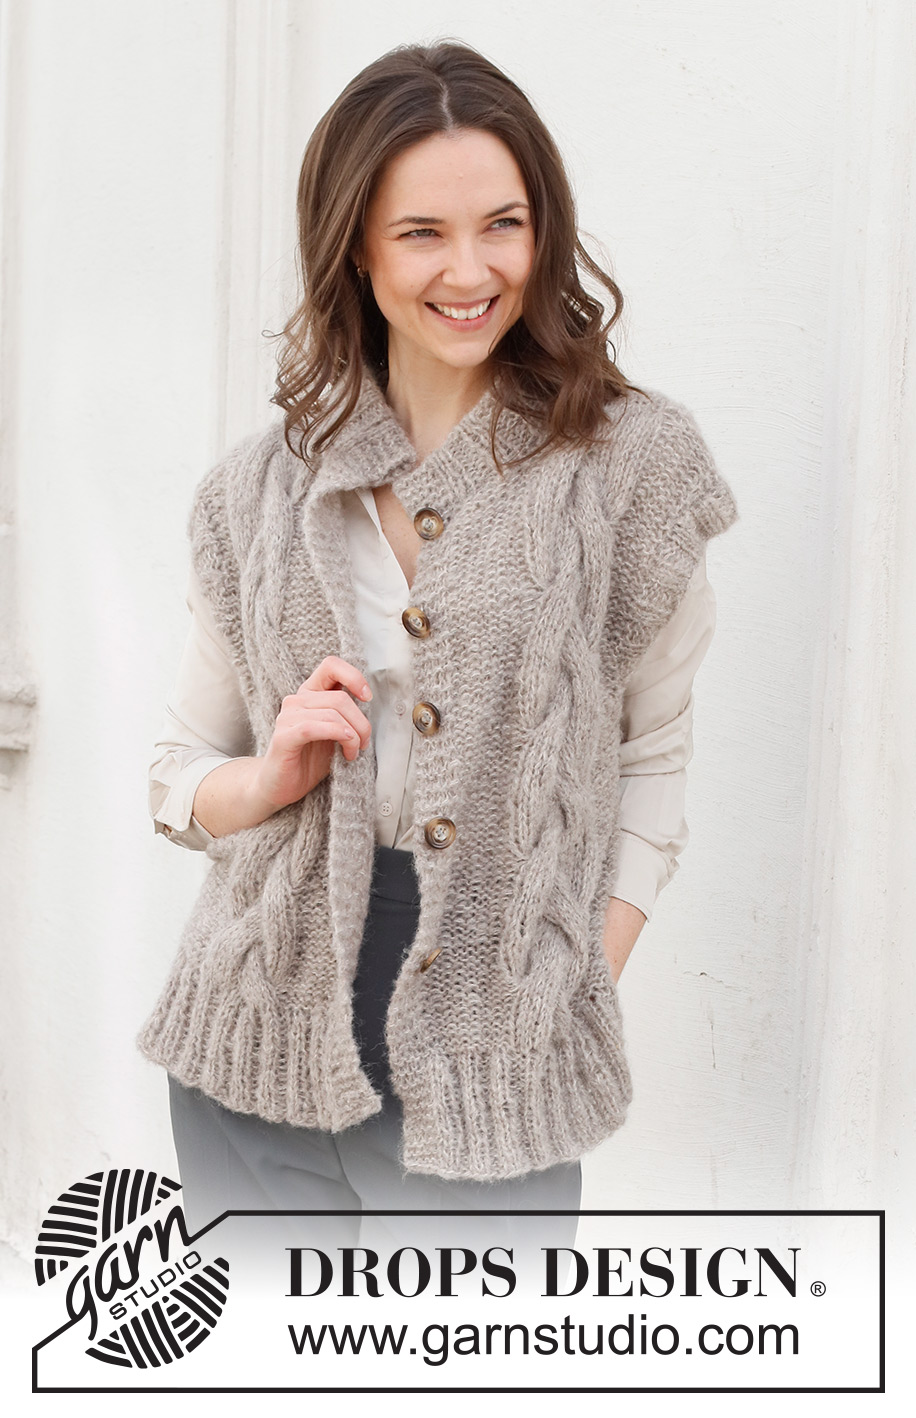
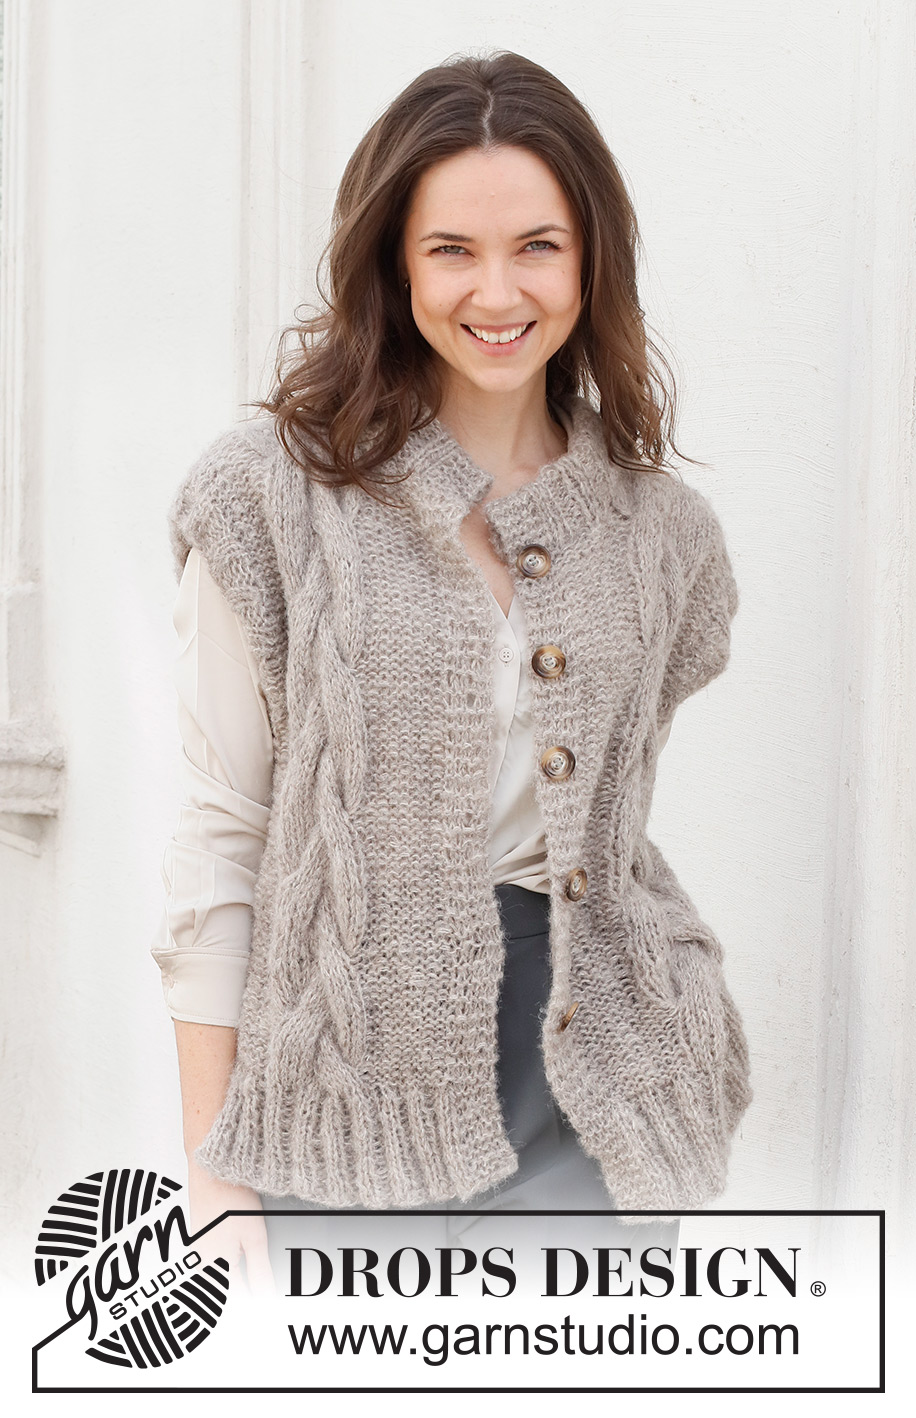
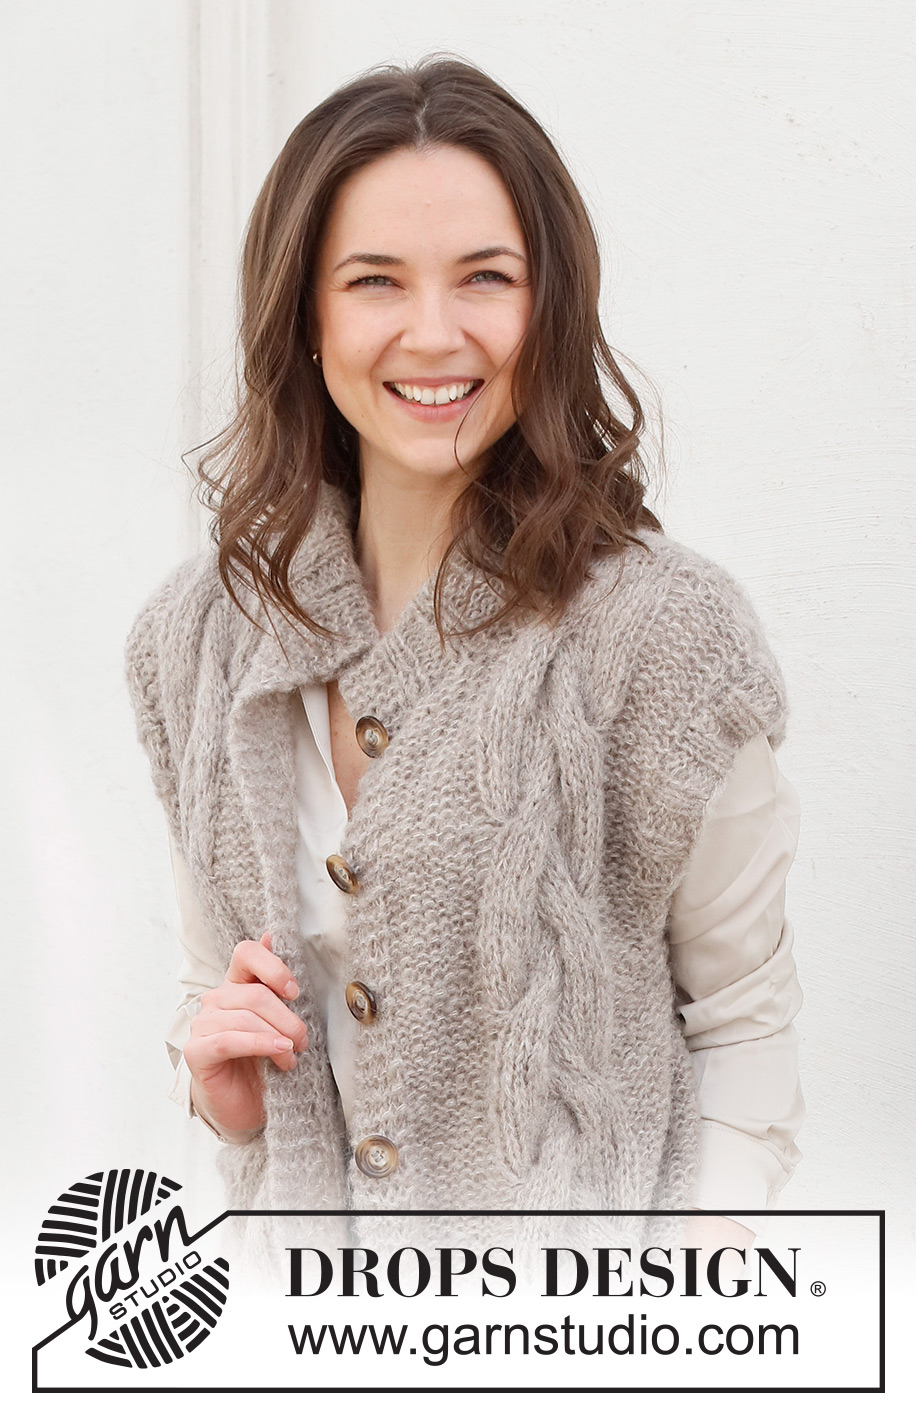
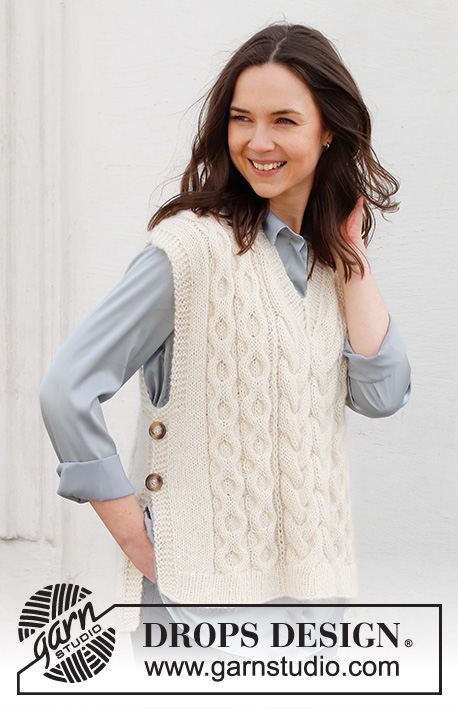
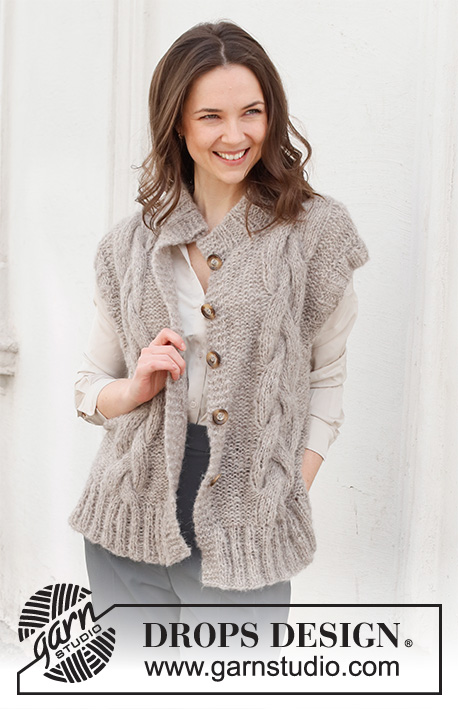
Evening Fires Vest#eveningfiresvest |
||||||||||
 |
 |
|||||||||
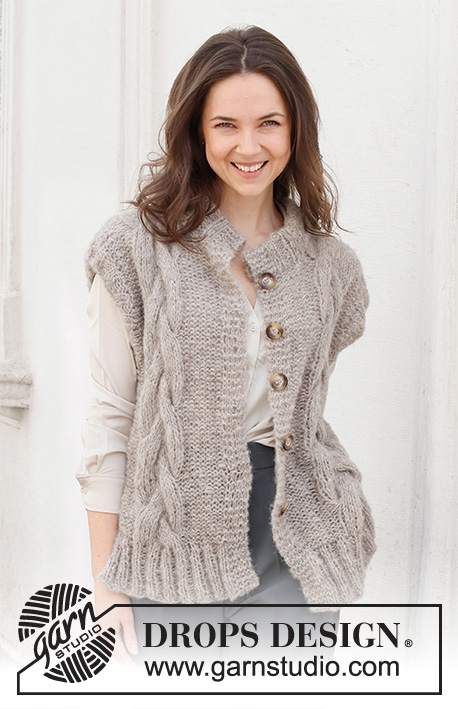
Vesta s copánky pletená 2 vlákny z příze DROPS Brushed Alpaca Silk nebo 1 vláknem DROPS Wish. Velikost: S - XXXL.
DROPS 228-38 |
||||||||||
|
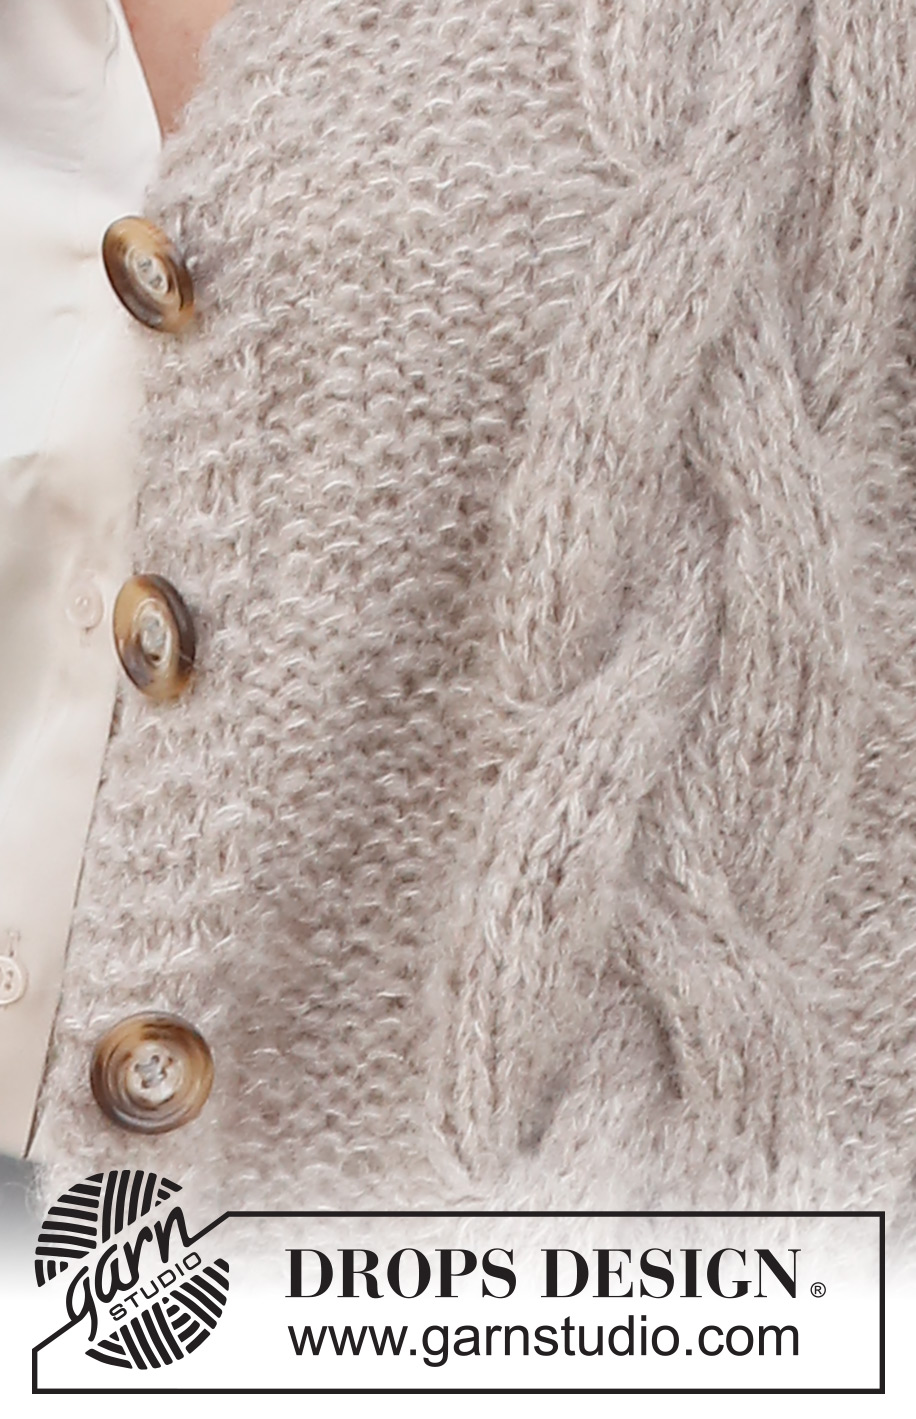
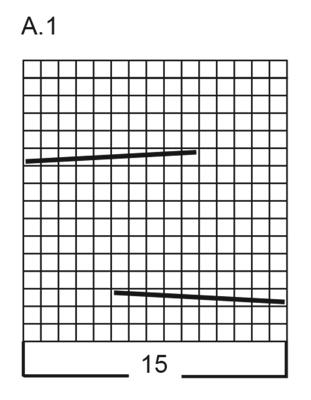
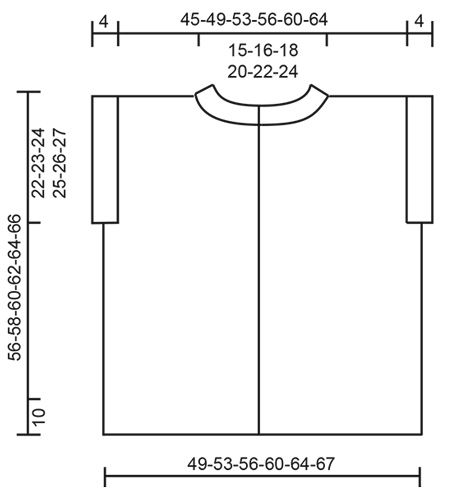
---------------------------------------------------------- VYSVĚTLIVKY K NÁVODU: ---------------------------------------------------------- VROUBKOVÝ VZOR: Pleteme stále hladce, lícové i rubové řady. 1 vroubek = 2 řady hladce. TIP – UJÍMÁNÍ: Abychom vypočítali, v jakých rozestupech máme ujímat, vydělíme celkový počet ok (např. 82 ok) počtem ok, která potřebujeme ujmout (např. 13) = 6,3. Podle tohoto příkladu spleteme každé zhruba 5. a 6. oko. VZOR: Viz schéma A.1. Zobrazeny jsou všechny řady vzoru nahlížené z lícové strany. KNOFLÍKOVÉ DÍRKY: Knoflíkové dírky vyplétáme v léze pravého předního dílu. 1 KNOFLÍKOVÁ DÍRKA = spleteme 3. a 4. oko od kraje hladce, 1x nahodíme. V následující řadě pleteme nahození hladce – vznikne dírka. Knoflíkové dírky vyplétáme, když pletenina měří: S: 17, 25, 33, 41 a 49 cm M: 17, 25, 33, 42 a 51 cm L: 17, 26, 34, 44 a 53 cm XL: 18, 27, 35, 45 a 55 cm XXL: 18, 27, 34, 47 a 57 cm XXXL: 19, 29, 39, 49 a 59 cm TIP - UZAVÍRÁNÍ: Abychom neměli uzavřený okraj moc stažený, můžeme na uzavírání ok použít silnější jehlice nebo za každým zhruba 4. okem 1x nahodíme – nahození hned uzavřeme jako běžné oko. ---------------------------------------------------------- PRÁCE ZAČÍNÁ ZDE: ---------------------------------------------------------- VESTA – JAK BUDEME POSTUPOVAT: Vestu pleteme dvojitou přízí v řadách na kruhové jehlici, přední a zadní díl potom sešijeme. Pak nabereme oka u průramků a průkrčníku a dopleteme lem. ZADNÍ DÍL: Na kruhovou jehlici č. 6 nahodíme 2 vlákny příze DROPS Brushed Alpaca Silk nebo 1 vláknem příze DROPS Wish 82-90-94-98-102-106 ok. Upleteme 1 rubovou řadu obrace, pak pleteme lem na lícové straně takto: 2 krajová oka VROUBKOVÝM VZOREM - viz popis výše - * 2 hladce, 2 obrace *, mezi *-* opakujeme po poslední 4 oka, 2 hladce a končíme 2 krajovými oky vroubkovým vzorem. Pokračujeme v tomto rozvržení do výše 10 cm. Pak převedeme pleteninu na kruhovou jehlici č.8, upleteme 1 rubovou řadu obrace a současně rovnoměrně ujmeme 13-17-17-17-17-17 ok - viz TIP - UJÍMÁNÍ = 69-73-77-81-85-89 ok. Pokračujeme lícovou řadou: 1 krajové oko vroubkovým vzorem, 5-7-9-11-13-15 ok obrace, vzorem A.1 (= 15 ok), 6 ok obrace, vzorem A.1, 6 ok obrace, vzorem A.1, 5-7-9-11-13-15 ok obrace, 1 krajové oko vroubkovým vzorem. V tomto rozvržení pokračujeme (oka pletená na lícové straně obrace, pleteme na rubu hladce). Ve výši 34-35-36-37-38-39 cm ujmeme na začátku následujících 2 řad 2 oka pro průramky = 65-69-73-77-81-85 ok. Ve výši 53-55-57-59-61-63 cm ujmeme v prostřední sekvenci vzoru A.1 rovnoměrně 5 ok. V následující řadě ujmeme prostředních 14-16-18-20-22-24 ok pro průkrčník, a každou náramenici dokončíme odděleně. V další řadě uzavřeme na každé straně průkrčníku ještě 1 oko = 22-23-24-25-26-27 ok. Oka vzoru A.1 pleteme lícovým žerzejem a současně v nich ujmeme rovnoměrně 5 ok. = 17-18-19-20-21-22 ok. Ve výši 56-58-60-62-64-66 cm (= 22-23-24-25-26-27 cm od ujmutí ok pro průramky) uzavřeme zbylá oka. Stejným způsobem vypracujeme druhou náramenici. LEVÝ PŘEDNÍ DÍL: Na kruhovou jehlici č. 6 nahodíme dvojitou přízí DROPS Brushed Alpaca Silk nebo 1 vláknem příze DROPS Wish 45-45-49-49-53-53 ok (včetně 5 ok légy na jedné straně). Upleteme 1 rubovou řadu obrace, pak pleteme lem na lícové straně takto: 2 krajová oka VROUBKOVÝM VZOREM, * 2 hladce, 2 obrace *, mezi *-* opakujeme po posledních 7 ok, 2 oka hladce a 5 ok légy vroubkovým vzorem. Pokračujeme v tomto rozvržení do výše 10 cm. Potom převedeme pleteninu na kruhovou jehlici č.8, upleteme 1 rubovou řadu obrace a SOUČASNĚ rovnoměrně ujmeme 9-7-9-7-9-7 ok = 36-38-40-42-44-46 ok. Pokračujeme lícovou řadou: 1 krajové oko vroubkovým vzorem, 7-9-11-13-15-17 ok obrace, pak vzorem A.1, 8 ok obrace, 5 ok vroubkovým vzorem. Takto pokračujeme do výše 34-35-36-37-38-39 cm, kde ujmeme na lícové straně na začátku řady 2 oka pro průramky = 34-36-38-40-42-44 ok. Pokračujeme dále, lícová strana: 6-8-10-12-14-16 ok obrace, potom vzorem A.1, 8 ok obrace, 5 ok vroubkovým vzorem. Ve výši 50-52-54-56-58-60 cm odložíme 8-9-10-11-12-13 ok od předního okraje dílu na pomocnou jehlici (= průkrčník). Na začátku každé řady u průkrčníku ujímáme 1× 2 oka a 2× 1 oko = zbývá 22-23-24-25-26-27 ok náramenice. Oka vzoru A.1 pleteme lícovým žerzejem a současně v nich ujmeme rovnoměrně 5 ok. = 17-18-19-20-21-22 ok. Ve výši 56-58-60-62-64-66 cm (= 22-23-24-25-26-27 cm od ujmutí ok pro průramky) uzavřeme zbylá oka. PRAVÝ PŘEDNÍ DÍL: Na kruhovou jehlici č. 6 nahodíme dvojitou přízí DROPS Brushed Alpaca Silk nebo 1 vláknem příze DROPS Wish 45-45-49-49-53-53 ok (včetně 5 ok légy na jedné straně). Upleteme 1 rubovou řadu obrace, pak pleteme lem na lícové straně takto: 5 ok légy vroubkovým vzorem, * 2 hladce, 2 obrace *, mezi *-* opakujeme po poslední 4 oka, 2 oka hladce a 2 krajová oka vroubkovým vzorem. Pokračujeme v tomto rozvržení do výše 10 cm. Pak převedeme pleteninu na kruhovou jehlici č.8, upleteme 1 rubovou řadu obrace a SOUČASNĚ rovnoměrně ujmeme 9-7-9-7-9-7 ok = 36-38-40-42-44-46 ok. Pokračujeme lícovou řadou: 5 ok légy vroubkovým vzorem, 8 ok obrace, pak vzorem A.1, 7-9-11-13-15-17 ok obrace, 1 krajové oko vroubkovým vzorem. Pokračujeme v pletení. Ve výši 17-17-17-18-18-19 cm vyplétáme KNOFLÍKOVÉ DÍRKY - viz popis! Ve výši 34-35-36-37-38-39 cm ujmeme na rubové straně na začátku řady 2 oka pro průramky = 34-36-38-40-42-44 ok. Pokračujeme lícovou řadou: 5 ok légy vroubkovým vzorem, 8 ok obrace, pak vzorem A.1, 6-8-10-12-14-16 ok obrace. Ve výši 50-52-54-56-58-60 cm odložíme 8-9-10-11-12-13 ok od předního okraje dílu na pomocnou jehlici pro průkrčník. Na začátku každé řady u průkrčníku ujímáme 1× 2 oka a 2× 1 oko = zbývá 22-23-24-25-26-27 ok náramenice. Oka vzoru A.1 pleteme lícovým žerzejem a současně v nich ujmeme rovnoměrně 5 ok. = 17-18-19-20-21-22 ok. Ve výši 56-58-60-62-64-66 cm (= 22-23-24-25-26-27 cm od ujmutí ok pro průramky) uzavřeme zbylá oka. DOKONČENÍ: Sešijeme náramenice. Sešijeme postranní švy – šev vedeme vnější částí krajových ok, abychom získali plochý šev. Ve spodní části necháme 10 cm nesešitých (= rozparky). Na levý přední díl přišijeme knoflíky. LEM PRŮKRČNÍKU: Začneme na lícové straně uprostřed předního dílu, kruhovou jehlicí č.6 a dvojitou přízí Brushed Alpaca Silk nebo 1 vláknem příze DROPS Wish nabereme podél průkrčníku 48 až 68 ok (včetně ok z pomocné jehlice) - počet ok musí být dělitelný 4. Pleteme lem takto (první řada je rubová): 5 ok légy vroubkovým vzorem, 2 obrace, pružný vzor (= 2 hladce, 2 obrace) až po posledních 7 ok, 2 obrace a 5 ok légy vroubkovým vzorem. Upleteme lem do výšky 12 cm, pak všechna oka dle vzoru uzavřeme – viz TIP – UZAVÍRÁNÍ. Lem průkrčníku přeložíme napolovic, zahneme do rubu a přišijeme. Dbáme na to, aby byl šev pružný, jinak se bude lem kroutit a ohýbat na lícovou stranu. LEMY PRŮRAMKŮ: Na krátkou kruhovou jehlici č. 6 nabereme dvojitou přízí DROPS Brushed Alpaca Silk nebo 1 vláknem příze DROPS Wish 52 až 72 ok (počet ok musí být dělitelný 4) a pleteme lem patentem (2 hl, 2 obr) do výše 4 cm. Pak všechna oka volně dle vzoru uzavřeme – viz TIP – UZAVÍRÁNÍ. Stejným způsobem upleteme lem i kolem druhého průramku. |
||||||||||
Vysvětlivky ke schématu |
||||||||||
|
||||||||||
|
||||||||||
|
||||||||||
Dokončili jste tento model?Pak označte své fotky tagem #dropspattern #eveningfiresvest nebo je pošlete do galerie #dropsfan. Potřebujete s tímto návodem poradit?Otevřete-li si návod na stránce garnstudio.com, najdete tam 29 výukových video-ukázek, Komentáře/Dotazy a další užitečné informace. © 1982-2025 DROPS Design A/S. Vyhrazujeme si veškerá práva. Tento dokument, včetně všech jeho dílčích částí, podléhá autorským právům. Podrobnější komentář k možnostem užití našich návodů najdete dole pod každým návodem na našich stránkách. |
||||||||||


V oblasti pletené a háčkované módy působí DROPS Design více než 40 let. Díky tomu vám můžeme nabídnout jednu z nejrozsáhlejších kolekcí modelů s bezplatnými návody dostupnými na internetu - navíc v 17 jazycích. K dnešnímu dni máme na 314 katalogů a 11822 návodů celkem - z nich je už 7048 dostupných v [češtině].
Přidejte komentář k návodu DROPS 228-38
Rádi bychom věděli, co si o tomto modelu myslíte!
Pokud se chcete na něco zeptat, dbejte prosím na to, abyste ve formuláři níže vybrali správnou kategorii - díky tomu se dříve dozvíte, co potřebujete vědět. Povinná pole jsou označena *.