
Popular categories
Looking for a yarn?


|
||||||||||||||||||||||
December Tide |
||||||||||||||||||||||
 |
 |
|||||||||||||||||||||
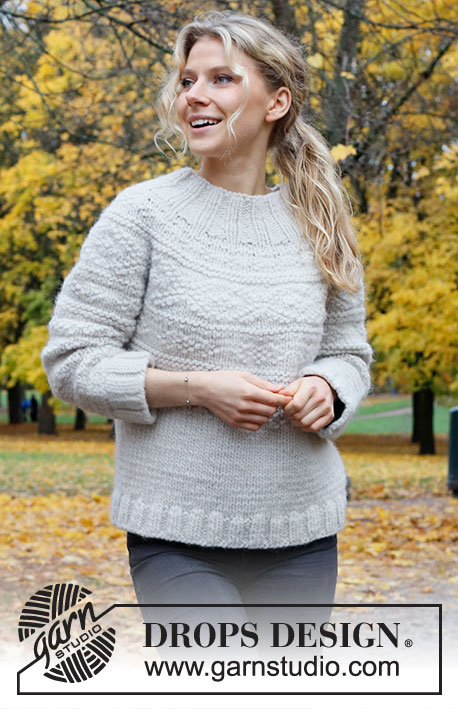
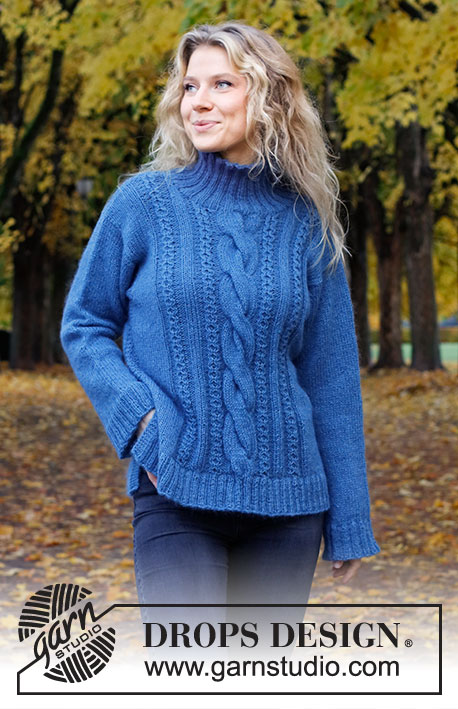
Knitted sweater in DROPS Flora and DROPS Kid-Silk or DROPS Alpaca and DROPS Kid-Silk. The pieced is worked with stockinette stitch, cables, high neck and split in the slides. Sizes S - XXXL.
DROPS 226-25 |
||||||||||||||||||||||
|
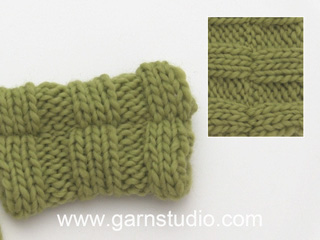
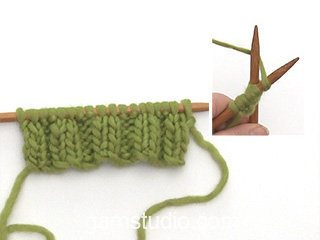
------------------------------------------------------- EXPLANATIONS FOR THE PATTERN: ------------------------------------------------------- RIDGE/GARTER STITCH (worked back and forth): Knit all rows. 1 ridge = knit 2 rows. PATTERN: See diagrams A.1 to A.3. Choose diagram for your size (applies to A.2). The diagrams show all rows in the pattern from the right side. DECREASE/INCREASE TIP (evenly spaced): To work out how to decrease/increase evenly, count the number of stitches to be decreased/increased over (e.g. 58 stitches), minus the edge stitches (e.g. 4 stitches)and divide the remaining stitches by the number of decreases/increases to be made (e.g. 20) = 2.7. In this example, decrease by knitting together approx. each 2nd and 3rd stitch. Do not decrease over the edge stitches. When increasing, make 1 yarn over after approx. each 3rd stitch. Do not increase over the edge stitches. On the next row work the yarn overs twisted to avoid holes. DECREASE TIP (for sleeves): Decrease 1 stitch on either side of the marker thread as follows: Work until there are 3 stitches left before the marker thread, knit 2 together, knit 2 (marker thread sits between these 2 stitches), slip 1 stitch as if to knit, knit 1 and pass the slipped stitch over the knitted stitch (2 stitches decreased). BINDING-OFF TIP: To avoid the bind-off edge being tight you can bind off with a larger size needle. If the edge is still tight, make 1 yarn over after approx. each 4th stitch at the same time as binding off; the yarn overs are bind off as normal stitches. ------------------------------------------------------- START THE PIECE HERE: ------------------------------------------------------- SWEATER – SHORT OVERVIEW OF THE PIECE: The front and back pieces are worked separately, back and forth, bottom up. The sleeve cap is worked back and forth, the rest of the sleeve in the round with short circular needle/double pointed needles, top down. The piece is sewn together and a high neck worked to finish. BACK PIECE: Cast on 126-134-142-154-170-182 stitches with circular needle size 4 MM = US 6 and 1 strand of each quality (= 2 strands). Purl 1 row (= wrong side). The next row is worked as follows from the right side: 4 edge stitches in GARTER STITCH – read description above, * knit 2, purl 2 *, work from *-* until there are 6 stitches left, knit 2 and 4 edge stitches in garter stitch. Continue this rib for 6 cm = 2⅜". When the rib is finished, knit 1 row from the right side where you decrease and increase as follows: Knit 58-62-66-72-80-86 stitches and decrease 20-20-21-23-25-26 stitches evenly over these stitches – read DECREASE/INCREASE TIP, work A.1 over the middle 9 stitches (= 9 stitches increased), knit the last 59-63-67-73-81-87 stitches and decrease 21-21-22-24-26-27 stitches evenly over these stitches = 94-102-108-116-128-138 stitches. Purl 1 row from the wrong side (yarn overs purled twisted and edge stitches in garter stitch). Change to circular needle size 5 MM = US 8. The next row is worked as follows from the right side: 4 edge stitches in garter stitch, 11-15-18-18-24-29 stitches in stockinette stitch, work A.2 (= 23-23-23-27-27-27 stitches), A.3 (= 18 stitches), A.2 (= 23-23-23-27-27-27 stitches), 11-15-18-18-24-29 stitches in stockinette stitch and 4 edge stitches in garter stitch. Continue this pattern back and forth. REMEMBER THE KNITTING GAUGE! When the piece measures 37-38-39-40-41-42 cm = 14½"-15"-15¼"-15¾"-16⅛"-16½", bind off 5-7-8-10-14-17 stitches for the armholes at the beginning of the next 2 rows = 84-88-92-96-100-104 stitches. Continue the pattern back and forth, now with 9-11-13-11-13-15 stitches in stockinette stitch and 1 edge stitch in garter stitch on each side. When there is approx. 1 row left before the piece measures 56-58-60-62-64-66 cm = 22"-22¾"-23⅝"-24⅜"-25¼"-26" and the next row is from the right side, decrease 11 stitches mid-back by knitting the middle 22 stitches together 2 and 2 (the other stitches are worked as before) = 73-77-81-85-89-93 stitches. On the next row bind off the middle 25-25-27-27-29-29 stitches for the neck and each shoulder is finished separately. Continue as before and bind off 2 stitches on the next row from the neck = 22-24-25-27-28-30 stitches on the shoulder. Continue working until the piece measures 57-59-61-63-65-67 cm = 22½"-23¼"-24"-24¾"-25½"-26⅜". Knit 1 row from the right side where you decrease 1 stitch over the outermost cable towards the armhole = 21-23-24-26-27-29 stitches. Knit 1 row from the wrong side. Bind off with knit from the right side. Work the other shoulder in the same way. The back piece measures approx. 58-60-62-64-66-68 cm = 22¾"-23⅝"-24⅜"-25¼"-26"-26¾" from the shoulder down. FRONT PIECE: Cast on and work in the same way as the back piece until there is approx. 1 row left before the piece measures 51-53-54-56-57-59 cm = 20"-21"-21¼"-22"-22½"-23¼". On the next row from the right side, decrease 11 stitches mid-front by knitting the middle 22 stitches together 2 and 2 (the other stitches are worked as before) = 73-77-81-85-89-93 stitches. On the next row place the middle 15-15-17-17-19-19 stitches on 1 thread for the neck and each shoulder is finished separately = 29-31-32-34-35-37 stitches on the shoulder. Continue as before and bind off for the neck at the beginning of each row from the neck as follows: Bind off 2 stitches 2 times and 1 stitch 3 times = 22-24-25-27-28-30 stitches. Continue working until the piece measures 57-59-61-63-65-67 cm = 22½"-23¼"-24"-24¾"-25½"-26⅜". Knit 1 row from the right side where you decrease 1 stitch over the outermost cable towards the armhole = 21-23-24-26-27-29 stitches. Knit 1 row from the wrong side. Bind off with knit from the right side. Work the other shoulder in the same way. The front piece measures approx. 58-60-62-64-66-68 cm = 22¾"-23⅝"-24⅜"-25¼"-26"-26¾" from the shoulder down. SLEEVE: Cast on 74-76-80-84-86-90 stitches (including 1 edge stitch on each side) with circular needle size 5 MM = US 8 and 1 strand of each quality. Work stockinette stitch back and forth with 1 edge stitch in garter stitch on each side for 3-4-5-6-8-10 cm = 1⅛"-1½"-2"-2⅜"-3⅛"-4" – AT THE SAME TIME, on the last row, bind off the 1 edge stitch on each side = 72-74-78-82-84-88 stitches. The sleeve cap is finished. The rest of the sleeve is worked in the round with short circular needle/double pointed needles. Insert 1 marker thread at the beginning of the round (= mid-under sleeve). Allow the thread to follow your work onwards; it is used when decreasing under the sleeve. Start the round at the marker thread and work stockinette stitch in the round. When the sleeve measures 2 cm = ¾" in all sizes from where you began working in the round, decrease 2 stitches under the sleeve – read DECREASE TIP. Decrease like this every 1½ cm = ½" a total of 11-11-13-14-14-15 times = 50-52-52-54-56-58 stitches. Continue working until the piece measures 43-42-41-40-38-36 cm = 17"-16½"-16⅛"-15¾"-15"-14¼" from where you began working in the round (shorter measurements in larger sizes due to wider shoulders and longer sleeve cap). There is approx. 6 cm = 2⅜" left to finished length; try the sleeve on and work to desired length. Knit 1 round where you increase 14-12-16-14-16-14 stitches evenly spaced – remember DECREASE/INCREASE TIP = 64-64-68-68-72-72 stitches. Change to double pointed needles size 4 MM = US 6 and work rib (knit 2, purl 2) for 6 cm = 2⅜". Bind off with knit over knit and purl over purl – read BINDING-OFF TIP! The sleeve measures approx. 52 cm = 20½" from the cast-on edge in all sizes. Work the other sleeve in the same way. ASSEMBLY: Sew the shoulder seams inside the bind-off edge. Sew the side seams in the outermost loop of the outermost stitch so the seam is flat – starting at the armholes and working down; leave approx. 15 cm = 6" at the bottom (= split). Sew the sleeve caps to the armholes, inside the 1 edge stitch. Then sew the openings from the top of the sleeves to the bottom of the armholes – see sketch. NECK: Start at the one shoulder and knit up from the right side 88 to 104 stitches round the neck (including the stitches from the thread in front) with short circular needle size 4 MM = US 6 and 1 strand of each quality (the number of stitches should be divisible by 4). Work rib in the round (knit 2, purl 2) for 12-12-12-14-14-14 cm = 4¾"-4¾"-4¾"-5½"-5½"-5½". Bind off loosely with knit over knit and purl over purl – remember BINDING-OFF TIP! |
||||||||||||||||||||||
Diagram explanations |
||||||||||||||||||||||
|
||||||||||||||||||||||

|
||||||||||||||||||||||

|
||||||||||||||||||||||

|
||||||||||||||||||||||
|
Have you made this or any other of our designs? Tag your pictures in social media with #dropsdesign so we can see them! Do you need help with this pattern?You'll find tutorial videos, a Comments/Questions area and more by visiting the pattern on garnstudio.com. © 1982-2024 DROPS Design A/S. We reserve all rights. This document, including all its sub-sections, has copyrights. Read more about what you can do with our patterns at the bottom of each pattern on our site. |
||||||||||||||||||||||


With over 40 years in knitting and crochet design, DROPS Design offers one of the most extensive collections of free patterns on the internet - translated to 17 languages. As of today we count 304 catalogs and 11422 patterns - 11417 of which are translated into English (US/in).
We work hard to bring you the best knitting and crochet have to offer, inspiration and advice as well as great quality yarns at incredible prices! Would you like to use our patterns for other than personal use? You can read what you are allowed to do in the Copyright text at the bottom of all our patterns. Happy crafting!
Comments / Questions (3)
Voor de schouder wordt er een naald recht gebreid aan de verkeerde kant. bij het afwerken lees ik: Naai de schoudernaden samen aan de binnenkant van de afkantrand. is hier een video van of kun je uitleggen hoe ik de schouders aan elkaar naai?
03.08.2022 - 15:34DROPS Design answered:
Dag Celine,
Vermoedelijk staat er een fout in en brei je niet 1 naald recht aan de verkeerde kant, maar brei je 1 naald aan de verkeerde kant zoals de steken zich voordoen. Anders zou je een ribbel krijgen aan de goede kant. Als je daarna afkant met recht aan de goede kant, kun je de schouders aan elkaar naaien met maassteken.
06.08.2022 - 11:13Hello again, Thank you for your prompt response. Is there a video showing how to knit this cable? Thank you again.
28.02.2022 - 15:39DROPS Design answered:
Dear Grace, you could use this video, but working 9 stitches in the cable needle instead of 3. https://www.garnstudio.com/video.php?id=19&lang=en. Happy knitting!
28.02.2022 - 16:10Hello, Regarding chart A.1- the way I understand it, there is a yarn over between 2 stitches =19 (?). Then on the way back?
28.02.2022 - 00:06DROPS Design answered:
Dear Grace, A.1 is worked over 9 sts; 1st row = *K1, YO* x 9 = you increase 9 sts = there are 18 sts. On next row purl all yarn overs twisted to avoid holes (= see 3rd symbol). Happy knitting!
28.02.2022 - 10:48