
Popular categories
Looking for a yarn?


|
|||||||||||||||||||||||||
Pink Peony Cardigan |
|||||||||||||||||||||||||
 |
 |
||||||||||||||||||||||||
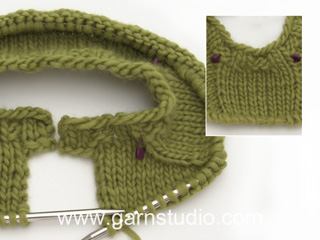
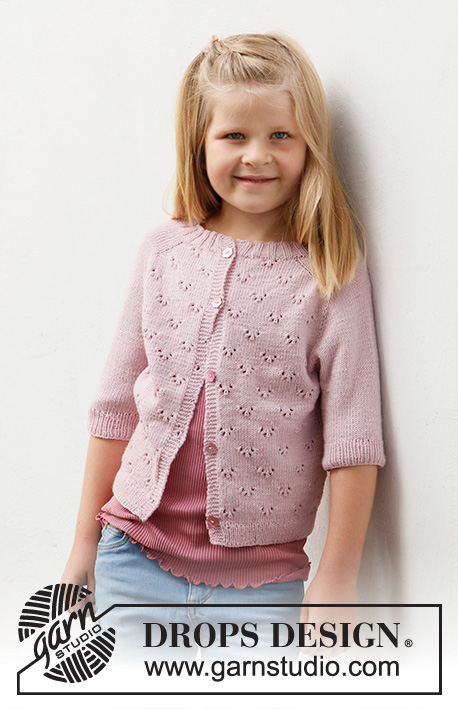
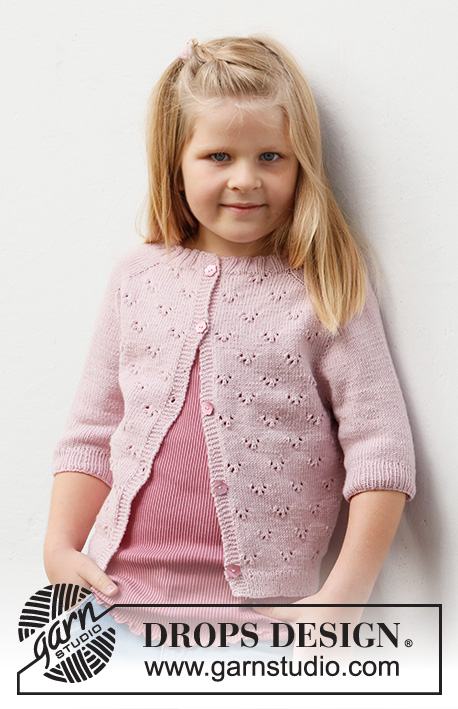
Knitted jacket for children in DROPS Baby Merino. The piece is worked top down with saddle-shoulders, lace pattern and short sleeves. Sizes 3-14 years.
DROPS Baby & Children 38-22 |
|||||||||||||||||||||||||
|
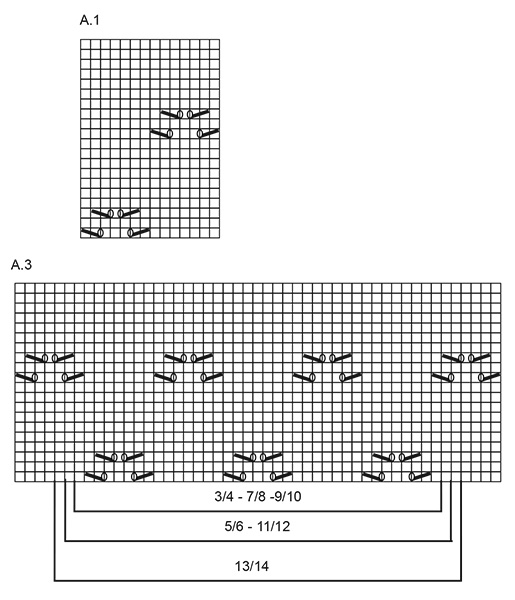
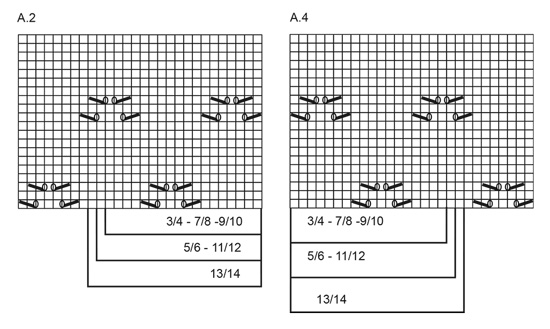
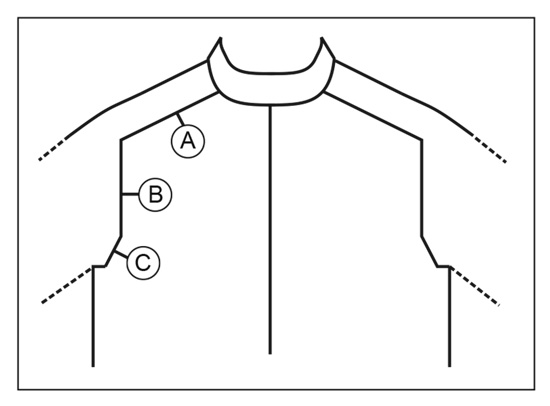
------------------------------------------------------- EXPLANATIONS FOR THE PATTERN: ------------------------------------------------------- RIDGE/GARTER STITCH (worked back and forth): Knit all rows. 1 ridge in height = Knit 2 rows. PATTERN: See diagrams A.1 to A.4. Find your size in the diagrams. The diagrams show all rows in the pattern from the right side. INCREASE TIP-1 (evenly spaced): To work out how to increase evenly, count the total number of stitches on the needle (e.g. 96 stitches), minus the bands (e.g. 10 stitches) and divide the remaining stitches by the number of increases to be made (e.g. 19) = 4.5. In this example, increase by making 1 yarn over after alternately each 4th and 5th stitch. Do not increase on the bands. On the next row work the yarn overs twisted to avoid holes. INCREASE TIP-2 (for saddle shoulders, sleeves and yoke from the RIGHT SIDE): BEFORE MARKER: The new stitch twists to the right. Use the left needle to pick up the strand between 2 stitches from the previous round, pick up the back strand and knit in the front loop. AFTER MARKER: The new stitch twists to the left. Use the left needle to pick up the strand between 2 stitches from the previous round, pick up the front strand and knit in the back loop. INCREASE TIP-3 (for saddle shoulders, sleeves and yoke from the WRONG SIDE): BEFORE MARKER: The new stitch twists to the right. Use the left needle to pick up the strand between 2 stitches from the previous round, pick up the front strand and purl in the back loop. AFTER MARKER: The new stitch twists to the left. Use the left needle to pick up the strand between 2 stitches from the previous round, pick up the back strand and purl in the front loop. BUTTONHOLES: Work buttonholes on the right band (when the garment is worn). Work from the right side when there are 3 stitches left on the row as follows: Make 1 yarn over, knit 2 together and knit 1. On the next row (wrong side), knit the yarn over to leave a hole. The first buttonhole is worked when the neck is finished (transition between neck and yoke). Then work the other 4-5-5-6-6-6 buttonholes with approx. 7-6-6½-6-6-6½ cm = 2¾"-2⅜"-2½"-2⅜"-2⅜"-2½" between each one. BINDING-OFF TIP: To avoid the bind-off edge being tight you can bind off with a larger size needle. If the edge is still tight, make 1 yarn over after approx. each 6th stitch at the same time as binding off; the yarn overs are bind off as normal stitches. ------------------------------------------------------- START THE PIECE HERE: ------------------------------------------------------- JACKET – SHORT OVERVIEW OF THE PIECE: The neck and yoke are worked back and forth with circular needle, from mid-front and top down. Stitches are increased for the shoulders, then for the sleeves and finally for the yoke. The yoke is divided for the body and sleeves and the body continued back and forth. The sleeves are worked in the round with double pointed needles/short circular needle, top down. NECK: Cast on 96-100-104-104-108-112 stitches (including 5 band stitches on each side towards mid-front) with circular needle size 2.5 MM = US 1.5 and Baby Merino. Purl 1 row (= wrong side). The next row is worked as follows from the right side: 5 band stitches in GARTER STITCH – read description above, * knit 2, purl 2 *, work from *-* until there are 7 stitches left, knit 2 and 5 band stitches in garter stitch. Continue this rib for 3 cm = 1⅛". When the rib is finished, knit 1 row from the right side where you increase 19-19-23-23-23-23 stitches evenly spaced – read INCREASE TIP-1 = 115-119-127-127-131-135 stitches. Purl 1 row from the wrong side (yarn overs purled twisted and the bands worked in garter stitch). Change to circular needle size 3 MM = US 2.5. YOKE: Insert a marker after the band at the beginning of the row – THE PIECE IS MEASURED FROM HERE! In addition, insert 4 other markers as described below – without working the stitches and each marker inserted between 2 stitches. The markers should be of a different color to the marker on the neck and are used when increasing. Marker 1: Count 23-24-23-23-24-25 stitches (= front piece), insert the marker before the next stitch. Marker 2: Count 16-16-22-22-22-22 stitches from marker 1 (= shoulder), insert the marker before the next stitch. Marker 3: Count 37-39-37-37-39-41 stitches from marker 2 (= back piece), insert the marker before the next stitch. Marker 4: Count 16-16-22-22-22-22 stitches from marker 3 (= shoulder), insert the marker before the next stitch. There are 23-24-23-23-24-25 stitches left on the front piece after marker 4. Allow the 4 markers to follow your work onwards. INCREASES FOR SADDLE SHOULDERS: Read the whole of the next section before continuing! Continue working 5 band stitches on each side, A.2 over the next 18-19-18-18-19-20 stitches, stockinette stitch over the next 16-16-22-22-22-22 stitches, A.3 over the next 37-39-37-37-39-41 stitches, stockinette stitch over the next 16-16-22-22-22-22 stitches, A.4 over the next 18-19-18-18-19-20 stitches. A.1 shows 1 repeat of the pattern. AT THE SAME TIME on the first row from the right side increase 4 stitches for the shoulders as follows: Increase 1 stitch BEFORE markers 1 and 3 and increase 1 stitch AFTER markers 2 and 4 – read INCREASE TIP-2. You are only increasing on the front and back pieces, the number of sleeve stitches remains the same. On the next row from the wrong side increase for the shoulders as follows: Increase 1 stitch BEFORE markers 4 and 2 and increase 1 stitch AFTER markers 3 and 1 – read INCREASE TIP-3. The increases are different on the right and wrong sides, so the stitches lie neatly. Continue the pattern and increase like this every row (i.e. both from the right and wrong side) a total of 12-16-20-22-24-26 times = 163-183-207-215-227-239 stitches. REMEMBER THE KNITTING GAUGE! The increased stitches are worked into A.1, make sure that A.1 fits over the stitches from A.2, A.3 and A.4. After the last increase, the piece measures approx. 4-5-6-7-8-9 cm = 1½"-2"-2⅜"-2¾"-3⅛"-3½" from the marker on the neck. Now increase for the sleeves as described below. INCREASES FOR SLEEVES: Continue with stockinette stitch, pattern as before and 5 band stitches in garter stitch on each side. AT THE SAME TIME on the next row from the right side, increase 4 stitches as follows: Increase 1 stitch AFTER markers 1 and 3 and increase 1 stitch BEFORE markers 2 and 4. You are only increasing on the sleeves and the number of stitches on the front and back pieces remains the same. The increased stitches are worked in stockinette stitch. Increase like this every 2nd row (i.e. every row from the right side) a total of 13-17-15-16-18-19 times = 215-251-267-279-299-315 stitches. The piece measures approx. 12-16-15-17-19-21 cm = 4¾"-6¼"-6"-6¾"-7½"-8¼" from the marker on the neck. INCREASES FOR YOKE: Now increase 1 stitch on each side of all 4 markers as follows: Work until there is 1 stitch left before markers 1 and 3, increase 1 stitch before the marker, work 1 stitch, move the marker to the right needle and increase 1 stitch after the marker. Work to markers 2 and 4, increase 1 stitch before the marker, move the marker to the right needle, work 1 stitch and increase 1 stitch after the marker (= 8 stitches increased). You are now increasing on both the front and back pieces and on the sleeves. The increased stitches are worked into A.1 on the back/front pieces and in stockinette stitch on the sleeves. Increase like this every 2nd row a total of 5-2-2-1-0-0 times = 255-267-283-287-299-315 stitches. When all the increases are finished, the piece measures approx. 15-17-17-18-19-21 cm = 6"-6¾"-6¾"-7"-7½"-8¼" from the marker on the neck. If the piece is shorter than this, continue working without further increases to the correct length. Now divide the piece for body and sleeves on the next row as follows: Work the first 40-42-45-46-48-51 stitches (front piece), place the next 52-54-56-56-58-60 stitches on a thread for the sleeve, cast on 8-8-8-10-10-10 stitches, work 71-75-81-83-87-93 stitches (= back piece), place the next 52-54-56-56-58-60 stitches on a thread for the sleeve, cast on 8-8-8-10-10-10 stitches, work the last 40-42-45-46-48-51 stitches (= front piece). Body and sleeves are finished separately. THE PIECE IS NOW MEASURED FROM HERE. BODY: = 167-175-187-195-203-215 stitches. Work A.1 back and forth with 5 band stitches in garter stitch on each side; the stitches which do not fit into A.1 in the sides are worked in stockinette stitch. Continue working until the piece measures 12-12-15-16-17-17 cm = 4¾"-4¾"-6"-6¼"-6¾"-6¾" from the division. There is approx. 4 cm = 1½" left to finished length; try the jacket on and continue to desired length. Knit 1 row from the right side, where you increase 36-36-36-40-44-44 stitches evenly spaced = 203-211-223-235-247-259 stitches. NOTE: You increase stitches here to prevent the rib being tight. Change to circular needle size 2.5 MM = US 1.5 and work the next row from the wrong side as follows: 5 band stitches in garter stitch, * purl 1, knit 1 *, work from *-* until there are 6 stitches left, purl 1 and 5 band stitches in garter stitch. Continue this rib for 4 cm = 1½". Bind off with garter stitch over garter stitch, knit over knit and purl over purl – read BINDING-OFF TIP! The jacket measures approx. 34-36-40-42-44-46 cm = 13⅜"-14¼"-15¾"-16½"-17¼"-18" from the shoulder down. SLEEVES: Place the 52-54-56-56-58-60 stitches from the thread on the one side of the piece on short circular needle/double pointed needles size 3 MM = US 2.5 and knit up 1 stitch in each of the 8-8-8-10-10-10 stitches cast on under the sleeve = 60-62-64-66-68-70 stitches. Insert a marker thread in the middle of the new stitches under the sleeve. Start at the marker thread and work stockinette stitch in the round. Continue working until the sleeve measures 5-6-10-13-15-17 cm = 2"-2⅜"-4"-5⅛"-6"-6¾" from the division, There is approx. 4 cm = 1½" left to finished length; try the jacket on and continue to desired length. Knit 1 round where you decrease 4 stitches evenly spaced = 56-58-60-62-64-66 stitches. Change to double pointed needles size 2.5 MM = US 1.5 and work rib (knit 1, purl 1) for 4 cm = 1½". Bind off with knit over knit and purl over purl – remember BINDING-OFF TIP! The sleeve measures approx. 9-10-14-17-19-21 cm = 3½"-4"-5½"-6¾"-7½"-8¼" from the division. Work the other sleeve in the same way. ASSEMBLY: Sew the buttons onto the left band. |
|||||||||||||||||||||||||
Diagram explanations |
|||||||||||||||||||||||||
|
|||||||||||||||||||||||||
|
|||||||||||||||||||||||||
|
|||||||||||||||||||||||||

|
|||||||||||||||||||||||||
|
|||||||||||||||||||||||||
|
Have you made this or any other of our designs? Tag your pictures in social media with #dropsdesign so we can see them! Do you need help with this pattern?You'll find tutorial videos, a Comments/Questions area and more by visiting the pattern on garnstudio.com. © 1982-2024 DROPS Design A/S. We reserve all rights. This document, including all its sub-sections, has copyrights. Read more about what you can do with our patterns at the bottom of each pattern on our site. |
|||||||||||||||||||||||||


With over 40 years in knitting and crochet design, DROPS Design offers one of the most extensive collections of free patterns on the internet - translated to 17 languages. As of today we count 304 catalogs and 11422 patterns - 11417 of which are translated into English (US/in).
We work hard to bring you the best knitting and crochet have to offer, inspiration and advice as well as great quality yarns at incredible prices! Would you like to use our patterns for other than personal use? You can read what you are allowed to do in the Copyright text at the bottom of all our patterns. Happy crafting!
Comments / Questions (25)
Buonasera, anch'io vorrei fare le maniche lunghe in questo modello. Oltre ad allungare la lunghezza delle maniche, come avete già scritto nella precedente risposta, come ci si deve comportare per le diminuzioni? È necessario farne qualcuna in più? Grazie
09.05.2021 - 18:55DROPS Design answered:
Buonasera Eleonora, dal momento che è un modello lavorato dall'alto in basso può provare mano a mano il lavoro e valutare se necessita di ulteriori diminuzioni. Buon lavoro!
09.05.2021 - 19:19Wunderschönes Teil! Und ich liebe Strickstücke aus einem Stück, weil ich immer Probleme habe, Ärmel nachträglich so einzusetzen, dass die Naht elastisch genug ist. ABER: Die Anleitung ist doch SEHR anspruchsvoll. Ich darf mich, glaube ich, als erfahrene Strickerin bezeichnen, aber hier brauchte ich Hochkonzentration: Gleichzeitig auf komplizierte Zunahmen, Muster, Knopflöcher und Blenden achten erfordert Einiges. Das Ergebnis wird aber glaube ich wunderschön!
06.05.2021 - 09:48Buonasera, avrei bisogno un chiarimento. Cosa significa ".... lavorare a maglia rasata le maglie che non rientrano in A.1 ai lati." Cosa devo fare concretamente? Non si potrebbe avere una foto che mostra come viene il diagramma sotto la manica? Grazie
16.04.2021 - 17:25DROPS Design answered:
Buongiorno Dea, deve lavorare a maglia rasata le maglie che non rientrano nelle ripetizioni di A.1 laterali. Buon lavoro!
17.04.2021 - 11:47Buongiorno, c'è una frase a cui penso manchi un pezzo, dice così " Gli aumenti sono diversi sul diritto e rovescio del lavoro, in modo che le maglie. "...cosa manca? Si trova nel paragrafo dove parla degli aumenti delle spalle ... Grazie è piuttosto urgente.
15.04.2021 - 11:06DROPS Design answered:
Buonasera Dea, abbiamo corretto il testo: semplicemente si aumenta in modo differente sul diritto e rovescio del lavoro in modo che il lavoro sia più ordinato. Buon lavoro!
15.04.2021 - 19:29Buongiorno, vorrei sapere se è possibile avere le istruzioni per fare la manica lunga per una taglia 5/6 anni su questo modello. Grazie
13.04.2021 - 15:31DROPS Design answered:
Buonasera Piera, può semplicemente allungare la lunghezza delle maniche. Buon lavoro!
15.04.2021 - 19:13