
Beliebte Kategorien
Suchen Sie nach einem Garn?


Kommentare / Fragen (11)
![]() Carmen hat geschrieben:
Carmen hat geschrieben:
Cuando se trata de los 4 puntos que se pasan el penúltimo sobre el último tengo una confusión: ¿El último es el de la derecha o el de la izquierda de esos 4?
01.12.2019 - 08:54DROPS Design hat geantwortet:
Hola Carmen. El último punto de los 4 puntos es el punto a la derecha (el último punto pasado de la aguja derecha a la aguja izquierda).
10.12.2019 - 00:09
![]() Susana hat geschrieben:
Susana hat geschrieben:
Creo que son 71 puntos los que se deben montar y no 70. ¿O tendré 4 hebrasjuntas al inicio del patrón? (dos hebras de A3 del lado derecho y 2 hebras de A5 del lado izquierdo) Porque al repetir el patron: A3, A4, A4, A5, A3, A4, A4, A5 tengo esas 4 hebras juntas en A5, A3.
10.11.2019 - 06:25DROPS Design hat geantwortet:
Hola Susana. el patrón es correcto. No estas teniendo en cuenta los dos puntos centrales ( ver las explicaciones en el texto), que no están presentes en el diagrama y se separan los dos lazadas dobles a cada lado en el centro del delantero y el centro de la espalda.
10.11.2019 - 11:22
![]() LUCIA CAMARGO DO CARMO hat geschrieben:
LUCIA CAMARGO DO CARMO hat geschrieben:
Fiz este modelo e ficou lindo! Muito obrigada por compartilhar conosco!
25.09.2019 - 19:41
![]() Tali hat geschrieben:
Tali hat geschrieben:
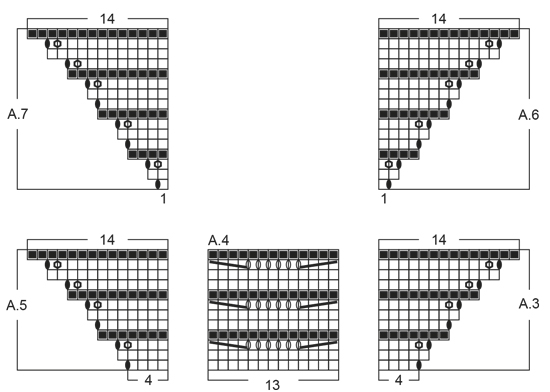
I continue the question Ana asked - and the next time I finish A6-7 vertically - I add more waves again right? and begin A6-7 from the beginning...
08.04.2019 - 17:32DROPS Design hat geantwortet:
Dear Tali, correct, you repeat A.6/A.7 over the first/last stitch and work all stitches in between in A.4 - in each A.6/A.7 you increased 13 sts, when A.6/A.7 have been worked 1 time in height, you work A.6 over the first st, then A.4 over the next 13 sts (= the last 13 sts from previous A.6) and same but reversed for A.7. Happy knitting!
09.04.2019 - 09:56
![]() Ana hat geschrieben:
Ana hat geschrieben:
Hi, I'm a bit confused. So after I have completed A.6/A.7 once, vertically, I continue to work by starting the A.6/A.7 diagram all over again from the beginning (bottom)? Also work an extra 13 st (A.4 ) on each side of poncho? Did I understood correctly?
08.04.2019 - 15:30DROPS Design hat geantwortet:
Dear Ana, after you have worked A.6/A.7 one time in height, you will repeat same patterns, but there are now enough stitches between A.6 and A.7 to work 2 more repeats of A.4 between the new A.6/A.7 (=6 repeats instead of 4). Happy knitting!
08.04.2019 - 16:26
![]() Tali hat geschrieben:
Tali hat geschrieben:
I have just began knitting the poncho and I have some questions: 1. Should I stay with the same light beige color in the first 3 rows (p, k, p) and the first 4 rows of the wave part? 2. When should i change colors? just before the first stitch of A3? it is YO? Thanks a lot. Tali
29.03.2019 - 15:44DROPS Design hat geantwortet:
Dear Tali, the cast on row + the first 3 rounds (= P, K, P) are worked with light beige, then work stripes (= A.1 then A.2), ie A.1 starts with 4 rounds beige clair (= there will be a total of 7 rounds including the rounds before pattern worked with beige clair). Changing colours happens at the beg of the round, ie with A.3 (= eg start the new colour with a double YO on round 5) Happy knitting!
01.04.2019 - 11:31
![]() Tali hat geschrieben:
Tali hat geschrieben:
This poncho is lovely! but I am planning to use another yarn (as I was asked to use not just wool )-:). I found two relevant: one is for 6.5 mm needles and the other for 10 mm needles. What will be better to choose and how should I convert the instructions? I thought doing the small size (it is for 12 years old girl). Thanks a lot!, Tali
01.03.2019 - 16:40DROPS Design hat geantwortet:
Dear Tali, we are unfortunately not able to adapt each our patterns to each individual request. Please contact the store where you bought the yarn for any individual assistance. Happy knitting!
04.03.2019 - 07:32
![]() Debbie Stevenson hat geschrieben:
Debbie Stevenson hat geschrieben:
Hi I would love to make this poncho for my grand daughter. She is 1yrs old. Do you have it in children sizes
26.01.2019 - 09:53DROPS Design hat geantwortet:
Dear Mrs Stevenson, this pattern is only available in adult size - you will find here our poncho patterns for babies. Happy knitting!
28.01.2019 - 10:13
![]() Grace E. James hat geschrieben:
Grace E. James hat geschrieben:
Gorgeous! it was pretty easy, thank you so much for the directions
14.07.2018 - 06:57
![]() Nancy Kreglow hat geschrieben:
Nancy Kreglow hat geschrieben:
I also would like to make this in crochet! Please!
28.03.2018 - 23:17
|
||||||||||||||||||||||||||||||||||||||||||||||
Double Rainbow |
||||||||||||||||||||||||||||||||||||||||||||||
|
|
||||||||||||||||||||||||||||||||||||||||||||||
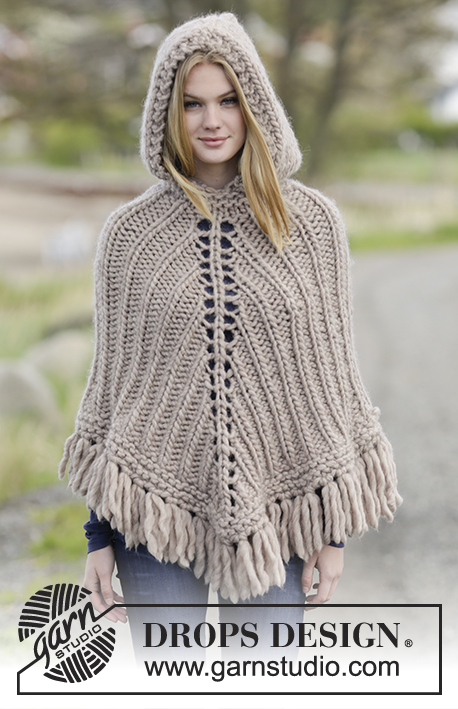
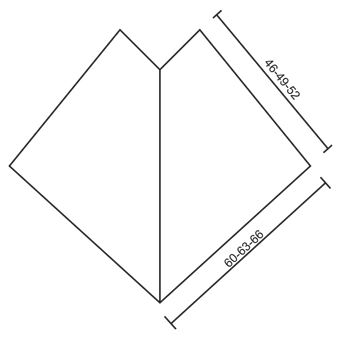
Von oben nach unten gestrickter DROPS Poncho in ”Snow” mit Streifen und Wellenmuster. Größe S - XXXL.
DROPS Extra 0-1220 |
||||||||||||||||||||||||||||||||||||||||||||||
|
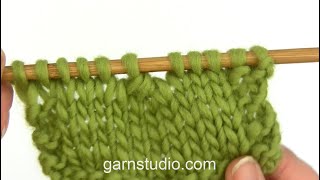
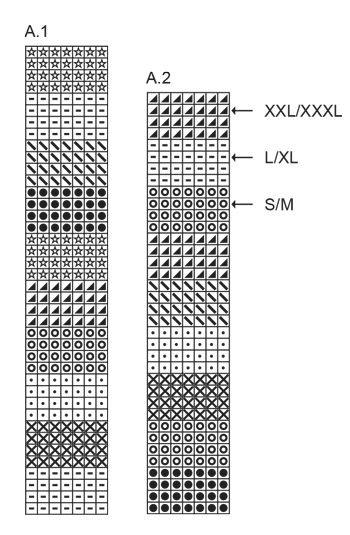
STREIFEN: Streifen zuerst wie in Diagramm A.1 gezeigt str, dann wie in Diagramm A.2 gezeigt. WELLENMUSTER: Siehe Diagramme A.3 bis A.7. MITTEL-M: Die Mittel-M wird in allen glatt-re-Rd von A.3-A.7 re gestr, jedoch in Rd, in denen in A.3-A.7 li gestr wird, wird die Mittel-M ebenfalls li gestr. STRICKTIPP: 4 M wie folgt re zusstr: 4 M re str, die M zurück auf die linke Nadel legen, die vorletzte M (von der Nadelspitze aus betrachtet) über die letzte M ziehen, sodass diese M um die letzte M herum liegt, dies wdh, bis alle 3 M übergezogen sind (= 3 M abgenommen), die letzte gestr M zurück auf die rechte Nadel legen. 4 M wie folgt re verschränkt zusstr: 4 M re str, die vorletzte M (von der Nadelspitze aus betrachtet) über die letzte M ziehen, sodass diese M um die letzte M herum liegt, dies wdh, bis alle 3 M übergezogen sind (= 3 M abgenommen) ---------------------------------------------------------- PONCHO: Die Arb wird in Rd von oben nach unten auf der Rundnadel gestr. 70 M (für alle Größen) auf Rundnadel Nr. 7 mit hellbeige anschlagen. An der 35. M und der 70. M je 1 Markierer anbringen (= MITTEL-M (siehe oben) vorne und hinten), die Markierer beim Stricken mitführen. 1 Rd li, 1 Rd re und 1 Rd li str. Zu Rundnadel Nr. 8 wechseln und STREIFEN (siehe oben) str, GLEICHZEITIG im WELLENMUSTER (siehe oben) in folgender Abfolge str: A.3 (= 4 M), A.4 über die nächsten 26 M (= 2 Rapporte), A.5 (= 4 M), 1 M re (= Mittel-M mit dem Markierer), A.3 (= 4 M), A.4 über die nächsten 26 M (= 2 Rapporte), A.5 (= 4 M) und 1 M re (= Mittel-M mit dem Markierer). In dieser Weise weiterstr. MASCHENPROBE BEACHTEN! Wenn A.3-A.5 1 x in der Höhe gestr wurden, sind 110 M auf der Nadel (d.h. je 54 M beidseitig der Mittel-M vorne und hinten). Die nächste Rd wie folgt str: A.6 (= 1 M), A.4 über die nächsten 52 M (= 4 Rapporte), A.7 (= 1 M), 1 M re (= Mittel-M mit dem Markierer), A.6 (= 1 M), A.4 über die nächsten 52 M (= 4 Rapporte), A.7 (= 1 M) und 1 M re (= Mittel-M mit dem Markierer). In dieser Weise weiterstr. Wenn A.6/A.7 1 x in der Höhe gestr wurden, sind 162 M auf der Nadel und es ist nun an beiden Seiten Platz für je 1 Rapport mehr von A.4. Weiter wie zuvor im Muster A.6/A.7 und A.4 str und die Arb nach der in A.2 mit dem Pfeil für die gewünschte Größe markierten Rd beenden (bzw. ggf. bis zur gewünschten Länge str). Dann locker li abketten. |
||||||||||||||||||||||||||||||||||||||||||||||
Erklärungen zum Diagramm |
||||||||||||||||||||||||||||||||||||||||||||||
|
||||||||||||||||||||||||||||||||||||||||||||||
 |
||||||||||||||||||||||||||||||||||||||||||||||
 |
||||||||||||||||||||||||||||||||||||||||||||||
 |
||||||||||||||||||||||||||||||||||||||||||||||
Haben Sie diese Anleitung nachgearbeitet?Dann taggen Sie Ihre Fotos mit #dropspattern oder schicken Sie sie an die #dropsfan Galerie Brauchen Sie Hilfe bei dieser Anleitung?Sie finden 19 Videotutorials, einen Kommentar/Fragen-Bereich und vieles mehr, wenn sie die Anleitung bei garnstudio.com aufrufen. © 1982-2026 DROPS Design A/S. Wir besitzen alle Rechte. Dieses Dokument, einschließlich aller Untersektionen, hat Urheberrechte. Mehr dazu, was Sie mit unseren Anleitungen machen können, finden Sie ganz unten auf der Seite zu jeder Anleitung. |
||||||||||||||||||||||||||||||||||||||||||||||


Mit über 40 Jahren Tätigkeit im Entwerfen von Strick- und Häkelmustern bietet Ihnen DROPS Design eine der umfangreichsten Sammlungen von kostenlosen Anleitungen im Internet - in 17 Sprachen übersetzt. Zum jetzigen Zeitpunkt haben wir insgesamt 324 Handarbeitshefte und 12290 Anleitungen auf Deutsch. 12202
Unser Ziel ist es, Ihnen die besten Angebote zum Stricken und Häkeln, Inspirationen und Ratschläge sowie qualitativ hochstehende Garne zu unglaublichen Preisen zu bieten! Möchten Sie unsere Anleitungen nicht nur für den persönlichen Gebrauch nutzen? Unsere Copyright Bedingungen finden Sie bei allen unseren Anleitungen ganz unten auf der jeweiligen Seite. Viel Spaß beim Handarbeiten!
Kommentieren Sie die Anleitung DROPS Extra 0-1220
Wir würden gerne Ihre Meinung zu diesem Modell erfahren!
Wenn Sie eine Frage stellen möchten, prüfen Sie bitte, dass Sie die richtige Kategorie im unten stehenden Formular gewählt haben - so bekommen Sie schneller eine Antwort. Die obligatorischen Felder sind mit einem * gekennzeichnet.