
Beliebte Kategorien
Suchen Sie nach einem Garn?


Kommentare / Fragen (118)
![]() Maria hat geschrieben:
Maria hat geschrieben:
Is it possible, that your stitch count is incorrect? With size XL I get 212 stitches around the chest, which come to 124 cm of circumference with a gauge of 17 stitches, instead of the indicated 116 cm... As Klaudia, I do not get your proportions: 84 cm (144 stitches at a 17 st gauge) of neckline circumference!?
04.02.2026 - 14:55
![]() Silvia hat geschrieben:
Silvia hat geschrieben:
Buongiorno, i 4 ferri in cui metto in attesa le maglie per lo scollo devono coincidere con gli ultimi 4 ferri del raglan? Io ho iniziato a mettere in attesa a 41 cm ma poi il raglan è continuato per un po' e mi sono trovata uno scalino...
30.12.2025 - 09:21DROPS Design hat geantwortet:
Buongiorno Silvia, deve seguire le indicazioni riportate: se le diminuzioni non sono terminate deve diminuire 1 maglia su ogni ferro fino alla fine delle diminuzioni. Buon lavoro!
30.12.2025 - 22:09
![]() Klaudia hat geschrieben:
Klaudia hat geschrieben:
Vielen Dank für die rasche Antwort. Mir war nicht klar, dass die Jacke einen so weiten Halsausschnitt hat - aber kein Problem, ich stricke einfach ein paar Abnahmen und Reihen mehr. Passt dann sicherlich auch noch oder?
02.12.2025 - 08:56DROPS Design hat geantwortet:
Liebe Klaudia, wenn Sie Änderungen machen möchten, denken Sie daran, die Jacke regelmäßig anzuprobieren, so wissen Sie, ob alles passt. Viel Spaß beim Stricken!
02.12.2025 - 17:07
![]() Klaudia hat geschrieben:
Klaudia hat geschrieben:
Servus, rein mathematisch bleiben mir erheblich mehr Maschen nach Abschluss der Raglanabnahmen übrig: ich stricke in XXL und habe bei Beginn der Rundpasse 352 M auf der Nadel, nehme dann 20 plus 6 x 8 M ab - sind 208 M. Es bleiben also 144 M übrig. Laut Anleitung sollten es jedoch "ca. 80 - 120 M entlang des gesamten Halsrandes" sein. Ich hab mal für alle Größen gerechnet und komm auf 92 - 156 M ??
01.12.2025 - 14:22DROPS Design hat geantwortet:
Liebe Klaudia, in XXL sind es 352 M am Anfang der Passe, für Raglan wird man insgesamt 208 Maschen abnehmen, dazu werden noch auch wenigstens 44 Maschen für den Hals stillgelegt und zwar: 12 M + (3 Maschen x 2) + (2 M x 2)= 22 M + 1 M in jeder 2. Reihe bis die Raglanabnahmen fertig sind. So sind es ca: 352-208-(22x2 Seiten) = 100 Maschen - dann stricken Sie alle Maschen inkl. die stillgelgten Maschen = wenigstens 44 Maschen (22 beidseitig) = ca 144 M. Viel Spaß beim Stricken!
01.12.2025 - 16:17
![]() Karishma Shah hat geschrieben:
Karishma Shah hat geschrieben:
Hi! When you say "remember the gauge" for the button band garter stitch, does that mean I should switch back to my Size 7 needles for the button band while using Size 8 needles for the stockinette?
24.10.2025 - 21:33DROPS Design hat geantwortet:
Dear Karishma Shah, after garter stitch at the bottom, you start working all the stitches on circular needle size 8 mm (including band mid front stitches). Happy knitting!
03.11.2025 - 08:53
![]() Tanja hat geschrieben:
Tanja hat geschrieben:
Kann das erste Knopfloch auch bereits nach 16cm statt nach 24 cm gearbeitet werden oder fällt der Kragen dann nicht richtig? Ich möchte den Hals lieber geschlossener haben.
03.09.2025 - 08:45DROPS Design hat geantwortet:
Liebe Tanja, das letzte Knopfloch wird ca 1 cm bevor man die Maschen für den Hals stilllegt, so können Sie kalkulieren, ob Sie am besten ein anderes Knopfloch vor dem 1. stricken möchten oder ob Sie dann liber das letzte früher stricken. Viel Spaß beim Stricken!
03.09.2025 - 16:18
![]() Susanne Hermann Danielsen hat geschrieben:
Susanne Hermann Danielsen hat geschrieben:
Hvor er opskriften til kraven ???
05.05.2025 - 13:07DROPS Design hat geantwortet:
Hei Susanne. Står under HALS: Når raglan indtagningerne er færdige skiftes til rundp 4,5 og der strikkes m op fra trådene = ca 80 til 120 m langs hele halskanten. Strik 1 p r - Samtidig med at m-ant justeres til 84-88-92-96-100-108 m. Fortsæt med retstrik til kraven måler 8-8-8-9-9-9 cm. Luk alle m løst af. mvh DROPS Design
05.05.2025 - 14:10
![]() Marie Duranceau hat geschrieben:
Marie Duranceau hat geschrieben:
Can you help me please, I have decreased 13 times and have reached the length recommended before I start to decrease on both the knit side and again on the purl side. How can I progress?
26.04.2025 - 23:53DROPS Design hat geantwortet:
Dear Mrs Duranceau, what about your tension? Do you have the 22 rows stocking stitch = 10 cm in height? If not, then you might have to edit how often you should work the decreases to match your own tension and the finished measurements. Happy knitting!
28.04.2025 - 09:29
![]() Marie Duranceau hat geschrieben:
Marie Duranceau hat geschrieben:
I find the instructions for the yoke very confusing, what do I do? Do I do the decreases on the knit and purl rows then do a plain knit and purl rows with no decreases? That makes 4rows altogether, and then do the 2 decrease rows again?
23.04.2025 - 15:49DROPS Design hat geantwortet:
See answer below, if it's still not clear, make sure to tell us which size you are working on. Happy knitting!
23.04.2025 - 16:20
![]() Marie Duranceau hat geschrieben:
Marie Duranceau hat geschrieben:
I find the instructions for the yoke very confusing, what do I do? Do I do the decreases on the knit and purl rows then do a plain knit and purl rows with no decreases? That makes 4rows altogether, and then do the 2 decrease rows again?
23.04.2025 - 15:49DROPS Design hat geantwortet:
Dear Mrs Duranceau, you start to decrease for raglan on the very first row over all stitches for yoke; and decrease for raglan a total of 18 -20 times (see size) on every other row = on every row from the right side then 2 to 8 times on every row = from both right side and wrong side, at the same time, remember to shape neck when piece measures 41-45 cm, first slipping stitches on each side on a thread/stitch holder, then casting off stitches. Can this help? Happy knitting!
23.04.2025 - 16:19
|
|
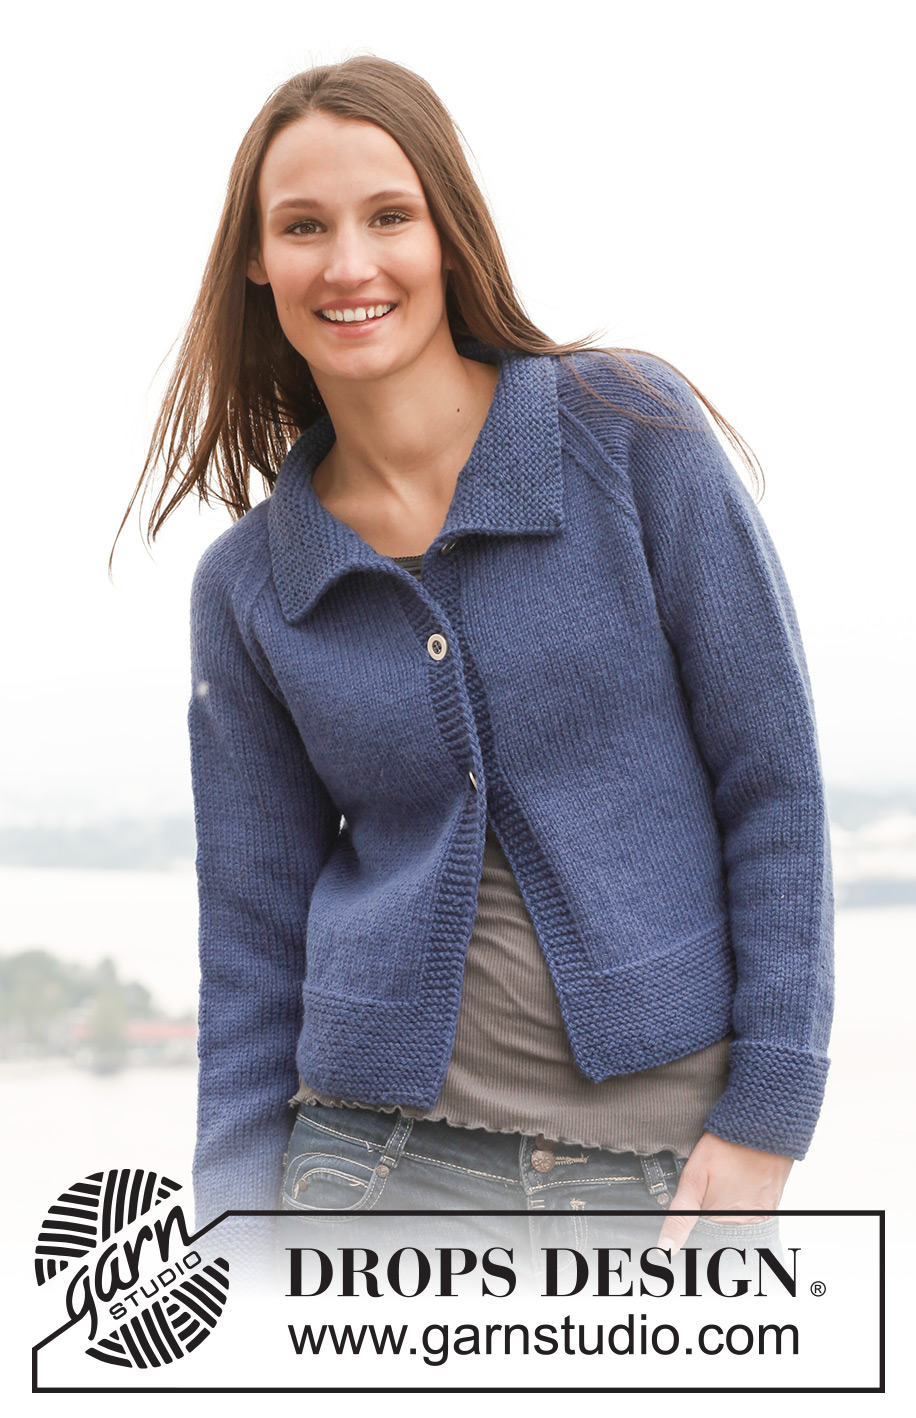
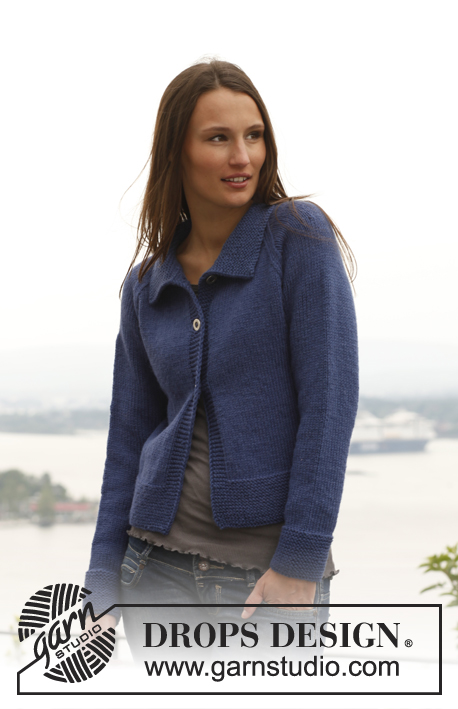
Winter Morning#wintermorningcardigan |
|
 |
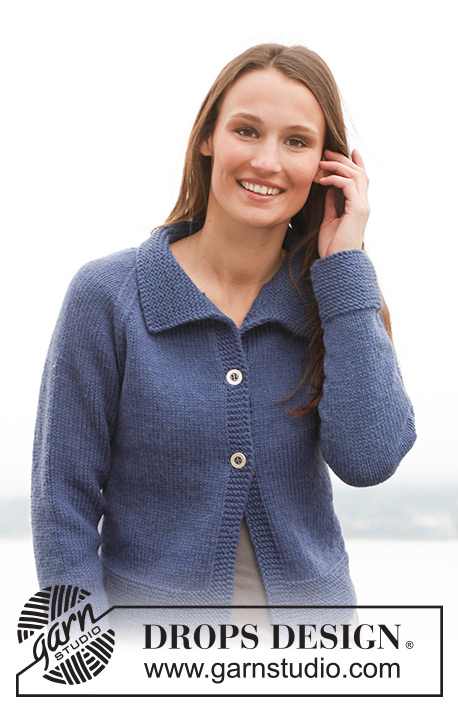 |
DROPS Jacke in ”Alaska” mit Raglanärmeln. Größe S - XXXL.
DROPS 141-9 |
|
|
KRAUS RECHTS (in Hin- und Rück-R): Jede R re stricken. KRAUS RECHTS (in Runden): 1 Rd re, 1 Rd li im Wechsel ZUNAHMETIPP: Je 1 M beidseitig des Markierers wie folgt zunehmen: Stricken, bis noch 1 M vor dem Markierer übrig ist, dann 1 Umschlag arbeiten, 2 M stricken (der Markierer befindet sich zwischen diesen beiden M), 1 Umschlag arbeiten. In der nächsten R die Umschläge verschränkt stricken, um Löcher zu vermeiden. RAGLANSCHRÄGUNG: Wie folgt in HIN-R abnehmen: Stricken, bis noch 3 M vor dem Markierer übrig sind, 2 M re zusammenstricken, 2 M re (der Markierer befindet sich zwischen diesen beiden M), 1 M wie zum Rechtsstricken abheben, 1 M re, die abgehobene M überziehen. Wie folgt in RÜCK-R abnehmen: Stricken, bis noch 3 M vor dem Markierer übrig sind, 2 M li verschränkt zusammenstricken (d.h. in das hintere M-Glied statt in das vordere einstechen), 2 M li (der Markierer befindet sich zwischen diesen beiden M), 2 M li zusammenstricken. KNOPFLÖCHER: An der Blende des rechten Vorderteils werden in Hin-R 3 Knopflöcher eingearbeitet. 1 Knopfloch = die 5. und 6. M der R abketten, in der nächsten R über den abgeketteten M 2 M neu anschlagen. Die Knopflöcher bei folgenden Maßen der Blende arbeiten: Gr. S: 24, 32, 40 cm. Gr. M: 25, 33, 41 cm. Gr. L: 24, 33, 42 cm. Gr. XL: 25, 34, 43 cm. Gr. XXL: 24, 34, 44 cm. Gr. XXXL: 24, 34, 44 cm. -------------------------------------------------------- RUMPFTEIL: Das Rumpfteil wird in Hin- und Rück-R auf der Rundnadel ab der vorderen Mitte gestrickt. 140-156-172-192-212-232 M auf Rundnadel Nr. 4,5 mit Alaska anschlagen. 8-8-8-9-9-9 cm KRAUS RE (siehe oben) stricken. In der nächsten Hin-R zu Rundnadel Nr. 5 wechseln und glatt re stricken, jedoch beidseitig die äußersten je 6-6-6-8-8-8 M kraus re stricken (= vordere Blenden). MASCHENPROBE BEACHTEN! VOR DEM WEITERSTRICKEN DEN NÄCHSTEN ABSCHNITT VOLLSTÄNDIG LESEN! Glatt re mit beidseitig je 6-6-6-8-8-8 M kraus re weiterstricken, bis das Strickstück 9-9-9-10-10-10 cm misst. Jeweils 1 Markierer nach den ersten 38-42-46-52-57-62 M und vor den letzten 38-42-46-52-57-62 M anbringen (= Vorderteile, = 64-72-80-88-98-108 M zwischen den Markierern für das Rückenteil). Die Markierer beim Stricken mitführen. Nun beidseitig der beiden Markierer je 1 M zunehmen – siehe ZUNAHMETIPP (= 4 zugenommene M). Die Zunahmen nach jeweils 4-4-4½-4½-4½-4½ cm noch weitere 4 x wdh (= insgesamt 5 x). Es befinden sich insgesamt 160-176-192-212-232-252 M auf der Nadel, davon 74-82-90-98-108-118 M zwischen den Markierern für das Rückenteil. GLEICHZEITIG bei einer Gesamtlänge von 24-25-24-25-24-24 cm an der rechten Blende 1 Knopfloch einarbeiten – siehe KNOPFLÖCHER. Weiterstricken, bis das Strickstück 29-30-31-32-33-34 cm misst. Dann beidseitig der beiden Markierer jeweils 3 M für den Armausschnitt abketten (d.h. je 6 M pro Armausschnitt) (= 148-164-180-200-220-240 verbleibende M). Das Strickstück zur Seite legen und die Ärmel stricken. ÄRMEL: Die Ärmel werden in Runden auf dem Nadelspiel gestrickt. 36-38-40-42-44-44 M auf Nadelspiel Nr. 4,5 mit Alaska anschlagen. 8 cm kraus re stricken. Dann zu Nadelspiel Nr. 5 wechseln und glatt re weiterstricken. Am Rd-Beginn 1 Markierer anbringen (= untere Ärmelmitte). Bei einer Gesamtlänge von 9 cm beidseitig des Markierers je 1 M zunehmen (= 2 zugenommene M). Die Zunahmen nach jeweils 3½-3-3-3-2½-2 cm noch weitere 10-11-12-12-13-15 x wdh (= insgesamt 11-12-13-13-14-16 x) (= 58-62-66-68-72-76 M). Bei einer Gesamtlänge von 48-48-47-47-46-46 cm (die kürzeren Ärmellängen bei den größeren Größen werden durch eine längere Armkugel ausgeglichen) beidseitig des Markierers je 3 M abketten (d.h. 6 abgekettete M an der unteren Ärmelmitte) (= 52-56-60-62-66-70 verbleibende M). RUNDPASSE: Die Ärmel-M an den Stellen, an denen die M beim Rumpfteil abgekettet wurden, auf dieselbe Rundnadel wie das Rumpfteil legen (= 252-276-300-324-352-380 M). An jedem Übergang zwischen dem Rumpfteil und den Ärmeln 1 Markierer anbringen (= 4 Markierer), die Markierer beim Stricken mitführen. Glatt re mit beidseitig 6-6-6-8-8-8 M kraus re, stricken, dabei GLEICHZEITIG in der 1. Hin-R mit den Abnahmen für die RAGLANSCHRÄGUNG (siehe oben) beginnen. Die Abnahmen in jeder 2. R insgesamt 18-18-18-20-20-20 x arbeiten, dann in jeder R 2-4-6-4-6-8 x. - Die Knopflöcher an der rechten Blende nicht vergessen! - GLEICHZEITIG bei einer Gesamtlänge von 41-42-43-44-45-45 cm die M am Halsausschnittrand beidseitig zu Beginn jeder R wie folgt stilllegen: 1 x je 8-8-10-10-12-12 M, 1-1-1-2-2-2 x je 3 M und 2 x je 2 M, dann je 1 M, bis die Raglanschrägung abgeschlossen ist. KRAGEN: Wenn alle Raglanabnahmen abgeschlossen sind, zu Rundnadel Nr. 4,5 wechseln und die stillgelegten M auf die Rundnadel stricken (= ca. 80 bis 120 M entlang des gesamten Halsrandes). 1 R re stricken, dabei GLEICHZEITIG die M-Anzahl auf 84-88-92-96-100-108 M anpassen. Kraus re stricken, bis der Kragen 8-8-8-9-9-9 cm misst. Alle M locker abketten. FERTIGSTELLEN: Die Öffnungen unter den Ärmeln schließen. Die Knöpfe an die linke Blende nähen. |
|
 |
|
Haben Sie diese Anleitung nachgearbeitet?Dann taggen Sie Ihre Fotos mit #dropspattern #wintermorningcardigan oder schicken Sie sie an die #dropsfan Galerie Brauchen Sie Hilfe bei dieser Anleitung?Sie finden 16 Videotutorials, einen Kommentar/Fragen-Bereich und vieles mehr, wenn sie die Anleitung bei garnstudio.com aufrufen. © 1982-2026 DROPS Design A/S. Wir besitzen alle Rechte. Dieses Dokument, einschließlich aller Untersektionen, hat Urheberrechte. Mehr dazu, was Sie mit unseren Anleitungen machen können, finden Sie ganz unten auf der Seite zu jeder Anleitung. |
|


Mit über 40 Jahren Tätigkeit im Entwerfen von Strick- und Häkelmustern bietet Ihnen DROPS Design eine der umfangreichsten Sammlungen von kostenlosen Anleitungen im Internet - in 17 Sprachen übersetzt. Zum jetzigen Zeitpunkt haben wir insgesamt 324 Handarbeitshefte und 12290 Anleitungen auf Deutsch. 12202
Unser Ziel ist es, Ihnen die besten Angebote zum Stricken und Häkeln, Inspirationen und Ratschläge sowie qualitativ hochstehende Garne zu unglaublichen Preisen zu bieten! Möchten Sie unsere Anleitungen nicht nur für den persönlichen Gebrauch nutzen? Unsere Copyright Bedingungen finden Sie bei allen unseren Anleitungen ganz unten auf der jeweiligen Seite. Viel Spaß beim Handarbeiten!
Kommentieren Sie die Anleitung DROPS 141-9
Wir würden gerne Ihre Meinung zu diesem Modell erfahren!
Wenn Sie eine Frage stellen möchten, prüfen Sie bitte, dass Sie die richtige Kategorie im unten stehenden Formular gewählt haben - so bekommen Sie schneller eine Antwort. Die obligatorischen Felder sind mit einem * gekennzeichnet.