
Beliebte Kategorien
Suchen Sie nach einem Garn?


Kommentare / Fragen (60)
![]() Vidal hat geschrieben:
Vidal hat geschrieben:
Bonjour, je suis en train de tricoter ce boléro et j\'ai du mal à comprendre la phrasé : \"EN MÊME TEMPS, au 2ème rang, monter 1 m côté milieu devant\". Cela veut-il dire qu\'il faut simplement faire 1 augmentation de 1 maille au milieu du devant ? Merci
25.07.2021 - 14:29DROPS Design hat geantwortet:
Bonjour Mme Vidal, vous allez monter 1 maille côté milieu devant (= côté ouverture du devant si vous préférez) à la fin de chaque rang (sur l'envers pour le devant gauche, sur l'endroit pour le devant droit) - cette vidéo montre comment procéder pour monter plusieurs mailles en fin de rang. Bon tricot!
26.07.2021 - 08:58
![]() Jeanette Gaboardi hat geschrieben:
Jeanette Gaboardi hat geschrieben:
Regarding 3/4 sleeve bolero AC 013 pattern. My piece measures 24" instead of the 28 I told you in the previous inquiry. This is the width before binding off for the arm holes. Will these extra inches make the finished bolero larger all over? Do you think 24" will work for the size L? Thank you Jeanette Gaboardi
20.04.2016 - 17:16DROPS Design hat geantwortet:
Dear Mrs Gaboardi, the best way to be sure about the size would be to compare a similar garment she has and like the shape to the finished measurements (taken flat from side to side, and remember in cm) - see here. Happy knitting!
20.04.2016 - 17:44
![]() Jeanette Gaboardi hat geschrieben:
Jeanette Gaboardi hat geschrieben:
Regarding the pattern for the Bolero w/3/4 sleeve pattern AC-013, I am now at the stage where you bind off for armholes. My work, before starting the bind off, is 28" wide. For size L should this piece measure 36 " as shown in diagram? Does the diagram mean the shoulder seams are 36" apart? When do you use the chart? Thank you. Jeanette Gaboardi
20.04.2016 - 14:13DROPS Design hat geantwortet:
Dear Mrs Gaboardi, with a tension of 20 sts = 10 cm (see under tab "materials") you should get approx. 50 cm/20 inc with the 102 sts in size L before binding off for armholes - remember to check and keep correct gauge. Measurement in chart are in cm, convert here into inches. Happy knitting!
20.04.2016 - 16:11
![]() Jeanette Gaboardi hat geschrieben:
Jeanette Gaboardi hat geschrieben:
In regards to Bolero w/3/4 sleeve pattern AC-013. Back piece (binding off for armholes size L). Pattern reads bind off 3 sts O-2 times. Don't understand this. Does it mean bind off 3 sts at the beg of two rows or no sts for 2 rows for size L?
19.04.2016 - 14:46DROPS Design hat geantwortet:
Dear Mrs Gaboardi, each number refers to a size, in size L, bind off for armholes as follows - at the beg of every row on each side: 4 sts 1 time, 2 sts 3 times and 1 st 3 times = 76 sts remain. Happy knitting!
19.04.2016 - 16:46
![]() Jessica hat geschrieben:
Jessica hat geschrieben:
Thank you for the response but i'm still strugglinig with how I end up with 38 sts. If I cast on 18 and do 6 increases (one every row RS and WS) and then 8 increases (every other row) and then 12 increases (inc 1 stitch each side 6 times) this equals 44 instead of the 38 I need. Can you help me understand where I have too many sts? Thank you!
21.01.2013 - 23:17DROPS Design hat geantwortet:
Dear Jessica, you will inc 12 sts towards mid front and only 6 sts towards the side (back piece are each side but front piece is only 1 side = towards seam to back), so 18 sts + 14 sts (6 every row + 8 every 2nd row) + 6 sts towards back piece = 38 sts. Happy knitting!
22.01.2013 - 09:48
![]() Jessica hat geschrieben:
Jessica hat geschrieben:
I'm struggling with the front and am wondering if someone can help. It says on row 2 increase 1st towards frond mid every row. Is this only supposed to be on the front knit side of the garment or on both knit and purl sides? I am doing size M and struggling to understand how I end up with only 38 sts at end of increases. Right now I am casting on 18 +6 every row +8 inc every other + 12 (inc 1st each side 6 times) = 44. Can u help me understand where I have too many stitches?
19.01.2013 - 18:09DROPS Design hat geantwortet:
Dear Jessica, there are 2 kinds of inc for front pieces : the first one every row (= from RS and from WS) towards mid front (to shape the round border) + the same inc as for back piece towards the side. Happy knitting !
21.01.2013 - 09:18
![]() Jessica hat geschrieben:
Jessica hat geschrieben:
I'm struggling with the front and am wondering if someone can help. It says on row 2 increase 1st towards frond mid every row. Is this only supposed to be on the front knit side of the garment or on both knit and purl sides? I am doing size M and struggling to understand how I end up with only 38 sts at end of increases. Right now I am casting on 18 +6 every row +8 inc every other + 12 (inc 1st each side 6 times) = 44. Can u help me understand where I have too many stitches?
19.01.2013 - 18:08
![]() Cobi Keus hat geschrieben:
Cobi Keus hat geschrieben:
Ik ben bezig met de rand langs de bolero, nu begrijp ik niet goed welke steken er tussen het patroon gebreid moet worden. Na de 12e nld moeten dan de steken afgekant worden? Heeft u een iets duidelijkere omschrijving?
14.12.2012 - 09:08DROPS Design hat geantwortet:
U moet geen steken tussen het patroon breien, ALLEEN de st van de teltekening. Bijv maat S, heeft u 288 st op de nld. U herhaalt M.1 over alle st (16 st per herhaling = 18 herhalingen over de hele nld). Volgt u de teltekening en de beschrijving hiervoor, dan komen er eerst automatisch meerderingen (= omsl) en in nld 12 breit u st samen (zie beschrijving) Brei door volgens de teltekening.
15.12.2012 - 17:28
![]() Becky Brock hat geschrieben:
Becky Brock hat geschrieben:
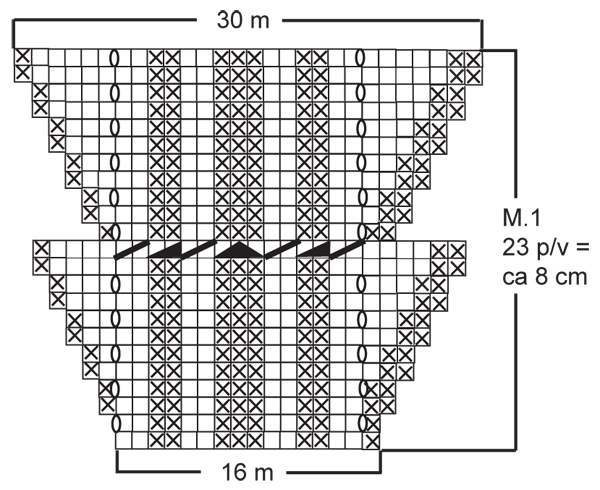
Thanks, the chart is upside down. It shows you starting with 30 sts.
20.11.2012 - 13:30
|
|||||||||||||||||||
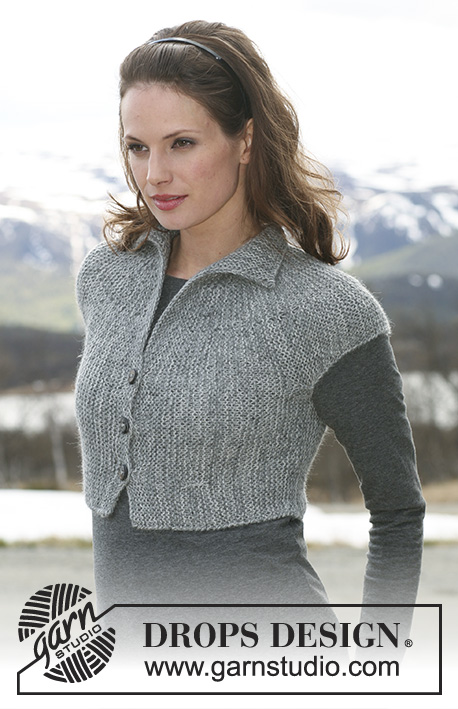
Elegant Dreams |
|||||||||||||||||||
|
|
|||||||||||||||||||
DROPS Bolero mit ¾ Ärmeln in ”Classic Alpaca”. Grösse S - XXXL
DROPS 115-16 |
|||||||||||||||||||
|
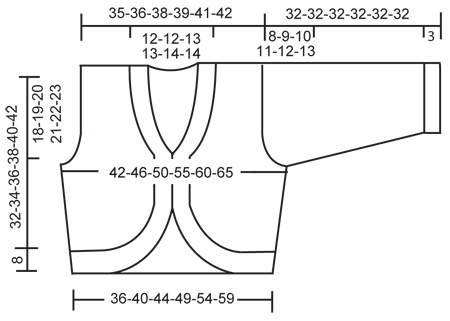
MUSTER: Siehe Diagramm. Das Diagramm zeigt das Muster von der Vorderseite. TIPP ZUM ABNEHMEN (gilt für die Abnahmen am Hals): Von der Vorderseite nach der Randmasche abn. NACH 1 M.: 1 M. re. abheben, 1 re., die abgehobene über die gestrickte ziehen. VOR 1 M.: 2 re. zusammen. ---------------------------------------------------------- ---------------------------------------------------------- RÜCKENTEIL: Die Arbeit wird hin und zurück gestrickt. Mit Classic Alpaca auf Nadel Nr. 4,5, 74-82-90-100-110-120 M. anschlagen (inkl. 1 Randm auf beiden Seiten). Glatt stricken. STIMMT DIE MASCHENPROBE? Nach 2-2-3-3-4-4 cm auf beiden Seiten je 1 M. aufnehmen und bei jeder 2. R. total 6 Mal wiederholen = 86-94-102-112-122-132 M. Nach 14-15-16-17-18-19 cm auf beiden Seiten am Anfang der R. für das Armloch abk.: 4 M. 1 Mal, 3 M. 0-0-0-1-2-2 Mal, 2 M. 1-2-3-3-3-5 Mal und 1 M. 2-3-3-4-4-4 Mal = 70-72-76-78-82-84 M. Nach 30-32-34-36-38-40 cm die mittleren 22-22-24-24-26-26 M. auf einen Hilfsfaden legen und bei der nächsten R. 1 M. gegen den Hals abk. = 23-24-25-26-27-28 M. auf der Nadel. Nach 32-34-36-38-40-42 cm abk. RECHTES VORDERTEIL: Die Arbeit wird hin und zurück gestrickt. Mit Classic Alpaca auf Nadel Nr. 4,5, 14-18-21-27-31-36 M. anschlagen. Glatt stricken und GLEICHZEITIG bei der 2. R. gegen die vordere Mitte 1 M. aufnehmen und bei jeder R. gegen die Mitte 6 Mal und danach bei jeder 2. R. 8 Mal wiederholen - GLEICHZEITIG nach 2-2-3-3-4-4 cm auf der Seite wie beim Rückenteil aufnehmen. Nach 14-15-16-17-18-19 cm auf der Seite wie beim Rückenteil für das Armloch abk. – GLEICHZEITIG nach 16-17-18-19-20-21 cm vorne in der Mitte 1 M. gegen den Hals abk. – SIEHE TIPP ZUM ABNEHMEN – diese Abnahmen alle 4 cm total 3-3-3-4-4-4 Mal wiederholen = 23-24-25-26-27-28 M. auf der Nadel. Nach 32-34-36-38-40-42 cm abk. LINKES VORERTEIL: Wie das rechte Vorderteil nur spiegelverkehrt. ÄRMEL: Die Arbeit wird hin und zurück gestrickt. Mit Classic Alpaca auf Nadel Nr. 3,5, 54-58-62-66-70-74 M. anschlagen und das Bündchen mit 2 re. / 2 li. und je 1 Randm auf beiden Seiten stricken. Nach 3 cm zu Nadel Nr. 4,5 wechseln und glatt weiterstricken – GLEICHZEITIG bei der 1. R. gleichmässig verteilt 8-8-8-10-10-10 M. abnehmen = 46-50-54-56-60-64 M. Nach 5 cm auf beiden Seiten je 1 M. aufnehmen und bei jeder 5-4-4-3-3-3 R. total 10-10-10-12-12-13 Mal wiederholen = 66-70-74-80-84-90 M. Nach 24-23-22-21-20-19 cm (Auf Grund der breiteren Schultern sind die Ärmel bei den grossen Grössen kürzer) beidseitig, am Anfang der R. für die Armkugel abk.: 4 M. 1 Mal und 3 M. 1 Mal, weiter auf beiden Seiten je 2 M. abk. bis die Arbeit 31 cm misst. Danach auf beiden Seiten 3 M. 1 Mal abk. Danach alle M. abk. Die Arbeit misst ca. 32 cm. ZUSAMMENNÄHEN: Die Schulter- und Seitennaht zusammennähen (innerhalb der Randm). Rund um den Bolero mit Classic Alpaca auf Rundstricknadel Nr. 3,5, 288-304-336-352-384-400 M. Bitte beachten Sie: Nehmen Sie auf der Vorderseite etwas dichter auf (inkl. den M. auf dem Hilfsfaden). M1 stricken (=18-19-21-22-24-25 Rapporte). Nachdem M1 fertig gestrickt ist sind 540-570-630-660-720-750 M. auf der Nadel. Danach re. über re. und li. über li. abk. Zum Schluss die Ärmel zusammennähen und danach einnähen. |
|||||||||||||||||||
Erklärungen zum Diagramm |
|||||||||||||||||||
|
|||||||||||||||||||
 |
|||||||||||||||||||
 |
|||||||||||||||||||
Haben Sie diese Anleitung nachgearbeitet?Dann taggen Sie Ihre Fotos mit #dropspattern oder schicken Sie sie an die #dropsfan Galerie Brauchen Sie Hilfe bei dieser Anleitung?Sie finden 23 Videotutorials, einen Kommentar/Fragen-Bereich und vieles mehr, wenn sie die Anleitung bei garnstudio.com aufrufen. © 1982-2026 DROPS Design A/S. Wir besitzen alle Rechte. Dieses Dokument, einschließlich aller Untersektionen, hat Urheberrechte. Mehr dazu, was Sie mit unseren Anleitungen machen können, finden Sie ganz unten auf der Seite zu jeder Anleitung. |
|||||||||||||||||||


Mit über 40 Jahren Tätigkeit im Entwerfen von Strick- und Häkelmustern bietet Ihnen DROPS Design eine der umfangreichsten Sammlungen von kostenlosen Anleitungen im Internet - in 17 Sprachen übersetzt. Zum jetzigen Zeitpunkt haben wir insgesamt 324 Handarbeitshefte und 12290 Anleitungen auf Deutsch. 12202
Unser Ziel ist es, Ihnen die besten Angebote zum Stricken und Häkeln, Inspirationen und Ratschläge sowie qualitativ hochstehende Garne zu unglaublichen Preisen zu bieten! Möchten Sie unsere Anleitungen nicht nur für den persönlichen Gebrauch nutzen? Unsere Copyright Bedingungen finden Sie bei allen unseren Anleitungen ganz unten auf der jeweiligen Seite. Viel Spaß beim Handarbeiten!
Kommentieren Sie die Anleitung DROPS 115-16
Wir würden gerne Ihre Meinung zu diesem Modell erfahren!
Wenn Sie eine Frage stellen möchten, prüfen Sie bitte, dass Sie die richtige Kategorie im unten stehenden Formular gewählt haben - so bekommen Sie schneller eine Antwort. Die obligatorischen Felder sind mit einem * gekennzeichnet.