
Beliebte Kategorien
Suchen Sie nach einem Garn?


Kommentare / Fragen (19)
![]() Balmajou hat geschrieben:
Balmajou hat geschrieben:
Bonjour Surle modèle 88 3 vous parlez drops safran pistache Et oui mettez numéro 31 c est le vert pomme Que doit on prendre Merci pour votre réponse Et quelle couleur doit on prendre en kit silk pour remplacer la vivaldi Ver or
25.03.2026 - 14:39DROPS Design hat geantwortet:
Bonjour Mme Balmajou, il est possible que les numéros/noms des couleurs ont été modifiés depuis la publication de ce modèle, choisissez la couleur qui vous convient le mieux dans le nuancier actuel de Safran en assortissant à Brushed Alpaca Silk (1 fil pour remplacer Vivaldi) ou 2 fils Kid-Silk (pour remplacer 1 fil Vivaldi) - pensez à utiliser le convertisseur pour avoir la nouvelle quantité correspondante. Vous pouvez choisir entre or et argent, en fonction de vos goûts personnels. Votre magasin saura vous conseiller les couleurs assorties, même par mail ou téléphone si vous avez besoin d'aide. Bon tricot!
25.03.2026 - 16:12
![]() Annelise Brincker hat geschrieben:
Annelise Brincker hat geschrieben:
Når man så har slået maskerne løst op, så samler man maskerne igen og strikker rundt, ikke?
26.05.2025 - 10:49DROPS Design hat geantwortet:
Hei Annelise. Når man har lagt opp riktig maskeantall til den størrelsen man skal strikke, fortsetter man å strikke rundt og rundt (med vrangbord, 2 rett - 4 vrang) til arbeidet måler 10 cm. mvh DROPS Design
26.05.2025 - 14:08
![]() Annelise hat geschrieben:
Annelise hat geschrieben:
Jeg forstår ikke ærmegabet. Med kun fire rækker frem og tilbage bliver hullet da meget småt? Har jeg misforstået noget
18.05.2025 - 11:31DROPS Design hat geantwortet:
Hej Annelise, de nye masker du slår løst op, er dem du kan se ovenpå ærmet, det bliver en del af bærestykket :)
21.05.2025 - 14:32
![]() Karine hat geschrieben:
Karine hat geschrieben:
Bonjour, Quelle laine vaut-il mieux choisir pour remplacer la Vivaldi? Brushed Alpaca ou Air ? Merci !
30.03.2025 - 18:05DROPS Design hat geantwortet:
Bonjour Karine, vous pouvez choisir 2 fils Kid-Silk (cf exemple ici) ou bien Brushed Alpaca Silk si vous préférez. Bon tricot!
31.03.2025 - 09:10
![]() Annette hat geschrieben:
Annette hat geschrieben:
Ich komme nicht klar, Werden Vorderteil und Rückenteil einzeln gestrickt? Warum steht in der Anleitung nichts darüber dass die Seitennähte zusammengenäht werden? Das irritiert mich.... Bitte Hilfe :-)
02.03.2024 - 12:06DROPS Design hat geantwortet:
Liebe Annette, es sind keine Seitennähte - Siehe unten.
04.03.2024 - 07:43
![]() Annette hat geschrieben:
Annette hat geschrieben:
Wird das in Rinden oder Hin- und Rückreihen gestrickt?
02.03.2024 - 11:21DROPS Design hat geantwortet:
Liebe Annette, man strickt zuerst in Runden bis Armauschnitt, dann wird man jedes Teil separat für einpaar Reihen in Hin- und Rückreihen stricken, dann wird man in Runden stricken. Viel Spaß beim Stricken!
04.03.2024 - 07:39
![]() Ann Davik hat geschrieben:
Ann Davik hat geschrieben:
Er dette riktig?: Forstk: = 56-62-68-74-86 m. Strikk 2-2-4-4-4 p frem og tilbake over disse m med r over r og vr over vr - men de 2 ytterste m i hver side strikkes i rille. Sett m på 1 tråd. Bakstk: Strikk som forstk men behold m på p når bakstk er strikket ferdig. Bærestk: Legg løst opp 20-26-32-38-38 nye m på p til erm, sett ….. Gjelder topp Drops 88-3
01.02.2024 - 23:20DROPS Design hat geantwortet:
Hei Ann, Det er riktig :)
02.02.2024 - 08:03
![]() Ruth Sutton hat geschrieben:
Ruth Sutton hat geschrieben:
The pattern color calls for "Drops Safran #31 Pistachio". Color #31 is called Apple Green while the color, Pistachio is actually color #65. Can you please tell me what color is shown in the pattern photo, #31 Apple Green, or #65 Pistachio?
18.05.2021 - 03:25DROPS Design hat geantwortet:
Hi Ruth, The colour 31 in Safran, and the colour shown in the picture, is apple green. Happy knitting!
18.05.2021 - 08:05
![]() Victoria hat geschrieben:
Victoria hat geschrieben:
88-3 help with this pattern. first question patterrn instructs to increase P2 each side of K2 marker to P8 each side of K2 marker at side. But then instructs to bind off 6sts each side for armhole (3sts each side of marker = P2 K2 P2, Is this correct or should it be P5 K2 P5? This would make 68 sts on front and back. Then when dividing front and back, how is this done with a ribb? do I split the K2? Thanks for the help
17.10.2020 - 20:05DROPS Design hat geantwortet:
Dear Victoria, mid under each arm = on each side you have: P8, K1, marker, K1, P8, you will now cast off 3 sts on each side of each marker, ie 6 sts that are worked: P2, K2, P2, this means you work on each side: P6, cast off 3 sts before marker = P2, K1 + 3 sts after marker = K1, P2 (= P2, K2, P2,) work P6 and continue in rib as before. Happy knitting!
19.10.2020 - 08:32
![]() Victoria hat geschrieben:
Victoria hat geschrieben:
Drops 88-3 instructs me to mark center of knit 2 at beginning and middle and then tells me to increase each side of knit two on each end and then purl the increased stich? Does this mean increase in knit and then purl The increased on the next row or increase in Pearl each side of knit not sure please help?
10.10.2020 - 21:40DROPS Design hat geantwortet:
Dear Victoria, this means you continue working the knit 2 sts at the beginning of round and at the middle of round (sides) and increase on each side of these 2 stitches - the new stitches will be purled (on each side of these K2, the number of P-stitch will incraese from P4 to P8 when all sts are increased) - work all other stitches as before with rib K2/P4. Happy knitting!
12.10.2020 - 08:04
|
|
DROPS 88-3 |
|
|
|
|
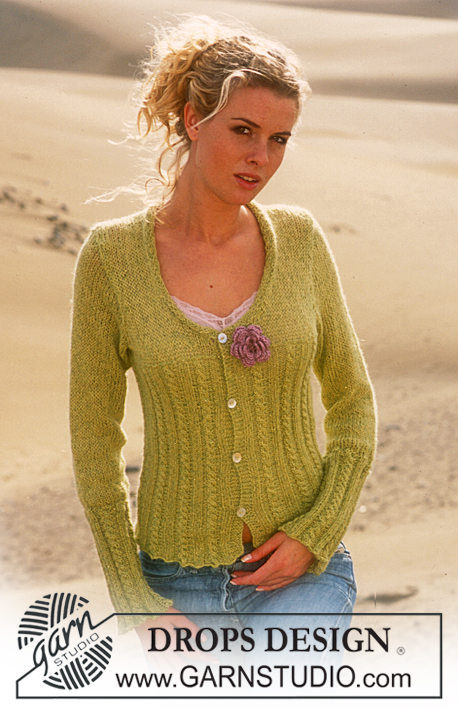
DROPS Bündchengestrickter Top in "Safran", "Vivaldi" und "Glitter"
DROPS 88-3 |
|
|
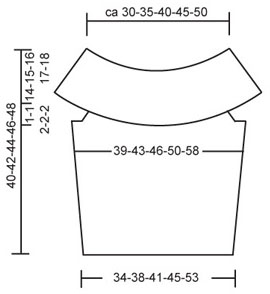
Bündchen: * 2 re, 4 li *, von *-* wiederholen. Krausrippe (hin und zurück auf der Ndl): Eine Kraurippe = 2 Ndl. 1. Ndl: re, 2. Ndl: re. Körper: Mit 1 Faden Safran + 1 Faden Vivaldi + 1 Faden Glitter (= 3 Fäden) auf Rundstr.Ndl.Nr 5,5 108-120-132-144-168 M anschlagen. Bündchenmuster stricken – 1 Markierungsfaden in der Mitte der 2 re-M auf jeder Seite anbringen. Achten Sie auf die Strickfestigkeit! Wenn die Arb. 10 cm misst, 1 M auf jeder Seite der 2 re-M (auf jeder Seite) alle 5. cm total 4 Mal aufnehmen- die neuen M werden li gestrickt = 124-136-148-160-184 M. Wenn die Arb 30-31-32-33-34 cm misst, 6 M auf jeder Seite für das Armloch abk. (= 2 li, 2 re, 2 li). Die Rückenteil-M auf 1 Hilfsfaden legen. Vorderteil: = 56-62-68-74-86 M. 2-2-4-4-4 Ndl hin und über diese M stricken, mit re über re und li über li – aber die 2 äussersten M auf jeder Seite werden in Krausrippen gestrickt.. Die M auf 1 Hilfsfaden legen. Rückenteil: Wie das Vorderteil stricken, aber die M auf der Ndl behalten, wenn das Rückenteil fertiggestrickt ist. Passe: Für den Ärmel 20-26-32-38-38 neue M locker anschlagen , die Vorderteil-Maschen auf der Ndl legen und für den Ärmel 20-26-32-38-38 neue M anschlagen = 152-176-200-224-248 M. Ab jetzt wird die Arb. von hier gemessen. Mit dem Bündchenmuster über alle M weiterfahren - Achtung! Das Bündchen sollte mit dem Vorder- und Rückenteil übereinstimmen – Gleichzeitig, auf der 1.R die 6 M auf jeder Seite des Vorder- und Rückenteils auf 4 li angleichen = 144-168-192-216-240 M. Wenn die Arb. 4 cm misst, jede zweite li-Teil von 4 li auf 3 li abketten. Wenn die Arb 6-6-7-7-8 cm misst, die restlichen li-Teile von 4 li auf 3 li abketten = 120-140-160-180-200 M. Wenn die Arb. 8-9-10-11-12 cm misst alle li-Teile von 3 li auf 2 li abketten = 96-112-128-144-160 M. Wenn die Arb. 11-12-13-14-15 cm alle re-Teile von 2 re auf 3 re aufnehmen (damit das Bündchen 2 re/ 3 li wird, wenn es nach unten gefaltet wird) = 120-140-160-180-200 M. Mit dem Bündchen weiterfahren, bis die Passe ca 15-16-17-18-19 cm misst. Jetzt jede zweite re –Teil von 3 re auf 4 re aufnehmen = 132-154-176-198-220 M. Wenn die Arb. 19-21-23-25-27 cm misst, die restlichen re-Teile von 3 re auf 4 re aufnehmen= 144-168-192-216-240 M. Mit dem Bündchenmuster weiter bis die Arb 28-30-32-34-36 cm misst und dann locker re über re und li über li abketten. |
|
 |
|
Haben Sie diese Anleitung nachgearbeitet?Dann taggen Sie Ihre Fotos mit #dropspattern oder schicken Sie sie an die #dropsfan Galerie Brauchen Sie Hilfe bei dieser Anleitung?Sie finden 18 Videotutorials, einen Kommentar/Fragen-Bereich und vieles mehr, wenn sie die Anleitung bei garnstudio.com aufrufen. © 1982-2026 DROPS Design A/S. Wir besitzen alle Rechte. Dieses Dokument, einschließlich aller Untersektionen, hat Urheberrechte. Mehr dazu, was Sie mit unseren Anleitungen machen können, finden Sie ganz unten auf der Seite zu jeder Anleitung. |


Mit über 40 Jahren Tätigkeit im Entwerfen von Strick- und Häkelmustern bietet Ihnen DROPS Design eine der umfangreichsten Sammlungen von kostenlosen Anleitungen im Internet - in 17 Sprachen übersetzt. Zum jetzigen Zeitpunkt haben wir insgesamt 324 Handarbeitshefte und 12290 Anleitungen auf Deutsch. 12202
Unser Ziel ist es, Ihnen die besten Angebote zum Stricken und Häkeln, Inspirationen und Ratschläge sowie qualitativ hochstehende Garne zu unglaublichen Preisen zu bieten! Möchten Sie unsere Anleitungen nicht nur für den persönlichen Gebrauch nutzen? Unsere Copyright Bedingungen finden Sie bei allen unseren Anleitungen ganz unten auf der jeweiligen Seite. Viel Spaß beim Handarbeiten!
Kommentieren Sie die Anleitung DROPS 88-3
Wir würden gerne Ihre Meinung zu diesem Modell erfahren!
Wenn Sie eine Frage stellen möchten, prüfen Sie bitte, dass Sie die richtige Kategorie im unten stehenden Formular gewählt haben - so bekommen Sie schneller eine Antwort. Die obligatorischen Felder sind mit einem * gekennzeichnet.