
Catégories populaires
Vous cherchez un fil?


Commentaires / Questions (93)
![]() Emiliep a écrit:
Emiliep a écrit:
Je veux dire que je pense que le diagramme est faux car à partir du 10 ème rang on a plus que 6 rangs à faire en A1a alors qu'il y a 7 lignes d'ajourés au centre pour arriver à 9 arceaux ?
20.05.2018 - 22:14DROPS Design a répondu:
Bonjour Emiliep, au dernier rang de A.1a, on crochète le 17ème symbole (carré dans la légende, mais rectangle dans le diagramme). Bon crochet!
22.05.2018 - 08:48
![]() Emiliep a écrit:
Emiliep a écrit:
Je dis ça car à compter du rang 10 il reste 6 rang à faire pour 10 motifs centraux ?
20.05.2018 - 21:54
![]() Emiliep a écrit:
Emiliep a écrit:
Bonjour, le diagramme est A1b est faux, non ? il comporte une ligne de plus que le A1a sur les motifs centraux ?
20.05.2018 - 21:46DROPS Design a répondu:
Bonjour Emiliep, je compte bien 16 rangs pour A.1b et autant pour A.1a. Bon crochet!
22.05.2018 - 08:46Nourhan Osama a écrit:
Continue A.3 in the round (repeat the 9 rounds vertically) until square measures 68-70-72-74-76-78 cm in the part of jacket , do you mean about vertically that i work in 2 corner back and forth OR in the 4 corner like before ?thanks and sorry for more question
15.05.2018 - 07:55DROPS Design a répondu:
Dear Mrs Osama, you continue working A.3, ie you repeat the 9 rows in A.3 (= in height) over all sts in the round until square measures 68-70-72-74-76-78 cm x 68-70-72-74-76-78 cm. Happy crocheting!
15.05.2018 - 09:41Nourhan Osama a écrit:
I am sorry , but i don't understand about the measures ,, like the first in Jacket ( When entire diagram A.2a and A.2b have been worked, square measures approx. 36 x 36 cm / 14 1/4" x 14 1/4''.) what this numbers /14 1/4" * 14 1/4" is refers to ?
14.05.2018 - 06:33DROPS Design a répondu:
Hi Nourham, The first measurement (36 x 36) is in centimetres, the second measurement (14 1/4 x 14 1/4) is in inches. Happy crocheting!
14.05.2018 - 08:09Nourhan Osama a écrit:
In round 17 you begin with a rectangle 4 chain stitches but i don't see it in the picture of jacket you are done,, can i dispensing this rectangle ??
07.05.2018 - 10:21DROPS Design a répondu:
Dear Mrs Osama, this is the 17th symbol under diagram text (which looks like a square there), ie: round begins with 4 chain stitches and finishes with 1 slip stitch in 4th chain stitch at beginning of round Fasten off. Begin next round around chain space between the last treble group worked - fasten yarn with 1 slip stitch in chain space. Happy crocheting!
07.05.2018 - 10:48
![]() Mary Houlihan a écrit:
Mary Houlihan a écrit:
Would you say this pattern is only for the ‘experienced’ crocheter?
05.05.2018 - 02:22DROPS Design a répondu:
Dear Mary, I would say this is for the intermediate. As it appears to be complicated, and there are a number of stitches and stitch combinations to follow, and you have to be able to read the chart. However the chart you help you visually what stitch / stitch combination goes where, and the most complicated stitch is a triple trble, and two trebles worked together. There are turtorials to help you (links on the left, just below the picture, and do not forget, you can always ask for help on person in the store you bought your DROPS yarn from. Happy Crafting!
06.05.2018 - 08:57
![]() Evelyne a écrit:
Evelyne a écrit:
Bonjour j'essaie desperement de faire ce modèle et pour une novice comme moi je ne parviens pas à comprendre le diagramme existe t'il des explications plus détaillées? Merci pour votre réponse
03.05.2018 - 16:10DROPS Design a répondu:
Bonjour Evelyne, n 'hésitez pas à poser vos questions ici, ou, pour toute aide complémentaire individuelle, merci de contacter le magasin où vous avez acheté votre fil. Bon tricot!
04.05.2018 - 08:27
![]() Sue Towler a écrit:
Sue Towler a écrit:
Hi,I\'m really confused with your chart. I have 16 stitches after round 3, but your symbol says I should have 14? Also, why is there a space between the treble stitches on round 4? You have 3 then a big gap before making 11 more. It doesn\\\'t look like the crochet charts I\\\'m used to.
02.05.2018 - 18:28DROPS Design a répondu:
Dear Mrs Towler, at the end of row 3 you should have *5 ch, 11 tr in the ch-space and 3 tr in 4-ch-space* x 4. (= 4 repeats of A.1) + the 3 ch from beg of round. There are some gaps in the chart due to the placement of symbols, simply follow symbols in diagram as they appear. For any individual assistance reading diagrams, you are welcome to contact the store where you bought your yarn. Happy crocheting!
03.05.2018 - 09:05Nourhan Osama a écrit:
My queastion about the step between 5th and 6th round .....in th 5th round in figure A.1b i will make 3 chains 12 times between every single crochet in stitches ,, but do i make 3 chain then slip stitch it or make single crochet ? and Then i finish it,,and go above the 5 chain stitches do i make slip stitches in it also or make 5 chain st ?
28.04.2018 - 22:28DROPS Design a répondu:
Dear Mrs Osama, on round 5 you repeat only 11 times (1 sc, 3 ch), then work 1 sc in last ch-space and work now 5 ch and repeat round from beg: (1 sc, 3 ch) x 11, 1 sc in last ch-space, 5 ch. At the end of round, after the last 5 ch, work 1 sl st in 1st ch from beg of round, then work sl st to the first ch-space (as at the beg of round 4). Happy crocheting!
30.04.2018 - 10:24
|
|||||||||||||||||||||||||||||||||||||||||||||||||||||||||||||||||||||||||||||||||||||
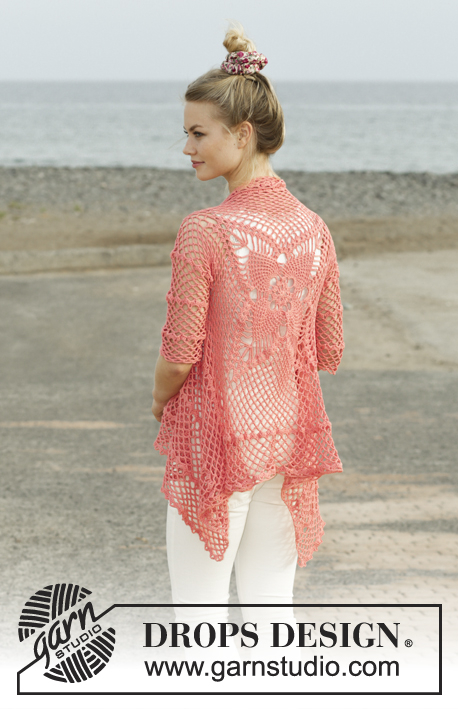
Butterfly Queen#butterflyqueenjacket |
|||||||||||||||||||||||||||||||||||||||||||||||||||||||||||||||||||||||||||||||||||||
 |
 |
||||||||||||||||||||||||||||||||||||||||||||||||||||||||||||||||||||||||||||||||||||
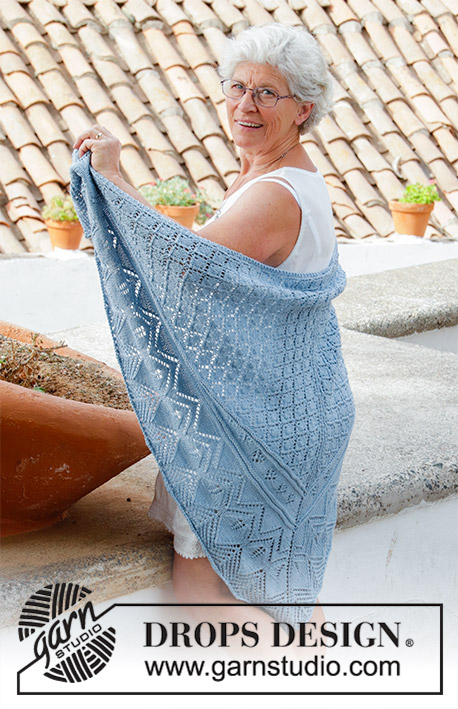
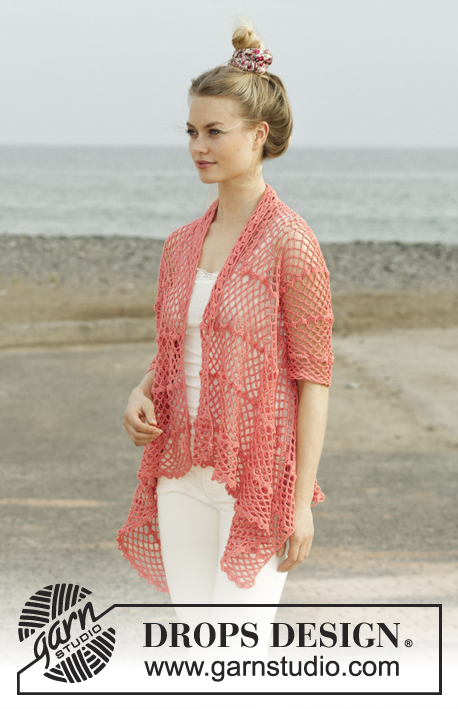
Gilet crocheté en forme de carré, avec point ajouré, en DROPS Flora. Du S au XXXL
DROPS 186-11 |
|||||||||||||||||||||||||||||||||||||||||||||||||||||||||||||||||||||||||||||||||||||
|
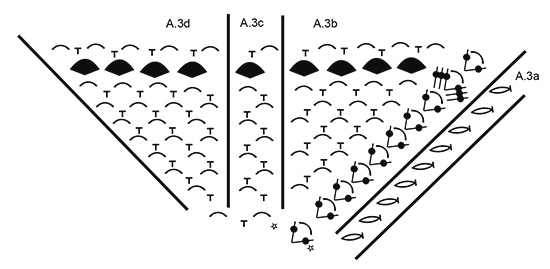
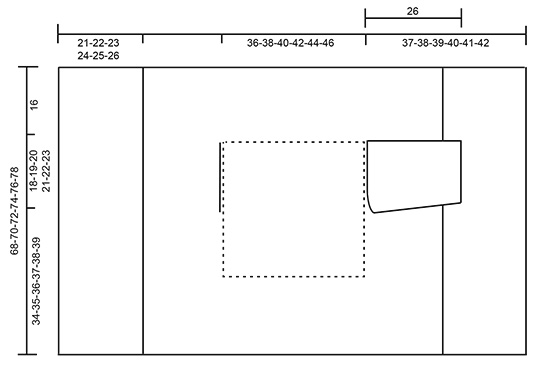
TECHNIQUES EMPLOYÉES POINT FANTAISIE: Voir diagrammes A.1 à A.4. INFO CROCHET (A.4): Remplacer la 1ère maille serrée du début du rang par 1 maille en l'air. Remplacer la 1ère triple-bride du début du rang par 5 mailles en l'air. DIMINUTIONS (milieu sous les manches): Crocheter 5 mailles en l'air, sauter 1 maille serrée + 1 arceau, crocheter 1 maille serrée autour de l'arceau suivant + 1 arceau (= on a diminué 1 motif), continuer comme avant jusqu'à ce qu'il reste 1 arceau + 1 maille serrée du rang précédent, sauter ces mailles et terminer par 1 double-bride dans la 1ère maille en l'air du début du rang précédent (= on a diminué 1 motif). ---------------------------------------------------------- GILET: Se crochète en rond, à partir du milieu dos, en forme de carré. Crocheter ensuite les devants séparément, en allers et retours. Les manches se crochètent en allers et retours à partir des emmanchures, avec une couture. Crocheter 4 mailles en l'air avec le crochet 3.5 en Flora et fermer en rond avec 1 maille coulée dans la 1ère maille en l'air. Crocheter ensuite en rond, en suivant le diagramme 4 fois A.1b au total tout le tour - Le diagramme A.1a montre comment commencer et terminer les tours et se fait en plus de A.1b. PENSER À BIEN CONSERVER LA MÊME TENSION QUE POUR L'ÉCHANTILLON! Quand les diagrammes A.1a et A.1b sont faits, couper le fil et commencer le tour suivant autour de l'arceau du dernier groupe de brides avec 1 maille coulée dans cet arceau. Crocheter maintenant en rond, en suivant le diagramme A.2 ainsi: *A.2b, répéter 6 fois A.2c en largeur au total, A.2d*, répéter de *-* 4 fois au total tout le tour – Le diagramme A.2a montre comment commencer et terminer les tours et se fait en plus de A.2b/c/d. Quand A.2a et A.2b ont été crochetés 1 fois en hauteur, le carré mesure environ 36 x 36 cm. On a maintenant un arceau (1 bride + 6 mailles en l'air + 1 bride) dans chacun des 4 coins et 14 arceaux le long de chacun des côtés du carré. LIRE LA SUITE AVANT DE CONTINUER! Continuer ainsi: * Crocheter A.3b autour de l'arceau du coin, répéter A.3c jusqu'à ce qu'il reste 1 arceau avant le coin, crocheter A.3d autour de l'arceau suivant*, répéter de *-* 4 fois au total tout le tour – Le diagramme A.3a montre comment commencer et terminer les tours et se fait en plus de A.3b/c/d. EN MÊME TEMPS, quand l'ouvrage mesure environ 36-38-40-42-44-46 cm x 36-38-40-42-44-46 cm, former les emmanchures ainsi: Crocheter A.3 comme avant jusqu'au 1er coin, crocheter autour de l'arceau comme avant, crocheter maintenant des mailles en l'air jusqu'au milieu du côté suivant (c'est-à-dire entre le 1er et le 2ème coin) ainsi: Crocheter 1 maille en l'air pour chaque maille en l'air/maille serrée sautée. Continuer ensuite comme avant jusqu'au milieu du côté, entre le 3ème et le 4ème coin. Crocheter maintenant des mailles en l'air jusqu'au 4ème coin ainsi: 1 maille en l'air pour chaque maille en l'air/maille serrée sautée, crocheter autour de l'arceau du coin et terminer le tour comme avant. Au tour suivant, crocheter A.3 comme avant au-dessus de toutes les mailles de nouveau (c'est-à-dire ajuster le motif au-dessus des emmanchures pour que ce tour soit juste). Continuer A.3 en rond (répéter les 9 tours en hauteur) jusqu'à ce que le carré mesure 68-70-72-74-76-78 cm x 68-70-72-74-76-78 cm (c'est-à-dire environ 16 cm à partir des emmanchures DANS TOUTES LES TAILLES) – Ajuster pour arrêter après un tour de groupes de brides. Couper le fil et placer 1 marqueur (entre le 1er et le 2ème coin). DEVANTS: Crocheter maintenant en allers et retours entre le 1er et le 2ème coin. NOTE! Crocheter les devants sans augmenter. Voir INFO CROCHET! Crocheter A.4a autour du coin, répéter A.4b jusqu'à ce qu'il reste 1 arceau avant le coin, crocheter A.4c autour de cet arceau et autour du coin. Continuer comme indiqué dans le diagramme et répéter A.4 en hauteur jusqu'à ce que le rang avec les groupes de brides ait été crocheté 2 fois au total en hauteur, puis répéter seulement les rangs d'arceaux jusqu'à ce que l'ouvrage mesure environ 19-20-21-22-23-24 cm à partir du marqueur, crocheter ensuite 1 fois le rang de groupes de brides dans toutes les tailles. L'ouvrage mesure maintenant 21-22-23-24-25-26 cm à partir du marqueur. Arrêter. Crocheter l'autre devant de la même façon (c'est-à-dire crocheter en allers et retours entre le 3ème et le 4ème coin). MANCHES: Se crochètent de haut en bas, directement à partir des emmanchures, en allers et retours, avec une couture à la fin. En commençant au milieu sous la manche, crocheter ainsi: Ne pas oublier INFO CROCHET! A.4a autour du 1er arceau, répéter 15-16-17-18-19-20 fois A.4b en largeur au total (Ajuster pour répartir A.4b à intervalles réguliers le long de l'emmanchure, c'est-à-dire crocheter soit 2 arceaux autour du même arceau, soit sauter 1 arceau), crocheter A.4c autour des 2 derniers arceaux. Continuer A.4 en allers et retours – EN MÊME TEMPS, quand l'ouvrage mesure 4 cm (Ajuster pour crocheter le rang suivant en mailles en l'air/mailles serrées) diminuer 1 motif de chaque côté – voir DIMINUTIONS. Diminuer ainsi 3-3-3-4-4-4 fois au total tous les 8-8-8-6-6-6 cm environ = 12-13-14-15-16-17 arceaux de 6 mailles après la dernière diminution. Continuer jusqu'à ce que l'ouvrage mesure environ 28 cm DANS TOUTES LES TAILLES - arrêter après un rang d'arceaux. Arrêter. Crocheter l'autre manche de la même façon de l'autre côté. ASSEMBLAGE: Faire la couture sous les manches, dans le brin le plus à l'extérieur des mailles en veillant à ce qu'elle ne resserre pas l'ouvrage. |
|||||||||||||||||||||||||||||||||||||||||||||||||||||||||||||||||||||||||||||||||||||
Légende diagramme(s) |
|||||||||||||||||||||||||||||||||||||||||||||||||||||||||||||||||||||||||||||||||||||
|
|||||||||||||||||||||||||||||||||||||||||||||||||||||||||||||||||||||||||||||||||||||
 |
|||||||||||||||||||||||||||||||||||||||||||||||||||||||||||||||||||||||||||||||||||||
 |
|||||||||||||||||||||||||||||||||||||||||||||||||||||||||||||||||||||||||||||||||||||
 |
|||||||||||||||||||||||||||||||||||||||||||||||||||||||||||||||||||||||||||||||||||||
 |
|||||||||||||||||||||||||||||||||||||||||||||||||||||||||||||||||||||||||||||||||||||
Vous avez terminé ce modèle?Alors taguez vos photos avec #dropspattern #butterflyqueenjacket ou bien présentez-les dans la galerie #dropsfan Vous avez besoin d'aide pour ce modèle ?Vous trouverez 12 tutoriels vidéo, une rubrique commentaires/questions et plus encore en vous rendant sur la page du modèle sur garnstudio.com © 1982-2026 DROPS Design A/S. Tous droits réservés. Ce document, y compris ces sous-sections, est protégé par les droits d'auteur (copyright). Apprenez-en davantage sur ce que vous pouvez faire avec nos modèles en bas de chacune des pages de notre site. |
|||||||||||||||||||||||||||||||||||||||||||||||||||||||||||||||||||||||||||||||||||||


Avec plus de 40 ans dans la conception de modèles tricot et crochet, DROPS Design offre l'une des plus vastes collections de modèles gratuits sur internet - traduits dans 17 langues. À ce jour, on compte 324 catalogues et 12290 modèles en français.
Nous nous efforçons de vous apporter le meilleur de ce que le tricot et le crochet peuvent vous offrir, inspiration et conseils mais également des fils de haute qualité à des prix incroyables! Vous souhaiteriez utiliser nos modèles autrement que pour un usage personnel? Vous pouvez lire ce que vous êtes autorisés à faire dans le Copyright en bas de page de chacun de nos modèles. Bon tricot!
Poster un commentaire sur le modèle DROPS 186-11
Nous aimerions connaître votre avis sur ce modèle !
Si vous souhaitez poser une question, merci de bien vouloir vérifier que vous avez choisi la bonne catégorie dans le formulaire ci-dessous afin d'accélérer la réponse. Les champs obligatoires sont indiqués par une *.