
Catégories populaires
Vous cherchez un fil?


Commentaires / Questions (57)
![]() Michelle a écrit:
Michelle a écrit:
Bonjour. Ce modèle m interesse... j aimerais savoir si dans le dos vu qu il n y a pas de photo du dos. il y a de la dentelle ou est ce du jersey? merci 😁😁
25.09.2020 - 13:13DROPS Design a répondu:
Bonjour Michelle, le point fantaisie ajouré est le même dans le dos que devant. Bon tricot!
25.09.2020 - 14:38
![]() Richard a écrit:
Richard a écrit:
HELP! I am in need of 3 x 50g balls of 'Drops Cotton Merino' - Colour 17- Dye Lot 52848. Any help or suggestions, gratefully received. Also, If I make a hat using Cotton Merino, but the pattern calls for 'Fingering Merino' will it make much difference?? Thank you. Richard.
27.01.2020 - 13:12DROPS Design a répondu:
Dear Richard, please contact your DROPS store (and more stores if necessary) or even our DROPS Workshop - CottonMerino is a 8 ply/Dk/Worsted yarn - see shadecard - see here all patterns you can use for Cotton Merino. Happy knitting!
27.01.2020 - 14:24
![]() Richard a écrit:
Richard a écrit:
Sorry, the last comment should read with "I placed the marker to the side (on my RIGHT)!" Thanks.
24.01.2020 - 15:28
![]() Richard a écrit:
Richard a écrit:
Hi, Thanks for your replies & I've mastered the difficult start - as you say, with double-pointed needles. The raglan decreasing is another matter. As I look at the sleeve (to my left), I have placed a marker on the stitch nearest to the side. I have then placed another marker on the 1st stitch of the side (which is to my left). Now, you say to start 3 stitches before this marker- yes? Where to I start on the sleeve decrease, please.
24.01.2020 - 15:25DROPS Design a répondu:
Dear Richard, you should have 1 marker between each piece; so if you look at the sleeve, there is 1 marker at the end of body (either back or front piece) = before the first stitch on sleeve and 1 marker at the end of sleeve, after the last stitch on sleeve = before the first stitch on front/back piece. Start 3 sts before the first of these 2 markers, K2 tog, = 1 stitch remain before marker, work this stitch + the next st (= first after marker) and dec = there are 2 sts decreased at the marker and K2 between the dec (with marker in the middle of these K2). Repeat at each marker. Happy knitting!
24.01.2020 - 16:04
![]() Richard a écrit:
Richard a écrit:
Hi, once more. I've placed markers at the sleeves & sides & now trying to knit the raglan decreases! I understand the pattern for instructions for the sides, but starting 3 stitches before the marker (does this include the marker), I end up, after the decrease, taking the first stitch of the sleeve. Your assistance once again would be very much appreciated. Thank you. Richard.
24.01.2020 - 12:29DROPS Design a répondu:
Dear Richard, there should be 1 stitch on each side of marker on each piece between the raglan decreases, ie you will work at each transition: K2 tog (1 dec), K2 (= Knit the stitch before marker + the stitch after marker), slip 1 as if to K, K1, psso. So starting at the transition between back and one sleeve, you will start (and end) round with K1, Hope it helps, Happy knitting!
24.01.2020 - 14:23
![]() Richard a écrit:
Richard a écrit:
Good morning. I have completed the body & both sleeves. But now that I have joined them on one needle, I find that when trying to knit the sleeves, the stitches are stretched (almost impossible to do)! I've had to use double-pointed needles to help me out! I don't remember having this trouble when I made the first one of this pattern (in size medium). Please can you help. Thanks. Richard.
24.01.2020 - 10:15DROPS Design a répondu:
Dear Richard, that's right, the first few rounds at the beginning of yoke can be somewhat tricky, you can use the double pointed needles or circular needles if you like to, after few rounds, all stitches will have enough place on the circular needle to work them on the round. Happy knitting!
24.01.2020 - 14:08
![]() Richard a écrit:
Richard a écrit:
Thank you for the reply to my question. I sent a sketch via email, showing how I was knitting the round. So, from what you are saying, I have to knit A1 (1st row), (only for the complete round)! Then for the next round, I have to knit A1 (2nd row), for the complete round! Then 3rd row, 4th row & so on.... This makes sense. Please can you confirm this for me.. Thanks a million. Richard.
13.01.2020 - 20:17DROPS Design a répondu:
Dear Richard, that's how you should work the diagrams (row 1 in A.1 on all diagrams, then row 2 in A.1 on all diagrams and so on). Happy knitting!
14.01.2020 - 07:50
![]() Richard a écrit:
Richard a écrit:
Good morning, again. Continuing from the two Ridge rows, I began the round, as per your instructions. But, I find that the *A1* pattern, repeats 3 times (2 with odd row numbers, 1 even row number. in the first half, up to 124 stitches. But for the continuing *A1* pattern, there is only 1 odd number row! But, there are 2 even row numbers! Is this so? Please. Richard. I have made a drawing which explains better. If I may upload it.
13.01.2020 - 11:03DROPS Design a répondu:
Dear Richard, not sure I'm getting this properly, when working A.1 in the round, you should work same round in each diagram all the round = round 1 A.1 when working round 1 on yoke, then work round 2 in A.1 and so on. What do I misunderstand?
13.01.2020 - 11:34
![]() Richard a écrit:
Richard a écrit:
Sadly, (Hi again). I'm still struggling after completing the two ridges! It is written that I knit 20, purl 3 (23 stitches), then *A1 (22 stitches, purl 6! (A1 = 10 rows @22 stitches) = 220 stitches. But adding the first 23 stitches to the 220 stitches = 243 stitches? Yet it is written, that I then purl 6! Doing this gives a total of 249 stitches! What am I doing wrong please? Forgive me, I am nearly 78 years old. Have a good day.
09.01.2020 - 12:22DROPS Design a répondu:
Dear Richard, you should work the 248 sts in size L as follows: knit 20, purl 3, *A.1 (= 22 sts), purl 6*, repeat from *-* a total of 2 times (= 28 sts x 2= 56 sts), A.1 (= 22 sts), purl 3, knit 40 , purl 3, repeat from *-* (= 56 sts), A.1 (= 22 sts), purl 3, knit 20 = 20+3 + 56+22 + 3+40+3 + 56+22 +3+20=248 sts. Try to add markers between each section, it can help you to check the number of stitches. Happy knitting!
09.01.2020 - 14:07
![]() Richard a écrit:
Richard a écrit:
Hi (once again). This should be the last for awhile. I understand the A1 block now, working from the bottom up! But, please tell me: Do I follow the pattern from left to right or right to left?? I ask this, because, I am reading the block from right to left! I don't believe it makes much difference (but, there again, you are the Expert). Thank you. Richard.
07.01.2020 - 22:07DROPS Design a répondu:
Dear Richard, diagrams are read bottom up starting from the right corner to the left, ie you will read every row in diagrams from the right towards the left (since you are working in the round) - read more about diagrams here (link is now working). Happy knitting!
08.01.2020 - 09:04
|
|||||||||||||||||||
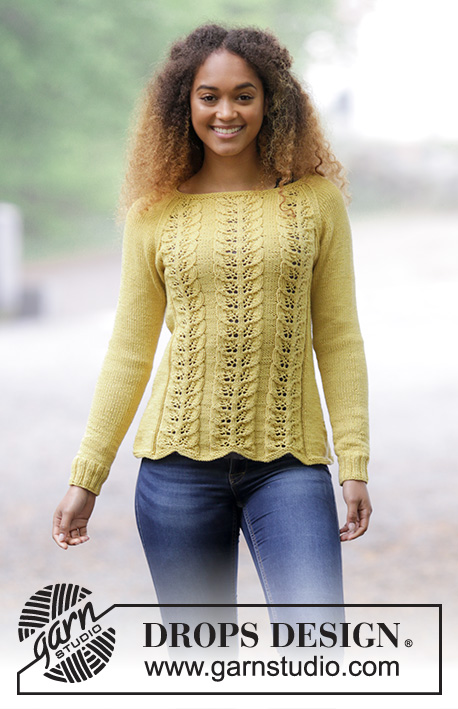
Lemon Parfait#lemonparfaitsweater |
|||||||||||||||||||
 |
 |
||||||||||||||||||
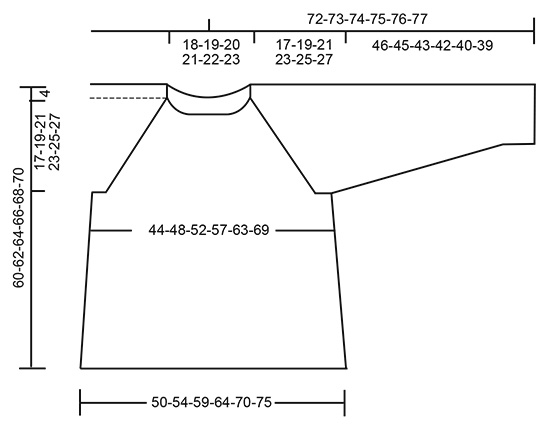
Pull raglan avec point de feuilles. Du S au XXXL. Se tricote en DROPS Cotton Merino.
DROPS 180-1 |
|||||||||||||||||||
|
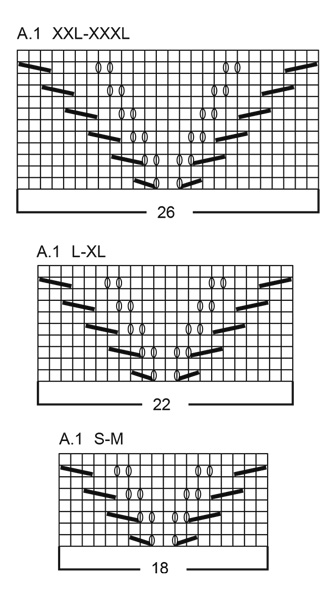
TECHNIQUES EMPLOYÉES: POINT MOUSSE (en rond): 1 côte mousse = 2 tours. Tricoter 1 tour endroit et 1 tour envers. POINT FANTAISIE: Voir diagramme A.1. Voir diagramme approprié à chaque taille. DIMINUTIONS (côtés): En commençant 3 mailles avant le fil marqueur sur le côté, tricoter 2 mailles ensemble à l'endroit, 2 mailles endroit (le fil marqueur se trouve entre ces 2 mailles), glisser 1 maille à l’endroit, 1 maille endroit, passer la maille glissée par-dessus la maille tricotée. AUGMENTATIONS: Augmenter ainsi au milieu sous la manche – en commençant 1 maille avant le fil marqueur: Faire 1 jeté, tricoter 2 mailles endroit (le fil marqueur se trouve entre ces 2 mailles), 1 jeté. Au tour suivant, tricoter les jetés torse à l'endroit pour éviter les trous. RAGLAN: On va diminuer 2 mailles à chaque transition entre le dos/le devant et les manches. En commençant 3 mailles avant le fil marqueur: Tricoter 2 mailles ensemble à l'endroit, 2 mailles endroit (le fil marqueur se trouve entre ces 2 mailles), glisser 1 maille à l'endroit, 1 maille endroit, passer la maille glissée par-dessus la maille tricotée. ASTUCE TRICOT: Si la tension n'est pas juste en hauteur et le tricot trop serré, l’empiècement sera trop court et les emmanchures trop étroites. On peut ajuster en tricotant un tour supplémentaire sans diminutions à intervalles réguliers entre les diminutions. ---------------------------------------------------------- DOS & DEVANT: Se tricotent en rond sur aiguille circulaire, de bas en haut. Monter 212-228-248-268-292-316 mailles avec l'aiguille circulaire 4 en Cotton Merino. Tricoter 2 CÔTES MOUSSE – voir ci-dessus. Continuer ainsi: 17-21-20-25-25-31 mailles endroit, 3 mailles envers, *A.1 (= 18-18-22-22-26-26 mailles), 6 mailles envers*, répéter de *-* 2 fois au total, A.1, 3 mailles envers, 34-42-40-50-50-62 mailles endroit, 3 mailles envers, *A.1, 6 mailles envers*, répéter de *-* 2 fois au total, A.1, 3 mailles envers, 17-21-20-25-25-31 maille endroit. Placer 1 fil marqueur au début du tour et 1 après 106-114-124-134-146-158 mailles = côtés. Continuer ainsi. BIEN CONSERVER LA MÊME TENSION QUE POUR L'ÉCHANTILLON! Quand l'ouvrage mesure 8 cm, diminuer 1 maille de chaque côté des fils marqueurs sur les côtés (= on diminue 4 mailles) – VOIR DIMINUTIONS! Diminuer 7 fois au total tous les 4½ cm dans toutes les tailles = 184-200-220-240-264-288 mailles. Quand l'ouvrage mesure 39-39-39-39-39-39 cm, rabattre 8-8-10-10-12-14 mailles de chaque côté (= 4-4-5-5-6-7 mailles de chaque côté des fils marqueurs). On a maintenant 84-92-100-110-120-130 mailles pour le dos et pour le devant. Mettre en attente et tricoter les manches. MANCHES: Se tricotent en rond avec les aiguilles doubles pointes, continuer avec la petite aiguille circulaire quand suffisamment de mailles ont été augmentées. Monter 48-52-56-56-60-64 mailles avec les aiguilles doubles pointes 3,5 en Cotton Merino. Tricoter 1 tour endroit, puis en côtes, 2 mailles endroit/ 2 mailles envers. Quand l'ouvrage mesure 6 cm, continuer avec les aiguilles doubles pointes 4 et tricoter 1 tour endroit en diminuant 4-6-8-6-8-10 mailles à intervalles réguliers = 44-46-48-50-52-54 mailles. Placer 1 marqueur au début du tour (= milieu sous la manche). Continuer en jersey. Quand l'ouvrage mesure 10-7-7-10-7-7 cm augmenter 2 mailles au milieu sous la manche – VOIR AUGMENTATIONS. Augmenter 12-15-18-19-20-21 fois au total tous les 3-2½-2-1½-1½-1½ cm = 68-76-84-88-92-96 mailles. Quand l'ouvrage mesure 46-45-43-42-40-39 cm (plus court dans les grandes tailles car l'empiècement est plus long), rabattre les 8-8-10-10-12-14 mailles au milieu sous la manche = 60-68-74-78-80-82 mailles. Mettre en attente et tricoter l'autre manche. EMPIÈCEMENT: Placer les manches sur la même aiguille circulaire que le dos et le devant, au-dessus des mailles rabattues pour les emmanchures = 288-320-348-376-400-424 mailles. Placer un fil marqueur à chaque transition entre le dos, le devant et les manches (= 4 fils marqueurs). Continuer comme avant et diminuer pour le RAGLAN – voir ci-dessus. Diminuer 5-5-6-6-6-7 fois tous les 4 tours, puis 14-16-18-21-23-24 fois tous les 2 tours = 19-21-24-27-29-31 fois au total. Tricoter en jersey les mailles de A.1 qui ne peuvent plus se tricoter en point fantaisie. Quand toutes les diminutions sont faites, il reste 136-152-156-160-168-176 mailles. Tricoter 2 côtes mousse sur toutes les mailles, mais au premier tour, tricoter ensemble 2 par 2 à l'endroit les 22-26-26-24-22-20 mailles de chaque manche, et diminuer en plus 18-28-26-28-34-40 mailles à intervalles réguliers = 96-98-104-108-112-116 mailles. Rabattre à l'endroit. ASSEMBLAGE: Fermer l'ouverture sous les manches par une couture. |
|||||||||||||||||||
Légende diagramme(s) |
|||||||||||||||||||
|
|||||||||||||||||||
 |
|||||||||||||||||||
 |
|||||||||||||||||||
Vous avez terminé ce modèle?Alors taguez vos photos avec #dropspattern #lemonparfaitsweater ou bien présentez-les dans la galerie #dropsfan Vous avez besoin d'aide pour ce modèle ?Vous trouverez 26 tutoriels vidéo, une rubrique commentaires/questions et plus encore en vous rendant sur la page du modèle sur garnstudio.com © 1982-2026 DROPS Design A/S. Tous droits réservés. Ce document, y compris ces sous-sections, est protégé par les droits d'auteur (copyright). Apprenez-en davantage sur ce que vous pouvez faire avec nos modèles en bas de chacune des pages de notre site. |
|||||||||||||||||||


Avec plus de 40 ans dans la conception de modèles tricot et crochet, DROPS Design offre l'une des plus vastes collections de modèles gratuits sur internet - traduits dans 17 langues. À ce jour, on compte 324 catalogues et 12252 modèles en français.
Nous nous efforçons de vous apporter le meilleur de ce que le tricot et le crochet peuvent vous offrir, inspiration et conseils mais également des fils de haute qualité à des prix incroyables! Vous souhaiteriez utiliser nos modèles autrement que pour un usage personnel? Vous pouvez lire ce que vous êtes autorisés à faire dans le Copyright en bas de page de chacun de nos modèles. Bon tricot!
Poster un commentaire sur le modèle DROPS 180-1
Nous aimerions connaître votre avis sur ce modèle !
Si vous souhaitez poser une question, merci de bien vouloir vérifier que vous avez choisi la bonne catégorie dans le formulaire ci-dessous afin d'accélérer la réponse. Les champs obligatoires sont indiqués par une *.