
Catégories populaires
Vous cherchez un fil?


Commentaires / Questions (48)
![]() María Fernanda Yáñez a écrit:
María Fernanda Yáñez a écrit:
Hola! Para la talla M, los 95 puntos de A2 no encajan con el sentido de los 7 puntos centrales de A3 (para que encajen tendría que tener 43 puntos a un lado y 45 en el otro). Hago el comentario para saber si es que hay un error en el patrón. Gracias por la respuesta.
15.03.2022 - 05:30
![]() Irene Simeone a écrit:
Irene Simeone a écrit:
Buongiorno, un'altra domanda. Quando si deve iniziare il diagramma A.3, le istruzioni dicono di iniziare dalla riga indicata dalla freccia su un ferro sul rovescio del lavoro. Questo significa che le 7 maglie centrali devono essere lavorati così: 1 dir, 5 rov, 1 dir? Grazie ancora. Irene
03.03.2022 - 15:43DROPS Design a répondu:
Buonasera Irene, dal rovescio del lavoro deve lavorare come indicato nella legenda e cioè 1 maglia rovescio, 5 maglie diritto e 1 maglia rovescio. Buon lavoro!
05.03.2022 - 22:09
![]() Irene Simeone a écrit:
Irene Simeone a écrit:
Buongiorno, sto seguendo le istruzioni ma sono un po' confusa :( il davanti del lavoro è quello in cui si vedono le coste oppure quello in cui ci sono una specie di nodini? spero riusciate a capire cosa intendo. Grazie mille! Irene
03.03.2022 - 15:24DROPS Design a répondu:
Buonasera Irene, il davanti del lavoro è quello in cui inizia a lavorare a coste sul dietro. Buon lavoro!
04.03.2022 - 17:46
![]() Stella a écrit:
Stella a écrit:
When it says to work 4 rows over 10 garter stitches, does is mean 4 rows with the 10 garter stitches or the 10 garter stitches with 4 rows of A2 over it?
03.01.2022 - 21:52DROPS Design a répondu:
Dear Stella, this means you work the next 4 rows with the 10 sts in garter stitch instead of pattern and the remaining stitches as before. Happy knitting!
04.01.2022 - 07:26
![]() Angela Beaty a écrit:
Angela Beaty a écrit:
In the Back Piece section, work from arrow in A.3 over the middle 7 stitches on row, Is this actually in the middle of the 96 stitches? So you skip the first 4 rows and just do the arrow row? Then work A.3 over the first 48 stitches do you start from the bottom of the diagram or from the arrow?
19.08.2021 - 10:21DROPS Design a répondu:
Dear Angela, when you work from the arrow, yes, you're working over the middle 7 stitches of the 96 stitches and you skip the first 4 rows and start from the arrow row. In the rest of the stitches, you work A.2. After finishing A.3, in the next row, there is a split for the opening. The rows under the arrow are actually from A.2 and are there just to give a context or to make it continuous visually.
30.08.2021 - 19:26
![]() Katzilicious a écrit:
Katzilicious a écrit:
I'm still confused, can you explain "work from arrow in A.3 over the middle 7 stitches on row - adjust so that this row marked with arrow is worked from wrong side. On first row from right side after A.3 work over the first 44-48-52-57-63-70 stitches on row and slip the remaining 44-48-52-57-63-70 stitches on 1 stitch holder"? So how do I read the chart? From the right bottom? And when i work from arrow A.3 do i start with RS or WS? Thank you
18.05.2021 - 12:06DROPS Design a répondu:
Dear Katzilicious, you read the diagram from right to left and from bottom up, from the right side. Here you have a lesson on how to read a diagram: https://www.garnstudio.com/lesson.php?id=68&cid=19 A.3 begins from the wrong side. Work 5 rows of A.3, which is in the center of the front or the back. The next step is to separate this part into two. You work one part with the V-neck and then you work the second part from the stitch holder. Happy knitting!
07.08.2021 - 11:30
![]() Jessica a écrit:
Jessica a écrit:
Hi again! Thanks for the help, it clears things up, but I’m still not sure what I should be doing when I switch to the A.3 chart. It says the row marked by the arrow should be worked from the WS, but to do that, I’d have to work the row below from the RS, meaning I’d be doing a row of knitting. But the A.2 pattern states that for RS rows I should P1 K1. I’m not sure how these two charts fit together. Any help would be great.
07.05.2021 - 13:32
![]() Jessica a écrit:
Jessica a écrit:
Hi! I’m a little confused about what to do once I’ve done the first 8 rows in A.1. I’m finishing on the WS so starting A.2 on the RS with a P1 K1 and 3 garter stitches at each end, then on the WS purling all stitches, but from previous comments that doesn’t seem to be the correct pattern, and after I got to switching to A.3, doing the row indicated by the arrow on the WS indicates that the previous RS row should be all knitted, not P1 K1 as I have done. Any help would be appreciated.
07.05.2021 - 11:22DROPS Design a répondu:
Dear Jessica, the garter stitches in A.2 (= P from RS, P from WS) should be worked over the P stitches in A.1, so that you will work A.2 from RS: 3 sts in garter st, K1, (P1, K1) repeat from (to) and finish with 3 sts in garter stitch and from WS: K3, P to the last 3 sts, P3. Happy knitting!
07.05.2021 - 13:00
![]() Katzilicious a écrit:
Katzilicious a écrit:
I'm confuse about worked A.1 until it had been vertically worked and work A.2 over A.1 can you please explain? Thank you
06.05.2021 - 07:39DROPS Design a répondu:
Dear Katzilicious, work first the 8 rows in A.1 as explained: (from RS = 3 sts in garter stitch, knit 1, repeat A.1 (read from the right towards the left= P1, K1), 3 sts in garter st / from WS: 3 sts in garter st, A.1 (read from the left towards the right = P1, K1), P1, 3 sts in garter st). Then work: 3 sts in garter st, knit 1, repeat A.2 (= 1 st in garter st, 1 st in stocking st), and finish with 3 sts in garter st, from WS: 3 sts in garter st, repeat A.1 (=1 st in stocking st = P, 1 st in garter st = K), P1, 3 sts in garter st. Hope this help. Happy knitting!
06.05.2021 - 07:45
![]() Diana a écrit:
Diana a écrit:
I prefer written instructions as opposed to charts. Is there anyone who has written out the instructions? Also, there are no instructions on how many inches or rows we need to knit for each diagram. I am a long time knitter but find almost all of the patterns here quite confusing with no written instructions or actual row/inches for each size. I understand the patterns are translated from Norwegian and it is not an easy task to ensure everything is explained in detail.
29.03.2021 - 22:35DROPS Design a répondu:
Dear Diana, we use charts insted of written out instructions not only because they are available in many languages, but also because we believe that with charts one can see not only the very next step, but one can see teh larger picture, as how stitches and rows relate to each other en large. We also have a lesson about how to read diagrams here, and one can always ask for help in the store where they bought their DROPS yarn from (over the phone or in person). We have many knitters who actually prefer diagrams to written instructions. Happy Knitting!
30.03.2021 - 11:50
|
|||||||||||||
Mazo#mazotop |
|||||||||||||
 |
 |
||||||||||||
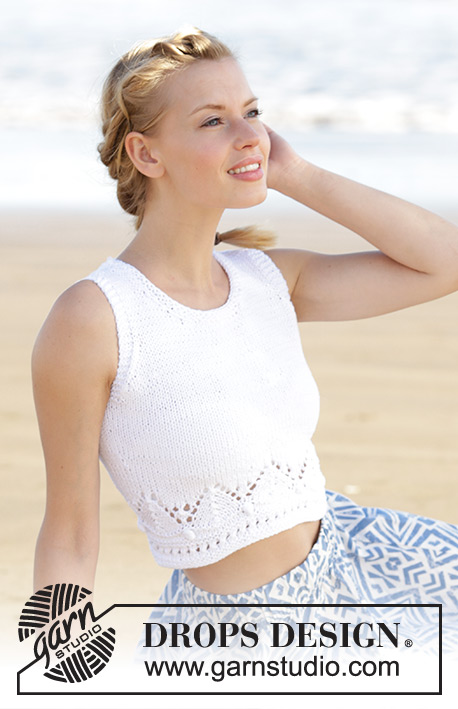
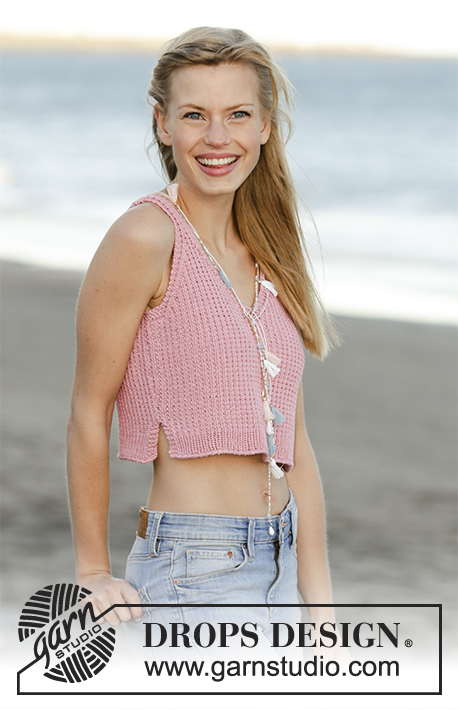
Top avec encolure V, point texturé et fentes sur les côtés, tricoté de bas en haut en DROPS Muskat. Du S au XXXL.
DROPS 178-66 |
|||||||||||||
|
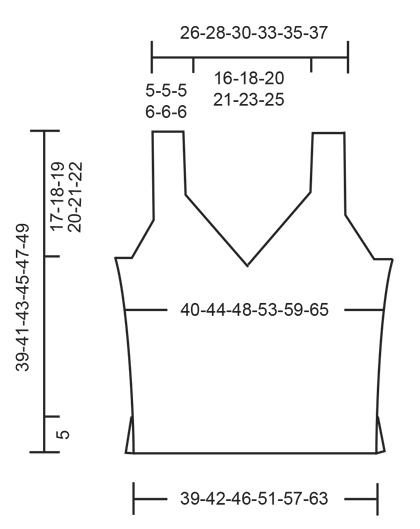
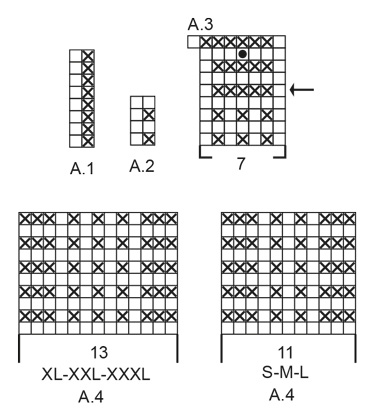
POINT MOUSSE (en allers et retours): Tricoter tous les rangs à l'endroit. 1 côte mousse = tricoter 2 rangs endroit. POINT FANTAISIE: Voir les diagrammes A.1 à A.4. Les diagrammes montrent tous les rangs du motif, vus sur l'endroit. Voir diagramme approprié à la taille. AUGMENTATIONS: Pour augmenter 1 maille, faire 1 jeté. Au rang suivant, tricoter le jeté torse à l'endroit pour éviter un trou. NOTE: Tricoter les nouvelles mailles en point fantaisie A.2 au fur et à mesure. DIMINUTIONS: Diminuer 1 maille après/avant 3 mailles de bordure au point mousse. Toutes les diminutions se font sur l'endroit. Diminuer ainsi après 3 mailles de bordure au point mousse: Glisser 1 m à l'endroit, 1 maille endroit, passer la maille glissée par-dessus la maille tricotée. Diminuer ainsi avant 3 mailles de bordure au point mousse: Commencer 2 mailles avant les 3 mailles de bordure au point mousse et tricoter 2 mailles ensemble à l'endroit. ---------------------------------------------------------- TOP: Se tricote en allers et retours en 2 parties assemblées entre elles à la fin. DOS: Monter 81-89-97-107-119-133 mailles avec l'aiguille circulaire 4 en Muskat. Tricoter 1 rang envers sur l'envers. Tricoter ensuite en côtes ainsi (1er rang = sur l'endroit): 3 mailles POINT MOUSSE - voir ci-dessus, 1 maille endroit, répéter A.1 (= 2 mailles) jusqu'à ce qu’il reste 3 mailles, terminer par 3 mailles point mousse. Continuer ainsi en allers et retours ainsi jusqu'à ce que A.1 a été tricoté 1 fois en hauteur. Tricoter ensuite A.2 (= 2 mailles) au-dessus de A.1. BIEN CONSERVER LA MÊME TENSION QUE POUR L'ÉCHANTILLON! Quand l'ouvrage mesure 5 cm, monter 1 maille à la fin des 2 rangs suivants (repère fin des fentes) = 83-91-99-109-121-135 mailles. Tricoter ensuite ainsi: 1 maille lisière au point mousse, 1 maille endroit, A.2 jusqu'à ce qu'il reste 1 maille, 1 maille lisière au point mousse. Quand l'ouvrage mesure 7 cm, augmenter 1 maille à 1 maille lisière au point mousse des bords de chaque côté - VOIR AUGMENTATIONS! Répéter ces augmentations quand l'ouvrage mesure 10 cm = 87-95-103-113-125-139 mailles. Quand l'ouvrage mesure 19-20-21-22-23-24 cm, tricoter à partir de la flèche dans A.3 au-dessus des 7 mailles du milieu du rang - ajuster pour que ce rang avec la flèche soit sur l'envers. Au 1er rang sur l'endroit après A.3, tricoter les 44-48-52-57-63-70 premières mailles du rang et glisser les 44-48-52-57-63-70 dernières mailles sur 1 arrêt de mailles. CÔTÉ DROIT DU DOS: = 44-48-52-57-63-70 mailles. LIRE ATTENTIVEMENT LA SUITE AVANT DE CONTINUER - on diminue pour l'encolure et pour l’emmanchure en même temps, ainsi: Tricoter A.2 comme avant avec 3 mailles de bordure au point mousse côté encolure et 1 maille lisière au point mousse sur le côté. ENCOLURE: Au 1er rang sur l'endroit commencer à diminuer pour l'encolure. Diminuer 1 maille à 3 mailles point mousse du bord - VOIR DIMINUTIONS. Diminuer ainsi 16-18-20-22-24-26 fois au total tous les 2 rangs (c'est-à-dire tous les rangs sur l'endroit). EMMANCHURES: Quand l'ouvrage mesure 21-22-23-24-25-26 cm, tricoter au point mousse au-dessus des 10-10-12-11-11-14 mailles sur le côté (y compris 1 maille lisière au point mousse). Quand 4 rangs (= 2 côtes mousse) ont été tricotés sur ces mailles, rabattre les 7-7-9-8-8-11 premières mailles en début de rang pour l'emmanchure. Tricoter les 3 mailles suivantes au point mousse (= bordure emmanchure). Diminuer 1 maille après les 3 mailles de bordure au point mousse côté emmanchure. Diminuer ainsi 10-12-12-14-18-20 fois au total tous les 2 rangs (c'est-à-dire tous les rangs sur l'endroit). Quand toutes les mailles ont été rabattues et diminuées pour l'emmanchure et l’encolure, il reste 11-11-11-13-13-13 mailles pour la bretelle. Continuer comme avant avec 3 mailles de bordure au point mousse de chaque côté. Tricoter la bretelle comme indiqué dans A.4 - voir diagramme approprié à la taille. Quand l'ouvrage mesure 39-41-43-45-47-49 cm, rabattre toutes les mailles. CÔTÉ GAUCHE DU DOS: Reprendre les 44-48-52-57-63-70 mailles de l'arrêt de mailles de l’autre côté du dos sur l'aiguille circulaire 4 et tricoter comme pour le côté droit du dos, mais en sens inverse – NOTE: Quand on forme l'emmanchure sur le côté, rabattre en début de rang sur l'envers (au lieu d’en début de rang sur l'endroit). Les diminutions restantes pour l'emmanchure et l’encolure se font sur l'endroit. DEVANT: Monter et tricoter comme pour le dos. ASSEMBLAGE: Coudre les 2 bretelles ensemble en grafting pour éviter que la couture ne soit trop épaisse. Faire la couture des côtés dans les mailles lisières au point mousse de chaque côté depuis l'emmanchure jusqu’à la fente des côtés. Répéter de l'autre côté. Arrêter. |
|||||||||||||
Légende diagramme(s) |
|||||||||||||
|
|||||||||||||
 |
|||||||||||||
 |
|||||||||||||
Vous avez terminé ce modèle?Alors taguez vos photos avec #dropspattern #mazotop ou bien présentez-les dans la galerie #dropsfan Vous avez besoin d'aide pour ce modèle ?Vous trouverez 23 tutoriels vidéo, une rubrique commentaires/questions et plus encore en vous rendant sur la page du modèle sur garnstudio.com © 1982-2026 DROPS Design A/S. Tous droits réservés. Ce document, y compris ces sous-sections, est protégé par les droits d'auteur (copyright). Apprenez-en davantage sur ce que vous pouvez faire avec nos modèles en bas de chacune des pages de notre site. |
|||||||||||||


Avec plus de 40 ans dans la conception de modèles tricot et crochet, DROPS Design offre l'une des plus vastes collections de modèles gratuits sur internet - traduits dans 17 langues. À ce jour, on compte 324 catalogues et 12290 modèles en français.
Nous nous efforçons de vous apporter le meilleur de ce que le tricot et le crochet peuvent vous offrir, inspiration et conseils mais également des fils de haute qualité à des prix incroyables! Vous souhaiteriez utiliser nos modèles autrement que pour un usage personnel? Vous pouvez lire ce que vous êtes autorisés à faire dans le Copyright en bas de page de chacun de nos modèles. Bon tricot!
Poster un commentaire sur le modèle DROPS 178-66
Nous aimerions connaître votre avis sur ce modèle !
Si vous souhaitez poser une question, merci de bien vouloir vérifier que vous avez choisi la bonne catégorie dans le formulaire ci-dessous afin d'accélérer la réponse. Les champs obligatoires sont indiqués par une *.