
Catégories populaires
Vous cherchez un fil?


Commentaires / Questions (68)
![]() Amy a écrit:
Amy a écrit:
To whom it may concern: I was wondering when I am knitting the 12 stitches do I knit both ends of the row in garter stitch or just the last stitch of the row. Thank you in advance for your help Amy
31.10.2015 - 16:27DROPS Design a répondu:
Dear Amy, when you are working the 12 sts for mid upper part, work the 1st and last st in garter st. See also the video in previous answer. Happy knitting!
31.10.2015 - 18:20
![]() Amy a écrit:
Amy a écrit:
To whom it may concern: The problem I am having is I have the 10 stitches on my needle for the top portion of the slipper but when I reach the 7 cm am I suppose to increase on those 10 stitches to reach the number 61 stitches that I need or do I start increasing after after the 7 cm. It says to pick up 12 stitches after I reach the 7 cm on either side of the edge stitch. That is where I am having the problem. Thank you again for your help
29.10.2015 - 04:56DROPS Design a répondu:
Dear Amy, after you have worked the 7 cm over the mid sts, and 10 sts left, pick up 12 sts along both side of the upper foot (along right side of the middle part + along left side of the middle part) + slip sts from thread back on needle = you have a total of 61 sts on needle and your work looks like as in video, time code 5:18 approx. Happy knitting!
29.10.2015 - 09:32
![]() Amy a écrit:
Amy a écrit:
To whom it may concern: I am still confused as to how many rows I need because there is no explanation for when I go to start the pattern 2 portion of the slipper part and how many increases I need to reach the required amount of sts as well. I tried to watch the video but it was hard to follow when the sped up the knitting part. Thank you again for your help Amy
28.10.2015 - 16:04DROPS Design a répondu:
Dear Amy, wijth pattern 2 portion of the slipper part, do you mean the edge around leg? Work first 4 ridges in garter st (= 8 K rows) but on the 8th K row increase 6 sts evenly - see here how to increase evenly. Then work following A.1 until 35-38 cm, work 4 ridges (8 K rows), but on the 1st of these 8 rows, decrease 6 sts evenly. Happy knitting!
28.10.2015 - 18:26
![]() Amy a écrit:
Amy a écrit:
Amy 25.10.2015 kl. 00:38: To whom it may concern: I am currently working on the slipper boot pattern and am wondering how I am suppose to do the heel of the slipper when it doesn't say how many rows to do it just say to work back and forth on the needles. If you could let me know it would be appreciated Thank you in advance for your help
25.10.2015 - 15:33
![]() Amy a écrit:
Amy a écrit:
To whom it may concern: I am currently working on the slipper boot pattern and am wondering how I am suppose to do the heel of the slipper when it doesn't say how many rows to do it just say to work back and forth on the needles. If you could let me know it would be appreciated Thank you in advance for your help
25.10.2015 - 00:38
![]() Yvonne a écrit:
Yvonne a écrit:
Kan ik de slof ook op 2 pennen breien ?
10.06.2015 - 23:26DROPS Design a répondu:
Hoi Yvonne. Nee, enkele delen van deze slof worden in de rondte gebreid.
11.06.2015 - 13:44
![]() Trudy a écrit:
Trudy a écrit:
I guess I did not make myself clear. I understand about putting the stitches back on the needles, although I am not sure if we are using three now or four. If we are using four - then I need to know how many stitches are put onto the fourth needle which would be the heal area of the boot.
12.04.2015 - 17:54DROPS Design a répondu:
Dear Trudy, distribute the sts on 4 needle or as in the video, making sure the markers are on the correct places. Happy knitting!
13.04.2015 - 09:32
![]() Elaine Langille a écrit:
Elaine Langille a écrit:
I don't understand "knit over knit" and "purl over purl" I watched the video, but still didn't know how to do it
11.02.2015 - 03:56DROPS Design a répondu:
Dear Mrs Langille, you work pattern 2 over the 12 sts as follows from RS: 1 edge st in garter st, *K2,P2* over the next 10 sts and finish with 1 edge st in garter st. On next row from WS work 1 edge st in garter st, *P2/K2* over the next 2 sts, 1 edge st in garter st. Happy knitting!
11.02.2015 - 09:14
![]() M Damen a écrit:
M Damen a écrit:
Een opmerking niet over de sloffen maar over de gebruikte taal. gecontroleerd is met 1 L niet met 2. Deze fout staat al enkele jaren bij ieder patroon.
04.01.2015 - 20:21Dianne Perrin a écrit:
Drops 158-47 pattern no an-025 I do not understand the directions for A.1 which is the first row and which x box is a p from rs and which x box is k from ws and which blank box is k from rs and which blank box is p from ws
16.12.2014 - 07:15DROPS Design a répondu:
Dear Mrs Perrin, please click here to read more about diagrams. Row 1 = K5, (P2, K2) repeat (to) a total of 5 times, K3. Row2= K3, (P2, K2) repeat (to) a total of 5 times, P2, K3. Happy knitting!
16.12.2014 - 09:58
|
|||||||
One Step Ahead#onestepaheadslippers |
|||||||
 |
 |
||||||
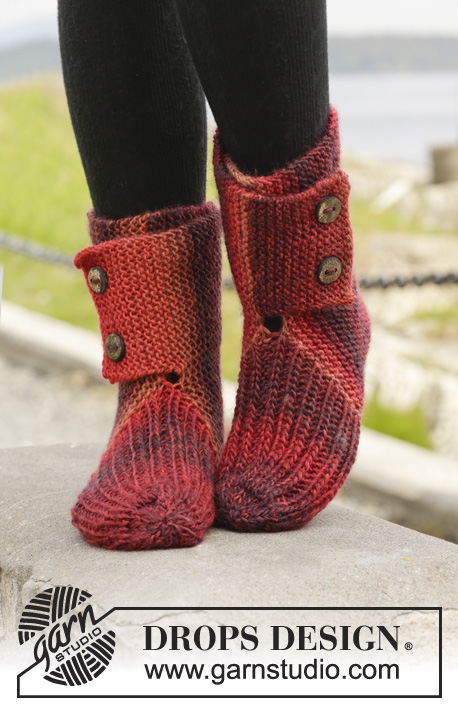
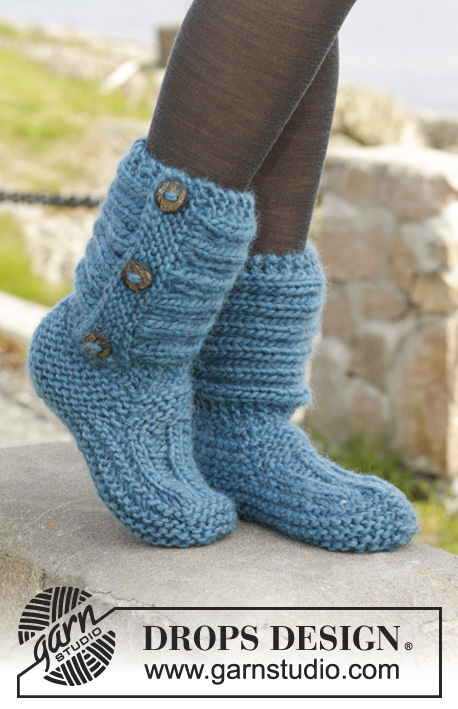
Chaussons DROPS au point mousse avec côtes, en "Andes".
DROPS 158-47 |
|||||||
|
POINT MOUSSE (en rond sur aiguilles doubles pointes): Tricoter: *1 tour end, 1 tour env*, répéter de *-*. 1 côte mousse = 2 tours. POINT MOUSSE (en allers et retours): Tricoter tous les rangs à l'endroit. 1 côte mousse = 2 rangs end. POINT FANTAISIE: Voir diagramme A.1. POINT FANTAISIE 2: Rang 1 (= sur l'endroit): *2 m end, 2 m env*, répéter de *-* jusqu'à ce qu'il reste 2 m, 2 m end. Rang 2 (= sur l'envers): Tricoter les m end à l'end et les m env à l'env. Répéter le rang 2 ---------------------------------------------------------- CHAUSSONS: Tricoter d'abord une bordure en bas de la jambe, puis le pied. Terminer par la bordure autour de la jambe. JAMBE: Monter 37-37-39 m avec les aiguilles doubles pointes 6 en Andes. Tricoter au POINT MOUSSE en rond - voir ci-dessus - jusqu'à ce que l'ouvrage mesure environ 4 cm, terminer après 1 tour env. PENSER À BIEN CONSERVER LA MÊME TENSION QUE POUR L'ÉCHANTILLON! PIED: Continuer en allers et retours. Garder maintenant sur l'aiguille les 10 premières m sur les aiguilles, glisser les 27-27-29 m restantes sur un arrêt de mailles. Tricoter maintenant les 10 m de la partie centrale en POINT FANTAISIE 2 – voir ci-dessus – EN MÊME TEMPS, à la fin des 2 rangs suivants monter 1 m lis (tricoter les m lis au POINT MOUSSE - voir ci-dessus) = 12 m. Quand la partie centrale mesure 7-8½-10 cm, diminuer 1 m lis de chaque côté = 10 m. Reprendre ensuite les mailles en attente et relever 12-14-16 m de chaque côté de la partie centrale (à 1 m des bords) = 61-65-71 m. MESURER MAINTENANT À PARTIR D'ICI! Placer 1 marqueur au milieu des 10 m de la partie centrale (= au niveau devant, côté pointe du pied) et 1 autre marqueur dans la maille au dos du talon, on a 30-32-35 m entre les marqueurs de chaque côté. Continuer maintenant en rond, au point mousse. À 2 cm, tricoter tous les 2 tours 2 m ens à l'end de chaque côté de chaque marqueur (= 4 m en moins par tour). Continuer ces diminutions jusqu'à ce que l'ouvrage mesure 5-5-6 cm. Rabattre les mailles restantes. Faire la couture sous le pied dans le brin le plus à l'extérieur des mailles pour éviter une couture trop épaisse. BORDURE AUTOUR DE LA JAMBE: Se tricote en allers et retours. Monter 22 m avec les aiguilles 6 en Andes. Tricoter 4 côtes mousse, EN MÊME TEMPS, au dernier rang, répartir 6 augmentations = 28 m. Tricoter en suivant A.1 (= 28 m) jusqu'à ce que l'ouvrage mesure environ 35-36-38 cm. Tricoter ensuite 4 côtes mousse, EN MÊME TEMPS, au 1er rang, répartir 6 diminutions = 22 m. Rabattre. Placer les mailles rabattues au-dessus des mailles montées, et coudre 3 boutons dans les côtes mousse de la bordure. ASSEMBLAGE Coudre la bordure de la jambe au rang de montage de la jambe (c'est-à-dire les mailles montées pour la jambe, au début des explications). Placer la bordure de sorte que les boutons soient placés sur l'extérieur, l'ouverture vers l'arrière, côté talon – coudre sur l'envers pour que la couture soit invisible. Tricoter un autre chausson identique, veiller à ce que l'ouverture de la bordure soit bien de l'autre côté. |
|||||||
Légende diagramme(s) |
|||||||
|
|||||||
 |
|||||||
Vous avez terminé ce modèle?Alors taguez vos photos avec #dropspattern #onestepaheadslippers ou bien présentez-les dans la galerie #dropsfan Vous avez besoin d'aide pour ce modèle ?Vous trouverez 18 tutoriels vidéo, une rubrique commentaires/questions et plus encore en vous rendant sur la page du modèle sur garnstudio.com © 1982-2026 DROPS Design A/S. Tous droits réservés. Ce document, y compris ces sous-sections, est protégé par les droits d'auteur (copyright). Apprenez-en davantage sur ce que vous pouvez faire avec nos modèles en bas de chacune des pages de notre site. |
|||||||


Avec plus de 40 ans dans la conception de modèles tricot et crochet, DROPS Design offre l'une des plus vastes collections de modèles gratuits sur internet - traduits dans 17 langues. À ce jour, on compte 324 catalogues et 12290 modèles en français.
Nous nous efforçons de vous apporter le meilleur de ce que le tricot et le crochet peuvent vous offrir, inspiration et conseils mais également des fils de haute qualité à des prix incroyables! Vous souhaiteriez utiliser nos modèles autrement que pour un usage personnel? Vous pouvez lire ce que vous êtes autorisés à faire dans le Copyright en bas de page de chacun de nos modèles. Bon tricot!
Poster un commentaire sur le modèle DROPS 158-47
Nous aimerions connaître votre avis sur ce modèle !
Si vous souhaitez poser une question, merci de bien vouloir vérifier que vous avez choisi la bonne catégorie dans le formulaire ci-dessous afin d'accélérer la réponse. Les champs obligatoires sont indiqués par une *.