
Catégories populaires
Vous cherchez un fil?


Commentaires / Questions (66)
![]() Linda Langlois a écrit:
Linda Langlois a écrit:
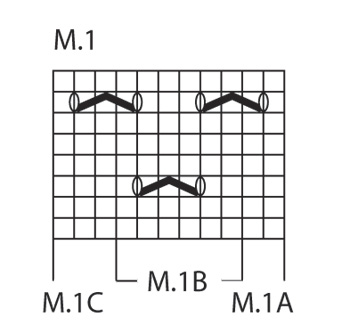
Bonjour, mon questionnement se situe au début du rang 7 c'est-à-dire: est-ce que je commence par une maille endroit selon le graphique ou si je dois faire le M.1A (2 mailles) avant le commencer le M.1B. Le nombre de répétition du motif est-il 4 fois comme le rang 3? J'ai essayé de le faire en commençant par 1 m. end., 1 jeté et en continuant avec le M.1B et en terminant le rang par 1 m. end. mais j'arrive à 5 répétitions au lieu de 4. Est-ce correct?
07.11.2019 - 15:10DROPS Design a répondu:
Bonjour Mme Langlois, vous devez toujours tricoter: 1 x M.1A, puis vous répétez M.1B et terminez par M.1C, au 7ème rang de M.1, tricotez les 2 premières m de A, puis vous répétez les mailles de B et terminez par les mailes de C - cf réponse ci-dessous pour le détail des mailles du 7ème rang. Bon tricot!
07.11.2019 - 15:23
![]() Linda Langlois a écrit:
Linda Langlois a écrit:
: M.1A (= 2 sts), then repeat M.1B a total of 4 times in width (= 24 sts) and finish with M.1C (= 3 sts) = 2+24+3= 29 stitches. Happy knitting! mais pour le rang 7???
05.11.2019 - 19:10
![]() Linda Langlois a écrit:
Linda Langlois a écrit:
Pouvez-vous m'explique le rang 7 du diagramme par rapport au rang 3? J'essaie de comprendre le M.1B Merci
05.11.2019 - 18:22DROPS Design a répondu:
Bonjour Mme Langlois, au rang 7 de M.1, vous tricotez: 1 m end, 1 jeté (= 2 m pour A), glissez la m suivante (=la dernière m de A, 2 m ens à l'end, m glissée par-dessus m tricotée), 1 jeté, 3 m end, 1 jeté (= M.1B), tricotez maintenant la dernière m de M.1B avec les 2 premières m du M.1B suivant (puis de M.1C la dernière fois). Bon tricot!
06.11.2019 - 08:43
![]() Christine a écrit:
Christine a écrit:
I am almost ready to decrease for the toe shaping...once again, I do not understand...I have 52 stitches, but the pattern says separate 25 stitches , for the underfoot and 25 stitches for the upper foot...what happens to the other 2 sts?, sigh...sorry to be such a pain...
03.10.2019 - 02:34DROPS Design a répondu:
Dear Christine, there should be 25 stitches for both upper and under foot + 1 stitch with marker on each side = 52 sts in total. Happy knitting!
03.10.2019 - 09:29
![]() Kendall a écrit:
Kendall a écrit:
Christine,thanks for your help I appreciated it😊I figured out to put the 35 stitches to the side by talking it over with my sister,she knits too,and the comment just confirmed it which is great and if you still need help on when to start the lace pattern,you start the lace pattern the row after you pick up the 14 side stitches go across the top of the sock and pick up the other 14 stitches once you get back to the 29 stitches that’s when you do the lace pattern I hope I helped😊
01.10.2019 - 15:40
![]() Christine a écrit:
Christine a écrit:
Kendall, clearly I was wrong. This is not a typo error. As you can see from the answers. I was wrong and hope I have not confused you. now I understand. if you need help, don’t be shy, I can now help 😊
01.10.2019 - 02:06
![]() Christine a écrit:
Christine a écrit:
Thank you for your answer. Does that mean that I should put 3 stitches from the 35 to the 14 stitches picked up on both sides, and work the decrease including those 3 stitches? Thank you.
30.09.2019 - 14:11DROPS Design a répondu:
Dear Christine, you will decrease before the 29 stitches (first 3 from the 35 sts are worked with the picked up stitches in stocking stitch) and after the 29 stitches in pattern (= the last 3 from the 35 sts are worked with the picked up sts in stocking st), ie these 3 sts on either side of the 29 middle sts will be worked in stocking stitch and decreased for instep. Happy knitting!
30.09.2019 - 16:04
![]() Christine a écrit:
Christine a écrit:
At what point do you start working with the Diagram please? I am totally confused. I am at the point where I have picked up 14 stitches on both sides as well as the 35 stitches that were on the stitch holder. I now have 76 stitches on the needles, but I am unsure how to proceed at this point. With big thanks in advance.
28.09.2019 - 20:03DROPS Design a répondu:
Dear Christine, once you get the 76 sts on the needle (= heel is now worked),k you now work the stitches from under foot in stocking stitch (= over the first 3 sts from the 35 sts slipped on a thread + the last 3 sts from these 35 sts (=29 sts remain for upper foot) + the stitches from heel while decreasing for instep and work the 29 stitches (upper foot, the stitches slipped on a thread) in pattern: : M.1A (= 2 sts), then repeat M.1B a total of 4 times in width (= 24 sts) and finish with M.1C (= 3 sts) = 2+24+3= 29 stitches. Happy knitting!
30.09.2019 - 10:26
![]() Christine a écrit:
Christine a écrit:
Kendall, I just started this yesterday and came across the same problem. I figured it out to be simply a typo, and followed the pattern with 35 (for the medium sock). It is working out perfectly like that. I hope this helps.
28.09.2019 - 18:49
![]() Kendall a écrit:
Kendall a écrit:
How come you go from 35 stitches on top of the foot to 29?wheres the rest of the stitches?and then at the end when you work the toe where’s the missing two stitches?
28.09.2019 - 16:28
|
|||||||
Neptunia Socks#neptuniasocks |
|||||||
|
|
|||||||
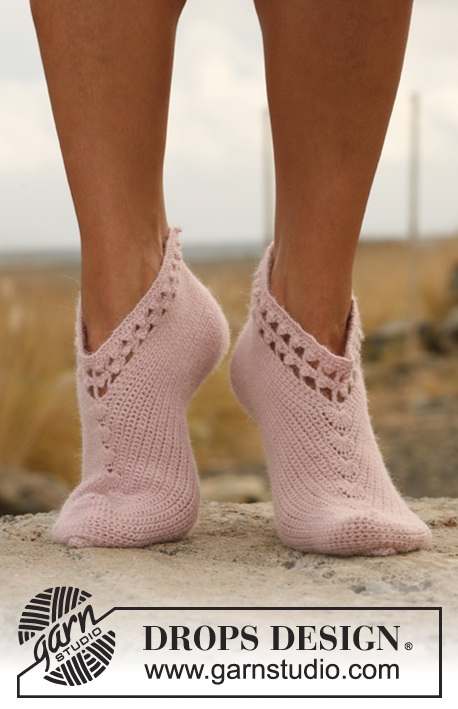
Soquettes ajourées DROPS en "Fabel".
DROPS 129-18 |
|||||||
|
POINT FANTAISIE : Voir diagramme M.1. DIMINUTIONS TALON : Rang 1 (= endroit): Tricoter jusqu'à ce qu'il reste 5-5-6 m, glisser 1 m à l'end, 1 m end, passer la m glissée par-dessus la m tricotée, tourner. Rang 2 (= envers): Tricoter jusqu'à ce qu'il reste 5-5-6 m, glisser 1 m à l'env, 1 m env, passer la m glissée par-dessus la m tricotée, tourner. Rang 3 (= endroit): Tricoter jusqu'à ce qu'il reste 4-4-5 m, glisser 1 m à l'end, 1 m end, passer la m glissée par-dessus la m tricotée, tourner. Rang 4 (= envers): Tricoter jusqu'à ce qu'il reste 4-4-5 m, glisser 1 m à l'env, 1 m env, passer la m glissée par-dessus la m tricotée, tourner. Continuer à diminuer ainsi avec 1 m en moins avant chaque diminution jusqu'à ce qu'il y ait 13-13-15 m sur l'aiguille. -------------------------------------------------------- SOQUETTES : Se tricotent en rond sur aiguilles doubles pointes. Monter 50-56-60 m avec les aiguilles doubles pointes 2.5 et le fil Fabel. Tricoter 1 tour end, et continuer en côtes = 1 m end/1 m env pendant 2-2-3 cm. Conserver ensuite les 21-21-25 premières m sur l'aiguille et glisser en attente sur un arrêt de mailles les 29-35-35 m restantes (= dessus du pied). Tricoter en jersey en allers et retours sur les mailles du talon pendant 5-5.5-6 cm. Placer un marqueur au milieu du talon - mesurer désormais à partir du marqueur. Former ensuite le talon - voir DIMINUTIONS TALON ! Après les diminutions du talon, relever 13-14-15 m le long de chaque côté du talon et reprendre les 29-35-35 m en attente = 68-76-80 m. Placer un marqueur de chaque côté des 29-29-35 m centrales du dessus du pied. Continuer en jersey sur les mailles du dessous du pied, et tricoter les 29-29-35 m du dessus du pied ainsi : M.1A (= 2 m), répéter M.1B sur les 24-24-30 m suivantes (= 4-4-5 fois) et terminer par M.1C (= 3 m). EN MÊME TEMPS, diminuer de chaque côté ainsi : tricoter ens torse à l'end (piquer dans le brin arrière au lieu du brin avant) les 2 dernières m avant les 29-29-35 m du dessus du pied et tricoter ens à l'end les 2 premières m après les 29-29-35 m centrales du dessus du pied. Répéter ces diminutions 10-12-12 fois au total tous les 2 tours = 48-52-56 m. Continuer jusqu'à 18-19-22 cm à partir du marqueur du talon (= il reste environ 4-5-5 cm). Placer un marqueur dans la 1ère m de chaque côté pour avoir 23-25-27 m pour le dessus du pied et 23-25-27 m pour le dessous du pied. Continuer en jersey sur toutes les mailles, EN MÊME TEMPS diminuer pour la pointe de chaque côté des marqueurs ainsi - commencer 2 m avant le marqueur : 2 m ens à l'end, 1 m end (le marqueur se trouve sur cette maille), 2 m ens torse à l'end. Continuer à diminuer ainsi de chaque côté 4-7-6 fois au total tous les 2 tours puis 6-4-6 fois au total tous les tours = il reste 8 m. Couper le fil et le passer dans les m restantes, serrer, arrêter. |
|||||||
Légende diagramme(s) |
|||||||
|
|||||||
 |
|||||||
Vous avez terminé ce modèle?Alors taguez vos photos avec #dropspattern #neptuniasocks ou bien présentez-les dans la galerie #dropsfan Vous avez besoin d'aide pour ce modèle ?Vous trouverez 18 tutoriels vidéo, une rubrique commentaires/questions et plus encore en vous rendant sur la page du modèle sur garnstudio.com © 1982-2026 DROPS Design A/S. Tous droits réservés. Ce document, y compris ces sous-sections, est protégé par les droits d'auteur (copyright). Apprenez-en davantage sur ce que vous pouvez faire avec nos modèles en bas de chacune des pages de notre site. |
|||||||


Avec plus de 40 ans dans la conception de modèles tricot et crochet, DROPS Design offre l'une des plus vastes collections de modèles gratuits sur internet - traduits dans 17 langues. À ce jour, on compte 324 catalogues et 12290 modèles en français.
Nous nous efforçons de vous apporter le meilleur de ce que le tricot et le crochet peuvent vous offrir, inspiration et conseils mais également des fils de haute qualité à des prix incroyables! Vous souhaiteriez utiliser nos modèles autrement que pour un usage personnel? Vous pouvez lire ce que vous êtes autorisés à faire dans le Copyright en bas de page de chacun de nos modèles. Bon tricot!
Poster un commentaire sur le modèle DROPS 129-18
Nous aimerions connaître votre avis sur ce modèle !
Si vous souhaitez poser une question, merci de bien vouloir vérifier que vous avez choisi la bonne catégorie dans le formulaire ci-dessous afin d'accélérer la réponse. Les champs obligatoires sont indiqués par une *.