
Popular categories
Looking for a yarn?


Comments / Questions (13)
![]() Alessandra wrote:
Alessandra wrote:
Salve non riescp a capire quando dice aumentare una maglia prima del segnapunto e dopo il segnapunto cioe devo fare due gettati cpnsecutivi o un gettato ppi lavoro una maglia e poi un altro gettato grazie
18.12.2013 - 11:58DROPS Design answered:
Buongiorno Alessandra, gli aumenti vengono fatti nello stesso modo sia prima che dopo il segnapunti, cioè con 1 gettato, ma deve seguire le istruzioni per lavorare. Deve aumentare 1 m dopo il 1° segno ogni 2 f, diminuire 1 m a ogni lato del 2° segno ogni 2 f, aumentare 1 m prima del 3° segno ogni 2 f, aumentare 1 m dopo il 3° segno ogni 4 f...e così via, continui a seguire le spiegazioni. Ci riscriva se non è chiaro. Buon lavoro!
18.12.2013 - 14:29
![]() Tina Rosvold wrote:
Tina Rosvold wrote:
Et tips- strikk snorene FØR lua, så får de samme farge som nederste del av lua. Slik som på bildet.
28.08.2013 - 21:29
![]() Nicolina Hauke wrote:
Nicolina Hauke wrote:
Sehr geehrte Damen und Herren, in der Anleitung ist bei den Zu- und Abnahmen sowohl von jeder 2. als auch von jeder 4. Reihe die Rede. Ist dabei berücksichtigt, dass jede 4. Reihe auch eine 2. Reihe ist. Nehme ich also in jeder 4. Reihe sowohl vor als auch nach dem 3. Markierungsfaden eine Masche auf oder soll in jeder 4. Reihe zwar nach aber nicht vor dem 3. Markierungsfaden eine Masche aufgenommen werden? Mit freundlichen Grüßen Nicolina Hauke
12.07.2013 - 22:07DROPS Design answered:
Liebe Nicolina, doch das ist berücksichtigt. In der 4. R wird beides durchgeführt.
13.07.2013 - 06:54
|
|
Baby Blue Hat#babybluehat |
|
 |
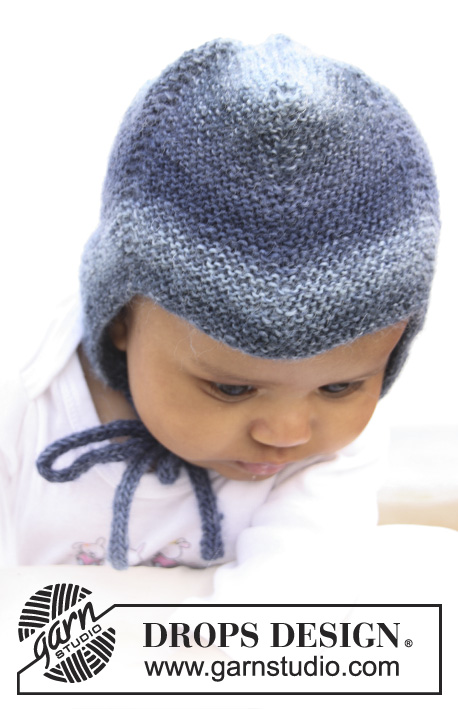 |
Knitted hat in garter st for baby and children in DROPS Delight
DROPS Baby 20-5 |
|
|
INCREASE TIP: All inc are done from RS. Inc 1 st before and after st with marker by making 1 YO. On next round knit YO twisted (i.e knit in the back loop of YO instead of front) to avoid holes. DECREASE TIP: All dec are done from RS. Dec 1 st on each side of st with marker. Beg 1 st before st with marker. Put 1 st on a cable needle behind the piece, slip 1 st (= st with marker), K next st and st on cable needle tog, psso. ---------------------------------------------------------- HAT: Worked back and forth on needle – K all rows (= garters). Cast on 119-127-135 (139-145) sts on needle size 2.5 mm with Delight. K 6 rows (1st row = RS). Insert 7 markers in the piece as follows (from RS): 1st marker in the 1st st on needle, 2nd marker in the 22nd-24th-26st (28th-31st) st, 3rd marker in the 43rd-47th-51st (55th-61st) st, 4th marker in the 60th-64th-68th (70th-73rd) st, 5th marker in the 77th-81st-85th (85th-85th) st, 6th marker in the 98th-104th-110th (112th-115th) st and 7th marker in the last st on the needle. Continue to K – AT THE SAME TIME on 1st row, beg to inc and dec – SEE INCREASE TIP AND DECREASE TIP! Inc 1 st after 1st marker on every other row. Dec 1 st on each side of the 2nd marker every other row. Inc 1 st before 3rd marker on every other row. Inc 1 st after 3rd marker on every 4th row. Dec 1 st on each side of the 4th marker every 4th row. Inc 1 st before 5th marker on every 4th row. Inc 1 st after 5th marker on every other row. Dec 1 st on each side of the 6th marker every other row. Inc 1 st before 7th marker on every other row. When piece measures 13-15-16 (18-19) cm (measured from bottom tip at 2nd and 6th marker) work next row from RS as follows: * K1, K2 tog *, repeat from *-* WHILE casting off. ASSEMBLY: Back of hat = cast off edge, i.e. 2 whole tips and 2 half tips. The 2nd of the 3 whole tips in the opposite side of the piece = cast on edge, goes down to the forehead at the front. Sew the hat tog edge to edge with 1 stitch in each st along the cast off edge as follows: Sew first half tip tog with first half of first whole tip. Continue to sew second half of first whole tip tog with first half of second whole tip. Then sew the other half of the second whole tip tog with the last half tip. Finish by sewing the hat tog mid back – make sure to sew edge to edge to avoid chunky seams. TIE STRING: Cast on 4 sts on needle size 2.5 mm with Delight. Knit as follows: * K1, place yarn in front of piece (towards you), slip 1 st as if to P, place yarn behind piece (from you) *, repeat from *-* the rest of row and on all rows. This becomes a string worked in the round. Cast off when the string measures approx. 20-22-24 (26-28) cm. Knit a similar tie string. Sew one tie string at the bottom of each tip on each side. |
|
Have you finished this pattern?Tag your pictures with #dropspattern #babybluehat or submit them to the #dropsfan gallery. Do you need help with this pattern?You'll find 5 tutorial videos, a Comments/Questions area and more by visiting the pattern on garnstudio.com. © 1982-2026 DROPS Design A/S. We reserve all rights. This document, including all its sub-sections, has copyrights. Read more about what you can do with our patterns at the bottom of each pattern on our site. |
|


With over 40 years in knitting and crochet design, DROPS Design offers one of the most extensive collections of free patterns on the internet - translated to 17 languages. As of today we count 324 catalogues and 12290 patterns translated into English (UK/cm). 12290
We work hard to bring you the best knitting and crochet have to offer, inspiration and advice as well as great quality yarns at incredible prices! Would you like to use our patterns for other than personal use? You can read what you are allowed to do in the Copyright text at the bottom of all our patterns. Happy crafting!
Post a comment to pattern DROPS Baby 20-5
We would love to hear what you have to say about this pattern!
If you want to leave a question, please make sure you select the correct category in the form below, to speed up the answering process. Required fields are marked *.