
Popular categories
Looking for a yarn?


Comments / Questions (22)
![]() Suse wrote:
Suse wrote:
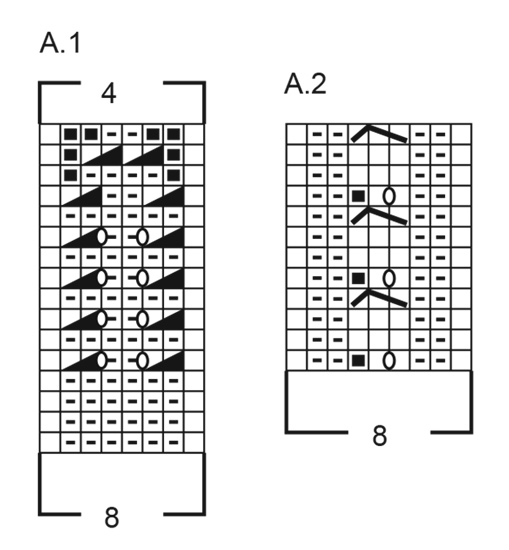
Hallo liebes Drops Design Team. Bei der Teilung in Vorder und Rückenteil habe ich festgestellt, dass ich jeweils 20 Maschen mehr auf der Nadel habe, wenn ich laut Chart in einer geraden Runde abteile. In diesem Fall bearbeite ich ja 9 statt 8 Maschen je Rapport. Danach ging alles prima auf. Grüße und Dankeschön von mir für Eure Mühe.
26.05.2023 - 06:43DROPS Design answered:
Liebe Sue, also die Umschläge von Diagrammen werden nicht als Maschen gezählt, so es kann sein, daß Sie mehr Maschen haben, wenn Sie diese Umschläge mitzählen. Viel Spaß beim stricken!
26.05.2023 - 10:16
![]() Charlotte Lomholt wrote:
Charlotte Lomholt wrote:
Mit bærestykke måler nu 33 cm efter jeg har strikket A2 mønsteret, og så står der at det er vigtigt at næste omgang stater med en “lige omgang”. HVad betyder det? Er det 2. Linie i A2 mønsteret eller er det en runde med 8 masker (a2 veksler jo mellem 8 og 9 masker)
21.05.2023 - 13:11DROPS Design answered:
Hej Charlotte, ja du skal sørge for at snoningspinden kommer fra retsiden når du deler arbejdet :)
23.05.2023 - 11:20
![]() Ave wrote:
Ave wrote:
Eesti keelses juhendis on viga! Kirjas on ,et "3 kokku (tõsta 1 silmus kudumata parempidi võttega, koo 2 parempidi kokku, tõsta kudumata silmus üle kokkukootud silmuste)" Tegelikult tõstad ühe paremidise võttega, siis kood kaks paremidi ja pärast tõstad selle kudumata üle nende kahe kootud silmuse. Kui on ebaselge, soovitan videost vaadata all!
16.04.2023 - 10:42
![]() Sofia wrote:
Sofia wrote:
Ho notato che molti dei vostri bellissimi modelli sono realizzati con ferri circolari. Io non ho esperienza. Come posso fare il modello con i ferri dritti? Grazie
15.03.2022 - 00:57DROPS Design answered:
Buongiorno Sofia, questo modello è lavorato in tondo. Può lavorarlo in piano con i ferro dritti aggiungendo 1 maglia di vivagno a ogni lato per la cucitura e adattando le spiegazioni alla lavorazione in piano. Buon lavoro!
15.03.2022 - 08:51
![]() Sofia wrote:
Sofia wrote:
Ho notato che molti dei vostri bellissimi modelli sono realizzati con ferri circolari. Io non ho esperienza. Come posso fare il modello con i ferri dritti?
15.03.2022 - 00:56DROPS Design answered:
Buongiorno Sofia, questo modello è lavorato in tondo. Può lavorarlo in piano con i ferro dritti aggiungendo 1 maglia di vivagno a ogni lato per la cucitura e adattando le spiegazioni alla lavorazione in piano. Buon lavoro!
15.03.2022 - 08:51
![]() Åsa wrote:
Åsa wrote:
I diagrammet A1 till DROPS 221-14 står det i teckenförklaringen: svart ruta = ingen maska, hoppa över denna rutan. Hur gör man det?
12.03.2022 - 23:10DROPS Design answered:
Hei Åsa. Den sorte firkanten indikerer på at det ikke er noen maske der. I begynnelsen av A.1 bestod diagrammet av 8 masker, men når du strikker omgang 13 av diagrammet strikker du 2 steder 2 masker sammen, du har minsket til 6 masker (tidligere har du økt med 2 masker slik at maskeantallet har vært det samme). Så på omgang 14 strikker du 1 rett + 4 vrang + 1 rett . På omgang 15 minsker du igjen, slik at du på omgang 16 kun har 4 masker igjen + 2 vrangen + 1 rett. mvh DROPS Design
14.03.2022 - 14:19
![]() Roberta Marchini wrote:
Roberta Marchini wrote:
Credo ci sia un errore nello schema A1 - la terz'ultima riga dovrebbe avere 6 maglie totali invece di 4
18.08.2021 - 17:17DROPS Design answered:
Buonasera Roberta, abbiamo inoltrato la sua segnalazione al settore design: se ci dovessero essere delle correzioni, il modello verrà corretto direttamente online. Buon lavoro!
21.08.2021 - 23:26
![]() Alla wrote:
Alla wrote:
Summer Dream
16.02.2021 - 19:36
![]() Christina Tännérus Carlé wrote:
Christina Tännérus Carlé wrote:
Namnförslag: Bethina
09.01.2021 - 14:22
![]() Helene wrote:
Helene wrote:
I had a name very similar to Natalia's "Fresh Breeze".
07.01.2021 - 20:27
|
|||||||||||||||||||
Amalfi Blue#amalfibluetop |
|||||||||||||||||||
 |
 |
||||||||||||||||||
Knitted top in DROPS Safran. Piece is knitted bottom up with pattern. Size: S - XXXL
DROPS 221-14 |
|||||||||||||||||||
|
------------------------------------------------------- EXPLANATION FOR THE PATTERN: ------------------------------------------------------- GARTER STITCH (worked in the round): 1 ridge vertically = 2 rounds, i.e. knit 1 round and purl 1 round. GARTER STITCH (back and forth): Knit all rows. 1 ridge vertically = knit 2 rows. PATTERN: See diagrams A.1 to A.3. Diagrams show all rows in pattern seen from the right side. NOTE! Stitches in A.2 are always counted as 8 stitches even though stitches in cable alternates between 2 and 3 stitches. Stitches in A.3 are always counted as 12 stitches in S/M and 16 stitches in L/XL and XXL/XXXL. See diagram for your size in A.3. DECREASE TIP: Decrease inside 7 stitches in each side. Decrease by purling 2 together. ------------------------------------------------------- START THE PIECE HERE: ------------------------------------------------------- TOP - SHORT OVERVIEW OF THE PIECE: Work body in the round on circular needle, from the bottom and up to armholes. Then work back piece and front piece separately, back and forth on circular needle until finished measurements. Straps on front piece are fastened to back piece. BODY: Cast on 512-640-768 stitches on circular needle size 3 mm with Safran. Work A.1 over all stitches (= 64-80-96 repetitions of 8 stitches). When A.1 has been worked 1 time vertically, there are 256-320-384 stitches on round. Work A.2 over all stitches (= 32-40-48 repetitions of 8 stitches). NOTE! Stitches in A.2 are always counted as 8 stitches even though stitches in cable alternates between 2 and 3 stitches. Work A.2 in the round – insert at the same time 1 marker thread at the beginning of round (= left side when garments is worn), and 1 marker thread after 128-160-192 stitches (= right side when garment is worn). Both marker threads are between 2 knit stitches. Move the marker thread upwards when working. REMEMBER THE KNITTING TENSION! When piece measures 33-33-35 cm, work next round as follows (approx. 1 cm remains until decrease for armholes): NOTE! Adjust so that next round worked, is a even round in pattern, this is important so that the cable row is from right side when piece is worked back and forth. Work in GARTER STITCH over the first 15-15-15 stitches – read explanation above, work pattern as before over the next 98-130-162 stitches, work in garter stitch over the next 30-30-30 stitches, work pattern as before over the next 98-130-162 stitches, and work in garter stitch over the last 15-15-15 stitches. Continue pattern like this until 3 ridges have been worked over stitches in the side. On next round cast off for armholes, i.e. work next round as follows: Cast off 10-10-10 stitches for armhole, work 5 stitches in garter stitch, continue pattern as before over the next 98-130-162 stitches, work 5 stitches in garter stitch, cast of 20-20-20 stitches for armhole, work 5 stitches in garter stitch, continue pattern as before over the next 98-130-162 stitches, work 5 stitches in garter stitch, and cast off the remaining 10-10-10 stitches for armhole. Cut the yarn. Finish back piece and front piece separately. BACK PIECE: = 108-140-172 stitches. Begin from wrong side and work 1 row in PATTERN as before with 5 edge stitches in GARTER STITCH - read explanation above, in each side. Continue with A.2 and in garter stitch, at the same time decrease for armhole in each side on every row from right side - read DECREASE TIP! Decrease 17-19-23 times in total in each side = 74-102-126 stitches remain. Work 3 ridges back and forth over all stitches. Cast off - make sure that the cast-off edge is not too tight. Back piece measures approx. 12-14-16 cm from where piece was divided for front piece and back piece. FRONT PIECE: = 108-140-172 stitches. Begin from wrong side and work 1 row in pattern as before with 5 edge stitches in garter stitch in each side. Continue with A.2 and in garter stitch, at the same time decrease for armhole in each side on every row from right side. Decrease 17-19-23 times in total = 74-102-126 stitches remain. Work 3 ridges back and forth over all stitches. Front piece measures approx. 12-14-16 cm from where piece was divided for front piece and back piece. Work next row as follows from right side: Knit the first 12-16-16 stitches and slip them on a stitch holder, cast off the next 50-70-94 stitches, knit the last 12-16-16 stitches on row. Keep the last 12-16-16 stitches on needle, and work strap as explained below. STRAP: = 12-16-16 stitches. Work A.3 (= 12-16-16 stitches) - see diagram for your size. Work first row from wrong side: Work pattern back and forth until the strap measures approx. 9-13-13 cm – try the top on and work to desired length, strap should continue over the shoulder and down to back piece. Cast off. Slip the 12-16-16 stitches from stitch holder back on circular needle size 3 mm and work the other strap the same way. ASSEMBLY: Fasten straps to back piece - begin at the edge in each side and fasten with 1 grafting/kitchener stitch in every stitch. Fasten off. |
|||||||||||||||||||
Diagram explanations |
|||||||||||||||||||
|
|||||||||||||||||||
|
|||||||||||||||||||

|
|||||||||||||||||||

|
|||||||||||||||||||
Have you finished this pattern?Tag your pictures with #dropspattern #amalfibluetop or submit them to the #dropsfan gallery. Do you need help with this pattern?You'll find 20 tutorial videos, a Comments/Questions area and more by visiting the pattern on garnstudio.com. © 1982-2025 DROPS Design A/S. We reserve all rights. This document, including all its sub-sections, has copyrights. Read more about what you can do with our patterns at the bottom of each pattern on our site. |
|||||||||||||||||||


With over 40 years in knitting and crochet design, DROPS Design offers one of the most extensive collections of free patterns on the internet - translated to 17 languages. As of today we count 314 catalogues and 11820 patterns translated into English (UK/cm). 11820
We work hard to bring you the best knitting and crochet have to offer, inspiration and advice as well as great quality yarns at incredible prices! Would you like to use our patterns for other than personal use? You can read what you are allowed to do in the Copyright text at the bottom of all our patterns. Happy crafting!
Post a comment to pattern DROPS 221-14
We would love to hear what you have to say about this pattern!
If you want to leave a question, please make sure you select the correct category in the form below, to speed up the answering process. Required fields are marked *.