
Categorie popolari
State cercando un filato?


Commenti / Domande (28)
![]() Georgia ha scritto:
Georgia ha scritto:
Coming back to this pattern now which is very difficult. The pattern does not tell you what needles to change to when reducing/shaping. I have discovered there are several different ways but none of them are outlined here on this website.
07.10.2022 - 17:01DROPS Design ha risposto:
Dear Georgia, we only change to double-pointed needles when it's too difficult to work the stitches in a circular needle because you have too few stitches in the needle. From them, you can continue with the double pointed needles up till the end. So it may depend on each person; you can directly change to double-pointed needles as soon as you start decreasing/ shaping for the top of the hat. Happy knitting!
09.10.2022 - 19:18
![]() Georgia ha scritto:
Georgia ha scritto:
Should the 'knit 2 together' and decrease knit be also 'twist knit'? What about the slip knitting h when decreasing? Dies it mean normal knitting or trust knit? Whi h would actually be purlwise .
03.05.2022 - 08:18DROPS Design ha risposto:
Dear Georgia, you can replace the K2 tog with slip 1 twisted, slip 1 twisted and K2 together, and the slip 1 as if to K., K1, psso, with slip 1 twisted, knit 1 and psso; Happy knitting!
03.05.2022 - 10:30
![]() Georgia ha scritto:
Georgia ha scritto:
Turning the work: when watching the suggested videos for this, the second video gies the best finish HOWEVER, because the video is using knit only it is important to make sure that your working yarn is in the right place. I have worked out that you need to follow the video instruction making sure that where the yarn is you need to do the opposite so that the yarn is in the right position (at the back) for when you have turned and are ready to do the first stitch will be a knit.
12.04.2022 - 12:30
![]() Georgia ha scritto:
Georgia ha scritto:
Another question: how do you 'turn the work'? I have watched the videos but both methods don't explain how to turn when doing ribbing.
11.04.2022 - 20:23DROPS Design ha risposto:
Dear Georgia, when you fold the lower part of the hat, the wrong side will be facing outwards. So, to be sure that the rib looks the same both in the upper part on the right side and the lower part on the wrong side, you turn, so that you work on the wrong side and then knit where you would purl and purl where you would knit. Then, if you fold the lower part of the hat, the rib should look opposite to what you have worked and the same as in the upper part of the hat. Happy knitting!
11.04.2022 - 22:56
![]() Georgia ha scritto:
Georgia ha scritto:
Hello, I am a beginner and don't understand what this means: A.1 (= 26 stitches) over all stitches (= 5 times in width). When A.1 has been worked 1 time in height there are 10 stitches left.
08.04.2022 - 21:42DROPS Design ha risposto:
Dear Georgia, you repeat A.1 (which consists of 26 stitches) in the round. So, to work it until the end of the round, you need to repeat it 5 times (work round 1 of A.1 once, then start again the round 1 of A.1 the 2nd time...). A.1 includes decreases. In the last round of A.1, you only work 2 stitches in each repeat (so, if you had 5 repeats, you will have 10 stitches left in total). Since you are working the last round of A.1, that's what's called working A.1 1 time in height (you have worked all of the rounds of A.1). Happy knitting!
09.04.2022 - 18:44
![]() Andreas ha scritto:
Andreas ha scritto:
Jag förstår inte hur jag ska vända arbetet?! När jag stickar baklänges blir det ett hål när jag kommer tillbaka till markören. Säg att jag stickar rät/ avig när jag vänder arbetet, kommer första maskan jag ska sticka i vara avig?
29.01.2022 - 11:14
![]() Laila ha scritto:
Laila ha scritto:
Etter å ha strikket oppbrettskanten, skal en ikke strikke videre med rett/vrang, og ikke vridd rett/vrang?
28.12.2021 - 08:34DROPS Design ha risposto:
Hei Laila. Når oppbrettskanten er ferdig, vendes luen slik at luen strikkes rundt i motsatt retning av brettekanten. Og det skal strikkes videre med vrangbord (= 1 vridd rett / 1 vrang). mvh DROPS Design
04.01.2022 - 13:55
![]() Ulrike K ha scritto:
Ulrike K ha scritto:
Die Mütze ist zur Lieblingsmütze des Vaters geworden, der täglich Mütze trägt. Grund dafür ist sicher das Garn, es ist so leicht und hält so schön warm. Da werde ich bald noch eine stricken. Vielen Dank für die Anleitung.
28.12.2021 - 07:26
![]() Claude ha scritto:
Claude ha scritto:
Bonjour, que voulez vous dire par :Continuer maintenant le bonnet en tournant l'ouvrage sur l'endroit et tricoter en rond, dans le sens opposé, en côtes. Pourriez vous intégrer un tutoriel pour que l’on puisse visualiser
03.09.2021 - 23:15DROPS Design ha risposto:
Bonjour Claude, la partie que vous avez tricoté au début doit se retrouver maintenant sur l'envers et vous continuez à tricoter sur l'endroit (qui était l'envers auparavant) pour que l'endroit du revers soit à l'endroit quand on le retourne (mais il sera sur l'envers jusqu'à la fin du bonnet). En espérant que ces explications complémentaires puissent vous aider; votre demande a été transmise à notre équipe; Bon tricot!
06.09.2021 - 07:17
![]() Alva ha scritto:
Alva ha scritto:
Hej! Läses A1 diagrammet från höger till vänster eller tvärtom?
28.05.2021 - 10:36DROPS Design ha risposto:
Hej Alva, Ja du starter i nederste højre hjørne og strikker hver maske ifølge diagrammet, så starter du forfra igen omgangen rundt :)
28.05.2021 - 13:37
|
||||||||||||||||
Care for Nature#carefornaturehat |
||||||||||||||||
 |
 |
|||||||||||||||
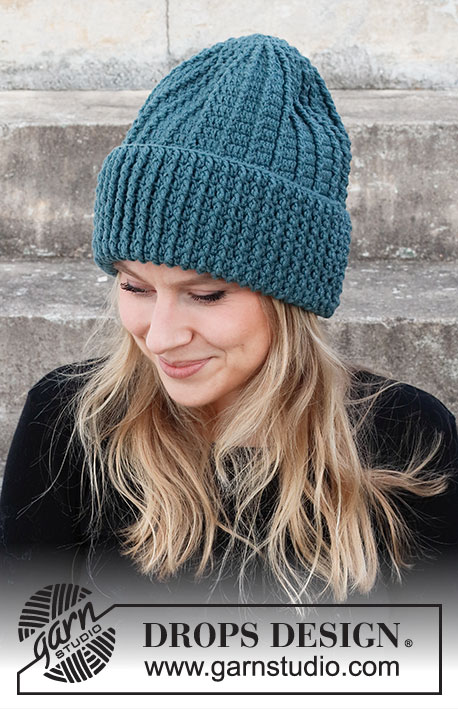
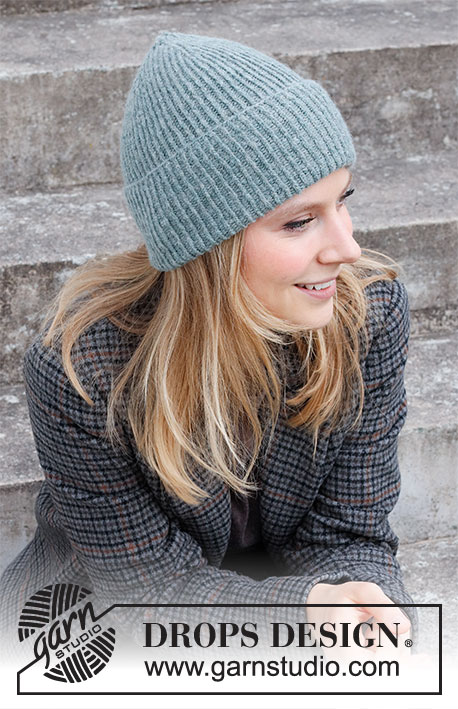
Cappello lavorato ai ferri a coste in DROPS Sky. Taglia unica.
DROPS 214-33 |
||||||||||||||||
|
------------------------------------------------------- TECNICHE IMPIEGATE: ------------------------------------------------------- MOTIVO: Vedere il diagramma A.1. ------------------------------------------------------- INIZIO DEL LAVORO: ------------------------------------------------------- CAPPELLO – BREVE RIASSUNTO DEL LAVORO: Lavorato in tondo con i ferri circolari, dal basso verso l’alto. Lavorare il bordo da piegare dal rovescio del lavoro, poi risvoltare il lavoro e lavorare il resto del cappello dal diritto del lavoro. Passare ai ferri a doppia punta quando necessario. CAPPELLO: Iniziare lavorando il bordo da piegare dal rovescio del lavoro come segue: avviare 130 maglie Sky e lavorare 1 giro diritto. Lavorare a coste (= 1 maglia diritto ritorto / 1 maglia rovescio) per 12 cm. Lavorare il bordo da piegare dal rovescio del lavoro in modo che le maglie a diritto ritorto siano verso l’esterno, quando si risvolta il lavoro. Ora lavorare il resto del cappello dal diritto del lavoro risvoltando il lavoro, in modo che il cappello venga lavorato in tondo nella direzione opposta del bordo da piegare. Continuare a lavorare a coste (= 1 maglia diritto ritorto / 1 maglia rovescio). FARE ATTENZIONE ALLA TENSIONE DEL LAVORO! Quando il cappello misura 27 cm (compresi i 12 cm ripiegati, mancano circa 8 cm alla fine del lavoro), lavorare A.1 (= 26 maglie) su tutte le maglie (= 5 volte in larghezza). Alla fine di A.1, in altezza rimangono 10 maglie. Tagliare il filo, farlo passare attraverso le maglie rimaste, tirare e affrancare bene. Il cappello misura circa 35 cm dal bordo di avvio. Ripiegare i 12 cm più in basso. |
||||||||||||||||
Spiegazioni del diagramma |
||||||||||||||||
|
||||||||||||||||
 |
||||||||||||||||
Avete terminato questo modello?Allora taggate le vostre foto con #dropspattern #carefornaturehat o inviatele alla #dropsfan gallery. Avete bisogno di aiuto con questo modello?Troverete 13 video tutorial, una sezione per i commenti/domande e molto altro guardando il modello su www.garnstudio.com © 1982-2026 DROPS Design A/S. Ci riserviamo tutti i diritti. Questo documento, compreso tutte le sue sotto-sezioni, è protetto dalle leggi sul copyright. Potete leggere quello che potete fare con i nostri modelli alla fine di ogni modello sul nostro sito. |
||||||||||||||||


Con oltre 40 anni di esperienza nel design di modelli di maglia e uncinetto, DROPS Design offre la più estesa collezione di modelli gratuiti su internet - tradotti in 17 lingue. Ad oggi vi possiamo fornire 324 cataloghi e 12290 modelli - 9561 dei quali sono tradotti in Italiano.
Ci stiamo impegnando molto per darvi il meglio che vi possiamo offrire in termini di maglia e uncinetto, ispirazioni e consigli così come filati di grande qualità ad un prezzo incredibile! Volete utilizzare i nostri modelli per qualcosa d'altro oltre al vostro uso personale? Potete leggere tutto ciò che è consentito nel testo sul Copyright in basso su tutte le pagine dei nostri modelli. Buon lavoro!
Lasciare un commento sul modello DROPS 214-33
Noi saremmo felici di ricevere i tuoi commenti e opinioni su questo modello!
Se vuoi fare una domanda, fai per favore attenzione a selezionare la categoria corretta nella casella qui sotto per velocizzare il processo di risposta. I campi richiesti sono indicati da *.