Clicking the ORDER button will redirect you to Wool Warehouse Direct Ltd website
The yarn cost is calculated from the pattern’s smallest size and the yarn’s cheapest product type. Looking for an even better price? You might find it on the DROPS Deals!
-------------------------------------------------------
Alternative Yarn – See how to change yarns here
Yarn Groups A to F – Use the same pattern and change the yarn here
Yarn usage using an alternative yarn – Use our yarn converter here
-------------------------------------------------------
Clicking the ORDER button will redirect you to Wool Warehouse Direct Ltd website
The yarn cost is calculated from the pattern’s smallest size and the yarn’s cheapest product type. Looking for an even better price? You might find it on the DROPS Deals!
= knit twisted | |
= purl | |
= slip 1 stitch as if to knit, knit 1 and pass the slipped stitch over the knitted stitch | |
= knit 2 together | |
= slip 2 stitches as if to knit together, knit 1 and pass the 2 slipped stitches over the knitted stitches |
Each of our patterns has specific tutorial videos to help you.
These step-by-step tutorials might also help you:
Why is the knitting/crochet tension so important?
Knitting tension is what determines the final measurements of your work, and is usually measured per 10 x 10 cm. It is provided like so: number of stitches in width x number of rows in height - eg: 19 stitches x 26 rows = 10 x 10 cm.
The knitting tension is very individual; some people knit/crochet loosely while others work tightly. You adjust the knitting tension with the needle size, which is why the suggested needle size is only meant as a guide! You need to adjust this (up or down) to ensure that YOUR knitting tension matches the knitting tension provided in the pattern. If you work with a different knitting tension than provided you will have a different yarn consumption, and your work will have different measurements than what the pattern suggests.
The knitting tension also determines which yarns can replace each other. As long as you achieve the same knitting tension you can replace one yarn with another.
See DROPS lesson: How to measure your tension/gauge
See DROPS video: How to make a gauge tension swatch
How do I know how many balls of yarn I need?
The required amount of yarn is provided in grams, eg: 450 g. To calculate how many balls you’ll need you first need to know how many grams are in 1 ball (25g, 50g or 100g). This information is available if you click on the individual yarn quality on our pages. Divide the amount required with the amount of each ball. For example, if each ball is 50g (the most common amount), the calculation will be as follows: 450 / 50 = 9 balls.
Can I use a different yarn than what the pattern suggests?
The important thing when changing from one yarn to another is that the knitting/crochet tension remains the same. This is so that the measurements of the finished piece will be the same as on the sketch provided. It is easier to achieve the same knitting tension using yarns from the same yarn group. It is also possible to work with multiple strands of a thinner yarn to achieve the knitting tension of a thicker one. Please try our yarn converter. We recommend you to always work a test swatch.
Please NOTE: when changing yarn the garment might have a different look and feel to the garment in the photo, due to individual properties and qualities of each yarn.
See DROPS lesson: Can I use a different yarn than the one mentioned in the pattern?
What are the yarn groups?
All our yarns are categorised into yarn groups (from A to F) according to thickness and knitting tension – group A contains the thinnest yarns and group F the thickest. This makes it easier for you to find alternative yarns to our patterns, should you wish to switch yarn. All yarns within the same group have a similar knitting tension and can easily replace each other. However, different yarn qualities have different structures and properties which will give the finished work a unique look and feel.
How do I use the yarn calculator?
At the top of all our patterns you’ll find a link to our yarn calculator, which is a helpful tool should you wish to use a different yarn than suggested. By filling in the yarn quality you wish to replace, the amount (in your size) and number of strands, the calculator will present good alternative yarns with the same knitting tension. Additionally it will tell you how much you’ll require in the new qualities and whether you’ll need to work with multiple strands. Most skeins are 50g (some are 25g or 100g).
If the pattern is worked with multiple colours, every colour will have to be calculated separately. Similarly, if the pattern is worked with several strands of different yarns (for example 1 strand Alpaca and 1 strand Kid-Silk) you will have to find alternatives for each, individually.
Why do you show discontinued yarns in the patterns?
Since different yarns have different qualities and textures we have chosen to keep the original yarn in our patterns. However, you can easily find options among our available qualities by using our yarn calculator, or simply pick a yarn from the same yarn group.
It is possible that some retailers still have discontinued yarns in stock, or that someone has a few skeins at home that they would like to find patterns for.
The yarn calculator will provide both alternative yarn as well as required amount in the new quality.
What size should I knit?
If you think it's hard to decide what size to make, it can be a good idea to measure a garment you own already and like the size of. Then you can pick the size by comparing those measures with the ones available in the pattern's size chart.
You'll find the size chart at the bottom of the pattern.
See DROPS lesson: How to read size chart
Why do I get the wrong knitting tension with the suggested needle size?
The needle size provided in the pattern serves only as a guide, the important thing is to follow the knitting tension. And since knitting tension is very individual, you will have to adjust the needle size to ensure that YOUR tension is the same as in the pattern – maybe you’ll have to adjust 1, or even 2 needle sizes, up or down to achieve the correct tension. For this, we recommend that you work test swatches.
Should you work with a different knitting tension than the one provided, the measurements of the finished garment might deviate from the measurement sketch.
See DROPS lesson: How to measure your tension/gauge
See DROPS video: How to make a tension/gauge swatch
Why is the pattern worked top-down?
Working a garment top-down provides more flexibility and room for personal adjustment. For example it is easier to try the garment on while working, as well as making adjustments to length of yoke and shoulder caps.
The instructions are carefully explaining every step, in the correct order. Diagrams are adjusted to the knitting direction and are worked as usual.
How do I work according to a knitting diagram?
The diagram depicts all rows/rounds, and every stitch seen from the right side. It is read from bottom to top, from right to left. 1 square = 1 stitch.
When working back and forth, every other row is worked from the right side and every other row is worked from the wrong side. When working from the wrong side, the diagram will have to be worked reversed: from left to right, knit stitches are purled, purl stitches are knit etc.
When working in the round every round is worked from the right side and the diagram are worked from right to left on all rounds.
See DROPS lesson: How to read knitting diagrams
How do I work according to a crochet diagram?
The diagram depicts all rows/rounds, and every stitch seen from the right side. It is worked from bottom to top, from right to left.
When working back and forth every other row is worked from the right side: from right to left and every other row is worked from the wrong side: from left to right.
When working in the round, every row in the diagram are worked from the right side, from right to left.
When working a circular diagram you start in the middle and work your way outwards, counter clockwise, row by row.
The rows usually start with a given number of chain stitches (equivalent to the height of the following stitch), this will either be depicted in the diagram or explained in the pattern.
See DROPS lesson: How to read crochet diagrams
How do I work several diagrams simultaneously on the same row/round?
Instructions for working several diagrams after each other on the same row/round, will often be written like so: “work A.1, A.2, A.3 a total of 0-0-2-3-4 times". This means you work A.1 once, then A.2 is worked once, and A.3 is repeated (in width) the number of times provided for your size – in this case like so: S = 0 times, M = 0 times, L=2 times, XL= 3 times and XXL = 4 times.
The diagrams are worked as usual: begin with the first row in A.1, then work the first row in A.2 etc.
See DROPS lesson: How to read knitting diagrams
See DROPS lesson: How to read crochet diagrams
Why are the sleeves shorter in larger sizes?
The total width of the garment (from wrist-to-wrist) will be larger in the larger sizes, despite the actual sleeves being shorter. The larger sizes have longer sleeve caps and wider shoulders, so there will be a good fit in all sizes.
Where on the garment is the length measured?
The measurement sketch/schematic drawing provides information regarding the full length of the garment. If it’s a jumper or a jacket the length is measured from the highest point on the shoulder closest to the neckline, and straight down to the bottom of the garment. It is NOT measured from the tip of shoulder. Similarly, the length of yoke is measured from the highest point on the shoulder and down to where yoke is split into body and sleeves.
On a jacket measures are never taken along bands, unless specifically stated. Always measure inside band stitches when measuring the length.
See DROPS lesson: How to read a schematic drawing
What is a repeat?
Diagrams are often repeated on the round or in height. 1 repeat is the diagram the way it appears in the pattern. If it says to work 5 repeats of A.1 in the round, then you work A.1 a total of 5 times after/next to each other in the round. If it says to work 2 repeats of A.1 vertically/in height you work the entire diagram once, then begin again at the start and work the entire diagram one more time.
Why does the piece start with more chain stitches than it’s worked with?
Chain stitches are slightly narrower than other stitches and to avoid working the cast-on edge too tight, we simply chain more stitches to begin with. The stitch count will be adjusted on the following row to fit the pattern and measurement sketch.
Why increase before the rib edge when the piece is worked top-down?
The rib edge is more elastic and will contract slightly compared to, for example, stocking stitch. By increasing before the rib edge, you avoid a visible difference in width between the rib edge and the rest of the body.
Why increase in the cast-off edge?
It’s very easy to cast off too tightly, and by making yarn overs while casting off (and simultaneously casting these off) you avoid a too tight cast off edge.
See DROPS video: How to bind off with yarn overs (yo)
How do I increase/decrease on every 3rd and 4th row/round alternately?
To achieve an even increase (or decrease) you can increase on, for example: every 3rd and 4th row alternately, like so: work 2 rows and increase on the 3rd row, work 3 rows and increase on the 4th. Repeat this until the increase is complete.
See DROPS lesson: Increase or decrease 1 st on every 3rd and 4th row alternately
How can I work a jacket in the round instead of back and forth?
Should you prefer to work in the round instead of back and forth, you may of course adjust the pattern. You’ll need to add steeks mid-front (usually 5 stitches), and follow the instructions. When you would normally turn and work from the wrong side, simply work across the steek and continue in the round. At the end you’ll cut the piece open, pick up stitches to work bands, and cover the cut edges.
See DROPS video: How to knit steeks and cut open
Can I work a jumper back and forth instead of in the round?
Should you prefer to work back and forth instead of in the round, you may of course adjust the pattern so you work the pieces separately and then assemble them at the end. Divide the stitches for the body in 2, add 1 edge stitch in each side (for sewing) and work the front and back pieces separately.
See DROPS lesson: Can I adapt a pattern for circular needles into straight needles?
Why is the pattern slightly different than what I see in the photo?
Pattern repeats can vary slightly in the different sizes, in order to get the correct proportions. If you’re not working the exact same size as the garment in the photo, yours might deviate slightly. This has been carefully developed and adjusted so that the complete impression of the garment is the same in all sizes.
Make sure to follow instructions and diagrams for your size!
How do I make a women’s size garment into a men’s size one?
If you have found a pattern you like which is available in women’s size it’s not very difficult to convert it to men’s size. The biggest difference will be the length of sleeves and body. Start working on the women size that you think would fit across the chest. The additional length will be worked right before you cast off for the armhole/sleeve cap. If the pattern is worked top-down you can add the length right after the armhole or before the first decrease on sleeve.
Regarding additional yarn amount, this will depend on how much length you add, but it is better with a skein too many than too few.
How do I prevent a hairy garment from shedding?
All yarns will have excess fibres (from production) that might come off as lint or shedding. Brushed yarns (ie hairier yarns) have more of these loose, excess fibres, causing more shedding.
Shedding also depends on what is worn under or over the garment, and whether this pulls at the yarn fibres. It’s therefore not possible to guarantee that there will be no shedding
Below are some tips on how to get the best result when working with hairier yarns:
1. When the garment is finished (before you wash it) shake it vigorously so the looser hairs come off. NOTE: do NOT use a lint roller, brush or any method that pulls at the yarn.
2. Place the garment in a plastic bag and put it in your freezer - the temperature will cause the fibres to become less attached to each other, and excess fibres will come off easier.
3. Leave in the freezer for a few hours before taking it out and shaking it again.
4. Wash the garment according to the instructions on the yarn label.
Why does my garment pill?
Pilling is a natural process that happens to even the most exclusive of fibers. It's a natural sign of wear and tear that is hard to avoid, and that is most visible in high friction areas of your garment like a sweater's arms and cuffs.
You can make your garment look as new by removing the pilling, using a fabric comb or a pill/lint remover.
Care for Nature |
||||||||||||||||
|
|
|||||||||||||||
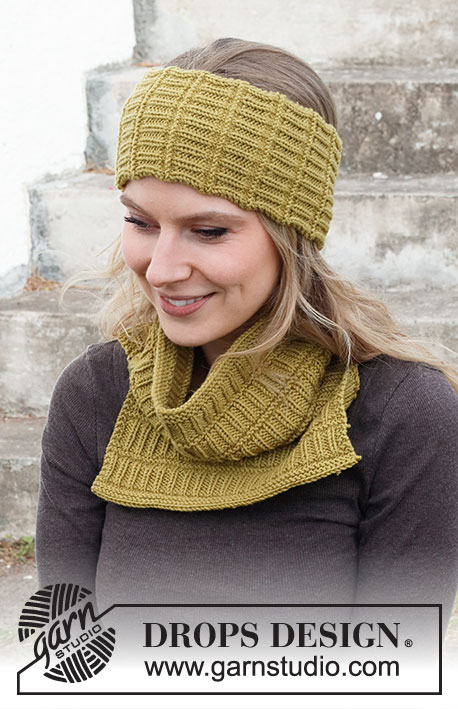
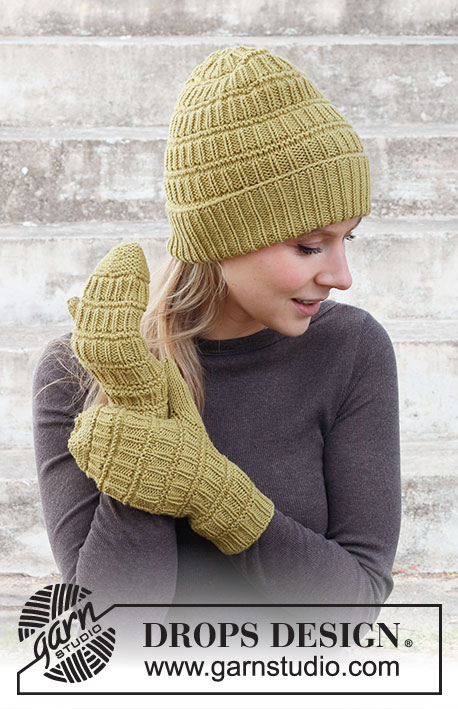
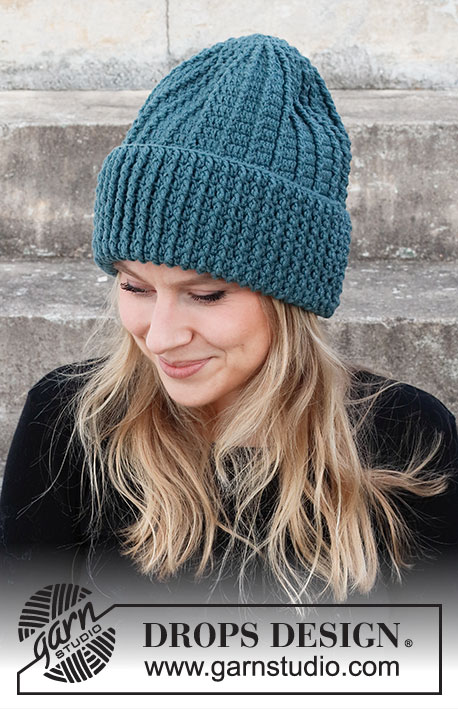
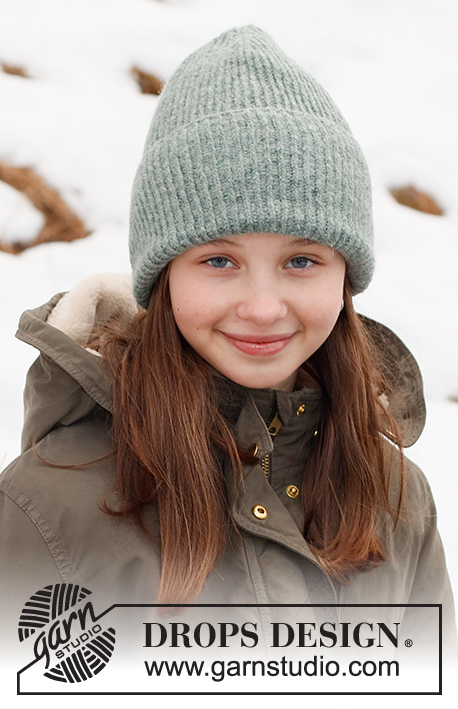
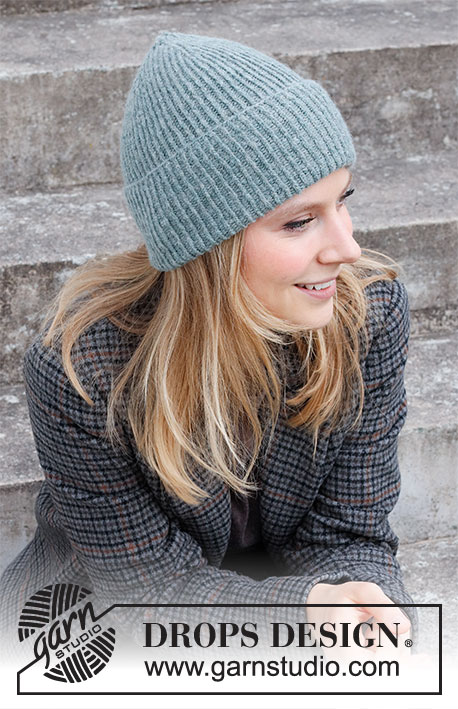
Knitted, ribbed beanie / hipster hat in DROPS Sky. One-size.
DROPS 214-33 |
||||||||||||||||
------------------------------------------------------- EXPLANATIONS FOR THE PATTERN: ------------------------------------------------------- PATTERN: See diagram A.1. ------------------------------------------------------- START THE PIECE HERE: ------------------------------------------------------- HAT – SHORT OVERVIEW OF THE PIECE: The piece is worked in the round with circular needle, bottom up. Folding edge is worked from wrong side, then turn piece and work the rest of the hat from right side. Change to double pointed needles when necessary. HAT: Start by working the folding edge from wrong side as follows: Cast on 130 stitches with Sky and knit 1 round. Work rib (= knit 1 twisted / purl 1) for 12 cm. The folding edge is worked from wrong side so that the knitted twisted stitches will be facing out, when folding up the folding edge. Now work the rest of the hat from right side by turning the work, so that the hat is worked in the round in opposite direction of the folding edge. Continue working rib (= knit 1 twisted / purl 1). REMEMBER THE KNITTING TENSION! When the hat measures 27 cm (including the 12 cm fold-up, there is approx. 8 cm left to finished length), work A.1 (= 26 stitches) over all stitches (= 5 times in width). When A.1 has been worked 1 time in height there are 10 stitches left. Cut the strand, pull it through the remaining stitches, tighten and fasten well. The hat measures approx. 35 cm from the cast-on edge. Fold up the bottom 12 cm. |
||||||||||||||||
Diagram explanations |
||||||||||||||||
|
||||||||||||||||
Have you made this or any other of our designs? Tag your pictures in social media with #dropsdesign so we can see them! Do you need help with this pattern?You'll find tutorial videos, a Comments/Questions area and more by visiting the pattern on garnstudio.com. © 1982-2024 DROPS Design A/S. We reserve all rights. This document, including all its sub-sections, has copyrights. Read more about what you can do with our patterns at the bottom of each pattern on our site. |
With over 40 years in knitting and crochet design, DROPS Design offers one of the most extensive collections of free patterns on the internet - translated to 17 languages. As of today we count 304 catalogues and 11422 patterns - 11422 of which are translated into English (UK/cm).
We work hard to bring you the best knitting and crochet have to offer, inspiration and advice as well as great quality yarns at incredible prices! Would you like to use our patterns for other than personal use? You can read what you are allowed to do in the Copyright text at the bottom of all our patterns. Happy crafting!
Comments / Questions (28)
Lamia wrote:
Mich verwirrt das noch etwas das wenden (selbst nach anschauen des Videos) Wenn ich alles richtig verstehe, werden nach dem Wenden die zuvor rechts verschränkten Maschen links und die linken rechts verschränkt gestrickt. Sorgt das nicht für einer Überdrehung der Maschen oder muss ich jede einzelne zuvor umdrehen, sodass die Maschenschenkel wieder richtig liegen?
20.01.2024 - 23:31DROPS Design answered:
Liebe Lamia, vor dem Drehen strickt man 1 M rechts verschränkt, 1 M links, nach dem Drehen strickt man 1 M rechts verschränkt, 1 M links, so wird Das Muster weitergestrickt und so sind die rechts verschränkten Maschen bei dem Vorderseite sichtbar. Viel Spaß beim stricken!
22.01.2024 - 08:54MamaKath wrote:
I have reached the A.1 diagram. Every time I have used a charted pattern it has been a flat-knitted project so I turn at the end of the row so the the diagram is read right-to-left then left to right. At this point I've been knitting this hat in the round. so is every row in the diagram started at the right and read to the left?
03.06.2023 - 20:50DROPS Design answered:
Dear MamaKath, yes, when working in the round, all rounds in the chart are read from right to left. Happy knitting!
04.06.2023 - 18:22Louise Pelletier wrote:
Pourquoi les côtes en mailles torses sont incliné et non droite quand je regarde mon produit fini ?
06.04.2023 - 21:25DROPS Design answered:
Bonjour Mme Pelletier, difficile de vous répondre sans voir votre ouvrage, dans cette vidéo, nous montrons comment tricoter des côtes 1 m torse à l'end, 1 m envers, cela pourra peut-être vous aider; sinon, n'hésitez pas à montrer votre ouvrage à votre magasin (même en photo par mail), ce sera ainsi plus facile pour eux de vous aider. Bon tricot
11.04.2023 - 11:51Christine wrote:
Je ne comprends pas comment je dois faire pour retourner le bonnet après avoir tricoté le revers. Pouvez-vous m’expliquer comment faire ? Merci d’avance
18.03.2023 - 20:13DROPS Design answered:
Bonjour Christine, cette vidéo explique (pour un autre modèle) comment procéder pour tourner l'ouvrage et continuer (tricotez bien les côtes comme dans ce modèle, sans vous laisser influencer par celles tricotées dans la vidéo, car le modèle est différent mais la technique est bien la même). Bon tricot!
20.03.2023 - 08:55Linda Gurr wrote:
I appreciate the quick response as I wanted to start the toque. I have another question. This video showed me how to do the twisted stitch on straight needles but I like to work in the round, how will this differ? Do I just keep doing the same twisted knit rather than what they show when they turn and go back the other way? Thank you.
19.01.2023 - 17:38DROPS Design answered:
Dear Mrs Gurr, since you will work here from right side only, just work as shown on the rows from right side in the video (the rows from WS do not apply there), this means every round you will knit the knit stitches in the back loop. Happy knitting!
19.01.2023 - 18:53Linda Gurr wrote:
I want to knit this pattern 214- 33 in yarn group B. how do I do a rib (knit 1 twisted/ purl 1. I cannot find instructions for this rib stitch. I also had a great deal of trouble doing an English rib even with wtching your video so I gave up and did a full garter stitch hat. Why is it so difficult to knit the English rib with drops snow as called for in my patter. Thank you for your help. Linda Gurr
19.01.2023 - 00:00DROPS Design answered:
Dear Mrs Gurr, this video shows how to work rib with knitted twisted stitches in rows, just follow the rows from RS on every round. This lesson gives an overview of the different techniques to work English rib, this might help. Happy knitting!
19.01.2023 - 10:57Malin wrote:
Tack för svar, men ni svarade tyvärr inte på alla mina frågor i förra kommentaren, fler har frågat samma sak och ni har inte gett nåt svar om det vad jag kan se tyvärr. Det framgår inte i mönstret vad man ska göra med HÅLET som blir när man vänder på arbetet? :) 56 cm mössa på ett huvud som är 54 cm i omkrets funkar ju inte, då åker den ner i ögonen ;) det måste ju töjas lite för att sitta på kvar.
10.01.2023 - 17:13DROPS Design answered:
Hei Malin. Ut i fra det jeg ser på svarene dine har du fått svar, bortsett fra det med hullet. Når du vender arbeidet kan du trekke litt ekstra i garnet, slik at tråden strammer og hullet blir noe mindre (men et lite hull må man regne med når arbeidet snus. Kan evnt sys litt sammen til slutt, om ønskelig). Luen er one-size, så noen med mindre hodeomkrets kan mene at luen blir for stor, enn de med større hodeomkrets. Siden brettekanten er høy, vil den holde fint på luen slik at den ikke faller ned i øynene. Ser at du minsket med 26 masker og du ble fornøyd med restulatet, det er fint å vite. mvh DROPS Design
16.01.2023 - 14:12Sonja wrote:
Ich verstehe nicht, wie es aussieht, wenn ich die Arbeit wende, um die Vorderseite zu wechseln? In den älteren Kommentaren wird von einem Video gesprochen, aber das finde ich nicht. Aus meiner Sicht müsste ich an der Wendestelle ein Loch oder zumindest einen Absatz bekommen.
09.01.2023 - 16:11DROPS Design answered:
Liebe Sonja, in diesem Video zeigen wir, wie die Arbeit (für ein anderes Modell, aber es wird genauso gemacht) umgewendet wird und wie es weitergestrickt wird. Hoffentlich kann es Ihnen helfen. Viel Spaß beim stricken!
09.01.2023 - 16:59Malin wrote:
När jag vänder arbetet, ska det stickas rät där det tidigare varv var avigt? Eller ska det fortsatt vara samma? Vad gör jag med hålet som blir vid vändningen? Min testlapp stämde med 23 m/10 cm men mössan blev jättestor med 130 maskor. Fick ta upp allt. Börjar om med 26 maskor mindre och det kommer bli lagom :)
06.01.2023 - 17:39DROPS Design answered:
Hej Malin, 130m/23= 56 cm i omkreds. Den vriden retmaske skal være på retsiden. God fonrøjelse!
10.01.2023 - 12:09Malin wrote:
Er det virkelig 130 masker som skal legges opp i drops sky på 3 mm pinne? Luen blir ekstremt stor - ca 80 cm i omkrets på ribb-kanten. Dette er virkelig rart. Jeg har aldri noen gang opplevd en oppskrift hvor målene og strikkefastheten er så ekstremt forskjellig i oppskriften som det jeg selv får. Veldig merkelig oppskrift. Og utrolig kjipt.
28.10.2022 - 21:08DROPS Design answered:
Hei Malin. Husk at strikkefastheten er oppgitt i glattstrikk, mens luen strikkes i vrangbord. Strikkefastheten som er oppgitt i oppskriften er 23 masker i bredden = 10 cm i glattstrikk. 130 masker = ca 57 cm, noe som er ca cm på omkretsen på et hode (voksen str). Denne luen strikkes med vrangbord og maskene vil trekke seg godt sammen, slik at luen vil passe godt til et hode. mvh DROPS Design
31.10.2022 - 10:38