
Categorie popolari
State cercando un filato?


Commenti / Domande (16)
![]() Maria Saginario ha scritto:
Maria Saginario ha scritto:
Don't know if I put this question in the right place. I have been trying to replace with worsted wool in this skirt. Any help would be most appreciated. I really want to start this project; please answer asap. Thanks and Happy New Year - God willing.
30.12.2021 - 21:33DROPS Design ha risposto:
Hello Maria Saginario! Please knit a swatch to make sure you get the right knitting tension. Also, if using bigger needles, you could try making a smaller size. Measure your hip measurement and calculate how many stitches you need. Happy knitting!
30.12.2021 - 22:41
![]() Maria ha scritto:
Maria ha scritto:
I have been trying to figure out how to use worsted weight in this skirt. Any help would be appreciated.
30.12.2021 - 21:30
![]() Maria Saginario ha scritto:
Maria Saginario ha scritto:
When using needles to work in the round, do I need to use a longer cable size? Also, I am assuming the measurements given are of the front of the piece which would mean I need to double the measurement so the skirt fits around the waist? Is this correct? I am anxious to start and want to be sure I understand. Thanks for your help.
23.12.2021 - 17:46DROPS Design ha risposto:
Hi Maria, We recommend a circular needle length 24 and 32 inches when working the skirt. The measurement chart shows the width of the skirt, so you double the measurement for the waist. Happy knitting!
24.12.2021 - 08:05
![]() Knit1 ha scritto:
Knit1 ha scritto:
Can I make this skirt longer?
17.09.2021 - 04:16DROPS Design ha risposto:
Dear Knit1, we are unfortunately not able to adjust every pattern to every single request, feel free to contact your DROPS store or a knitting forum for any individual assistance. Thanks for your comprehension. Happy knitting!
17.09.2021 - 07:25
![]() Whitepaw ha scritto:
Whitepaw ha scritto:
For increase tip 2 it says that I am to have a knit stitch on each side of the stockinette stitch, but I only have 1 stitch that I worked the first stitch of A1 for. Am I supposed to increase on each side of this A1 stitch or am I supposed to increase on just the first and last stitch of the stockinette sections ?
28.05.2021 - 14:30DROPS Design ha risposto:
Dear Whitepaw, you will increase after A.1 + 1 stitch in stocking stitch at the beg of front/back piece and before 1 stitch + A.1 at the end of front/back piece. Happy knitting!
28.05.2021 - 15:18
![]() Whitepaw ha scritto:
Whitepaw ha scritto:
How do I increase every 3rd round 8 times and every 6th round twice ? Is it not the same as increasing every third round you knit?
09.05.2021 - 15:07DROPS Design ha risposto:
Dear Whitepaw, yes, you increase first every 3rd. round you knit 8 times, then every 6th round you knit 2 times. Happy Knitting!
09.05.2021 - 15:23
![]() Myriam De Meyer ha scritto:
Myriam De Meyer ha scritto:
Voor de kleinste maat heb ik na de boord 138 steken. Dan moet ik 6 x 4 ( om de drie naalden) en 2 x 4 (om de zes naalden merderen. Als ik goed kan rekenen komt dit op 174 steken. In het patroon staat echter 170 steken. Wat doe ik verkeerd?
06.05.2021 - 18:19DROPS Design ha risposto:
Dag Myriam,
Je meerdert inderdaad in totaal 8 keer 4 steken, dat zijn in totaal 32 steken gemeerderd. 32 + 138 = 170 steken.
07.05.2021 - 10:49
![]() Whitepaw ha scritto:
Whitepaw ha scritto:
When you switch over to the bigger sized needles and have completed the sectioning off and have 176 stitches and you "continue the pattern in the round" does this mean you increase every round ? Example for the first 22 stitches (18+4 for the large size) you add another 4 stitches again or do you only add the stitches every third round ?
02.05.2021 - 15:12DROPS Design ha risposto:
Dear Whitepaw, you d not have to repeat the increases (evenly), only increase what is stated in the text. Happy Knitting!
02.05.2021 - 17:16
![]() Laila Sandaas ha scritto:
Laila Sandaas ha scritto:
Det skal økes fire masker pr omgang, men det står man skal øke ,1 maske etter første maske i det glattstrikkede stykke foran og bak, det blir bare to masker, skal det ikke også økes sist på det glattstrikkede stykket?
24.03.2021 - 14:56DROPS Design ha risposto:
Hei Laila, Ja, du har rett og det skal økes 1 maske på begge sider av glattstrikket partiet foran og bak (se Øketips 2 på toppen av oppskriften). God fornøyelse!
25.03.2021 - 08:49
![]() Devine ha scritto:
Devine ha scritto:
Hej! Efter första varvet (precis efter resåren) med ökningar står det att man ska fortsätta i 3 varv. Ska man öka likadant i tre varv då så man ökar som på första varvet, ytterligare 3 varv till?
01.02.2021 - 13:34DROPS Design ha risposto:
Hej Devine. Nej, du stickar inga ökningar på de 3 varven du stickar mönster dvs A.1 där du tidigare stickade A.1 och slätstickning där du tidigare stickade slätstickning. Efter de varven börjar ökningar enligt beskrivningen. Mvh DROPS Design
02.02.2021 - 10:40
|
||||||||||
Swing Time#swingtimeskirt |
||||||||||
 |
 |
|||||||||
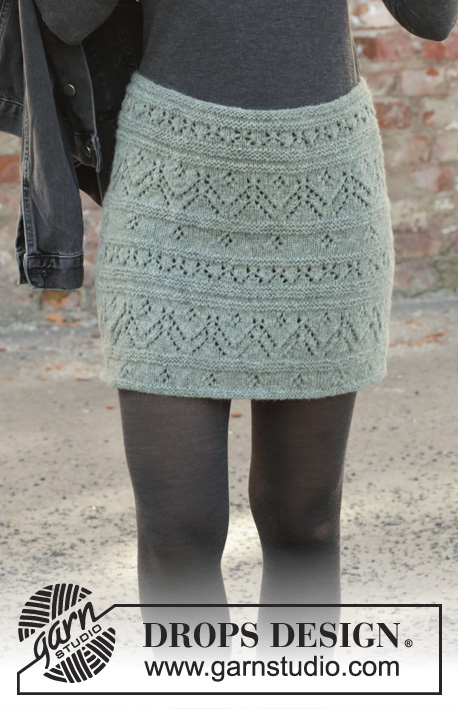
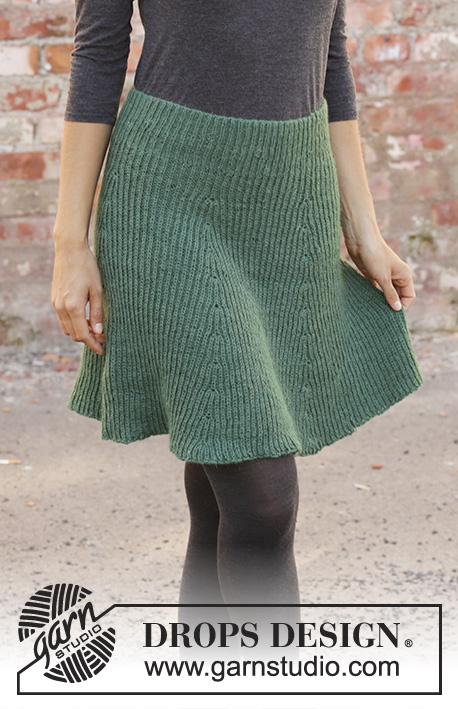
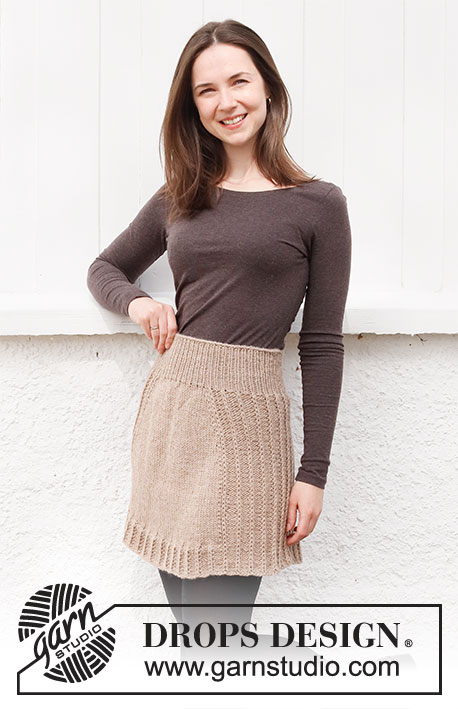
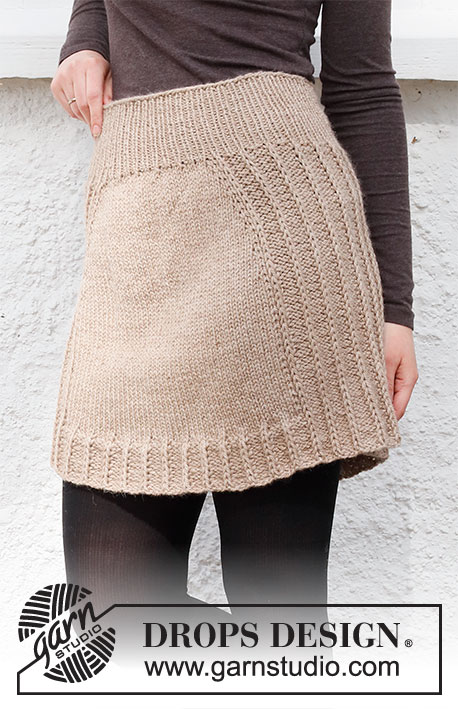
Gonna ai ferri in DROPS Nepal. Lavorata dall’alto verso il basso con coste inglesi sui lati. Taglie: Dalla S alla XXXL.
DROPS 218-24 |
||||||||||
|
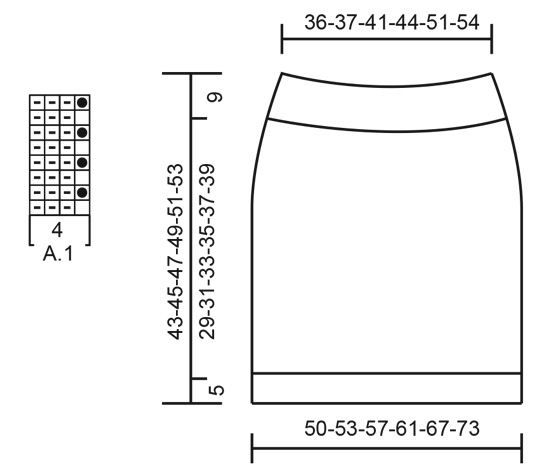
------------------------------------------------------- TECNICHE IMPIEGATE: ------------------------------------------------------- MOTIVO: Vedere il diagramma A.1. SUGGERIMENTO PER GLI AUMENTI-1 (a intervalli regolari): Per calcolare ogni quante maglie aumentare, dividere il numero complessivo delle maglie sul ferro (p.es: 12 maglie) per il numero di aumenti da fare (p.es 3) = 4. Quindi, in questo esempio, per aumentare, fare 1 maglia gettata dopo ogni 4 maglie. Al giro successivo, lavorare le maglie gettate ritorte per evitare buchi SUGGERIMENTO PER GLI AUMENTI-2 (sui lati): Per aumentare fare 1 maglia gettata prima/dopo 1 maglia diritto, da una parte e dall’altra delle sezioni a maglia rasata della gonna (davanti e dietro = 4 maglie aumentate sul giro). Al giro successivo, lavorare le maglie gettate a diritto ritorto per evitare buchi. Lavorare poi le nuove maglie a maglia rasata. SUGGERIMENTO PER CHIUDERE LE MAGLIE: Per evitare un bordo di chiusura delle maglie troppo stretto, chiudere le maglie usando ferri di una misura più grande. Se il bordo è ancora troppo stretto, fare 1 maglia gettata dopo ogni 4 maglie circa; chiudere le maglie gettate come fossero maglie normali. ------------------------------------------------------- IL LAVORO INIZIA QUI: ------------------------------------------------------- GONNA – BREVI INDICAZIONI PER IL LAVORO: Si lavora in tondo con i ferri circolari, dall’alto verso il basso. GONNA: Avviare 128-132-148-160-184-196 maglie con i ferri circolari n° 3,5 ed il filato Nepal. Lavorare 1 giro a diritto. Inserire un segno all’inizio del giro (= centro, sul dietro). Proseguire a coste (= 1 maglia diritto, 1 maglia rovescio) in tondo per 9 cm. Passare ai ferri circolari n° 5. Lavorare ora come segue: lavorare le prime 12-12-14-18-22-24 maglie a diritto e ALLO STESSO TEMPO, aumentare 3-3-3-4-4-5 maglie a intervalli regolari – vedere il SUGGERIMENTO PER GLI AUMENTI-1, lavorare il diagramma A.1 sulle 40-40-44-44-48-48 maglie successive (= 10-10-11-11-12-12 ripetizioni), lavorare la prima maglia del diagramma A.1, 23-25-29-35-43-49 maglie diritto e ALLO STESSO TEMPO, aumentare 5-6-7-8-8-10 maglie a intervalli regolari, diagramma A.1 sulle 40-40-44-44-48-48 maglie successive (= 10-10-11-11-12-12 ripetizioni), lavorare la prima maglia del diagramma A.1, lavorare le ultime 11-13-15-17-21-25 maglie a diritto e aumentare 2-3-4-4-4-5 maglie a intervalli regolari = 138-144-162-176-200-216 maglie. RICORDARSI DI MANTENERE LA CORRETTA TENSIONE DEL LAVORO! Proseguire in questo modo in tondo. Dopo aver lavorato 3 giri, iniziare ad aumentare da ciascun lato delle sezioni di maglie a diritto sul davanti e sul dietro della gonna – vedere il SUGGERIMENTO PER GLI AUMENTI-2. Aumentare in questo modo ogni 3 giri 6-7-8-8-9-10 volte e poi ogni 6 giri 2-2-2-2-2-2 volte = 170-180-202-216-244-264 maglie (= 44-49-56-63-73-83 maglie in ognuna delle 2 sezioni a maglia rasata). Proseguire seguendo il motivo e a maglia rasata finché la gonna non misura 38-40-42-44-46-48 cm dal ferro di avvio delle maglie lungo il centro sul dietro. Lavorare il giro successivo come segue: Lavorare come prima e aumentare 7-6-7-8-6-8 maglie a intervalli regolari sulle 44-49-56-63-73-83 maglie a maglia rasata sul davanti e sul dietro della gonna (= 51-55-63-71-79-91 maglie) = 184-192-216-232-256-280 maglie. Lavorare come indicato fino alla prima maglia a coste inglesi su uno dei lati; questo diventa ora l’inizio del giro. Lavorare un bordo come segue: Lavorare il diagramma A.1 fino alla fine del giro (= 46-48-54-58-64-70 ripetizioni). Proseguire in questo modo per 5 cm – aggiustare per finire dopo il penultimo giro del diagramma (in questo modo si chiudono le maglie su un giro di maglie a coste inglesi). Intrecciare le maglie come segue – vedere il SUGGERIMENTO PER CHIUDERE LE MAGLIE: * puntare il ferro destro nella maglia sotto la maglia successiva e lavorare 1 maglia diritto, chiudere questa maglia, chiudere le 3 maglie successive a rovescio *, ripetere da *-* fino alla fine del giro. La gonna misura circa 43-45-47-49-51-53 cm. |
||||||||||
Spiegazioni del diagramma |
||||||||||
|
||||||||||
 |
||||||||||
Avete terminato questo modello?Allora taggate le vostre foto con #dropspattern #swingtimeskirt o inviatele alla #dropsfan gallery. Avete bisogno di aiuto con questo modello?Troverete 17 video tutorial, una sezione per i commenti/domande e molto altro guardando il modello su www.garnstudio.com © 1982-2026 DROPS Design A/S. Ci riserviamo tutti i diritti. Questo documento, compreso tutte le sue sotto-sezioni, è protetto dalle leggi sul copyright. Potete leggere quello che potete fare con i nostri modelli alla fine di ogni modello sul nostro sito. |
||||||||||


Con oltre 40 anni di esperienza nel design di modelli di maglia e uncinetto, DROPS Design offre la più estesa collezione di modelli gratuiti su internet - tradotti in 17 lingue. Ad oggi vi possiamo fornire 324 cataloghi e 12290 modelli - 9561 dei quali sono tradotti in Italiano.
Ci stiamo impegnando molto per darvi il meglio che vi possiamo offrire in termini di maglia e uncinetto, ispirazioni e consigli così come filati di grande qualità ad un prezzo incredibile! Volete utilizzare i nostri modelli per qualcosa d'altro oltre al vostro uso personale? Potete leggere tutto ciò che è consentito nel testo sul Copyright in basso su tutte le pagine dei nostri modelli. Buon lavoro!
Lasciare un commento sul modello DROPS 218-24
Noi saremmo felici di ricevere i tuoi commenti e opinioni su questo modello!
Se vuoi fare una domanda, fai per favore attenzione a selezionare la categoria corretta nella casella qui sotto per velocizzare il processo di risposta. I campi richiesti sono indicati da *.