
Categorie popolari
State cercando un filato?


Commenti / Domande (41)
![]() Rousseau ha scritto:
Rousseau ha scritto:
Merci beaucoup. Bonne journée. AR
09.09.2024 - 13:09
![]() Anne ROUSSEAU ha scritto:
Anne ROUSSEAU ha scritto:
Bonjour. Je n'arrive pas à réaliser le point du tricot en suivant le diagramme j'obtiens le point de côte1/1! Dois je comprendre rang 2 maille endroit sur maille envers où maille à l'endroit si je suis sur l'envers ? Merci pour votre réponse. Cordialement. AR
08.09.2024 - 13:35DROPS Design ha risposto:
Bonjour Mme Rousseau, la 2ème maille de A.1 se tricote à l'endroit sur l'endroit mais à l'endroit sur l'envers, autrement dit, c'est une maille point mousse, vous aurez ainsi des côtes 1 maille jersey (1ère maille de A.1), 1 maille point mousse (2ème maille de A.1). Bon tricot!
09.09.2024 - 10:25
![]() Monika ha scritto:
Monika ha scritto:
Hallo, welche Art Maschenanschlag eignet sich denn noch gut, außer dem üblichen Kreuzanschlag, und sieht auch gut aus? Italienischer Anschlag oder Norwegischer Anschlag zum Beispiel?
13.04.2024 - 21:50DROPS Design ha risposto:
Liebe Monika, je nach jeder Strickerin kann die "beste" Technik verschieden sein, gerne können Sie bei Ihrer Maschenprobe versuchen, welche Technik Sie am besten haben. Viel Spaß beim Stricken!
15.04.2024 - 07:36
![]() Yvonne ha scritto:
Yvonne ha scritto:
Wenn ich in Runden stricken will, wie stricke ich in dann die Rückreihe?
05.03.2024 - 15:34DROPS Design ha risposto:
Liebe Yvonne, wenn man A.1 für den Kragen in Runden strickt, liest man jede Runde rechts nach links - hier lesen Sie mehr über Diagramme. Viel Spaß beim stricken!
05.03.2024 - 15:38
![]() Ika Andersson ha scritto:
Ika Andersson ha scritto:
Det skulle underlätta för mig om det stod att det är mönsterstickning, slätstickning, vartannat varv räta, vartannat aviga. På avigvarvet stickas varannan maska avig, varannan rät. Nu står rätstickning och då stämmer inte mönster A1 riktigt så jag fick klura och testa lite.
17.02.2024 - 12:19
![]() Dian Nanda ha scritto:
Dian Nanda ha scritto:
Hi, i would like to make this project. But i have a question about the neck. Can i change the neck to a short round neck? How should i do to get the short round neck? Thank You!
13.12.2023 - 14:00DROPS Design ha risposto:
Sure you can, just work the neck as long as you like it to be. Happy knitting!
13.12.2023 - 16:22
![]() Shelley ha scritto:
Shelley ha scritto:
Would like to confirm pattern. Is it, 'Cast on X stitches. Purl 1 row (WS). Repeat next two rows until X cm is reached. R1 (RS): K all the stitches. R2 (WS): K1, *K1, P1 until 1 stitch before the end, K1 Is that correct?
14.08.2023 - 05:57DROPS Design ha risposto:
Dear Shelly, on first row in A.1 you will end the row with the first stich in A.1, as the number of stitches is uneven. This means, from WS you will work ; k1 (edge stitch), then P1 (= first stitch A.1) and repeat now (K1, P1) to the edge stitch, end with K1. Happy knitting!
14.08.2023 - 10:26
![]() Phoebe Andrew ha scritto:
Phoebe Andrew ha scritto:
Hi, would this work with your Andes and Brushed Alpaca yarn? (I got these yarns for another of your vest patterns but I've lost my printed out pattern and this is the closest one I can find!)
03.03.2023 - 19:29DROPS Design ha risposto:
Dear Phoebe, you can't work this pattern with Andes, since the yarn used is thinner than Andes. You could try the following pattern, which is worked with Andes and a group C yarn: https://www.garnstudio.com/pattern.php?id=6213&cid=19. You can also check here all patterns worked in Andes: https://www.garnstudio.com/search.php?action=browse&c=women&y=drops-andes&lang=en. Happy knitting!
05.03.2023 - 19:39
![]() Mervi ha scritto:
Mervi ha scritto:
Tässä ohjeessa ei mikään pitänyt paikkaansa, ei silmukkamäärä, ei koko, ei langanmenekki, ei mikää. Ja , joo tein ”koepalan”
22.02.2023 - 21:34
![]() Liliana ha scritto:
Liliana ha scritto:
Me encanta, se puede hacer a crochet?
15.08.2022 - 20:50DROPS Design ha risposto:
Hola Liliana, este es un patrón a punto, podrías adaptarlo a ganchillo pero nosotros no hacemos patrones personalizados. En nuestro catálago puedes encontrar otros patrones similares a ganchillo, como el siguiente: https://www.garnstudio.com/pattern.php?id=9792&cid=23
21.08.2022 - 21:15
|
|||||||
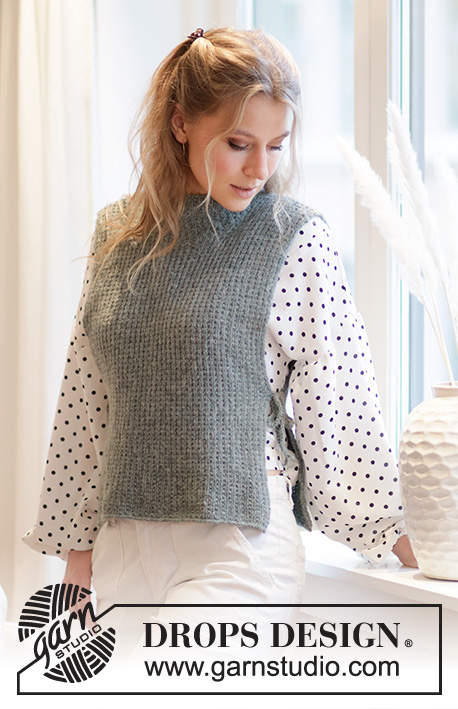
City Cover#citycovervest |
|||||||
 |
 |
||||||
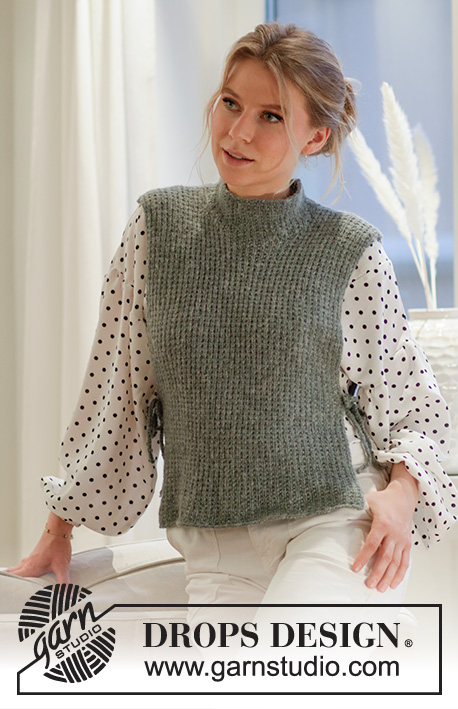
Gilet / smanicato lavorato ai ferri in DROPS Sky. Lavorato con motivo a punto fantasia, collo alto e aperture laterali. Taglie: S - XXXL.
DROPS 212-45 |
|||||||
|
------------------------------------------------------- TECNICHE IMPIEGATE: ------------------------------------------------------- COSTA/MAGLIA LEGACCIO (avanti e indietro): Lavorare tutti i ferri a diritto. 1 costa in altezza = 2 ferri diritto. MOTIVO: Vedere il diagramma A.1. Il diagramma mostra tutti i ferri del motivo visti dal diritto del lavoro. ------------------------------------------------------- INIZIO DEL LAVORO: ------------------------------------------------------- GILET – BREVE RIASSUNTO DEL LAVORO: Lavorato in piano in parti separate e cucito all’altezza delle spalle. Poi riprendere le maglie per il collo. Affrancare i cordini/trecce ai lati alla fine. DIETRO: Avviare 77-79-81-83-85-87 maglie (compresa 1 maglia di vivagno a ogni lato) con i ferri circolari n° 4,5 mm e Sky. Lavorare 1 ferro rovescio (= rovescio del lavoro). Poi lavorare il motivo come segue: 1 maglia di vivagno a MAGLIA LEGACCIO – leggere la descrizione sopra, A.1 fino a quando rimane 1 maglia, 1 maglia di vivagno a maglia legaccio. FARE ATTENZIONE ALLA TENSIONE DEL LAVORO. Quando il lavoro misura 48-50-52-54-56-58 cm, intrecciare le 29-29-31-31-33-33 maglie centrali per il collo e finire ogni spalla in modo separato. Continuare intrecciando 1 maglia sul ferro successivo dal collo = 23-24-24-25-25-26 maglie rimaste sulla spalla. Quando il lavoro misura 50-52-54-56-58-60 cm, intrecciare. Lavorare l’altra spalla nello stesso modo. DAVANTI: Avviare 77-79-81-83-85-87 maglie (compresa 1 maglia di vivagno a ogni lato) con i ferri circolari n° 4,5 mm e Sky. Lavorare 1 ferro rovescio (= rovescio del lavoro). Poi lavorare il motivo come segue: 1 maglia di vivagno a maglia legaccio, A.1 fino a quando rimane 1 maglia, 1 maglia di vivagno a maglia legaccio. Quando il lavoro misura 43-45-46-48-49-51 cm, mettere le 15-15-17-17-17-17 maglie centrali in sospeso per il collo e finire ogni spalla in modo separato. Continuare intrecciando le maglie su ogni ferro dal collo come segue: intrecciare 3 maglie 1 volta, 2 maglie 2 volte e 1 maglia 1-1-1-1-2-2 volte = 23-24-24-25-25-26 maglie rimaste sulla spalla. Quando il lavoro misura 50-52-54-56-58-60 cm, intrecciare. Lavorare l’altra spalla nello stesso modo. CONFEZIONE: Cucire i margini delle spalle a punto maglia al’linterno del bordo di chiusura. COLLO: Iniziare dal diritto del lavoro all’altezza di uno dei due margini delle spalle e con i ferri circolari corti n° 4,5 mm riprendere circa 78 - 92 maglie (comprese le 15-15-17-17-17-17 maglie in sospeso) all’interno della 1° maglia attorno al collo (il n° di maglie dev’essere divisibile per 2). Lavorare il motivo a punto fantasia (= A.1) in tondo per 8 cm – fare in modo di lavorare diritto su diritto e maglia legaccio su maglia legaccio quando si lavorano le maglie in sospeso (cioè sul davanti). Intrecciare con diritto su diritto e rovescio su maglia legaccio. TRECCE LATERALI: Tagliare 3 capi di 80 cm e farli passare nel lavoro a circa 20 cm dal bordo di avvio e all’interno delle 2 maglie di vivagno sul davanti. Far passare tutti i capi nel lavoro e piegarli a metà = 6 capi. Aggiustarli in 3 gruppi di 2 capi ognuno, lavorare una treccia. Fare un nodo in basso in modo che la treccia non si disfi. Tagliare il filo. Ripetere dall’altro lato del davanti e a ogni lato del dietro. |
|||||||
Spiegazioni del diagramma |
|||||||
|
|||||||
 |
|||||||
Avete terminato questo modello?Allora taggate le vostre foto con #dropspattern #citycovervest o inviatele alla #dropsfan gallery. Avete bisogno di aiuto con questo modello?Troverete 13 video tutorial, una sezione per i commenti/domande e molto altro guardando il modello su www.garnstudio.com © 1982-2026 DROPS Design A/S. Ci riserviamo tutti i diritti. Questo documento, compreso tutte le sue sotto-sezioni, è protetto dalle leggi sul copyright. Potete leggere quello che potete fare con i nostri modelli alla fine di ogni modello sul nostro sito. |
|||||||


Con oltre 40 anni di esperienza nel design di modelli di maglia e uncinetto, DROPS Design offre la più estesa collezione di modelli gratuiti su internet - tradotti in 17 lingue. Ad oggi vi possiamo fornire 324 cataloghi e 12290 modelli - 9561 dei quali sono tradotti in Italiano.
Ci stiamo impegnando molto per darvi il meglio che vi possiamo offrire in termini di maglia e uncinetto, ispirazioni e consigli così come filati di grande qualità ad un prezzo incredibile! Volete utilizzare i nostri modelli per qualcosa d'altro oltre al vostro uso personale? Potete leggere tutto ciò che è consentito nel testo sul Copyright in basso su tutte le pagine dei nostri modelli. Buon lavoro!
Lasciare un commento sul modello DROPS 212-45
Noi saremmo felici di ricevere i tuoi commenti e opinioni su questo modello!
Se vuoi fare una domanda, fai per favore attenzione a selezionare la categoria corretta nella casella qui sotto per velocizzare il processo di risposta. I campi richiesti sono indicati da *.