
Categorie popolari
State cercando un filato?


Commenti / Domande (33)
![]() Roro ha scritto:
Roro ha scritto:
Sorry there are so many questions. I'm kind of struggling a bit with this pattern. The 'CROCHET INFORMATION' section states that each row will finish with a slip stitch. Does this mean that the last stitch in the row in the diagram is not actually the last stitch because a slip stitch comes after it. So in effect there is 2 stitches worked in A4 (Right side) or A1 (Wrong side). For example the 1st row ends in A4 with '1 treble crochet in stitch' - is there a slip stitch after this? Thanks.
18.07.2020 - 00:59DROPS Design ha risposto:
Dear Roro, you can follow diagram, ie work back and forth as explained under each piece, without joining at the end of every row, then sew the seam on mid back (hat and neck warmer). The first stitch of each row is drawn in the chart, ie at the beg of puff sts start with 3 chains and end with 1 treble and at the beg of dc row, start with 1 chain and end with 1 dc in 3rd ch from previous row. (A.1 might have to be edited, but our design team is now on summer vacation - thanks in advance for your patience and comprehension). Happy crocheting!
20.07.2020 - 09:11
![]() Roro ha scritto:
Roro ha scritto:
Thanks for your quick response. I'm still not understanding aspects of this diagram. In the second row up after the 1st row of double crochet (working the wrong side), I understand that A4 applies to the 1st stitch and A1 applies to the last stitch. I'm not sure about A3 and A2 though. Does A3 apply to stitches 2 and 3 on the row and then A2 worked for the rest of the row, or is it the opposite way round. Or are A3 and A2 worked alternately throughout the row? Thanks for your patience.
17.07.2020 - 09:05DROPS Design ha risposto:
Dear Roro, from RS you work: A.1 over 1 st, repeat A.2 and finish with A.3 (1 repeat in width) and A.4 over the last stitch. From WS you will work A.4 over the first st, A.3 (1 repeat in width), repeat A.2 and finish with A.1. read more about diagrams here. Happy crocheting!
17.07.2020 - 12:05
![]() Roro ha scritto:
Roro ha scritto:
Instructions for neck warmer say: 'Work A.1A over the first stitch, A.2 until there are 3 stitches left on the row, A.3 over 2 stitches and finish with A.4 over the last stitch'. This worked well in the initial row, but 4 rows up in diagram there is an oblong box in A.3. This box is worked over 3 stitches (skip 1 puff-stitch + 1 chain stitch, work 1 treble crochet) so I'm not sure how it fits in A3 which is worked over 2 stitches. I'm a beginner so any help is appreciated, thanks.
16.07.2020 - 00:52DROPS Design ha risposto:
Dear Roro, after you have worked the X from the puff stitch, you have wokred: 1 treble, 1 chain, 1 puff stitch - over these stitches you will work the next-to-last symbol: skip 1 puff stitch and 1 chain, crochet 1 treble in the treble, 1 chain, 1 puff stitch in the chain skipped. Happy crocheting!
16.07.2020 - 10:06
![]() Marie-Louise ha scritto:
Marie-Louise ha scritto:
Skøn opskrift og garnvalg, men er det muligt at give andre farvekombinationer af de to garntyper, som vil fungere sammen på samme vis - vil gerne lave sættet i enten rosa eller mere blå nuancer. Men det er vanskeligt at vurdere farverne og deres match på nettet. På forhånd tak.
07.06.2020 - 21:55DROPS Design ha risposto:
Hei Marie-Louise. Fargevalg er ganske personlig, men jeg syns i rosanyanse vil Sky 18 støvrosa + Kid-Silk 20 beige eller Sky 14 lys syrin + Kid-Silk 4 gammelrosa være pent sammen. I blånyanser syns jeg Sky 12 jeansblå + Kid-Silk 10 grå eller Sky 13 lys jeansblå + Kid-Silk 10 lys himmelblå ville være flott. God Fornøyelse!
09.06.2020 - 11:52
![]() Sammy ha scritto:
Sammy ha scritto:
Könnte man das Modell auch mit Brushed Alpaca Silk häkeln und wieviel Garn würde man benötigen?
06.02.2020 - 09:46DROPS Design ha risposto:
Liebe Sammy, das könnte auch passen, aber beachten Sie, daß es anders aussehen würde - hier lesen Sie mehr über Garnalternativen. Ihr DROPS Laden wird Ihnen gerne weiter empfehlen. Viel Spaß beim häkeln!
06.02.2020 - 10:45
![]() Cécile ha scritto:
Cécile ha scritto:
Je ne comprends pas : "1 maille serrée dans la 3ème maille en l'air ??à partir du crochet?? ," Faut il faire 3 mailles en l'air aant de commencer le rang ? ou bien prendre la 3 eme maille en l'air sur le début du rang ? merci Cécile
29.12.2019 - 21:38DROPS Design ha risposto:
Bonjour Cecile, chaque rang de points soufflés commence par 3 mailles en l'air (remplacent la 1ère bride). Regardez le video ICI. Happy crocheting!
29.12.2019 - 23:10
![]() Cecile ha scritto:
Cecile ha scritto:
Bonjour, tres joli modèle ! Mais je ne comprends pas la description du premier rang: "Crocheter le 1er rang ainsi: 1 maille serrée dans la 3ème maille en l'air à partir du crochet, 1 maille serrée dans chacune des 1-2-3 mailles en l'air suivantes" (différent de ce que montre le schéma non ?) pouvez vous m'aider ? -Et me confirmer ce que montre l'étoile, avec le trait au-dessus, faut il sauter une maille à chaque fois tout le long ? merci ... Cécile
29.12.2019 - 21:20DROPS Design ha risposto:
Bonjour Cecile, premier rang ne fait pas partie du schemat. Les mailles en l'air sont souvent légèrement plus serrées que les autres mailles et, pour éviter que le montage ne soit trop serré, on crochète simplement quelques mailles en l'air en plus au début. L'etoile signifie - ce rang n'est pas à faire, il a déjà été crocheté et montre comment crocheter le rang suivant. Bon crochet!
29.12.2019 - 23:28
![]() Murielle Pham ha scritto:
Murielle Pham ha scritto:
Bonsoir, juste une confirmation pour le point soufflé, une fois qu'on a ramené le dernier jeté dans toutes les boucles, on fait une maille en l'air avant de continuer avec la bride ?
02.12.2019 - 19:23DROPS Design ha risposto:
Mme Pham, aux rangs 1 et 4 (la ou vous avez 2 croix a cote de soi) on ne fait pas de maille en l'air avant de continuer avec la bride. Au rang 5 il y a une maille an l'air avant la bride suivante. Bon crochet!
02.12.2019 - 20:08
![]() Daniela ha scritto:
Daniela ha scritto:
Mein Favorit beim heutigen Stöbern. Warte gespannt auf die Anleitung!!
12.11.2019 - 21:59
![]() Carina Brännström ha scritto:
Carina Brännström ha scritto:
Skynda med beskrivning.......Såå fin❤️
08.10.2019 - 12:48
|
|||||||||||||||||||||||||
Fields of Blue#fieldsofblueset |
|||||||||||||||||||||||||
 |
 |
||||||||||||||||||||||||
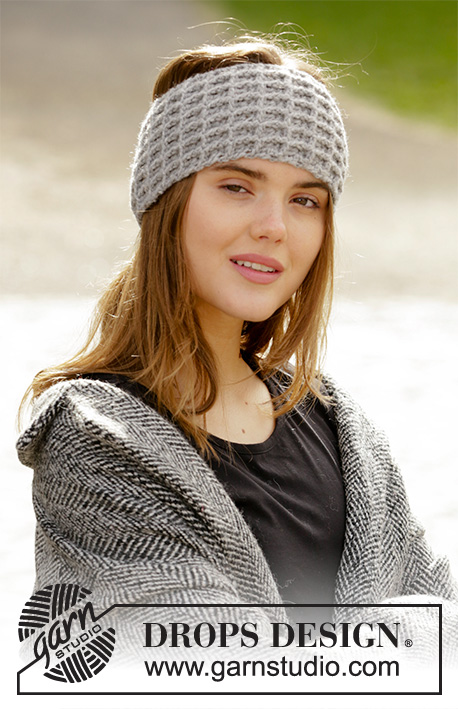
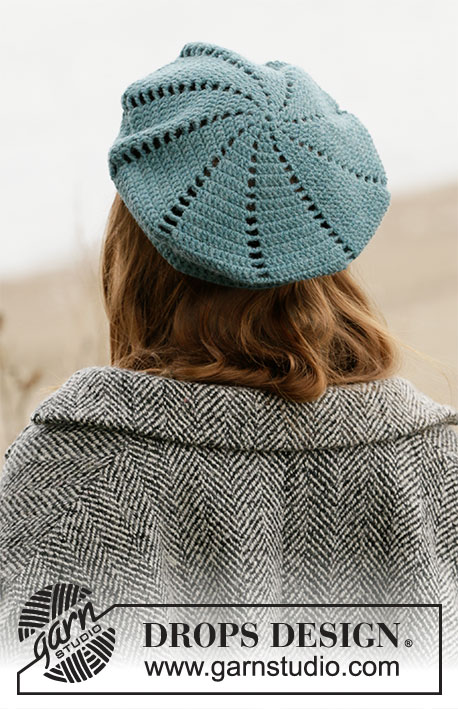
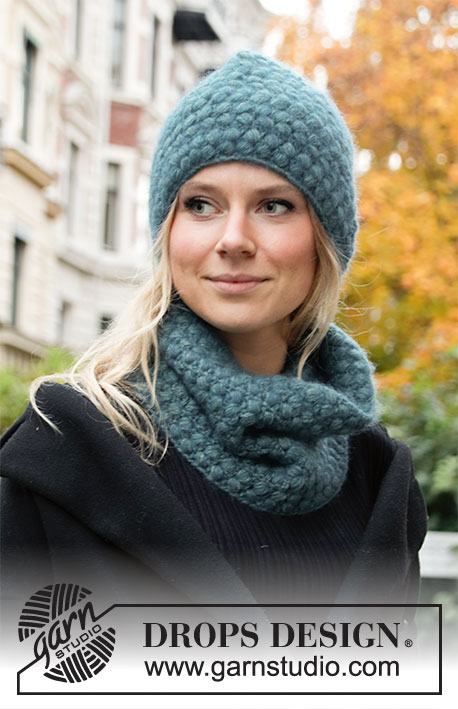
Cappello e scaldacollo lavorati all'uncinetto con puff-stitches. Tutto il completo è lavorato in DROPS Sky e DROPS Kid-Silk.
DROPS 204-16 |
|||||||||||||||||||||||||
|
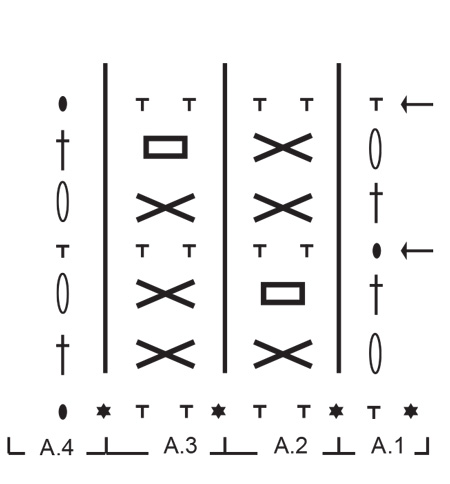
------------------------------------------------------- TECNICHE IMPIEGATE: ------------------------------------------------------- MOTIVO (sia per il cappello che per lo scaldacollo): Vedere i diagrammi A.1 - A.4. CATENELLA: Se lavorate principalmente sulla parte finale dell'uncinetto, la catenella risulterà troppo spesso tirata; 1 catenella dovrebbe essere lunga come la larghezza di una maglia bassa/maglia alta. 1 PUFF-STITCH: Lavorare come segue nella stessa maglia (è importante lavorare nella maglia e non attorno alla maglia): * 1 gettato, inserire l'uncinetto nella maglia, fare 1 gettato e far passare entrambi i gettati attraverso la maglia; fare i gettati abbastanza lunghi (per evitare che il puff-stitch risulti piccolo e compatto è importante tenere i gettati lunghi circa 2 cm) *, lavorare *-* per un totale di 5 volte, fare un gettato e farlo passare attraverso tutti gli occhielli sull'uncinetto. SUGGERIMENTO PER LE DIMINUZIONI (distribuite in modo uniforme): Per stabilire ogni quanto diminuire in modo uniforme, prendere il n° totale di maglie sulla riga (ad esempio 63 maglie) e dividerlo per il n° di diminuzioni da fare (ad esempio 28) = 2,3. In questo esempio diminuire lavorando insieme ogni 1° e 2° maglia circa come segue: Inserire l'uncinetto nella maglia successiva, fare 1 gettato e farlo passare attraverso la maglia, inserire l'uncinetto nella maglia successiva, fare 1 gettato e farlo passare attraverso la maglia, fare un altro gettato e farlo passare attraverso tutti e 3 gli occhielli sull'uncinetto (= 1 maglia diminuita). ------------------------------------------------------- INIZIO DEL LAVORO: ------------------------------------------------------- CAPPELLO - BREVE RIASSUNTO DEL LAVORO: Il cappello è lavorato avanti e indietro dal centro dietro, dal basso verso l'alto, e cucito al centro dietro per finire. CAPPELLO: Avviare 75-77-82 catenelle con l'uncinetto n° 5,5 mm, usando 1 capo di Sky + 1 capo di Kid-Silk (= 2 capi). Lavorare la 1° riga come segue: lavorare 1 maglia bassa nella 3° catenella dall'uncinetto, 1 maglia bassa in ognuna delle 0-2-1 catenelle successive, * saltare 1 catenella, lavorare 1 maglia bassa in ognuna delle 5 catenelle successive *, lavorare *-* fino alla fine della riga = 62-64-68 maglie basse sulla riga. Lavorare la riga successiva come segue: lavorare A.1 sulla 1° maglia, A.2 fino a quando rimangono 3 maglie sulla riga, A.3 su 2 maglie e finire con A.4 sull'ultima maglia. Continuare questo motivo avanti e indietro. FARE ATTENZIONE ALLA TENSIONE DEL LAVORO! Quando il lavoro misura circa 20-21-22 cm, diminuire 28-30-30 maglie in modo uniforme, o sulla riga 3 o sulla riga 6 del diagramma (indicato con la freccia del diagramma) – leggere il SUGGERIMENTO PER LE DIMINUZIONI = 34-34-38 maglie. Lavorare altre 2 righe di puff-stitches. Sulla riga successiva (una riga di maglie basse), diminuire lavorando tutte le maglie basse insieme 2 a 2 = 17-17-19 maglie basse rimaste. Poi lavorare 2 righe a maglie basse in cui tutte le maglie basse vengono lavorate insieme 2 a 2 su entrambe le righe = 5 maglie basse rimaste per tutte le taglie. Tagliare i fili ma lasciare un'estremità lunga abbastanza per la cucitura. Far passare il filo dentro e fuori dalle 5 maglie in cima al cappello, tirare e affrancare bene. Il cappello misura circa 26-27-28 cm dall'alto in basso. CONFEZIONE: Cucire il cappello al centro dietro – cucire margine a margine nel filo più esterno della maglia più esterna in modo che la cucitura sia piatta. ------------------------------------------------------- SCALDACOLLO - BREVE RIASSUNTO DEL LAVORO: Lavorato avanti e indietro dal centro dietro, dal basso verso l'alto e cucito al centro dietro per finire. SCALDACOLLO: Avviare 94-101-108 catenelle con l'uncinetto n° 5,5 mm usando 1 capo di Sky + 1 capo di Kid-Silk (= 2 capi). Lavorare la 1° riga come segue: lavorare 1 maglia bassa nella 3° catenella dall'uncinetto, 1 maglia bassa in ognuna delle 1-2-3 catenelle successive, * saltare 1 catenella, lavorare 1 maglia bassa in ognuna delle 5 catenelle successive *, lavorare *-* fino alla fine della riga = 78-84-90 maglie basse sulla riga. Lavorare la riga successiva come segue: lavorare A.1A sulla 1° maglia, A.2 fino a quando rimangono 3 maglie sulla riga, A.3 su 2 maglie e finire con A.4 sull'ultima maglia. FARE ATTENZIONE ALLA TENSIONE DEL LAVORO! Continuare questo motivo avanti e indietro fino a quando il lavoro misura circa 24-27-30 cm (o fino alla lunghezza desiderata) ma finire dopo la riga 3 o riga 6 dei diagrammi. Tagliare il filo ma lasciare un'estremità lunga abbastanza per cucire. CONFEZIONE: Cucire lo scaldacollo al centro dietro – cucire margine a margine nel filo più esterno della maglia più esterna in modo che la cucitura sia piatta. |
|||||||||||||||||||||||||
Spiegazioni del diagramma |
|||||||||||||||||||||||||
|
|||||||||||||||||||||||||
 |
|||||||||||||||||||||||||
Avete terminato questo modello?Allora taggate le vostre foto con #dropspattern #fieldsofblueset o inviatele alla #dropsfan gallery. Avete bisogno di aiuto con questo modello?Troverete 8 video tutorial, una sezione per i commenti/domande e molto altro guardando il modello su www.garnstudio.com © 1982-2026 DROPS Design A/S. Ci riserviamo tutti i diritti. Questo documento, compreso tutte le sue sotto-sezioni, è protetto dalle leggi sul copyright. Potete leggere quello che potete fare con i nostri modelli alla fine di ogni modello sul nostro sito. |
|||||||||||||||||||||||||


Con oltre 40 anni di esperienza nel design di modelli di maglia e uncinetto, DROPS Design offre la più estesa collezione di modelli gratuiti su internet - tradotti in 17 lingue. Ad oggi vi possiamo fornire 325 cataloghi e 12298 modelli - 9569 dei quali sono tradotti in Italiano.
Ci stiamo impegnando molto per darvi il meglio che vi possiamo offrire in termini di maglia e uncinetto, ispirazioni e consigli così come filati di grande qualità ad un prezzo incredibile! Volete utilizzare i nostri modelli per qualcosa d'altro oltre al vostro uso personale? Potete leggere tutto ciò che è consentito nel testo sul Copyright in basso su tutte le pagine dei nostri modelli. Buon lavoro!
Lasciare un commento sul modello DROPS 204-16
Noi saremmo felici di ricevere i tuoi commenti e opinioni su questo modello!
Se vuoi fare una domanda, fai per favore attenzione a selezionare la categoria corretta nella casella qui sotto per velocizzare il processo di risposta. I campi richiesti sono indicati da *.