
Categorie popolari
State cercando un filato?


Commenti / Domande (9)
![]() Yvonne ha scritto:
Yvonne ha scritto:
Es fehlen die Randmaschen. Ich stricke eine RM immer so, dass ich sie in am Anfang rechts abhebe und am Ende links stricke. Man kann sie auch weglassen und gleich die ersten beiden Maschen zusammenstricken, aber dann wird der Farbwechsel nicht so schön. Auch bei anderen Drops-Modellen kämpfe ich mit diesem Problem (natürlich nicht, wenn in Runden gestrickt wird 😁)
12.10.2025 - 09:16DROPS Design ha risposto:
Liebe Yvonne, wie die Randmaschen gestrickt werden, ist Geschmackssache. Bei diesen Lappen sind es Knötchenränder, die auch dekorativ aussehen können und hier zum Rest des Musters passen. Sie können aber auch zusätzlich Randmaschen stricken. Viele unserer Anleitungen verwenden kraus rechte Randmaschen. Auch die lassen sich durch andere Arten von Randmaschen ersetzen. Vielen Dank auf jeden Fall für die Erläuterung Ihrer Randmaschen! :-) Und viel Spaß beim Stricken!
22.10.2025 - 01:05
![]() Amanda ha scritto:
Amanda ha scritto:
I want to make this in brown and call it "wavy gravy" 😆
22.02.2025 - 21:01
![]() Kathy ha scritto:
Kathy ha scritto:
Hello, thank you for this lovely pattern! Would you please explain this direction: “measure along the side and adjust to after 1 complete repeat in height.” Thank you.
03.07.2023 - 13:51DROPS Design ha risposto:
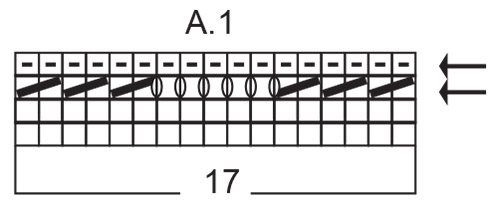
Dear Kathy, you have to measure along the edge stitches (and not in the middle of the piece), adjust the length so that you have worked a full repeat of A.1 in height, this means you might have work some more / fewer rows but the last row should be the last in A.1. Happy knitting!
03.07.2023 - 15:58
![]() Glenda ha scritto:
Glenda ha scritto:
Fresh Wave pattern: How do I "on the next row work the yarn over twisted to avoid a hole". How is this done? I'm not understanding. Thank you for your help.
01.06.2023 - 05:09DROPS Design ha risposto:
Hi Glenda, You can work in the back loop of the yarn over (instead of the usual front loop), which twists the yarn over, or slip the yarn over off the left needle and replace it the other way round, then work the front loop. Happy knitting!
01.06.2023 - 06:35
![]() Hetty Stok ha scritto:
Hetty Stok ha scritto:
I have followed this carefully- work 3 rows, Then A1 pattern. Therefore first row of A1 is on the wrong side. Also row 3 of A1 on the wrong side. Which makes rows 2 & 4 on the right side. Why then do the instructions say, for row 4, “knit from wrong side”?
03.03.2023 - 03:59DROPS Design ha risposto:
Dear Mrs Stok, the first row of A.1 should be worked from right side, this means, knit 3 rows (first row is worked from wrong side), then start A.1 from RS (knit 1st row from RS, purl 2nd row from WS, 3rd row will be worked from RS and 4th row from WS). Happy knitting!
03.03.2023 - 09:17
![]() Creativ-idees ha scritto:
Creativ-idees ha scritto:
J'adore ce modèle, je l'ai déjà fait à plusieurs reprises. Le motif est facile à mémoriser et le résultat est spectaculaire. Merci pour les explications !
30.12.2021 - 15:48
![]() Movrel Marie-francoise ha scritto:
Movrel Marie-francoise ha scritto:
Bonjour. J essaie de faire le point de vague Mais obligatoirement en faisant 6 jetés je me retrouve au 6ème rangs avec des mailles en plus. 1 rg tout à l end 2rg tt à env 3ème tt a l end 4ème tt a l env 5ème 1lis puis 3 fois 2 m ens sur l env puis 6 fois 1 m end 1 jeté finir le rang sur 1 m lis end . Pour retrouver le même nombre de mailles qu au départ est ce normal?
02.10.2020 - 15:49DROPS Design ha risposto:
Bonjour Mme Movrel, cette vidéo montre comment tricoter ce type de diagramme (la seule différence est l'ordre des rangs, mais le motif sera le même), surtout celui avec les jetés. le 3ème rang se tricote ainsi: *3 fois 2 m ens à l'end, (1 jeté, 1 m end) x 5, 1 jeté, 3 fois 2 m ens à l'end* = vous avez diminué 6 m et fait 6 jetés. répétez de *à*. Bon tricot!
05.10.2020 - 12:18
![]() Sissel ha scritto:
Sissel ha scritto:
Spm: Jeg er usikker på fra hvilken side man skal begynne med diagrammet - fra vrangsiden eller rettsiden?
03.08.2020 - 17:01DROPS Design ha risposto:
Hej Sissel, du strikker hulmønstret i diagrammet fra retsiden. God fornøjelse!
05.08.2020 - 15:17Antal Ibolya ha scritto:
Lovely pattern: easy to knit, quick to memorize! I'm just knitting it using 100% cotton yarn (50 gr 125 m) and needle size 3 mm, and it looks gorgeous! Thank you for the pattern.
18.04.2018 - 06:50
|
|||||||||||||
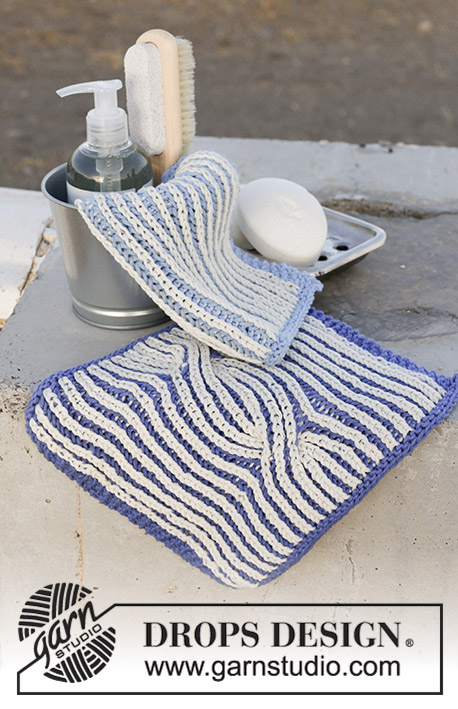
Fresh Wave#freshwavewashcloth |
|||||||||||||
|
|
|||||||||||||
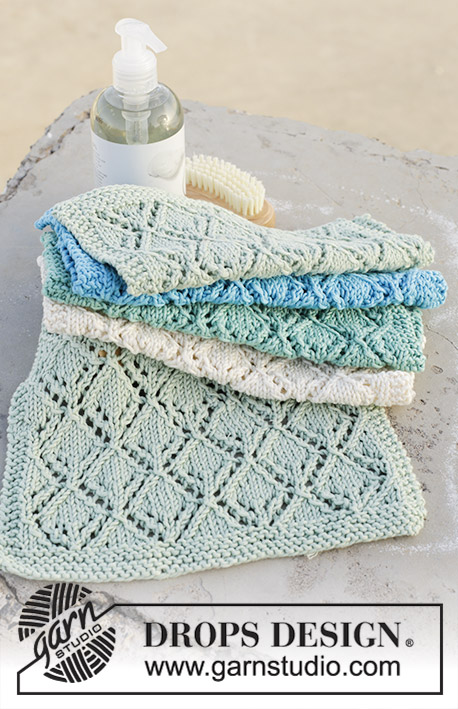
Asciughini lavorati ai ferri con motivo ad onde e strisce. Lavorati in DROPS Paris.
DROPS 189-13 |
|||||||||||||
|
INFORMAZIONI GENERALI: MOTIVO: Vedere il diagramma A.1. Il diagramma mostra tutti i ferri del motivo visti dal diritto del lavoro. ---------------------------------------------------------- ASCIUGHINI: Gli asciughini sono lavorati avanti e indietro sui ferri. Sono lavorati in 3 diverse combinazioni di colori. ASCIUGHINO 1: Avviare 51 maglie con i ferri n° 4 mm e light wash. Lavorare 3 ferri diritto, lavorare il diagramma A.1 su tutte le maglie fino a quando il lavoro misura circa 21 cm; misurare lungo il lato e aggiustarlo dopo una ripetizione completa in altezza. Lavorare 2 ferri diritto e intrecciare a diritto sul ferro successivo. Tagliare e affrancare il filo. ASCIUGHINO 2: Lavorare come per l’asciughino 1, ma lavorare a strisce a ripetizioni alterne in altezza. Lavorare come segue: Avviare 51 maglie con i ferri n° 4 mm e light wash. Lavorare 3 ferri diritto, lavorare il diagramma A.1 su tutte le maglie ma sui ferri indicati dalla freccia lavorare con il bianco a ripetizioni alterne (tagliare il filo bianco dopo questi ferri, mentre il filo light wash viene portato in avanti lungo il lato). Lavorare fino a quando il lavoro misura circa 21 cm lungo il lato e aggiustarlo dopo una ripetizione intera in altezza. Lavorare 2 ferri diritto con il light wash e intrecciare a diritto sul ferro successivo. Tagliare e affrancare i fili. ASCIUGHINO 3: Lavorare come per l’asciughino 1, ma lavorare a strisce bianche su ogni ripetizione in altezza. Lavorare come segue: Avviare 51 maglie con i ferri n° 4 mm e light blue. Lavorare 3 ferri, lavorare il diagramma A.1 su tutte le maglie, ma sui ferri indicati con la freccia lavorare con il bianco (non tagliare i fili; lasciare che seguano il lavoro sul lato). Lavorare fino a quando il lavoro misura circa 21 cm, misurati lungo il lato e aggiustarlo dopo un’intera ripetizione in altezza. Passare al light blue e lavorare 2 ferri diritto. Intrecciare a diritto sul ferro successivo. Tagliare e affrancare i fili. |
|||||||||||||
Spiegazioni del diagramma |
|||||||||||||
|
|||||||||||||
 |
|||||||||||||
Avete terminato questo modello?Allora taggate le vostre foto con #dropspattern #freshwavewashcloth o inviatele alla #dropsfan gallery. Avete bisogno di aiuto con questo modello?Troverete 15 video tutorial, una sezione per i commenti/domande e molto altro guardando il modello su www.garnstudio.com © 1982-2026 DROPS Design A/S. Ci riserviamo tutti i diritti. Questo documento, compreso tutte le sue sotto-sezioni, è protetto dalle leggi sul copyright. Potete leggere quello che potete fare con i nostri modelli alla fine di ogni modello sul nostro sito. |
|||||||||||||


Con oltre 40 anni di esperienza nel design di modelli di maglia e uncinetto, DROPS Design offre la più estesa collezione di modelli gratuiti su internet - tradotti in 17 lingue. Ad oggi vi possiamo fornire 324 cataloghi e 12290 modelli - 9561 dei quali sono tradotti in Italiano.
Ci stiamo impegnando molto per darvi il meglio che vi possiamo offrire in termini di maglia e uncinetto, ispirazioni e consigli così come filati di grande qualità ad un prezzo incredibile! Volete utilizzare i nostri modelli per qualcosa d'altro oltre al vostro uso personale? Potete leggere tutto ciò che è consentito nel testo sul Copyright in basso su tutte le pagine dei nostri modelli. Buon lavoro!
Lasciare un commento sul modello DROPS 189-13
Noi saremmo felici di ricevere i tuoi commenti e opinioni su questo modello!
Se vuoi fare una domanda, fai per favore attenzione a selezionare la categoria corretta nella casella qui sotto per velocizzare il processo di risposta. I campi richiesti sono indicati da *.